Course aims
Source: Daily Applications, p.2
Key topics in depth
These six topics were pulled out in full because they directly back up existing banking, sales, job-costing, and payroll content on the Hub.
Banking Command Center -- Spend Money & Tax-Inclusive Transactions
Source: Daily Applications, p.87-88
Reconcile Accounts (Bank Reconciliation)
Source: Daily Applications, p.104
Sales Command Center -- Print/Email Invoices
Source: Daily Applications, p.109 & p.128
Job Costing
Source: Daily Applications, p.33
Card File Command Center
Source: Daily Applications, p.47 & p.53
Timesheets for Time Billing and Payroll
Source: Daily Applications, p.143
Full walkthrough (p.1-179)
This section works through the entire 179-page Daily Applications guide in order, command center by command center, expanding every topic beyond the short index below into full explanatory prose. Screenshots from the original guide are placed alongside the relevant text.
Introduction to AccountEdge -- An Overview
Source: p.9-10
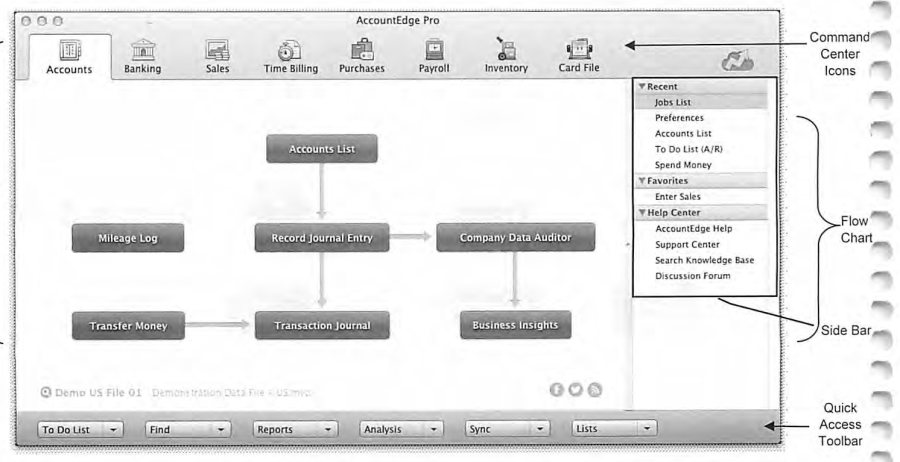
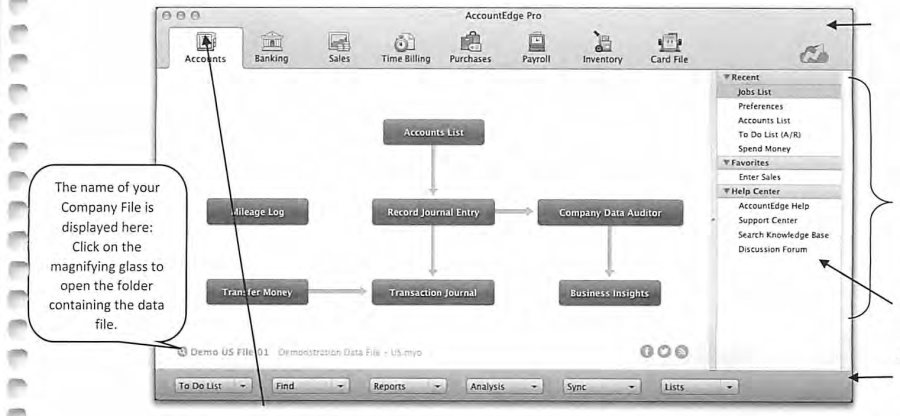
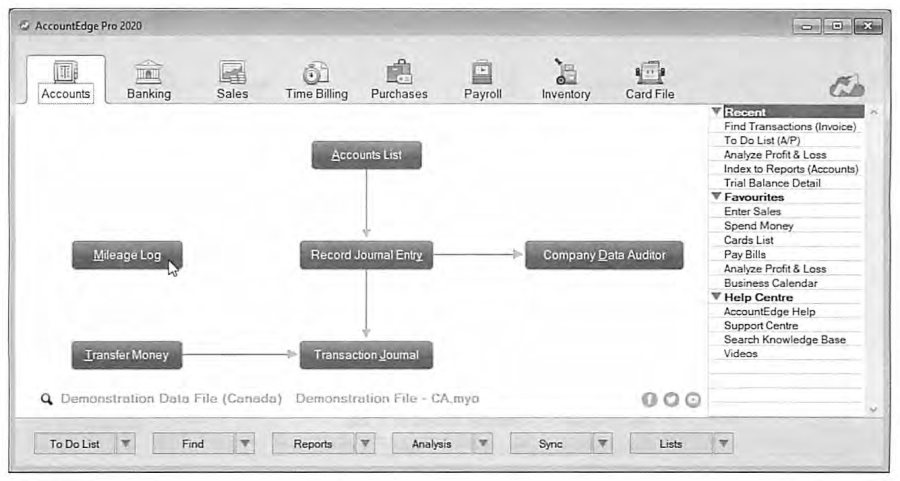
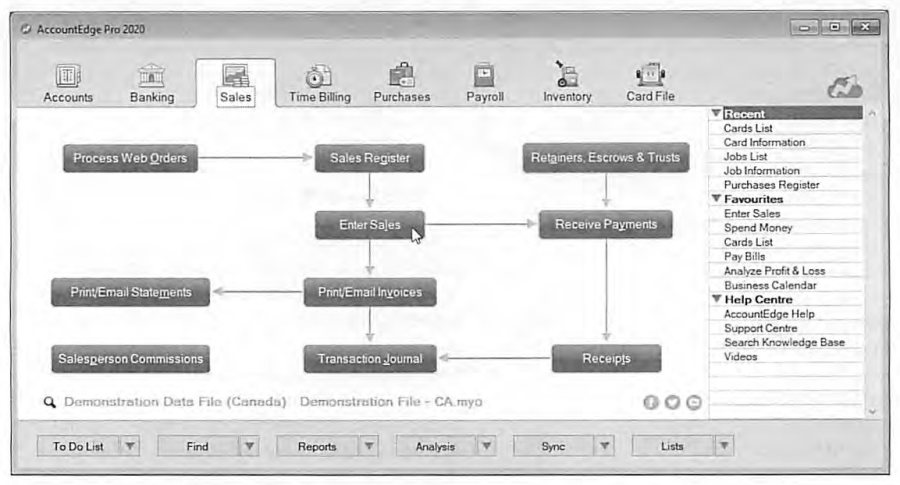
The guide opens by explaining how AccountEdge "comes together" as four connected pieces: the Menu Bar, the Command Centers, the Side Bar, and the Quick Access Toolbar. The Menu Bar sits across the top of the screen and provides access to every function, including several that are not duplicated anywhere else in the interface. The eight Command Centers -- Accounts, Banking, Sales, Time Billing, Purchases, Payroll, Inventory, and Card File -- are represented as a row of icons, and only one Command Center can be "active" at a time. You activate a Command Center by clicking its icon, by choosing it from the Menu Bar, or by using its keyboard shortcut. Each Command Center presents a Flow Chart of the typical workflow for that area of the business (for example, in the Sales Command Center the flow runs from Quote through Order to Invoice to Receive Payment), and clicking directly on a step in the Flow Chart opens that function. The Side Bar (Windows) or equivalent Mac feature lists Recent items, Favourites you have pinned, and Help Centre links, giving a second, faster route back into functions you use often.
Below the Flow Chart on every Command Center sits the Quick Access Toolbar: To Do List, Find, Reports, Analysis, Sync, and Lists. This row is identical in every Command Center, but its contents are context-sensitive -- the Reports button in Sales opens Sales reports, the Reports button in Purchases opens Purchases reports, and so on. The guide encourages new users to spend time simply exploring the Quick Access Toolbar in each Command Center before diving into transaction entry, since so much of AccountEdge's day-to-day power is reachable from this one row.
The Menu Bar, Navigating Fields, and Data-Entry Shortcuts
Source: p.10-12
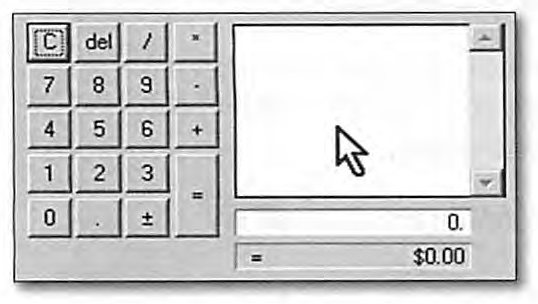
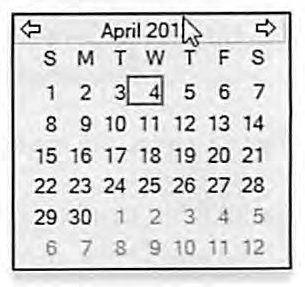
Two data-entry conveniences are introduced early because they are used constantly afterward. First, entering dates: pressing the space bar, right-clicking, or pressing the equal key inside a date field pops up a calendar, and you can select a date with the mouse or the arrow keys. Second, calculating amounts: tabbing into any numeric field and then pressing the space bar (or any of +, -, /, *, or the equal key) opens a pop-up calculator that behaves like an adding-machine tape -- you can chain several operations and press Tab or Enter to drop the result straight into the field.
The guide then works through the mechanics of moving around AccountEdge screens. The Tab key moves forward between fields (Shift+Tab moves back), and Escape is generally the fastest way to close a window without saving. The "Zoom" arrow (»), found throughout the software next to card names, account numbers, and transaction IDs, drills down into the underlying record -- a greyed-out zoom arrow (») indicates the record is locked against changes, usually due to a Security preference. The "Select from List" button, present wherever you would choose an account, customer, vendor, employee, or item, either shows the full list or -- combined with AccountEdge's "Easy Fill" -- completes your typed entry against the closest match as you type. "Ship To" and "Select" buttons work the same way for addresses, payment methods, and sale/purchase status.
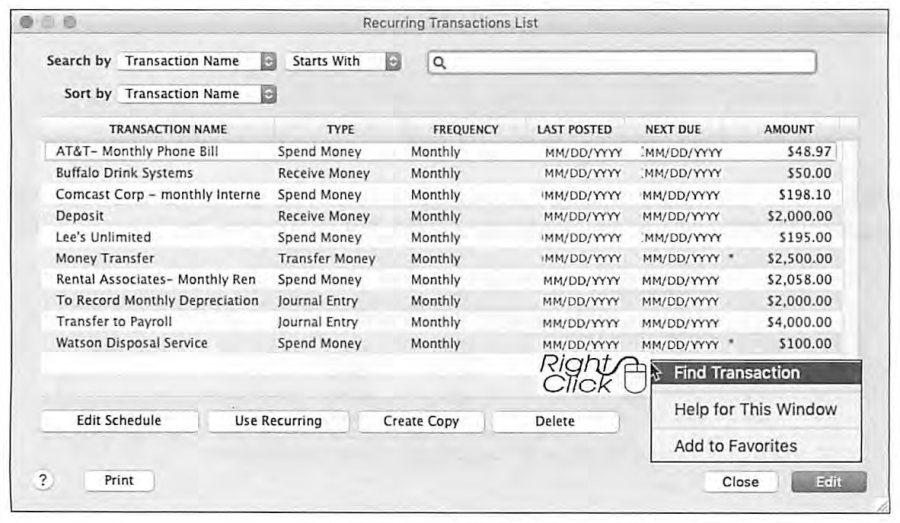
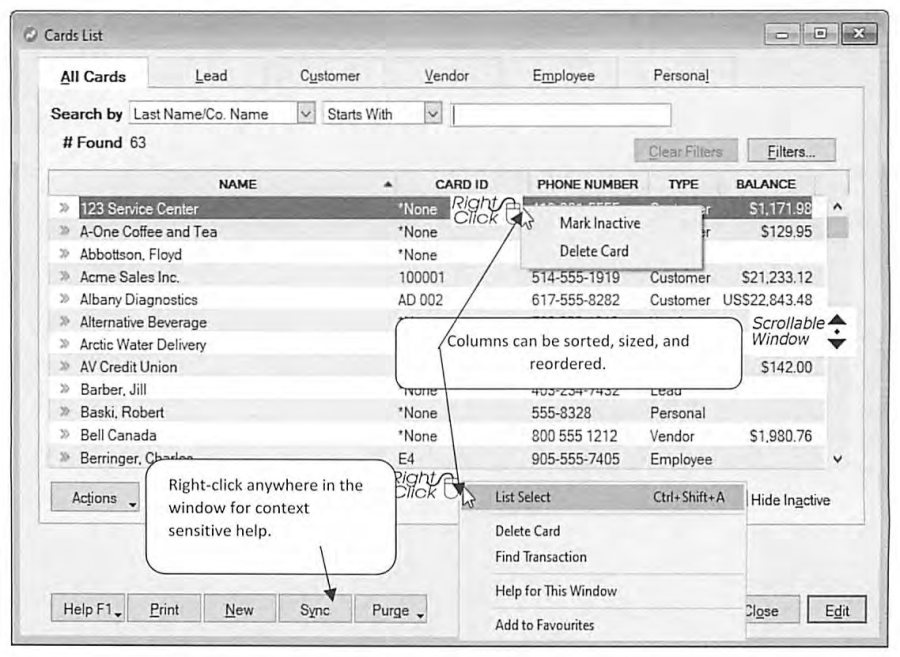
Right-clicking inside almost any AccountEdge window opens a context-sensitive menu equivalent to the Edit menu options for that screen -- in a transaction list this might include Find, Erase, Delete, or Reverse; in a card list it might include Mark Inactive. Clicking the Help button, or right-clicking and choosing "Help for This Window," opens context-sensitive help specific to the screen you are on, which the guide calls "two examples of AccountEdge's complete help system" worth exploring deliberately to shorten the learning curve.
The To Do List, Find Transactions & Report Customization
Source: p.12-17
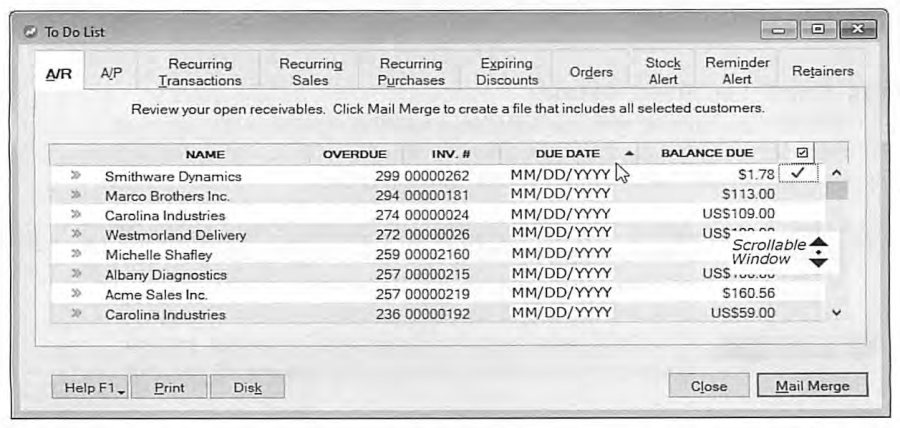
The To Do List, opened from the Quick Access Toolbar, is the single screen that surfaces everything requiring attention: overdue receivables and payables in aged order, recurring transactions due, expiring purchase discounts, outstanding sales and purchase orders, stock alerts, and reminders/retainers. Each tab presents a scrollable list with an appropriate "action button" at the bottom -- Mail Merge, Pay Bills, Record, Record as Actual, Order/Build, or Remove -- so that once you've selected the items you want to act on, a single click processes them.
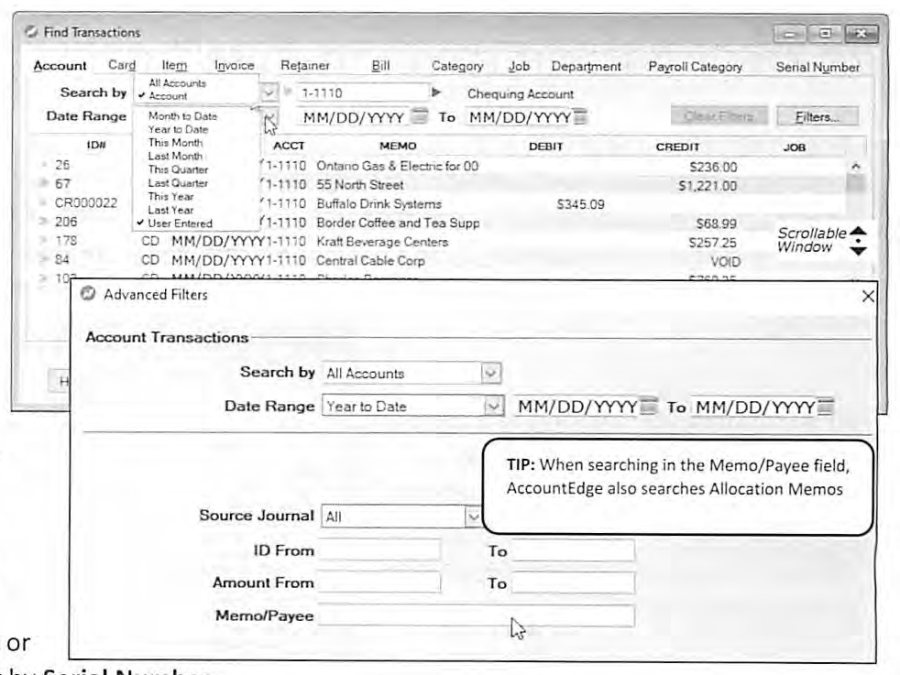
The Find button opens Find Transactions, which searches by Account, Card, Item, Invoice, Retainer, Bill, Category, Job, Department, Payroll Category, or Serial Number, narrowed further by an Advanced Filters panel covering date range, source journal, transaction ID range, amount range, and memo/payee text. This is the tool for locating a specific transaction when you don't remember which command center it was entered from.
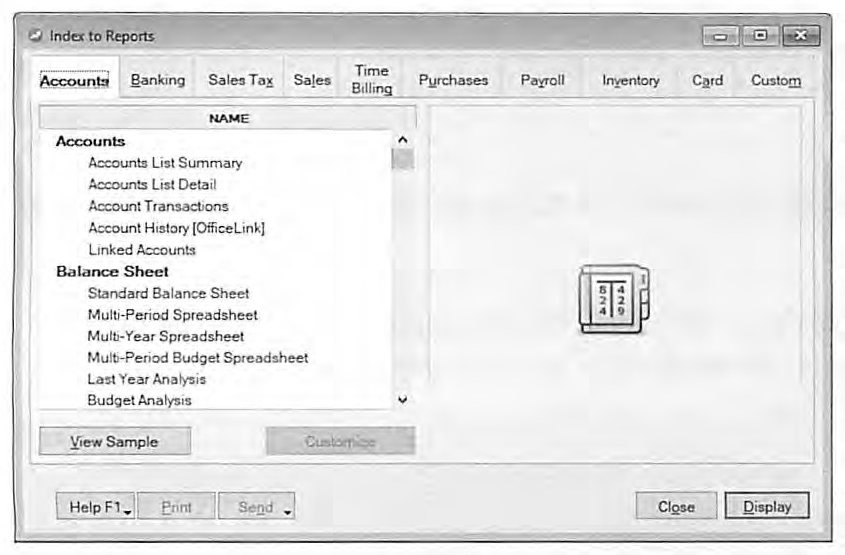
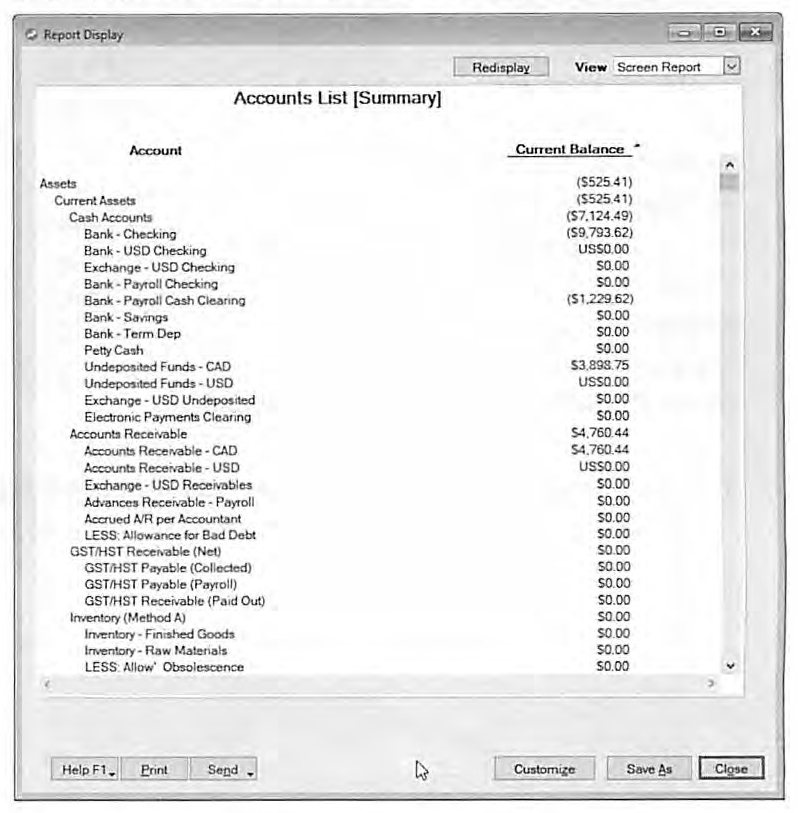
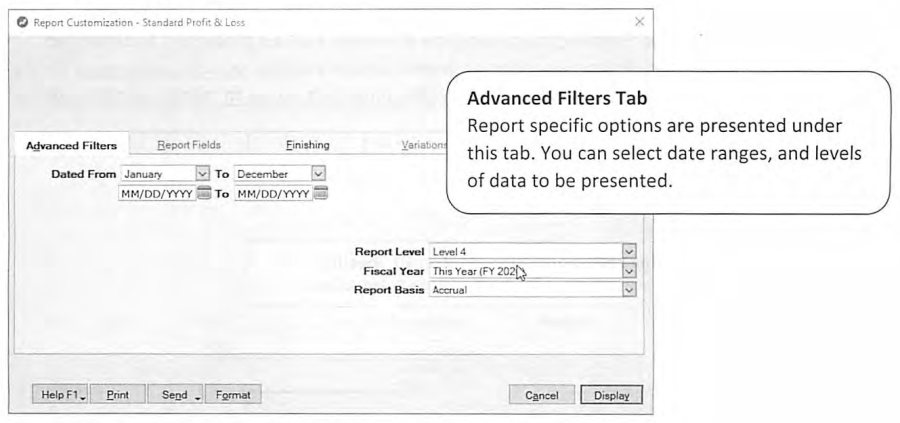
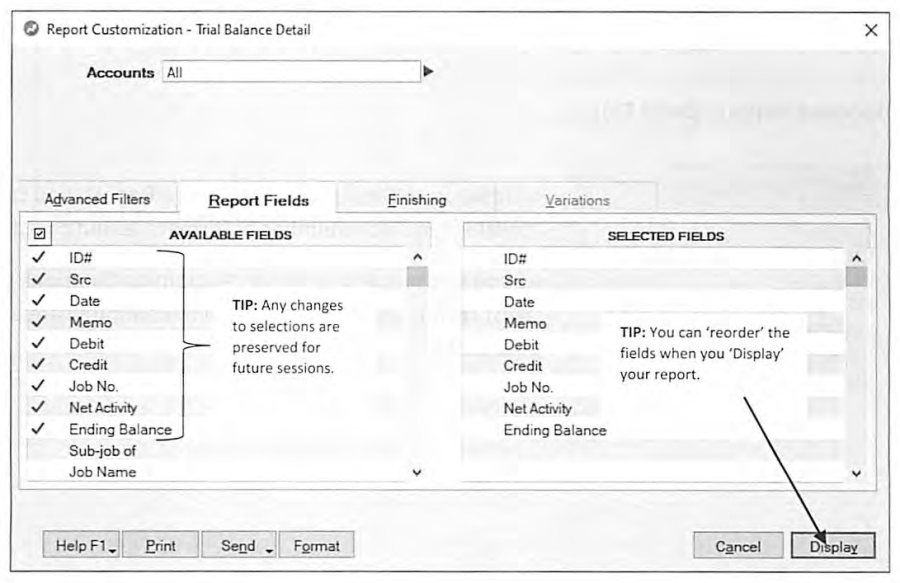
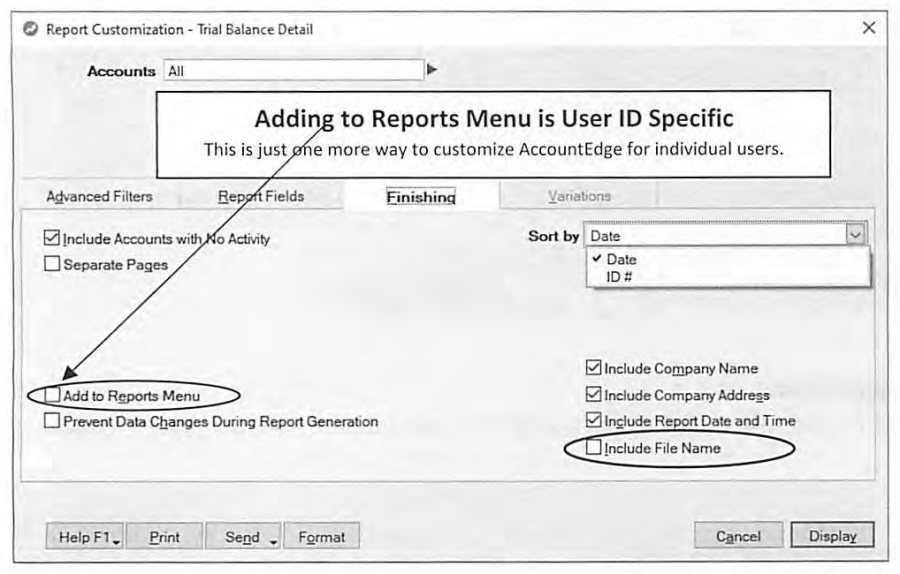
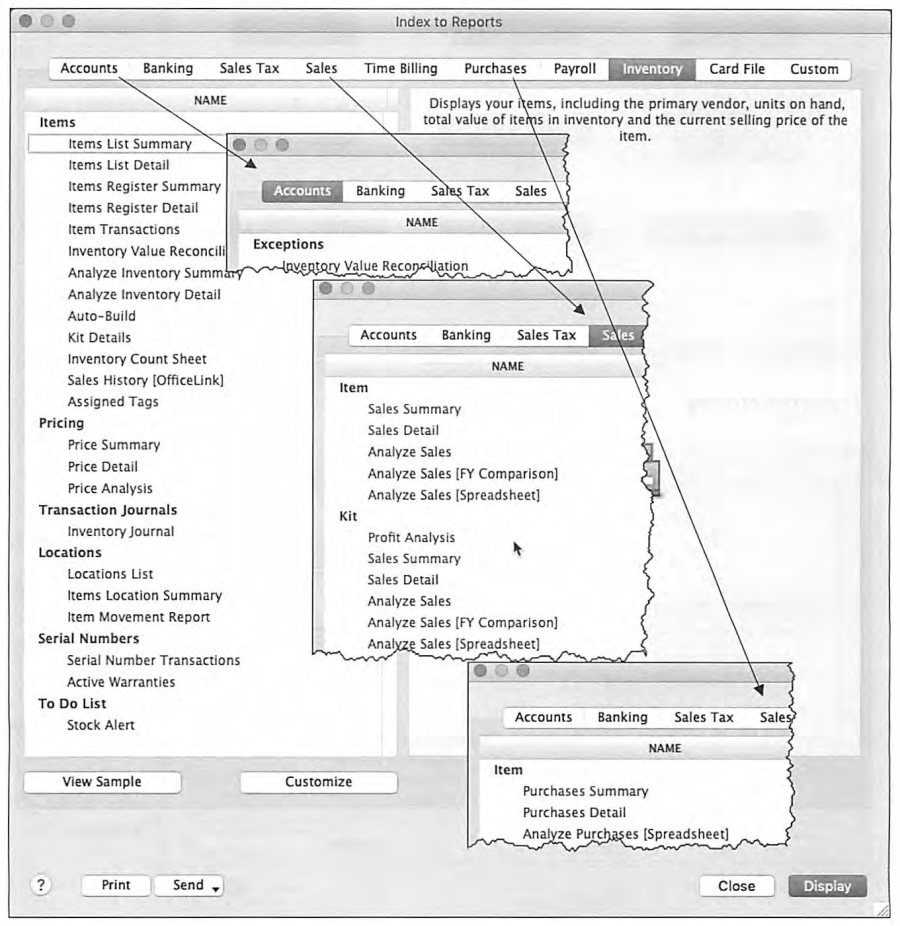
The Reports button opens the Index to Reports for whichever Command Center is active, organized by tab. Every report can be previewed with "View Sample" before you run it live, and "Customize" opens a three-tab dialog: Advanced Filters (date ranges and levels of detail), Report Fields (which columns appear, in what order -- selections are remembered for future sessions), and Finishing (page breaks, company name/address/date stamps, and whether the customized report gets added permanently to the Reports Menu for one-click future access). Once displayed, the Redisplay button reruns the report with updated data, and you can toggle between Screen Report and Print Preview. Reports can be Sent To Excel, Email, PDF, HTML, Tab-Delimited Text, Comma-Separated Text, or Simple Text -- a range the guide highlights as proof that "AccountEdge Accounting Solutions integrate the latest technologies."
Using Registers, and the Analysis & Sync Buttons
Source: p.18-19
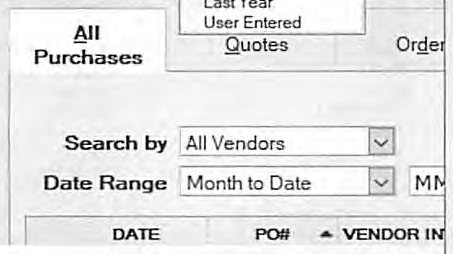
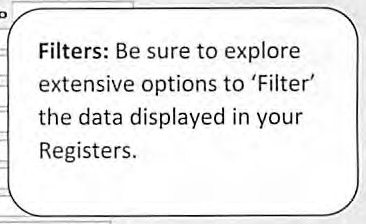
Registers (Bank, Sales, Purchases, and Item) present a scrollable list of transactions in a single window, with a top pane for filtering by date range and card, and a bottom pane designed for quick "telegraphic" entry of new transactions without opening the full transaction screen. AccountEdge columns in any register can be sorted, resized, or reordered. The guide encourages spending time inside "Help for This Window" for each register, since the specifics of what can be managed from a register (and how) influence how a company file should be set up in the first place.
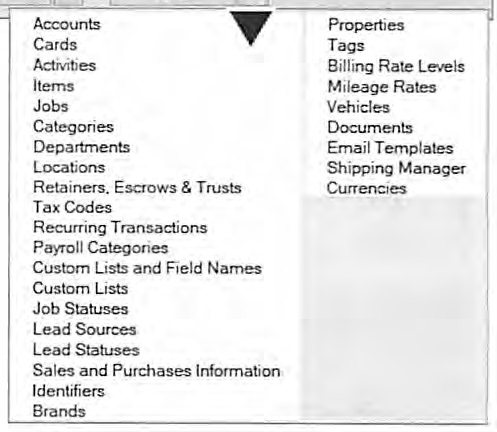
The Analysis button gives instant access to the AccountEdge Analyst tools -- Balance Sheet, Profit and Loss, Jobs, Cash Flow, Sales, Receivables, Payables, Payroll, Inventory, and more -- regardless of which Command Center is currently active, by clicking the "Select" arrow beside the tool you want. The Sync button links to external data sources: AccountEdge Mobile, Rerun, AccountEdge Connect, and an integrated Web Store, synchronizing that outside data back into the company file. The Lists button opens whichever data lists are relevant to the active Command Center.
Recording an Accounts Command Center Transaction: Mileage Log
Source: p.19-21
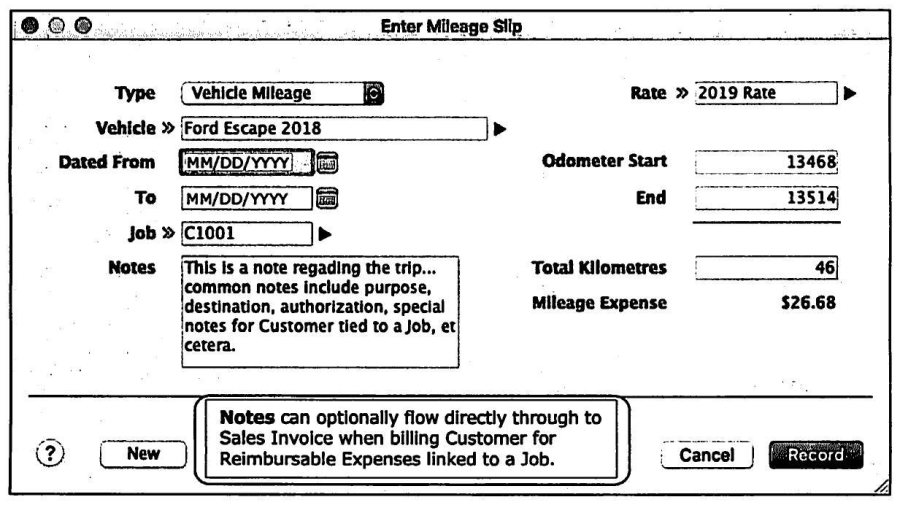
The Accounts Command Center's Mileage Log tracks mileage for vehicles and employees against a separate Rates list, so different rates can apply regardless of which vehicle or employee logged the trip, and Job IDs can be attached to mileage slips to tie the expense to a specific project. Vehicles and Rates are set up under Accounts > Mileage Log > Vehicles or Rates respectively; current government mileage rates are published by the CRA (Canada) or the GSA (United States), and the guide points users to those external sites rather than baking a rate into the software.
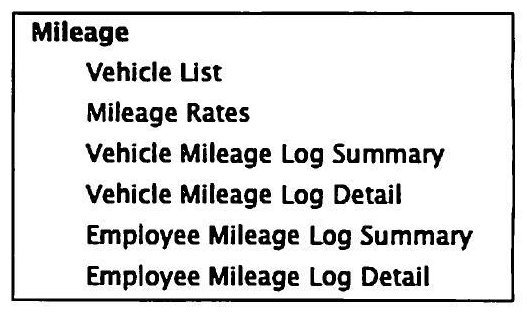
To create a mileage slip: Accounts > Mileage Log > New, choose the slip type (Vehicle or Employee Mileage), and fill in Odometer Start/End (or total kilometres/miles directly), the applicable rate, and an optional Job. The resulting Mileage Expense can reimburse an employee, bill a customer, or simply track asset operating expense. Notes entered on the slip can flow through automatically onto a Sales Invoice when the mileage is billed to a customer tied to a Job. Mileage slips can also be created remotely inside AccountEdge Mobile or AccountEdge Connect and synced back to the company file. Reports > Accounts > Mileage covers Vehicle List, Mileage Rates, and Summary/Detail logs for both Vehicle and Employee mileage.
Transfer Money
Source: p.21-22
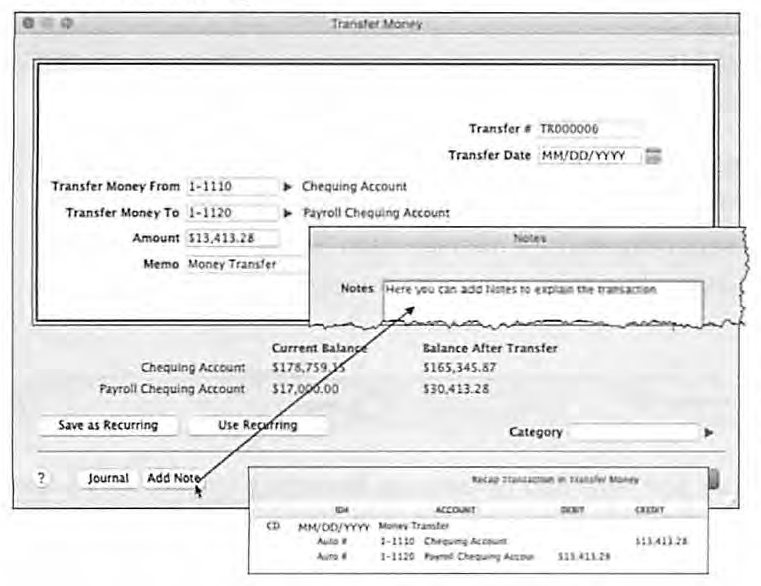
Transfer Money -- reached from the Accounts Command Center despite being conceptually a Banking function -- moves funds between cash accounts and immediately shows the "Balance(s) After Transfer" for both accounts, removing the ambiguity that can arise from using a Journal Entry or Spend/Receive Money to accomplish the same thing. Users coming from legacy Journal Entry or Spend/Receive Money habits are pointed toward Transfer Money as the more intuitive tool for this specific job. One limitation: Transfer Money does not accommodate multi-currency transfers -- moving money in a foreign currency requires Spend/Receive Money instead, where the currency and exchange rate can be specified explicitly.
Record Journal Entry, and Job/Departmental Allocations
Source: p.22-23
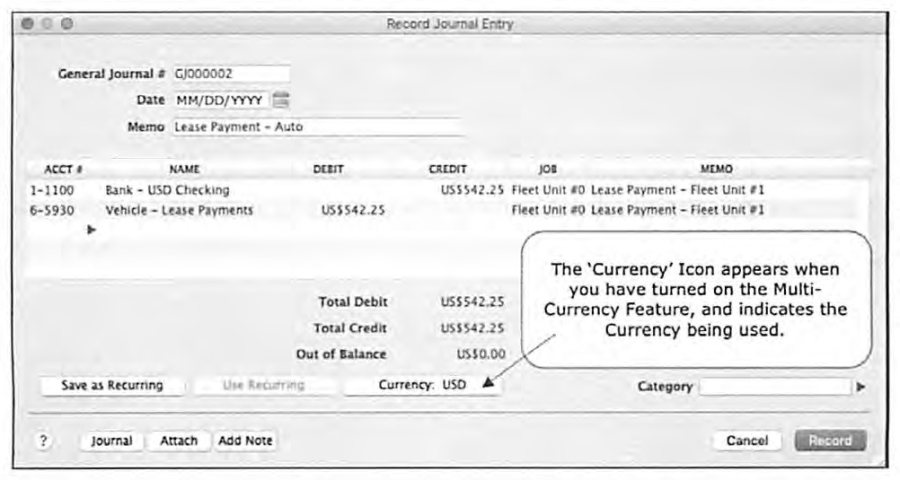
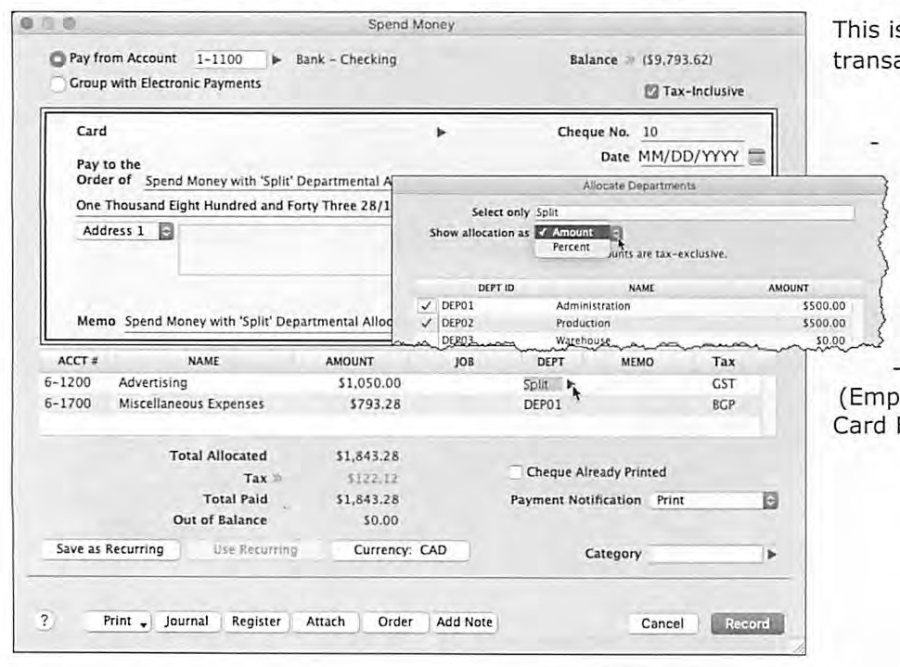
Record Journal Entry opens a standard debit/credit grid, with a Currency icon appearing automatically once multi-currency has been turned on. The guide is candid that "you can almost eliminate the use of Journal Entries" in AccountEdge -- alternate, more purpose-built methods for many classic journal-entry scenarios (particularly around bank reconciliation) are covered later in the Period End Procedures guide. Each line of a Journal Entry can be allocated to one or more Jobs or Departments, and an Allocation Memo Comment of up to 255 characters can be attached to any individual line -- useful documentation that can surface later in the General Journal, Cash Disbursements/Receipts reports, and elsewhere. A transaction (in its entirety, not line by line) can also be allocated to a Category, representing something like a Division, Profit Center, Region, or Fund, with its own family of reports. One important caution: Journal Entries do not apply sales taxes, so tax amounts recorded through a Journal Entry will not appear in standard sales-tax-code reports -- a reason to prefer Spend/Receive Money or the transaction-specific screens whenever sales tax is involved.
Recurring Transactions -- Setting Up
Source: p.23-25
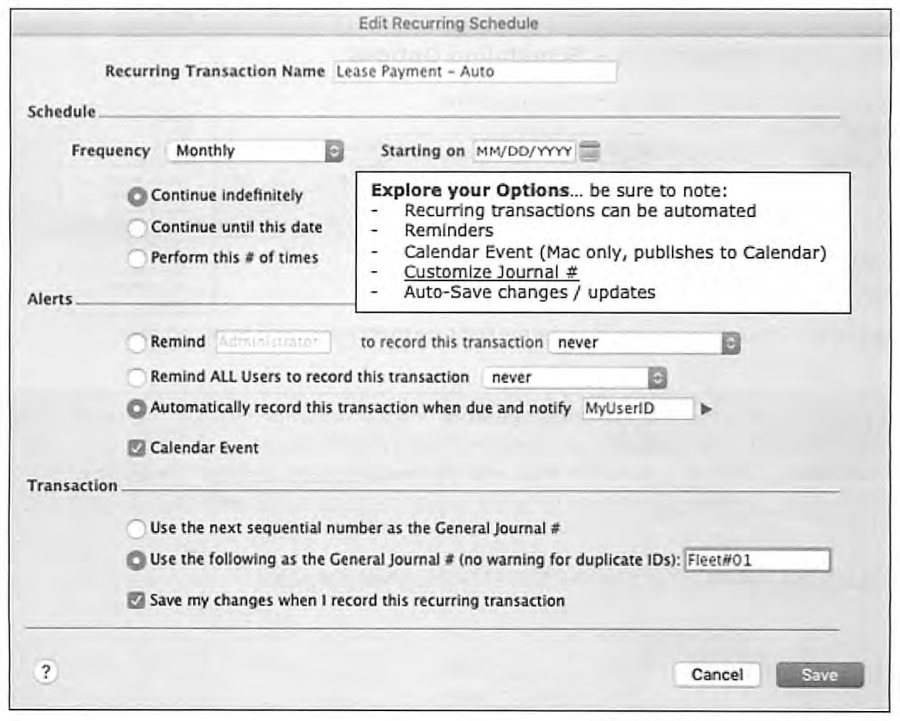
A recurring transaction can represent a fixed monthly obligation like a lease payment, or serve as a reusable template for a complex transaction where only the amounts change each time. Setting one up starts from the originating transaction screen -- enter the transaction as usual, then click "Save as Recurring" to open the Edit Recurring Schedule window. There you name the recurring transaction (it defaults to the Memo field, but can be renamed for clarity), set a Frequency (Never, Daily, Weekly, Every 2 Weeks, Twice a Month, Every 3 Weeks, Every 4 Weeks, Monthly, Every Other Month, Quarterly, Every 4 Months, Every 6 Months, or Annually), and a Starting On date, which can be pre-dated -- useful when entering historical data, though alert functions cannot apply to past-dated transactions until they're posted from the To Do List. You choose whether the schedule continues indefinitely, until a specified date, or for a fixed number of occurrences.
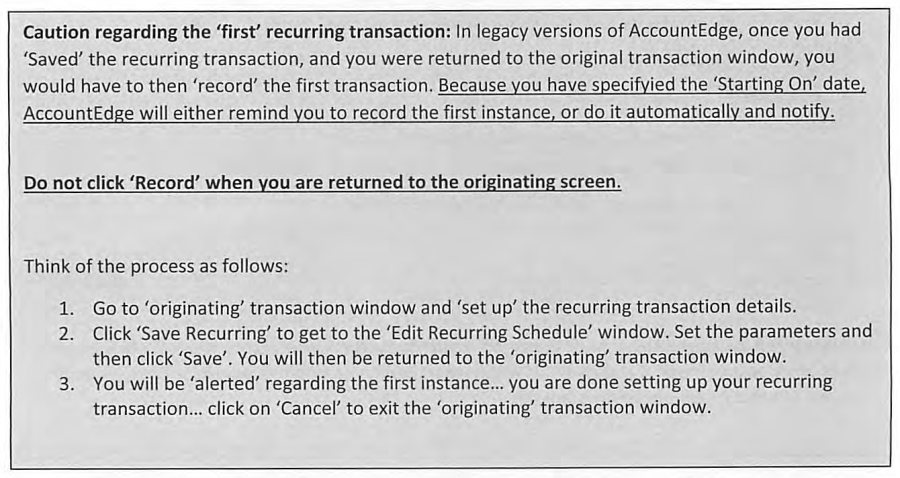
One workflow trap carried over from legacy AccountEdge: after saving the recurring schedule and returning to the originating window, do not click Record again for that first instance -- AccountEdge will either remind you to record the first occurrence or record and notify you automatically, based on the alert settings chosen in the schedule.
Recurring Transactions -- Alerts, IDs, and Managing from the To Do List
Source: p.26-29
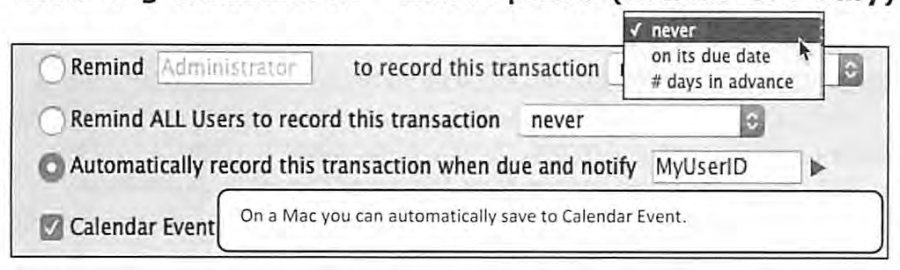
Alert Options let you Remind a specific user (or all users) a set number of days in advance, or set AccountEdge to Automatically record the transaction when due and notify a chosen user -- on the Mac, a Calendar Event can also be published automatically. For the transaction ID, you can choose to Use the next sequential number, or Use a fixed ID with no duplicate-ID warning, and separately choose whether to "Save my changes when I record this recurring transaction," which updates the template itself going forward (this was the default behavior in legacy AccountEdge, but is now opt-in).
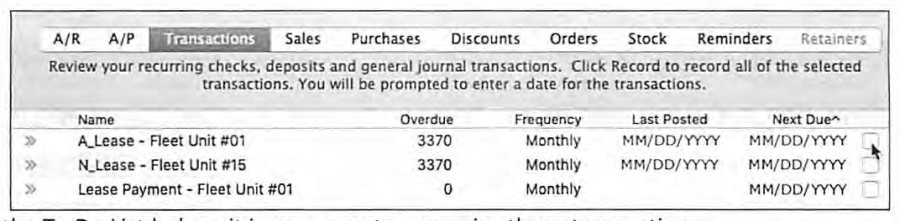
Recurring transactions surface on the To Do List's Recurring tab, where selecting one or more and clicking Record posts them after prompting for a date. Because transactions with automatic-record or notify alerts don't need manual handling from the To Do List, the guide suggests a naming convention -- prefixing recurring transaction names with "A-" for Automatically-recorded and "N-" for Notification-based -- so staff can tell at a glance which ones actually need attention in the list.
Editing a recorded recurring transaction can be either "one time" (select from the To Do List or click "Use Recurring" from the originating window, edit, and record -- the template itself is untouched) or "continuous/permanent" (go to Lists > Recurring Transactions, select the transaction, and click Edit to change the template, or Edit Schedule to change frequency/dates -- clicking Save updates the template without recording a transaction). Recurring transactions can also be copied (useful, for example, for a property manager setting up a nearly-identical recurring rent charge for a new tenant) or deleted -- deleting the recurring schedule does not affect any transactions already recorded from it.
Company Data Auditor
Source: p.27-30
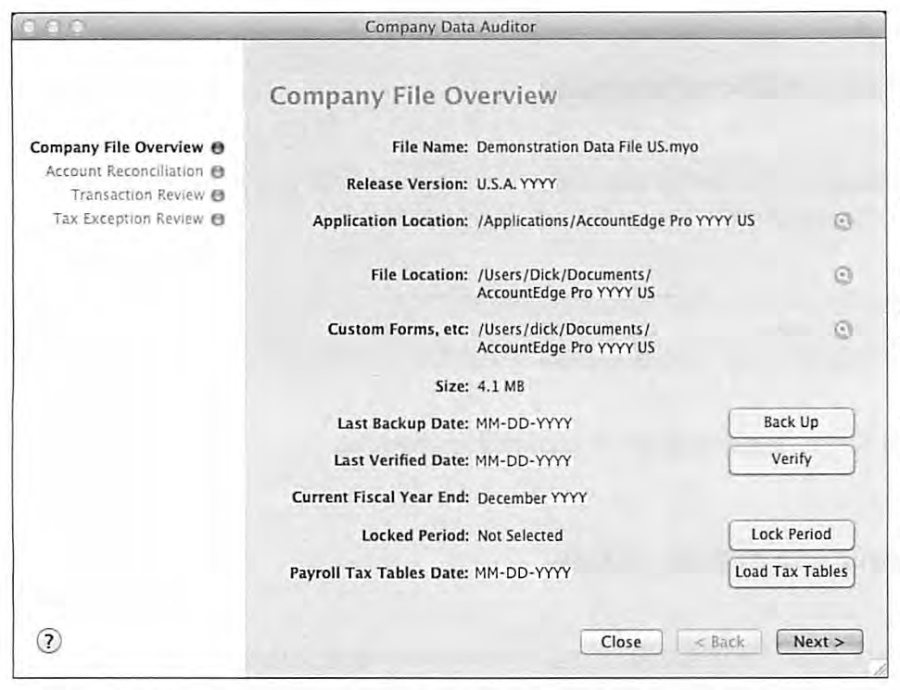
The Company Data Auditor, introduced here and covered in full depth in the Period End Procedures guide, provides a high-level integrity check of the company file. Its first pane, Company File Overview, displays the file name, software release, application and file locations, file size, last backup and verification dates, fiscal year end, locked period status, and the effective date of the payroll tax tables -- and lets you back up, verify, lock periods, or load tax tables directly from that screen.
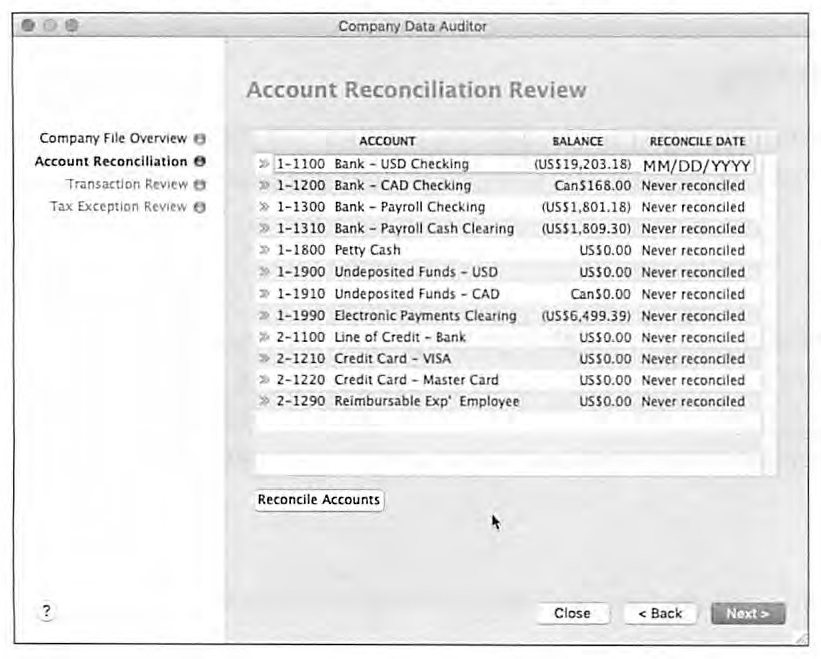
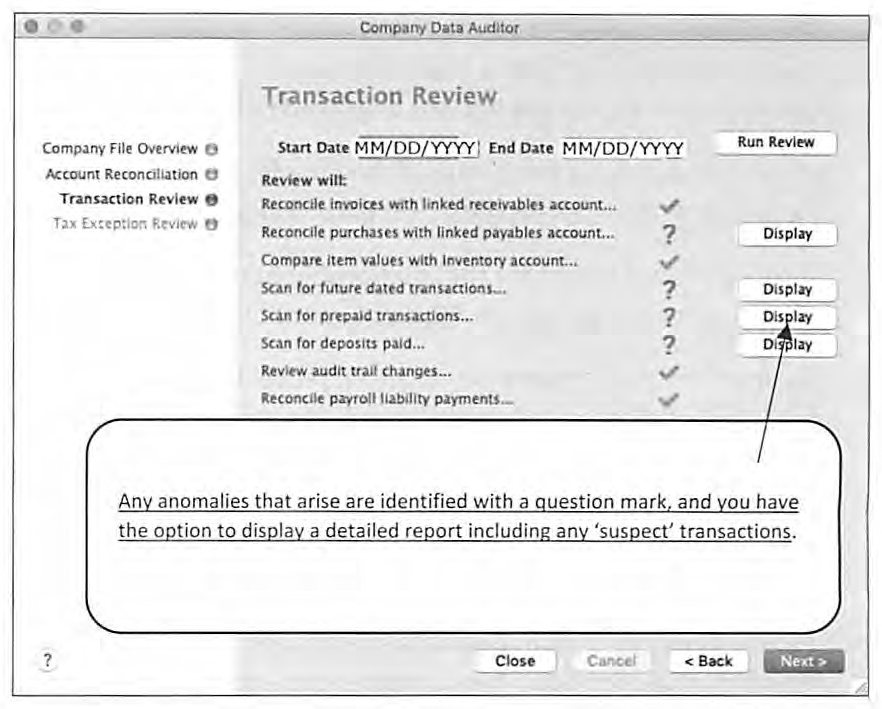
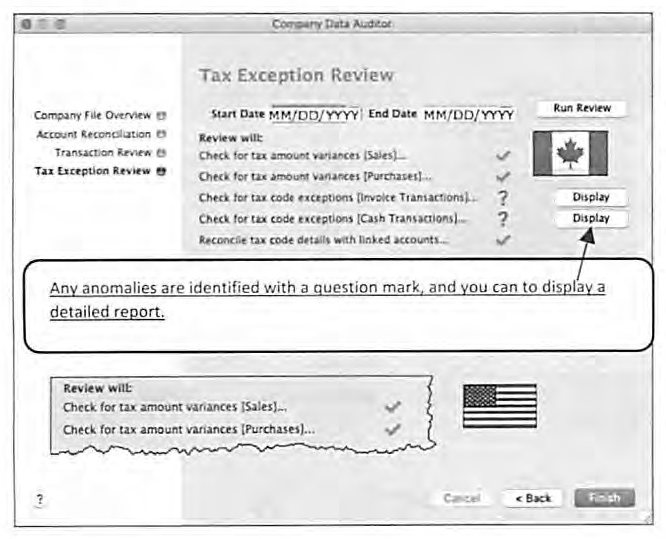
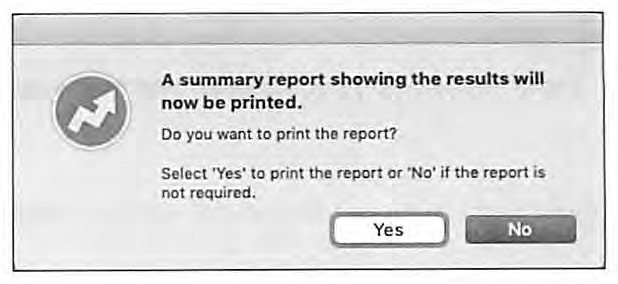
Account Reconciliation Review lists every bank and credit-card account with its balance and last-reconciled date, letting you jump straight into Reconcile Accounts for anything overdue -- though the guide notes this list includes all bank and credit-card accounts regardless of whether you actually use AccountEdge's formal bank reconciliation tool for each one. Transaction Review scans a chosen date range for exceptions: it reconciles total Receivable, Payable, and Inventory values against their linked Balance Sheet accounts, and separately scans for future-dated transactions, prepaid transactions, deposits paid, audit trail changes, job exceptions, and payroll liability payment reconciliation, flagging anomalies with a question mark and offering a detailed report. Tax Exception Review checks for tax amount variances on Sales and Purchases and for tax code exceptions on invoice and cash transactions -- the exact review options vary by country edition. On finishing any review, AccountEdge offers to print a summary report, which the guide recommends retaining as documentation.
Business Insights
Source: p.30-31
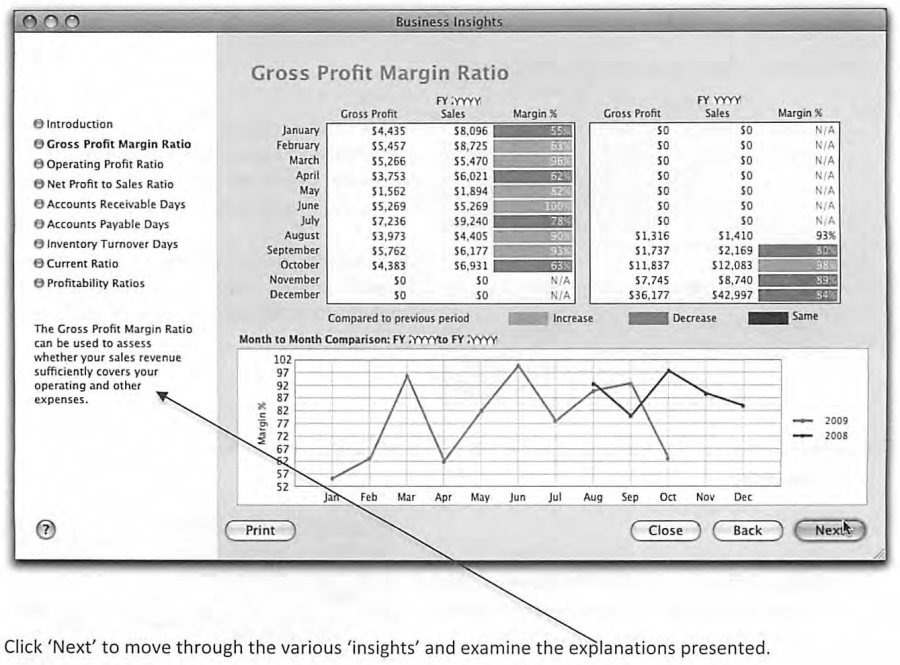
Business Insights (or Business Insights Reports, under Reports > Accounts, for versions without the dedicated button) presents key financial ratios -- Gross Profit Margin, Operating Profit Ratio, Net Profit to Sales Ratio, Accounts Receivable Days, Accounts Payable Days, Inventory Turnover Days, Current Ratio, and Profitability Ratios -- computed from the company's Accounts List, comparing the current period both to prior months in the year and to the same month a year earlier, with month-to-month totals and a tabular plus graphical presentation side by side. The value of these calculations depends on the accounts having been set up with the correct Account Type in the first place, which is why the guide cross-references the Accounts List Worksheet covered in Setting It Up Properly. Business Insights is developed further in the Period End Procedures guide.
Transaction Journal & Accounts Reports
Source: p.31-32
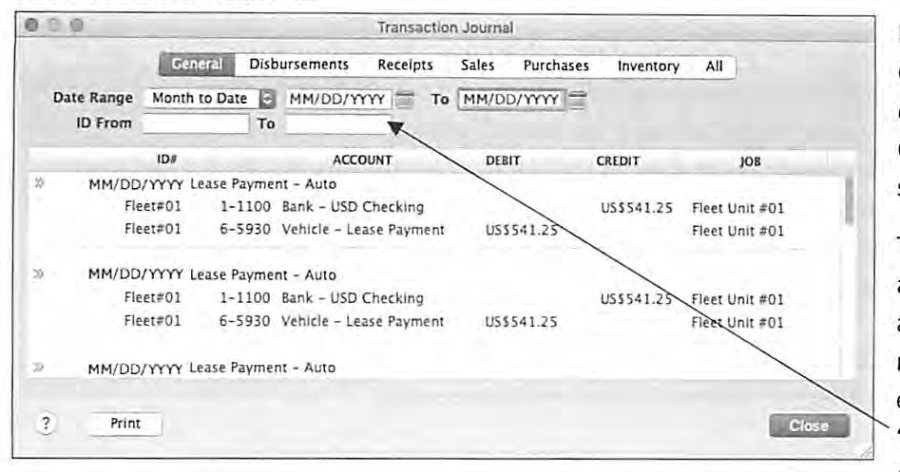
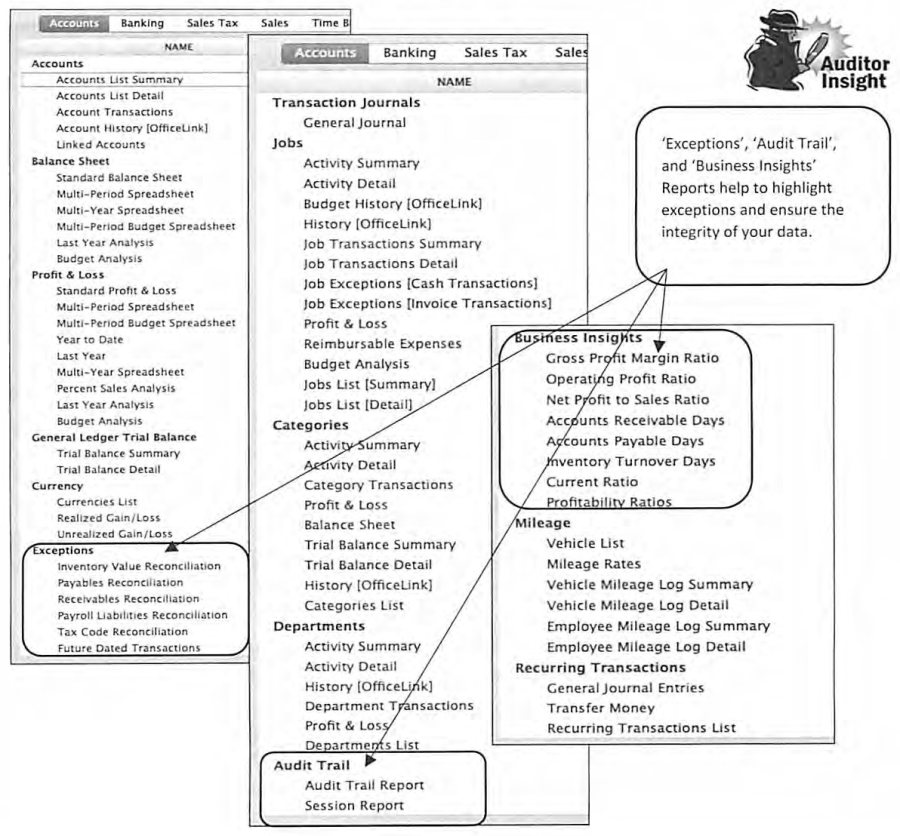
The Transaction Journal button, present in every Command Center, is context-sensitive -- clicked from Accounts it displays the journal of transactions recorded in the Accounts Command Center for a default date range of the current month, editable as needed, and can be filtered by transaction ID to isolate and print a single journal entry (handy when a third party, such as an accountant, needs documentation of one specific entry). The Accounts Reports index groups Accounts List Summary/Detail, Account Transactions, Account History, Linked Accounts, Balance Sheet variants (Standard, Multi-Period Spreadsheet, Multi-Year Spreadsheet, Multi-Period Budget Spreadsheet, Last Year Analysis, Budget Analysis), Profit & Loss variants, Trial Balance, Currency reports (Currencies List, Realized/Unrealized Gain-Loss), and an Exceptions family (Inventory Value Reconciliation, Payables Reconciliation, Receivables Reconciliation, Payroll Liabilities Reconciliation, Tax Code Reconciliation, Future Dated Transactions, Audit Trail Report, Session Report) -- these Exceptions reports, and Business Insights, are highlighted as the tools that "help to ensure the integrity of your data."
Job Costing -- Creating and Organizing Jobs
Source: p.32-34
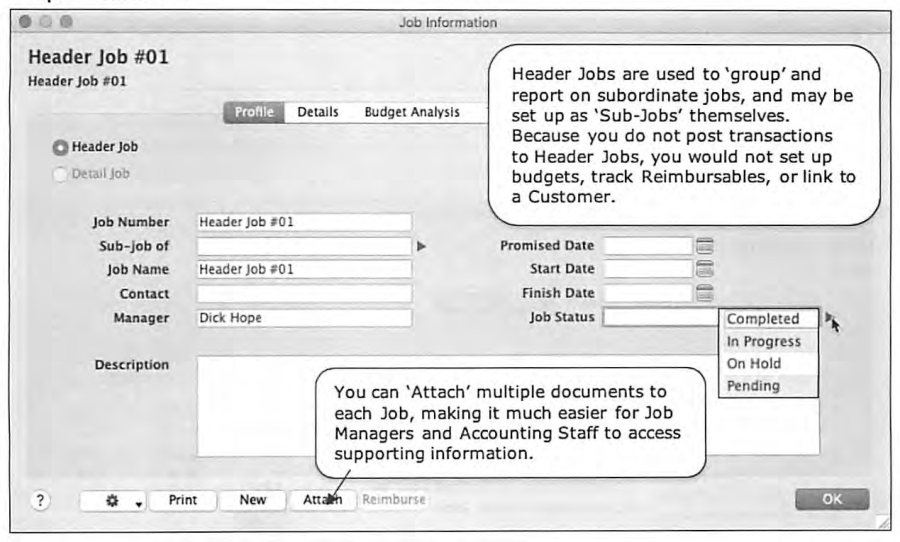
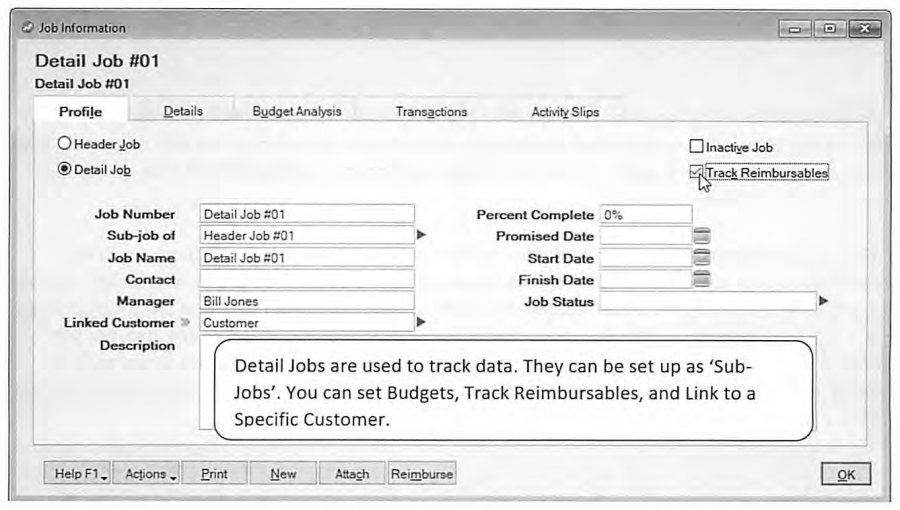
Job Costing keeps detailed records of Jobs, Projects, or Profit Centers, backed by dedicated reporting (Profit & Loss, Budget Analysis, and more) so that "management can examine the 'trees' without the 'forest' getting in the way." Jobs List (Lists > Jobs) displays jobs in a hierarchy up to four levels deep -- similar in structure to an Accounts List -- with Income, Cost, Expenses, and Net Profit (Loss) columns visible at every level, including consolidated totals for "header" jobs. Job Numbers accept up to fifteen alphanumeric characters; the guide suggests conventions such as prefixing with a Project Manager's initials to make reporting by manager intuitive. Jobs can be imported from another accounting program via AccountEdge's standard import tools.
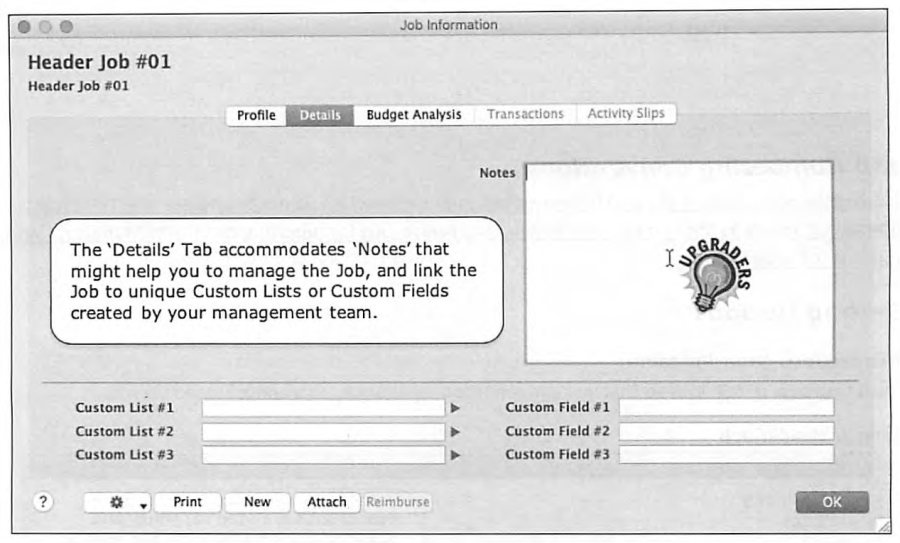
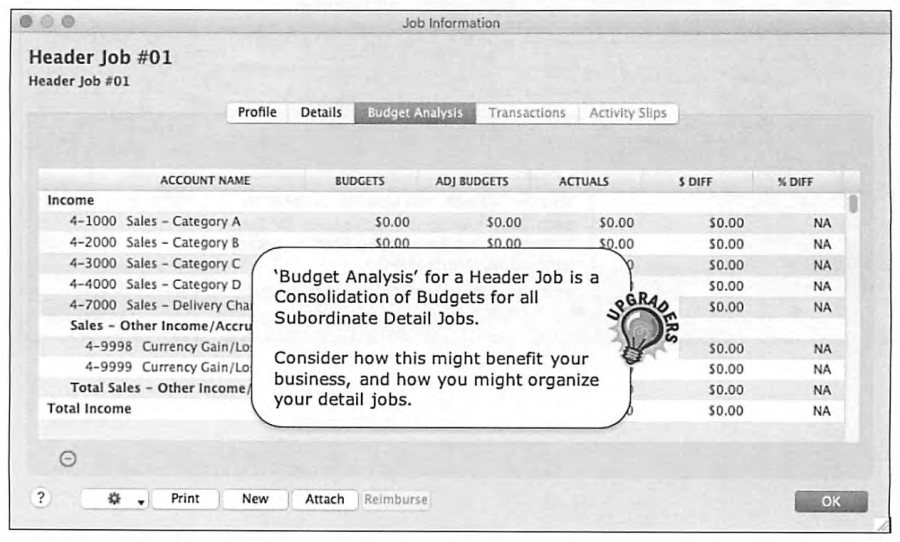
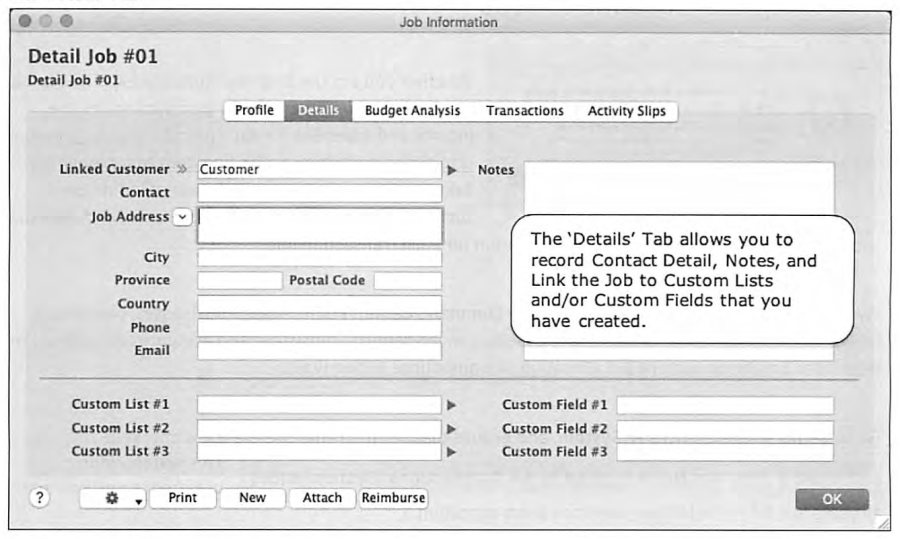
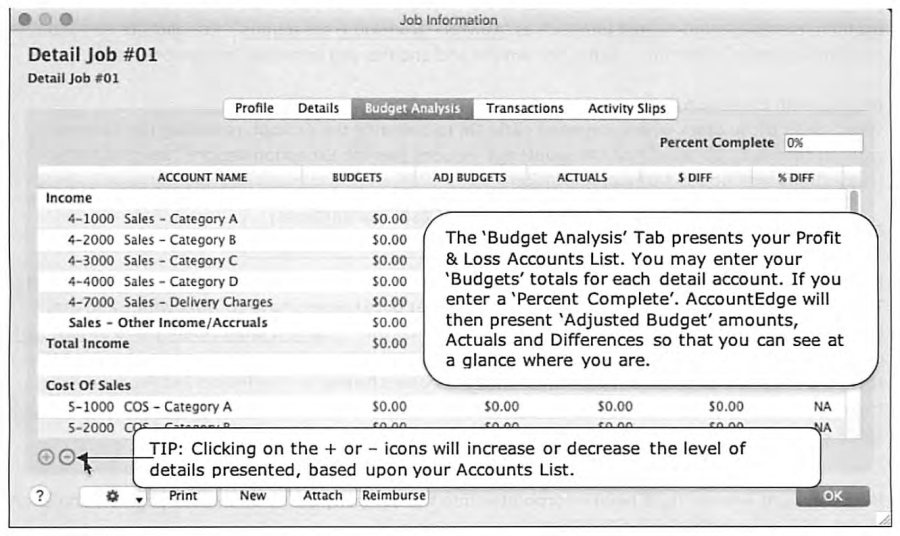
Header Jobs are non-postable -- they exist purely to group and report on subordinate ("detail") jobs, and consequently have no Budgets, no Reimbursables tracking, and no linked Customer. Detail Jobs are the postable kind: they may, but need not, sit beneath a Header Job, and they're where actual income, cost, and expense line items get assigned during daily transaction entry. Each job record's Details tab carries free-form Notes plus up to three Custom Lists and three Custom Fields for whatever attributes matter to the business; the Budget Analysis tab presents the full Profit & Loss accounts list with Budget, Adjusted Budget (scaled to Percent Complete), Actuals, and variance columns, so accurate Percent Complete figures directly drive accurate budget reporting.
The guide flags a genuine risk here: AccountEdge's Job Costing is powerful enough to accommodate needs "far exceed[ing] realistic needs," and the caution is to resist over-engineering a job structure beyond what management actually requires -- "be brutally honest (conservative) in determining what best fits your business."
Track Reimbursables & Invoicing Customers for Reimbursable Expenses
Source: p.35-41
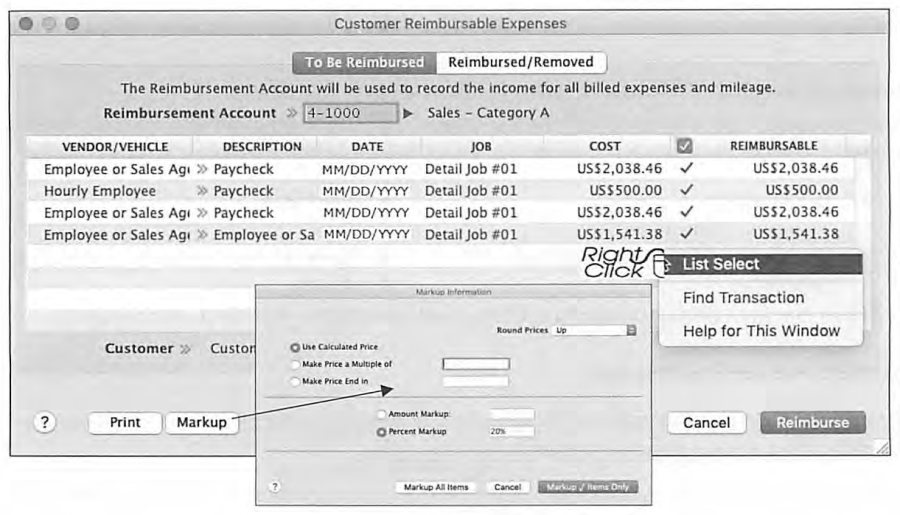
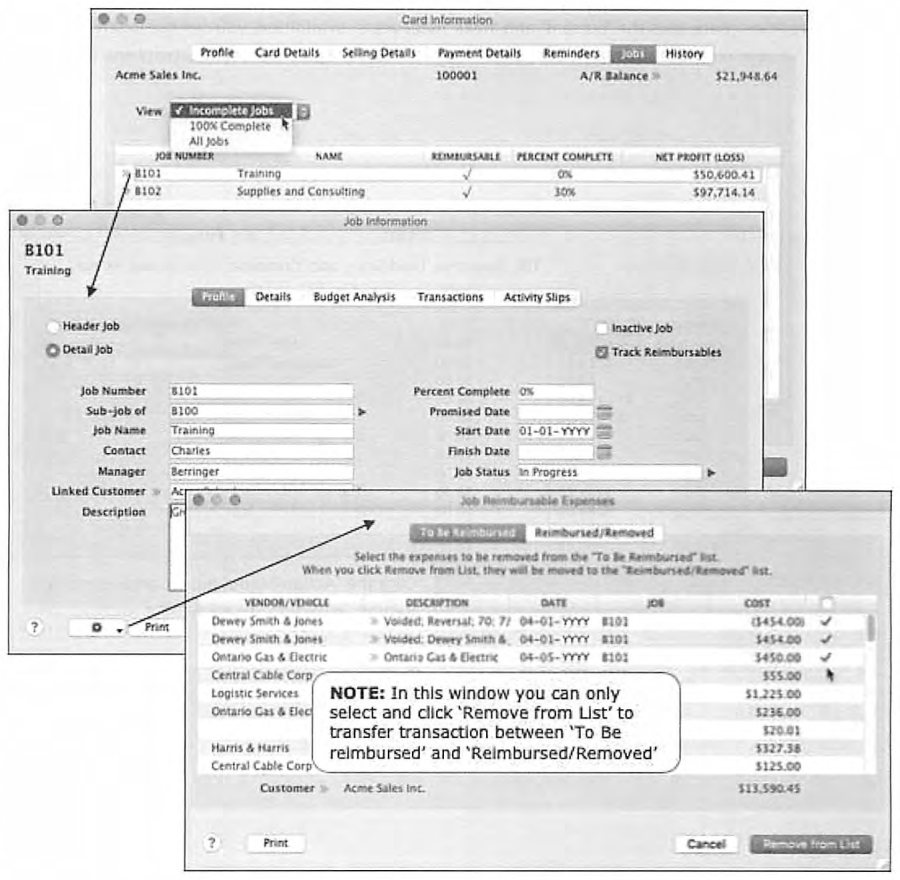
When a Job is linked to a Customer and "Track Reimbursables" is checked, every reimbursable expense assigned to that job accumulates until it's time to invoice the customer -- at which point opening a new invoice and choosing "Add Reimbursable Expense..." from the Action Menu pulls in the outstanding expenses, optionally marked up, with the original allocation memo comments (and, on certain invoice layouts, the original expense date) copied straight onto the customer's invoice. Only expenses entered through the Purchases, Banking (Spend Money), or Payroll Command Centers can become Reimbursables -- purchasing inventoried items never triggers a Reimbursable, since the "expense" isn't recognized until the item is later sold.
The guide identifies three ways project profitability erodes: time overruns (which the guide ties directly to watching the planned Finish Date on each job), out-of-scope "change orders" that go undocumented and unbilled, and poor budgeting caught too late because expenses weren't posted and reviewed promptly. A System preference (Setup > Preferences > Sales > Track Change Orders on Quotes and Orders) can prompt automatic documentation of change orders -- comments recording the date, details of the edit, and dollar impact -- whenever a quote or order is modified.
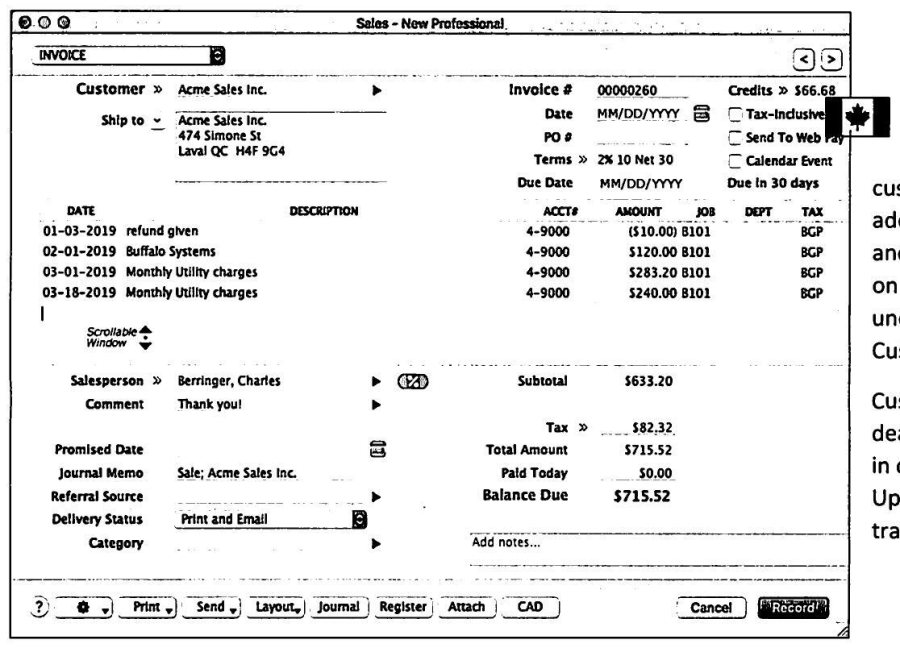
Three invoice layouts handle reimbursable billing differently: Item or Time Billing invoices require a "placeholder" item or activity (since neither layout lets you specify a credit account directly), Professional invoices include a date column that AccountEdge auto-fills with the original disbursement date plus more room for descriptive comments, and Miscellaneous invoices cannot be printed at all, making them unsuitable wherever the customer needs to see the invoice.
Because Work-In-Progress (unbilled reimbursable expenses and unbilled time) can materially distort an Income Statement by overstating expenses relative to recorded sales, the guide cross-references the Work-In-Progress section of Period End Procedures for anyone whose outstanding reimbursables could be large enough to matter.
Assigning Transactions to Jobs, and Job Exception Reports
Source: p.39-43
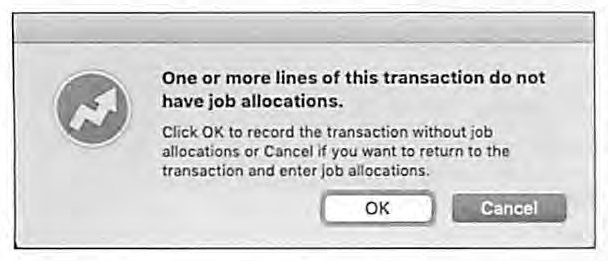
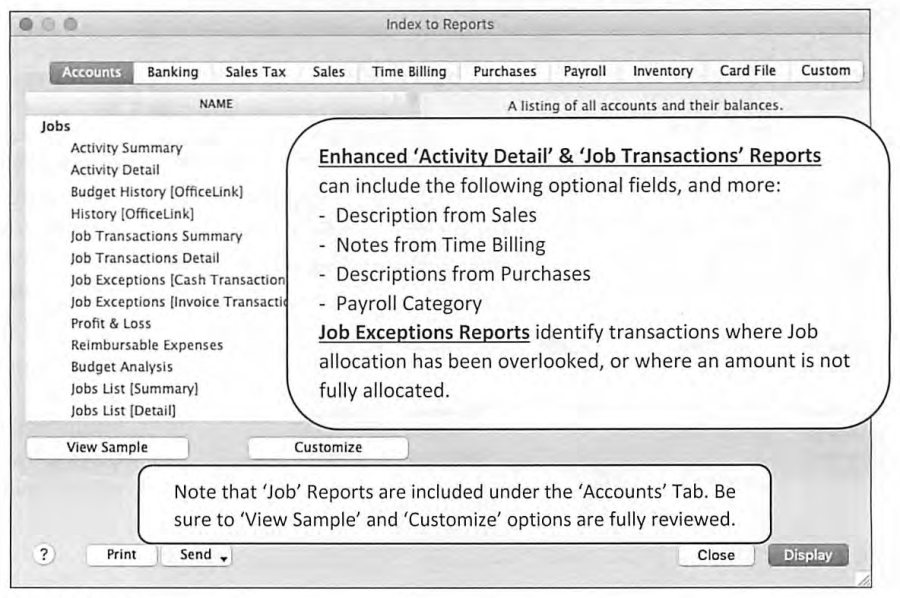
Most transaction-entry windows -- Journal Entry, Inventory Adjustments, Receive Money, Purchases, Sales, Spend Money, Payroll, plus the Time Billing Activity Slip and Timesheet screens -- include a Job column so line items can be allocated as they're entered. To enforce consistent allocation, Setup > Preferences > System offers "Warn if Jobs Are Not Assigned to All Transactions"; where that warning would be disruptive because many transactions genuinely aren't job-related, the guide's suggested workaround is a dedicated "ADMIN -- Non-Job Transactions" detail job to catch everything else, keeping exception review clean. Two Job Exception Reports (Cash Transactions and Invoice Transactions), reachable from Reports > Accounts and folded into the Company Data Auditor, surface any transaction recorded without a complete job allocation, for after-the-fact cleanup.
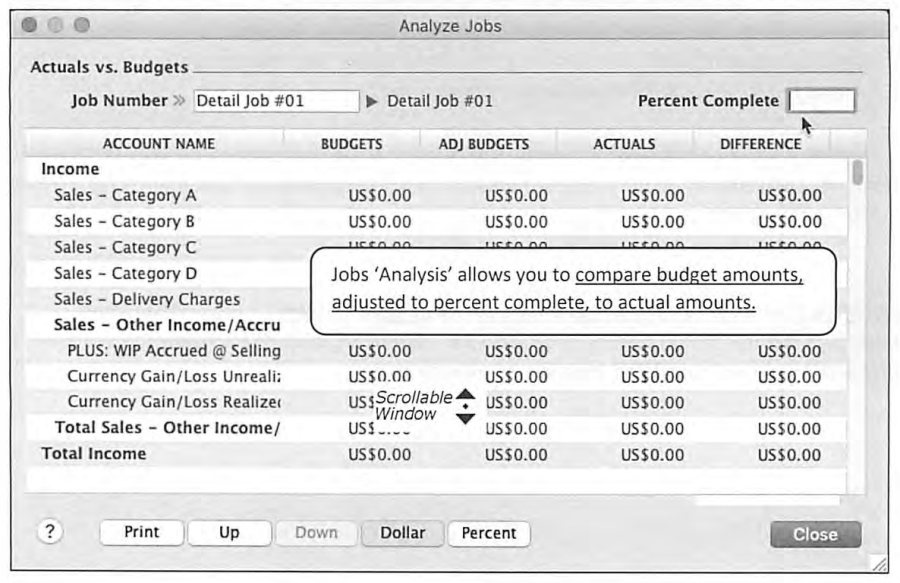
Job-related reports live under the Accounts tab of the Index to Reports: Activity Summary/Detail, Budget History, History, Job Transactions Summary/Detail, the two Job Exceptions reports, Profit & Loss, Reimbursable Expenses, Budget Analysis, and Jobs List Summary/Detail. The Analyze Jobs screen (Command Centers > Accounts > Analyze Jobs) compares Budget, Adjusted Budget (by Percent Complete), Actuals, and the resulting Difference for a chosen job, toggle-able between dollar and percentage display.
Departmental Accounting
Source: p.43-46
Departmental Accounting tracks profit by department -- each transaction line can be allocated to one or multiple departments -- without adding complexity to the Accounts List itself, the way many legacy programs force by duplicating accounts per department. The guide frames it as a close cousin of Job Costing and recommends reviewing both before deciding which fits: departments, unlike jobs, have no hierarchy or nesting.
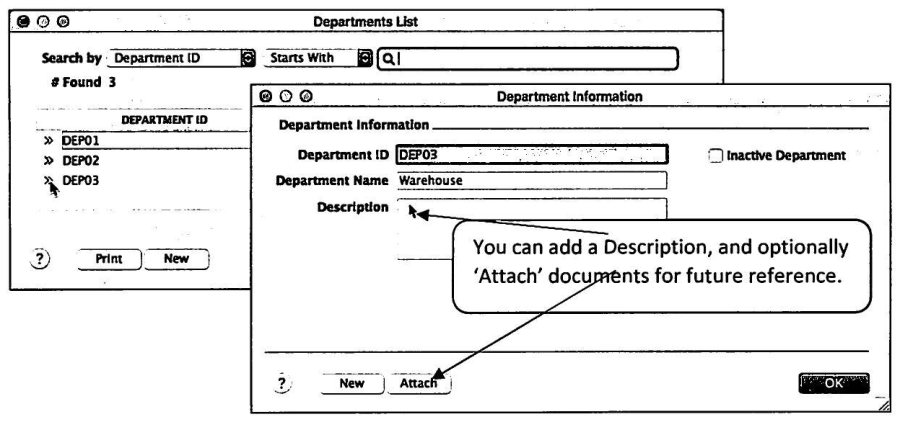
Turning the feature on (Setup > Preferences > System > "Use Departments") also exposes a companion "Warn if Departments Are Not Assigned to All P&L Accounts" preference. A hard trap here: turning the System-wide Departments preference back off permanently deletes all departments and their transaction allocations -- an action the guide says "cannot be undone," and recommends restricting who has permission to change that preference. Departments are created under Lists > Departments, each with a Department ID, Name, optional Description, and attachable documents. Example use cases offered include an auto dealership (Sales, Service, Parts, Marketing, Administration) and a grocery store (Bakery, Grocery, Meat, Produce, Deli, Warehousing, Administration).
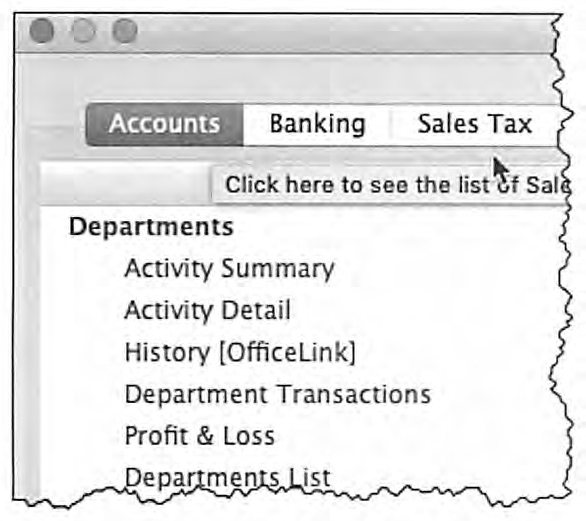
A default Department can be set on any Card (Customer, Vendor, Employee, or Personal) under its Card Details tab, becoming that card's default allocation on future transactions. Once enabled, Departmental allocation appears as a column across Spend Money, Receive Money, Receive Retainer, Spend Retainer, Enter Purchases, Enter Sales, Journal Entry, Enter Activity Slips, and Enter Paychecks -- and can even be split by percentage within Recurring Pay details for payroll, covered further in the Payroll training guide. Reports > Accounts > Departments offers Activity Summary/Detail, History, Department Transactions, and Profit & Loss, each runnable against Last Year, This Year, or Next Year.
Cards List & the Action Menu
Source: p.46-49
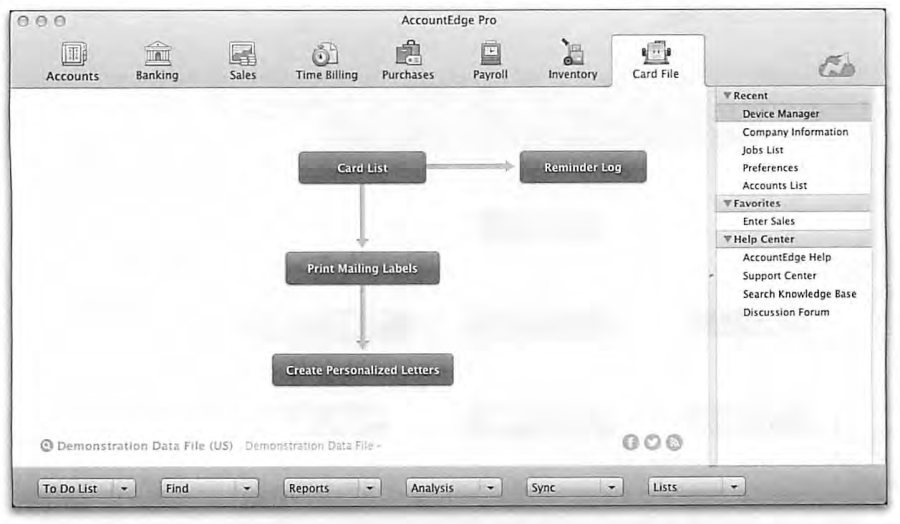
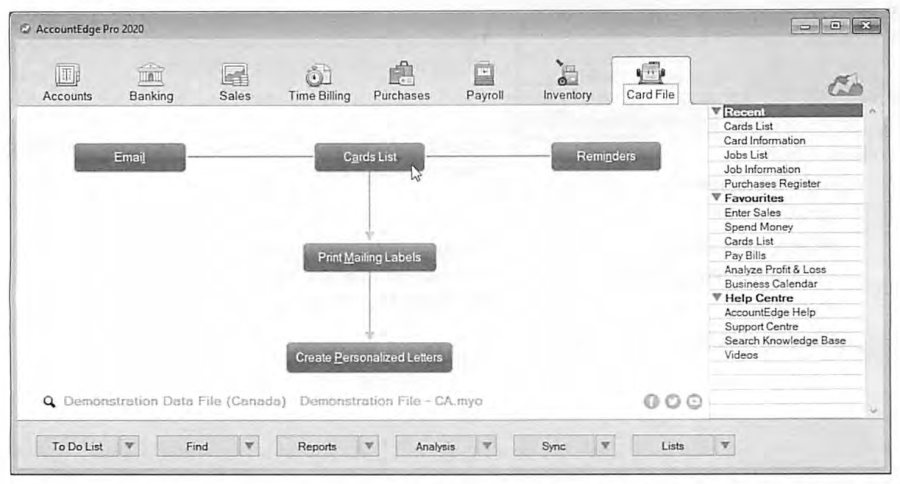
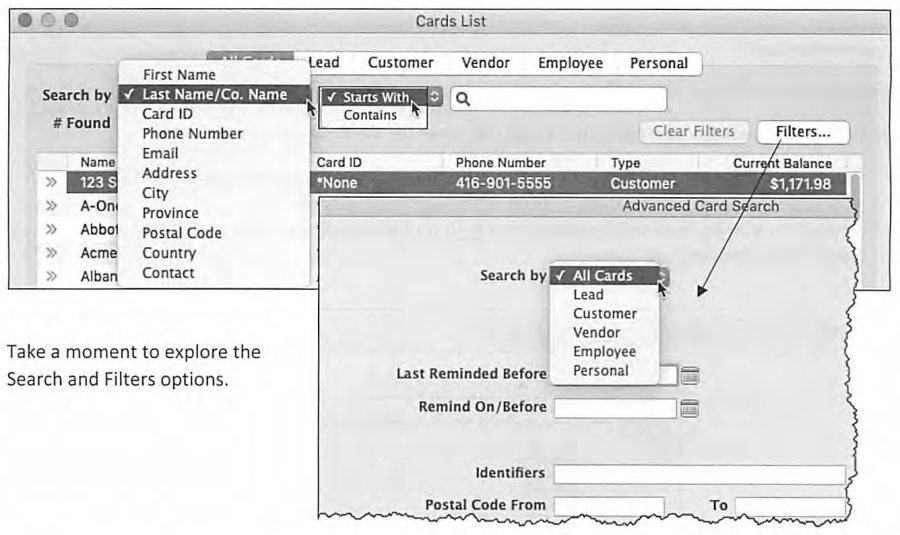
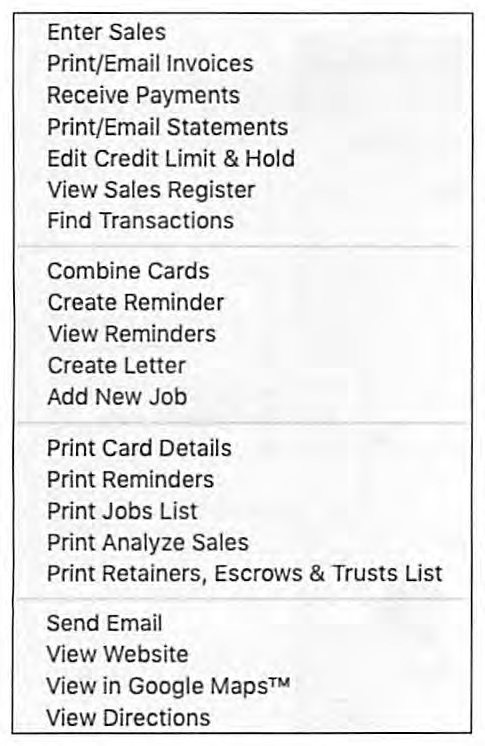
The Card File Command Center is where mailing labels get printed and personalized letters get generated from Microsoft Word templates using data pulled from a selected card. Cards List (five tabs: All Cards, Lead, Customer, Vendor, Employee, Personal) supports searching by Last Name/Company Name or Card ID, with sortable, resizable, reorderable columns and an Advanced Card Search panel (province, postal code, country, contact, last reminded date). The Action Menu button, present throughout AccountEdge but with card-type-specific contents here, groups shortcuts by task -- for a Customer card it includes Enter Sales, Print/Email Invoices, Receive Payments, Print/Email Statements, Edit Credit Limit & Hold, View Sales Register, Find Transactions, Combine Cards, Create Reminder, View Reminders, Create Letter, Add New Job, and various print/email/mapping shortcuts; a Vendor card's Action Menu differs accordingly.
Combine Cards -- called out specifically as a Period End Procedures topic rather than a daily task -- transfers all transaction history from a redundant "secondary" card onto a "primary" card, then deletes the secondary card once complete; the primary retains all its own properties and history throughout.
Synchronize Cards
Source: p.49
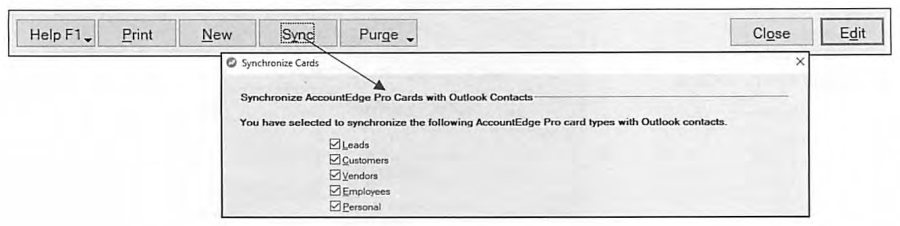
On the Windows version, selecting a card-type tab in Cards List and clicking Sync Cards synchronizes that card type with Outlook Contacts (Leads, Customers, Vendors, Employees, Personal can each be included or excluded). AccountEdge warns you to complete a backup of both the company file and the Address Book before proceeding, since a two-way sync carries real risk of overwriting data on either side if run carelessly.
Profile Tab, Card Type & Locations
Source: p.48-51
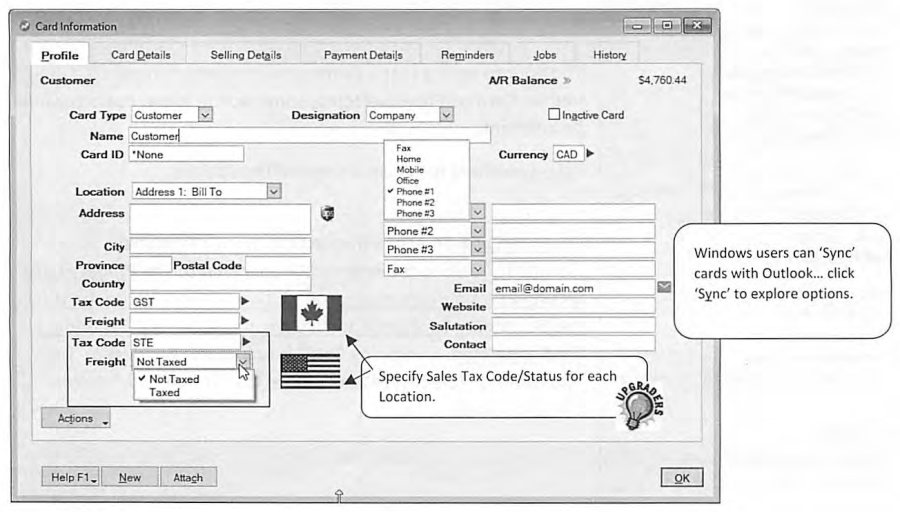
The Profile tab is common to every card type: Card Type, Designation (Company or Individual), inactive status, Name, Card ID, and up to five Locations. AccountEdge often pre-selects the correct Card Type based on which Command Center you entered the Card File from (Sales > Customer, Purchases > Vendor, Payroll > Employee) -- a convenience the guide flags as also a trap: entering a new card from the Banking Command Center gives no such hint, so it's easy to create the wrong card type there by accident. Making a card Inactive removes it from "Select from List" windows but does not delete history, and a card cannot actually be deleted until its transaction history has been purged at year end.
Each of the five Locations carries full address, phone, fax, email, web, and salutation fields. For Customers and Vendors, Location 1 is always the "Bill To" address and Location 2 defaults to "Ship To." Where "Ship To" is consistent but different from "Bill To," it belongs in Location 2; where there are up to three distinct recurring Ship To addresses, they go in Locations 3-5 with a prompt in Location 2 like "USE THE SELECT BUTTON TO DISPLAY SHIP TO OPTIONS"; where there are more than three, each Ship To should become its own Personal card instead, since Personal cards never appear in the Customer or Vendor selection lists and so can't be invoiced by accident, but can still be chosen for the Ship To field on a sale or purchase order; and for genuinely random one-off Ship To addresses, they're simply typed directly into the transaction. Whichever approach is used, the correct sales tax code or status must be set for each address, since collecting the wrong sales tax carries statutory penalties.
Card Details Tab -- Identifiers & Custom Lists/Fields
Source: p.51-53
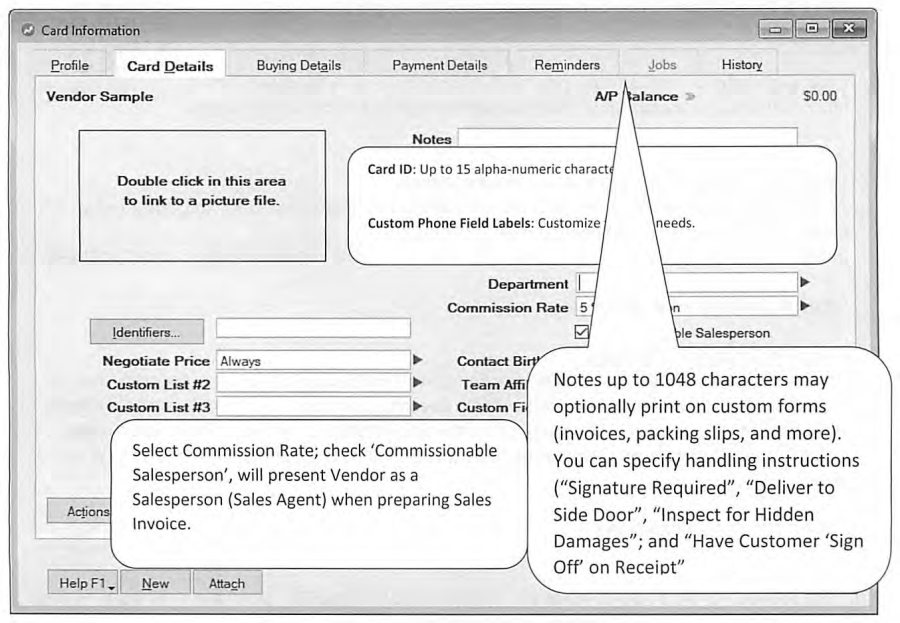
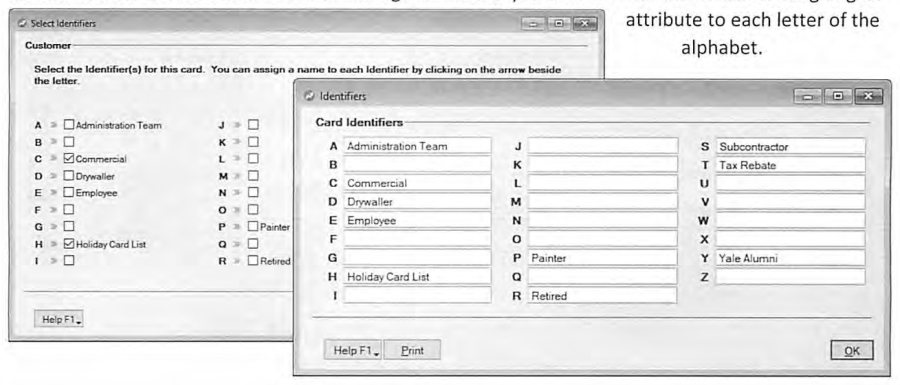
Identifiers assign an arbitrary attribute to each letter of the alphabet (A through Z), shared across all card types and named under Lists > Identifiers -- for example, "H" might mean "Holiday Card List." Because Identifiers are shared, a mailing-label run filtered on identifier "H" would pull every Customer, Vendor, Employee, or Personal card flagged that way at once. The guide suggests exploring Custom Lists and Custom Fields before reaching for Identifiers in more nuanced situations.
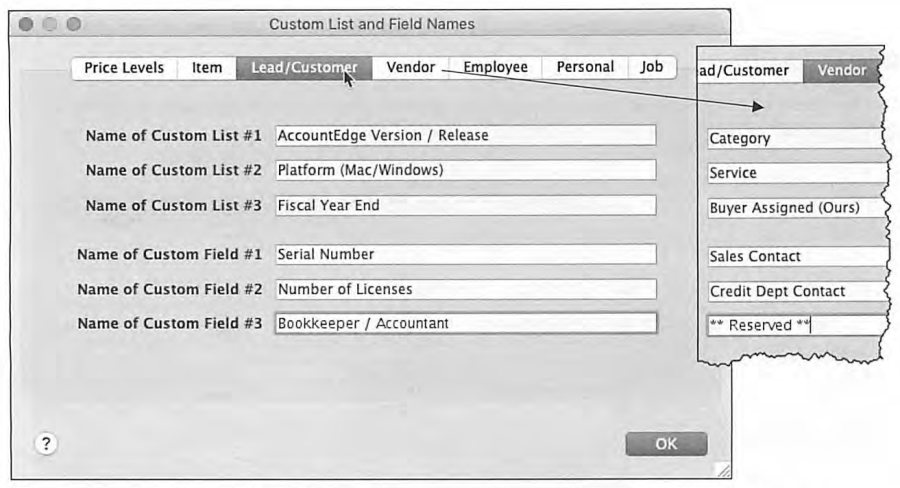
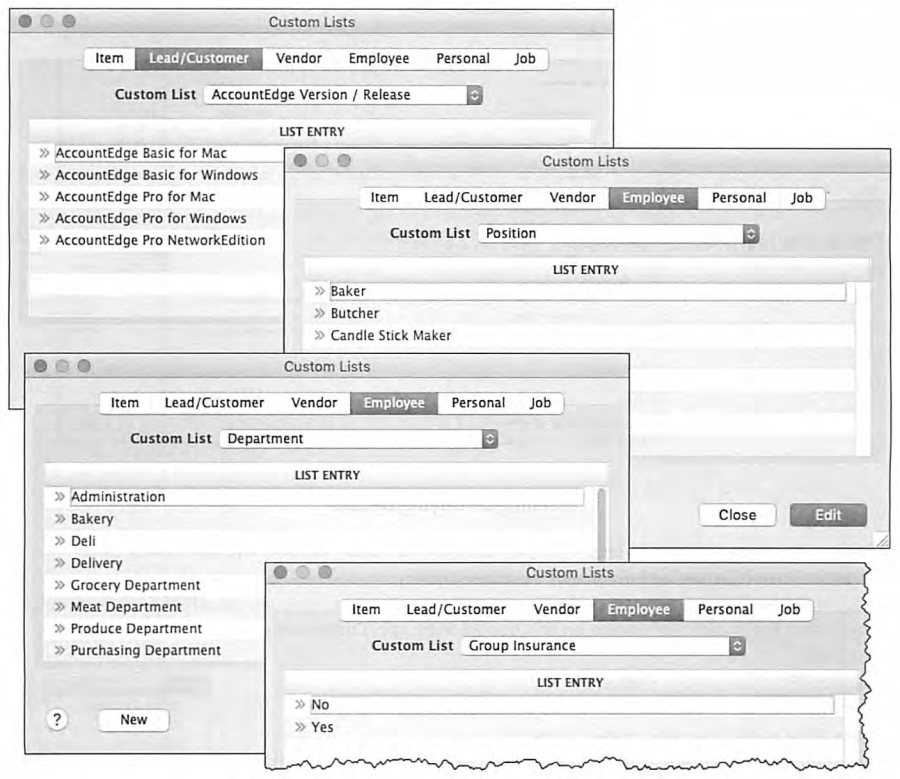
Each card type supports up to three Custom Lists and three Custom Fields, named under Lists > Custom List & Field Names for each card type separately (Customers/Vendors, Employees, Personal, Job, Item). Custom Lists behave like any other "select from" list in AccountEdge -- a defined set of choices, useful for information shared across multiple cards, and usable to filter reports. Custom Fields, by contrast, hold a single free-form piece of information specific to one card (an example given: a WCB Certificate of Good Standing expiry date) and, while they cannot be used to filter reports, can be printed on forms and reports. Once the list categories are named, the actual list entries are populated under Lists > Custom Lists (by category tab), either in advance or on the fly while entering a card.
Selling/Buying Details Tab
Source: p.54-57
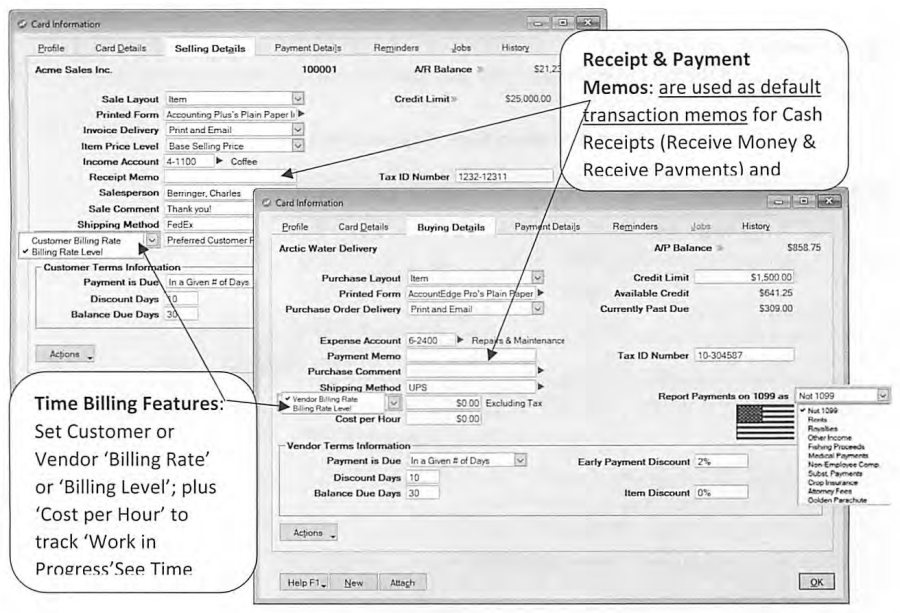
The Selling Details tab (Customers) and Buying Details tab (Vendors) carry the defaults that speed up transaction entry: Sale/Purchase Layout, a card-specific Printed Form (customized invoice or PO), Invoice/PO Delivery method, an Item Price Level for inventory sales (up to six levels, e.g. Retail, Wholesale, Staff), a default Income or Expense Account, a default Receipt/Purchase Memo, a Salesperson link for commission tracking and sales-by-salesperson reporting, default Sale/Purchase Comment and Shipping Method, and Customer/Vendor Billing Rate information used in Time Billing.
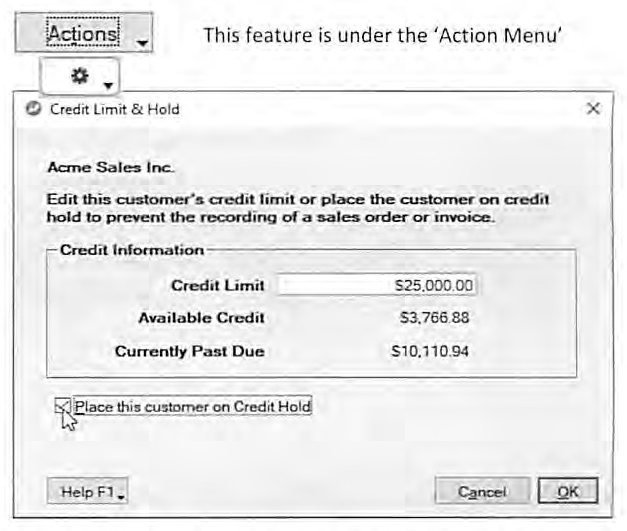
Customer or Vendor Terms Information -- payment due basis, discount days, early payment discount %, late payment monthly charge %, and item discount % -- defaults from the global settings under Setup > Linked Accounts > Sales/Purchases Accounts > Terms, but can be overridden per card. Credit Limit & Hold, reached from the Action Menu, lets you cap a customer's credit and optionally place them on Credit Hold, which blocks all new sales until lifted; a companion Setup > Preferences > Sales choice decides whether an exceeded limit only Warns and Continues or fully Prevents Unless Overridden with a password -- a password that, the guide stresses, "should be provided only to employees with the responsibility and authority to make credit decisions." Vendor credit limits work similarly but are a soft warning rather than a hard block.
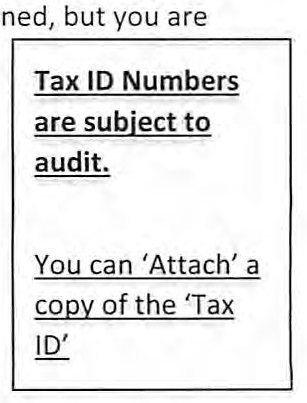
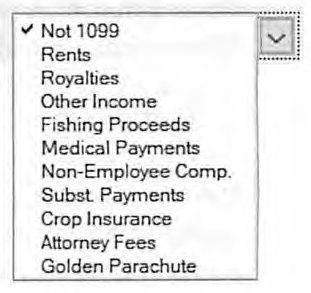
Tax ID Numbers matter on both sides: a Customer's Tax ID documents their reseller status to support sales-tax exemption under audit, and a Vendor's Tax ID may need to be tracked to identify vendors from whom resale purchases were made -- both can have supporting documentation attached directly to the card. The guide reminds readers that Canadian and American sales tax defaults work differently: Canadian tax codes are typically specified line-by-line, with a distinct code available for tax-on-freight, while American tax status is typically set at the transaction level with per-line taxable/non-taxable toggles and a separate default for freight taxability. On the U.S. side, Vendor cards also carry the "Report Payments on 1099 as" designation (Non-Employee Comp., Royalties, Other Income, Fishing Proceeds, Medical Payments, Subst. Payments, Crop Insurance, Attorney Fees, Golden Parachute, and others) -- tracked only from the date that designation is set, and tied to the company file's Current Payroll Year even for businesses not using AccountEdge Payroll at all.
Payment Details Tab & the Reminder (Contact) Log
Source: p.57-60
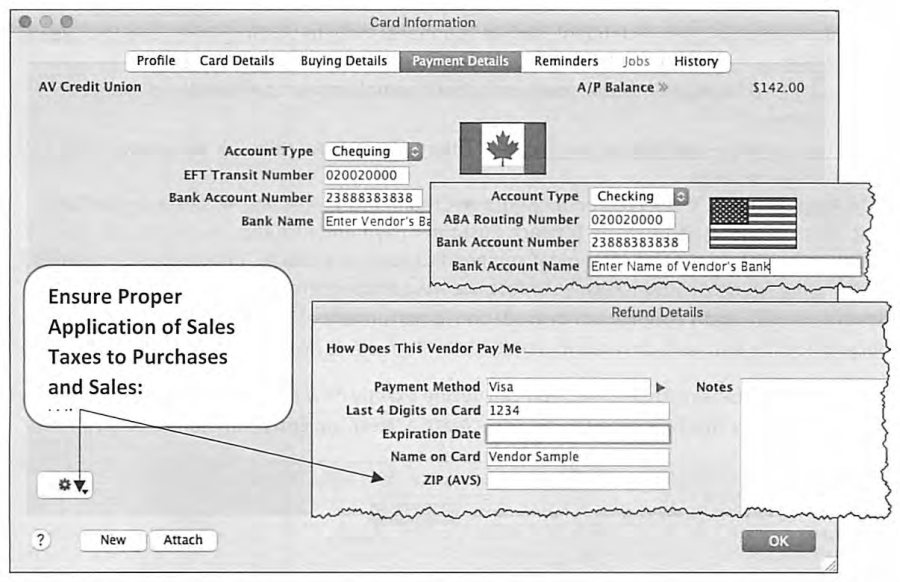
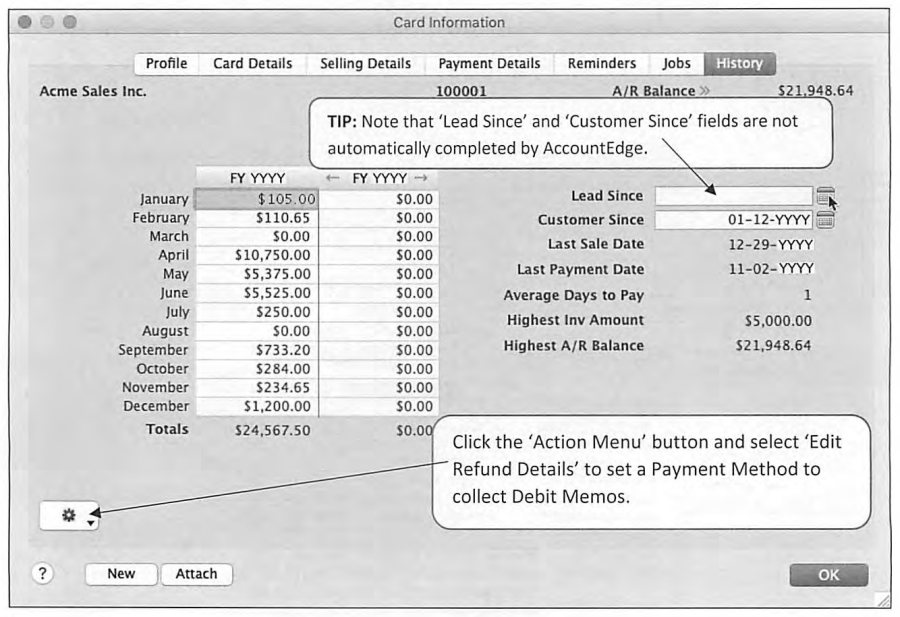
The Payment Details tab (mainly used for Vendors) captures bank account particulars -- Account Type, EFT Transit Number/Routing Number, Bank Account Number and Name -- needed for electronic vendor payments, plus "How Does This Vendor Pay Me" fields for card-based vendor payments. The Action Menu's "Edit Refund Details" lets you set up automated collection of Debit Memos against a vendor.
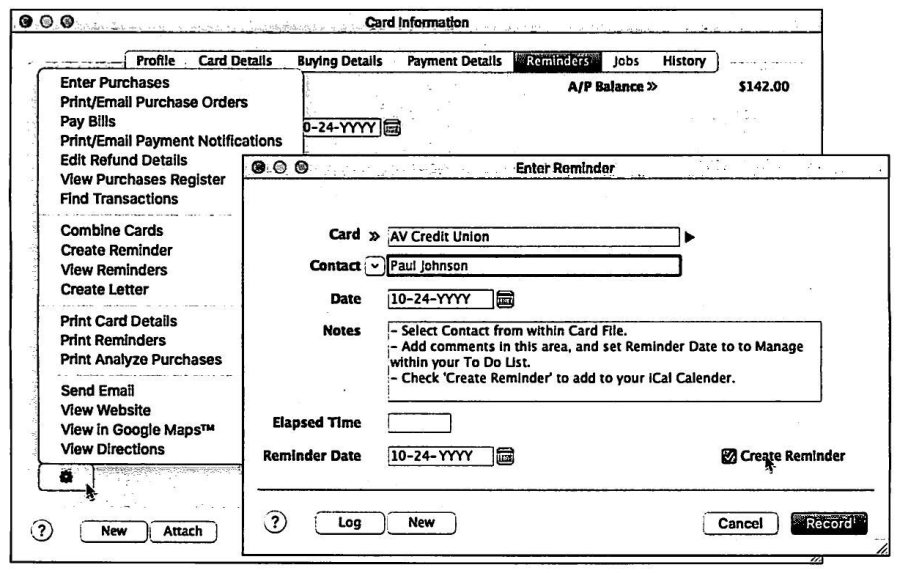
The Reminder (Contact) Log tracks four kinds of information per card: Transactional History (a one-line automatic entry per sale/purchase/payroll/payment, which the guide actively discourages, since it "adds unnecessarily to posting times, and the size of your company file"), Notational History (complaints, commendations, special requests), Communication History with optional Recontact Dates that feed the To Do List, and -- if Credit Card Processing is enabled -- an automatic Credit Card Payments Log with Authorization Code and Trace ID for every customer payment, useful if a charge ever needs to be reversed or disputed. Log entries are never purged automatically, and the guide notes real client files with entries "going back several years," with a "significant degradation in performance" as a result -- the process of managing or purging the log is deferred to Period End Procedures. On the Mac, contact log entries can be published directly to iCal.
Jobs Tab & History Tab
Source: p.59-61
The Jobs tab on a card shows every open or closed job associated with that customer, including reimbursable-expense and percent-complete status, and doubles as the entry point for invoicing reimbursable expenses -- described in more detail on page 39 of the guide. The History tab tracks monthly Sales or Purchase totals for up to five prior years plus This Year and Next Year (useful for entering pre-conversion historical totals during a data migration), alongside Lead Since and Customer Since dates (which the guide notes are not filled in automatically and must be entered manually), Last Sale Date, Last Payment Date, Average Days to Pay, Highest Invoice Amount, and Highest A/R Balance -- a compact snapshot of the entire relationship on one screen.
Inventory Command Center -- Locations & Preferences
Source: p.61-63
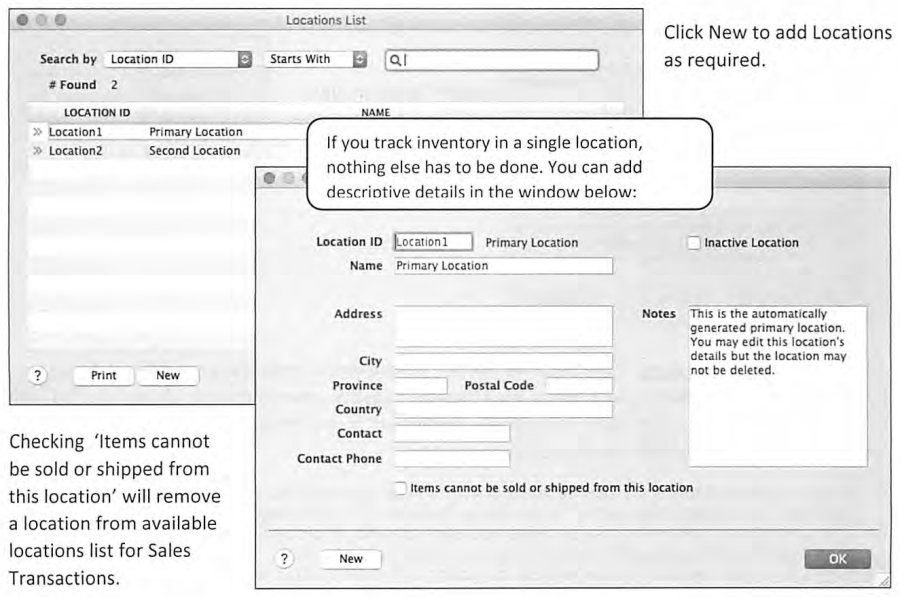
AccountEdge's inventory system supports multiple tracking Locations -- separate warehouses, a main warehouse plus sub-locations (held by sales/service/delivery staff, on consignment, or components in-process at a sub-contractor), and more. If a business tracks inventory in a single location, no setup is needed at all; Locations only need to be created (Lists > Locations) once a second physical location comes into play, at which point Location selections start appearing on item records, purchases, and sales (excluding quotes).
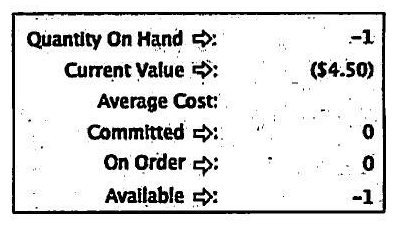
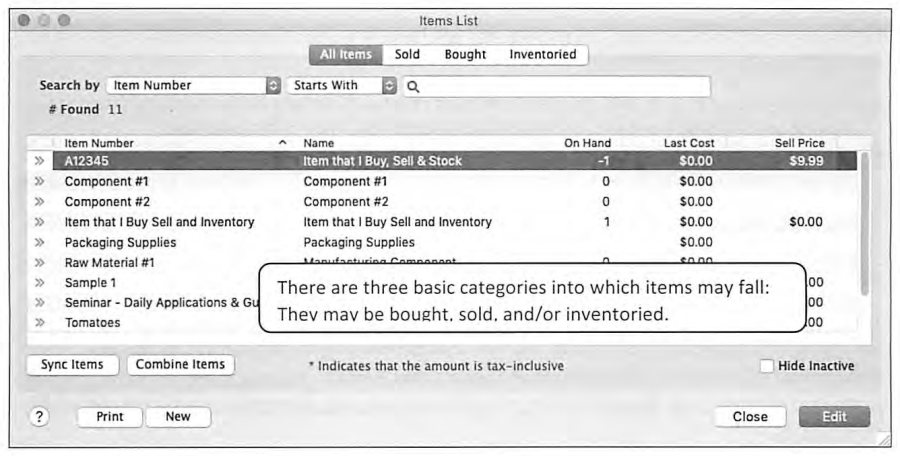
Setup > Preferences > Inventory governs two important behaviors. "Allow the Sale of Items with Insufficient On-Hand Quantities" permits negative on-hand counts (and negative item value) so a sale can be completed despite an inventory discrepancy -- AccountEdge will use Last Cost or Standard Cost if available, prompt for an estimated cost, or default to $0.00, automatically correcting the cost later when the item is actually purchased at its real price. Negative inventory arising from receiving/shipping/count errors self-corrects at the next physical count; negative inventory from location mix-ups is corrected with a Move Items transaction; negative inventory from being behind on posting builds or purchases is corrected simply by catching postings up. "Use Standard Cost as the Default Price on Purchase Orders and Bills" lets Standard Cost -- rather than the historical Last Purchase Price -- drive new purchase orders and the cost of sales for brand-new items with no purchase history yet.
Entering Inventory Items -- the Item Information Screen
Source: p.63-65
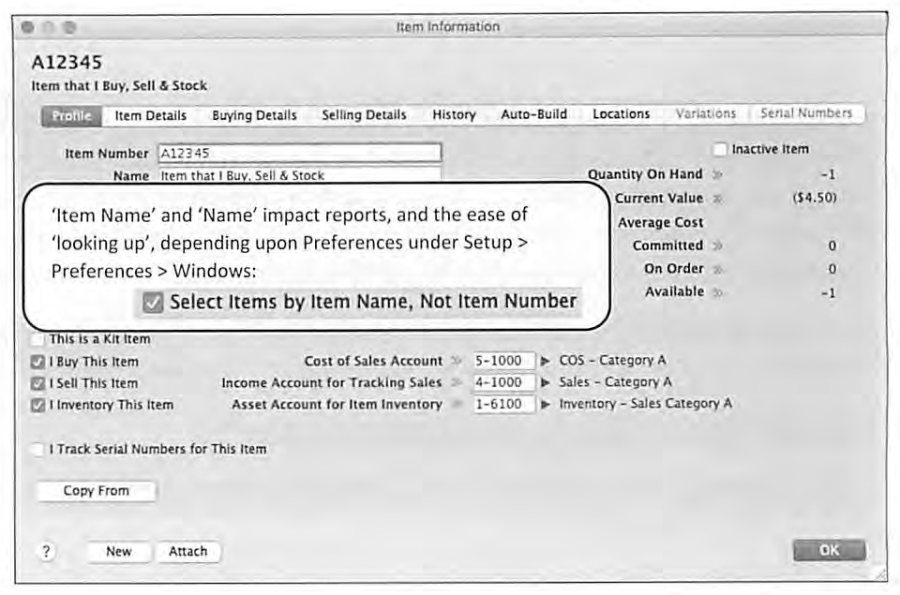
Setting up an item (Inventory > Items List > New) is described as the most complex step in the whole inventory setup, and the guide is emphatic about getting it right the first time: "once you have processed transactions, you may be unable to change the item setup." Every item is some combination of three checkboxes -- I Buy This Item, I Sell This Item, I Inventory This Item -- and each combination changes which accounts and tabs are relevant. A fully-inventoried item that is bought, sold, and stocked links a Cost of Sales account, an Income account for tracking sales, and an Asset account for item inventory; buying increases on-hand count and the asset account by the purchase value, and selling decreases on-hand count, decreases the asset account by average cost, increases the income account by the selling price, and increases cost of sales by average cost -- the classic "perpetual inventory" pattern.
Item Number and Name each accept up to 30 alphanumeric characters and should be chosen to make lookups intuitive -- following a single supplier's numbering, using UPC barcodes, or whatever convention fits internal habits. A useful trick for rarely-repeated special-order items: set them up as "I Buy" and "I Sell" only (skipping inventory tracking), possibly even as a single generic "Special Order Item" whose description gets edited at time of use, then mark it inactive to keep performance up if there are many of these. Existing item data in Excel, text, or Word format can be imported rather than keyed by hand.
Kit Items & Serial Numbers
Source: p.66-68
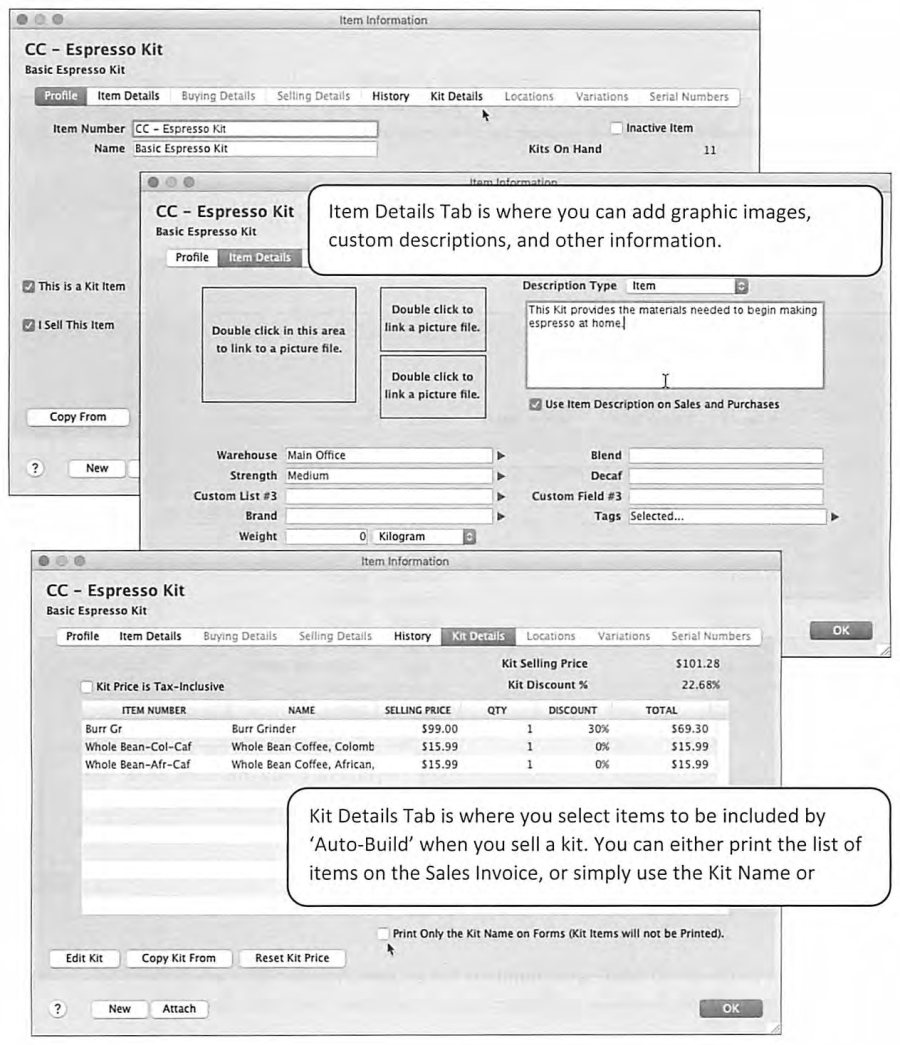
A Kit Item bundles several inventoried items into one thing that gets sold together -- the kit itself is never inventoried or purchased, only sold. Checking "This is a Kit Item" reveals a Kit Details tab where you select the component items, quantities, and a Kit Selling Price (with an automatically-computed Kit Discount % versus buying the pieces separately). The invoice can either print every component line, or "Print Only the Kit Name on Forms" to keep the customer's invoice simple.
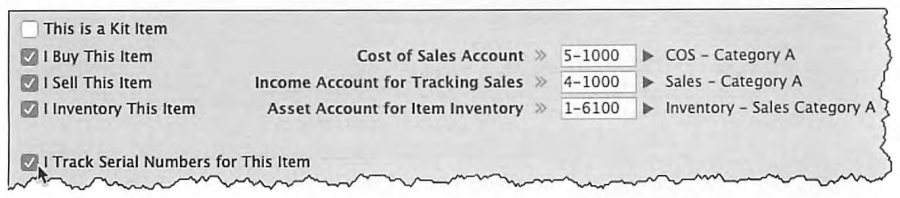
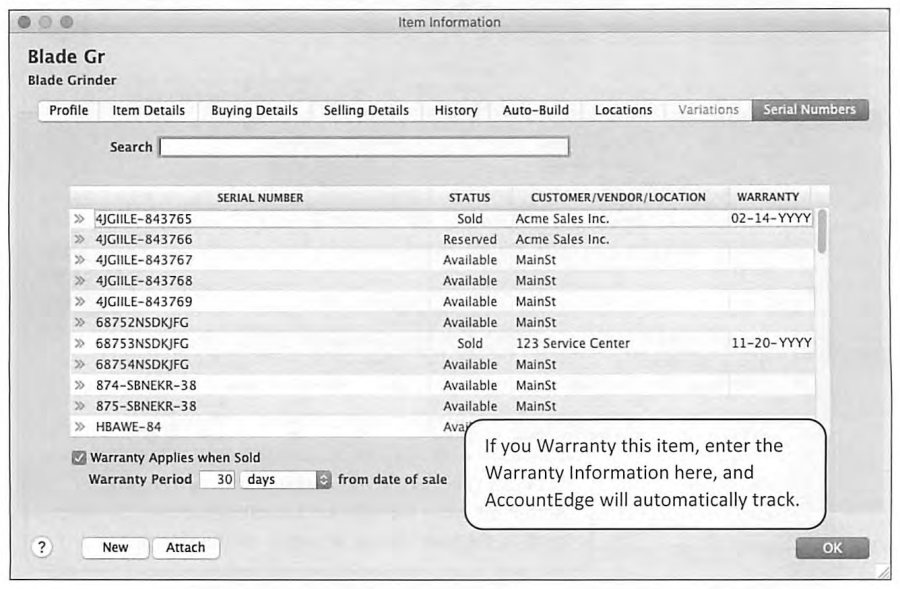
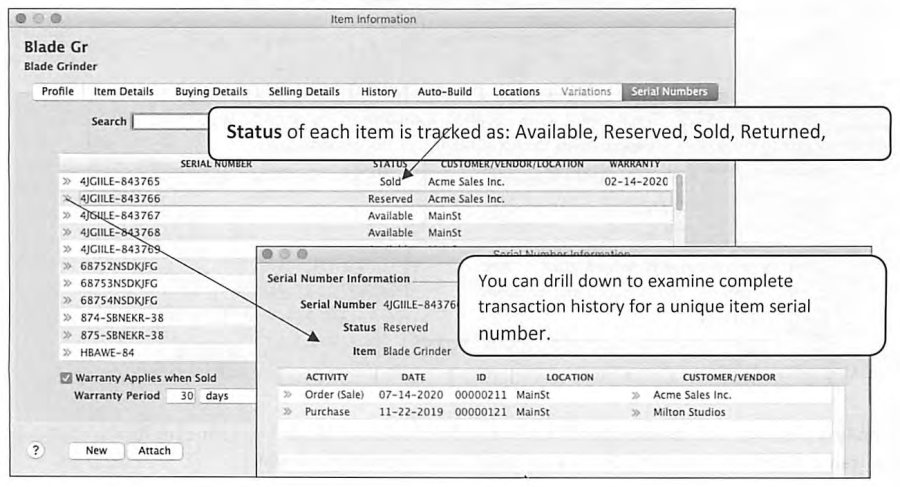
Checking "I Track Serial Numbers for This Item" activates a Serial Numbers tab where every unit's individual serial number, Status (Available, Reserved, Sold, Returned), and associated Customer/Vendor/Location can be reviewed, along with optional Warranty tracking (a warranty period in days, dated from sale). Once serial tracking is on for an item, AccountEdge displays a small distinguishing icon beside that item wherever it's listed -- in Sales, Purchases, or Item Lists -- as a visual reminder that a serial number selection will be required.
Item Details, Pictures & Custom Lists (Inventory)
Source: p.67-70
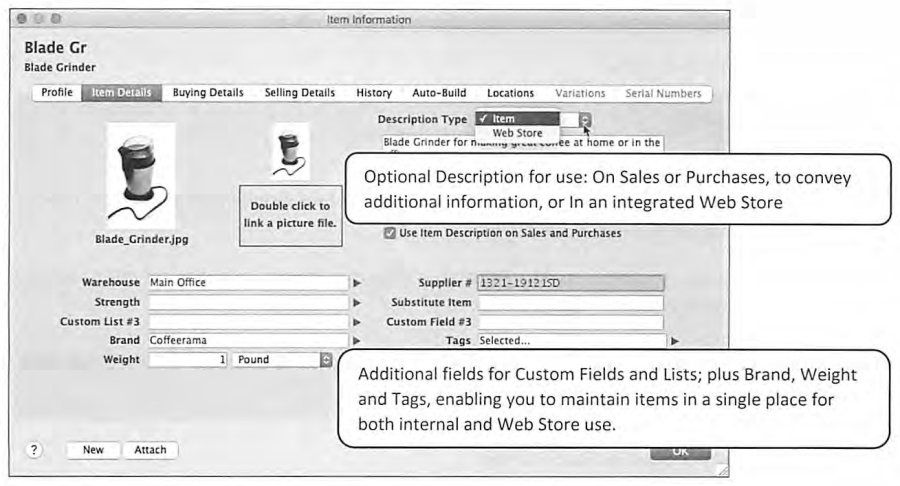
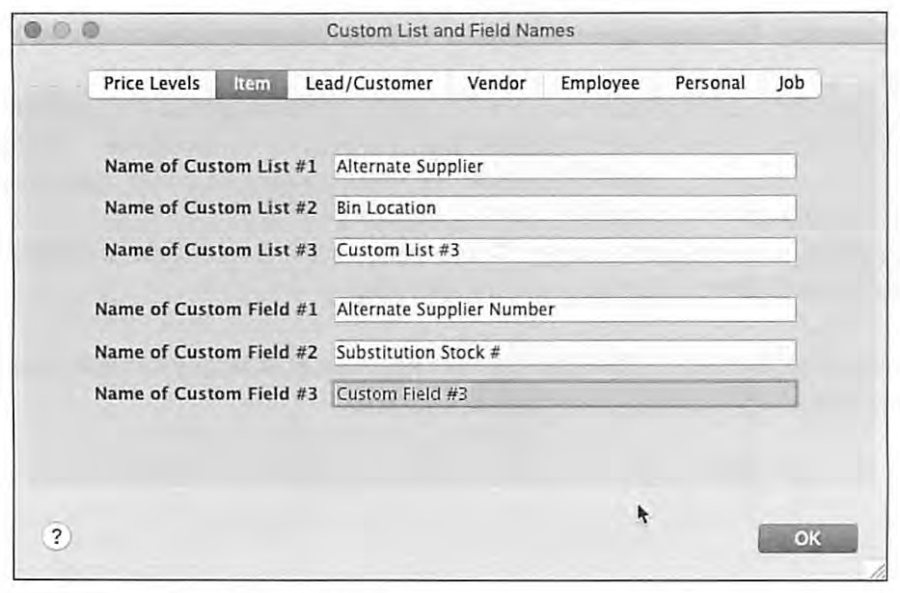
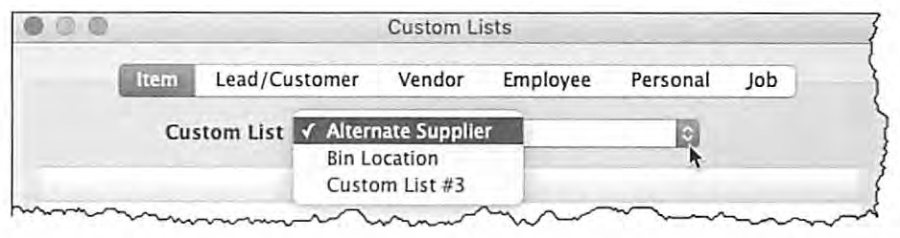
The Item Details tab holds a longer optional Description (which can print on forms, or feed a Web Store listing), a linked picture, and up to three item-level Custom Lists and Custom Fields, plus Brand, Weight, and Tags fields aimed specifically at businesses syncing to a Web Store. Item pictures help staff identify stock and support catalogues or online listings; the guide's practical advice is to use descriptive file names (often the item number or name itself), match resolution to purpose (higher for print catalogues, more compact for web use), and know that AccountEdge stores linked images in a "Graphics" folder created alongside the company file. Custom Lists at the item level typically track attributes shared across several items -- alternate supplier, warehouse/bin location, colour, "re-pack" categories -- while Custom Fields typically hold something item-specific, like an alternate item number, alternate supplier stock number, or a per-item serial number where only one exists. Both can be renamed under Lists > Custom List & Field Names > Items, and both can appear on customized forms and reports.
Buying & Selling Details Tabs (Inventory)
Source: p.70-73
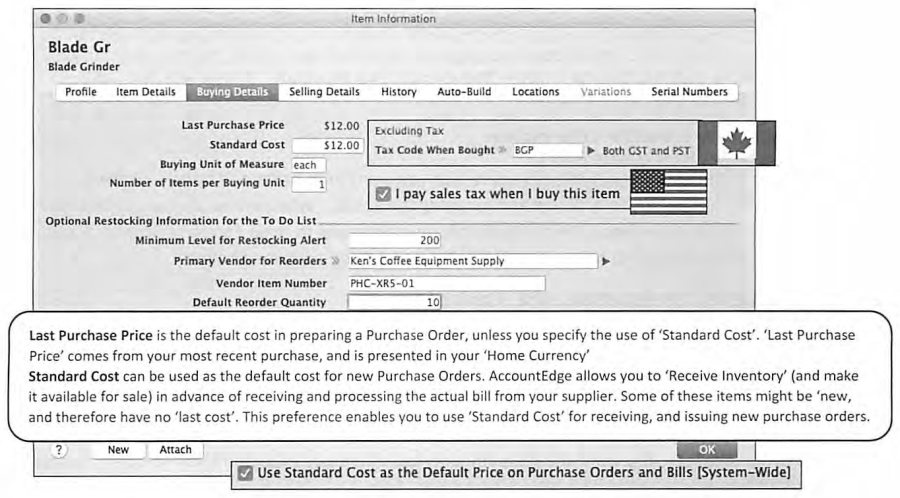
The Buying Details tab carries Last Purchase Price (auto-updated from the most recent purchase, in your home currency) and Standard Cost, either of which can drive new Purchase Order defaults; Buying Unit of Measure and Number of Items per Buying Unit (for example, buying by the case but selling "each"); tax status when bought (a required setting for every taxable item in the US, with a somewhat more nuanced set of exceptions in Canada around reseller status and tax-inclusive provincial pricing); and Optional Restocking Information -- a Minimum Level for Restocking Alert that drives the To Do List's Stock Alert tab, a Primary Vendor for Reorders with that vendor's own item number, and a Default Reorder Quantity balanced against expected sales volume and shipping/brokerage cost efficiency.
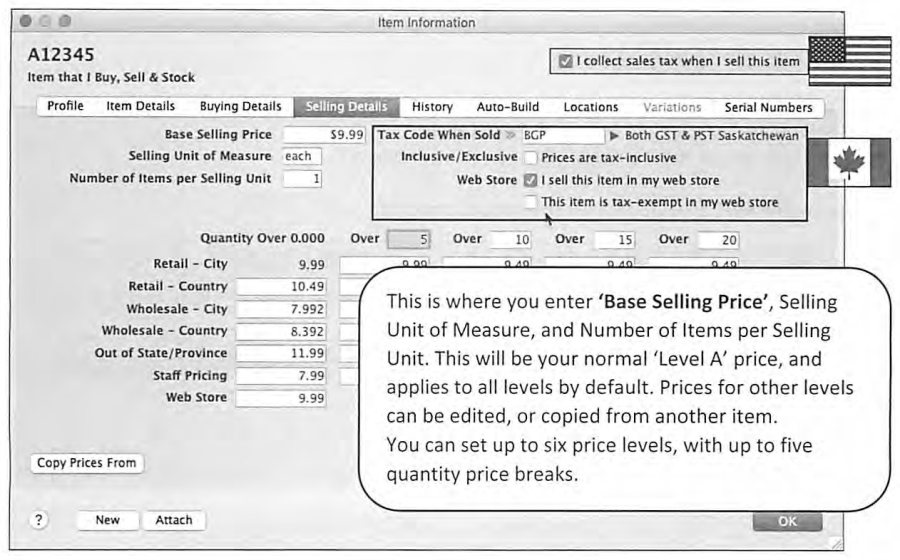
The Selling Details tab carries Base Selling Price, Selling Unit of Measure, tax status when sold (the mirror image of the buying-side rules, including whether prices are tax-inclusive), Web Store sale eligibility and web tax-exempt status, and up to six Price Levels (commonly things like Retail-City, Retail-Country, Wholesale-City, Wholesale-Country, Out-of-State, Staff, Web Store) each supporting up to five quantity-based price breaks. Price Level names are customized under Lists > Custom Lists & Field Names > Price Levels. The guide specifically warns against using Price Levels for customer-specific pricing -- Recurring Quotes or Volume Discounts fit that purpose better (which requires leaving "Delete Quotes upon Converting and Recording as an Order or Invoice" unchecked under Setup > Preferences > Sales if recurring quotes are the chosen approach).
History, Auto-Build, Locations, Variations & Serial Numbers Tabs
Source: p.72-74
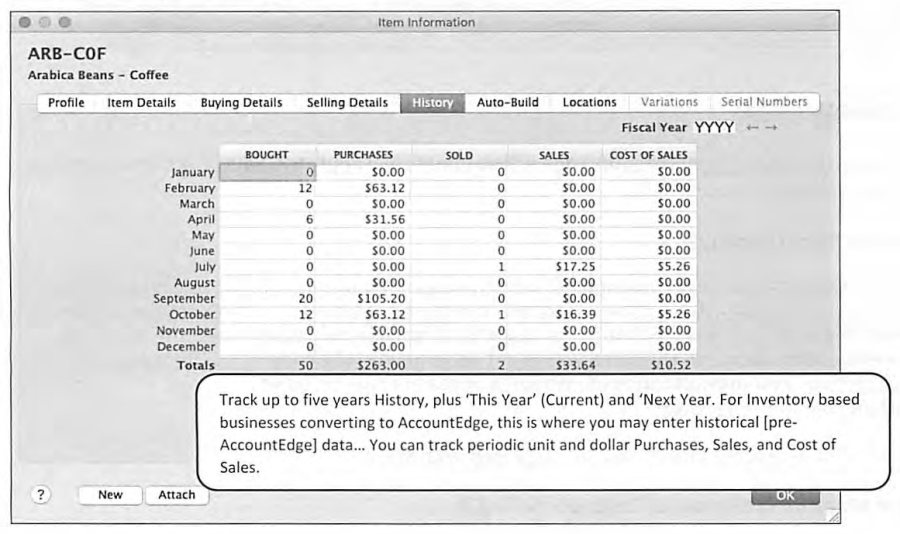
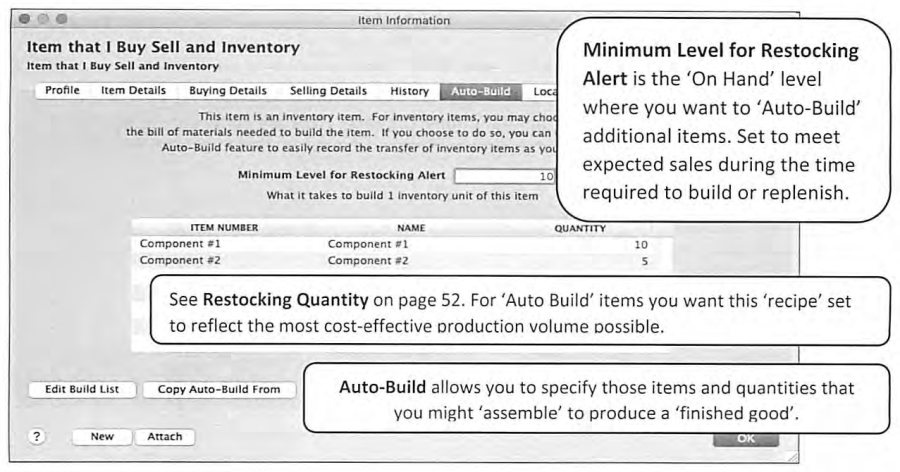
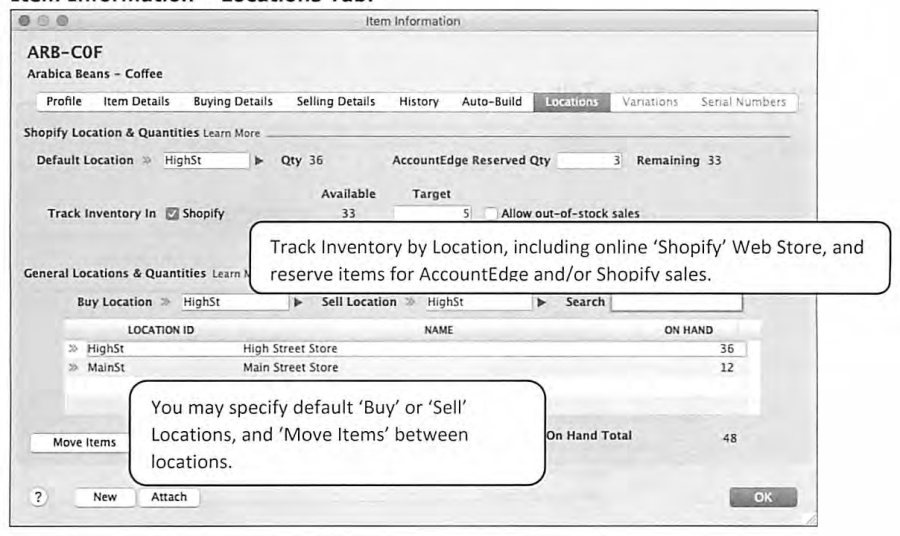
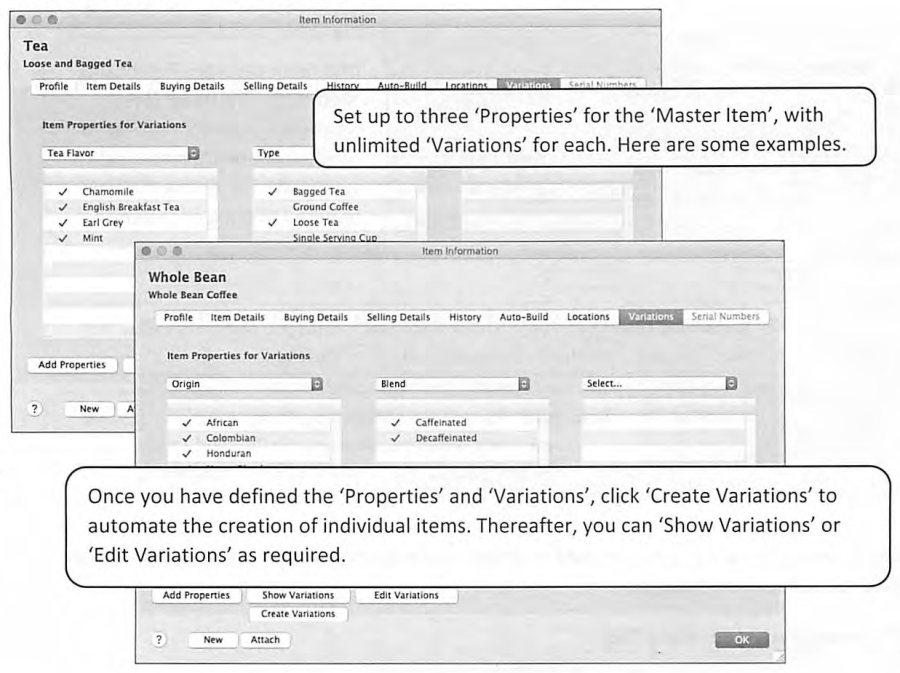
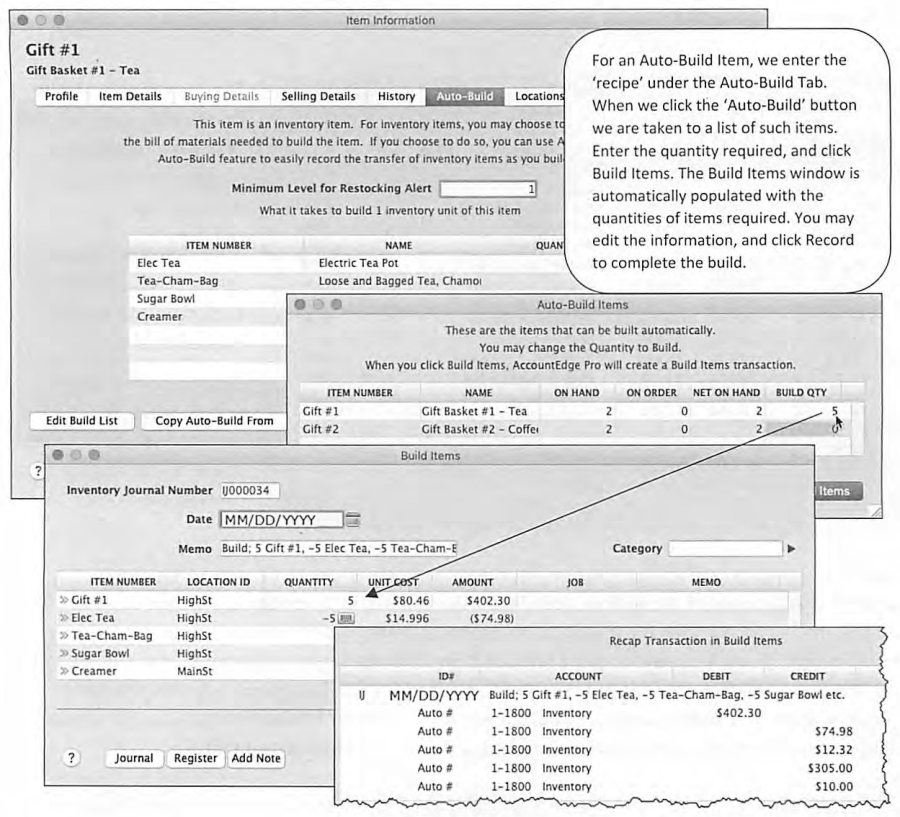
The History tab tracks up to five years of monthly Bought/Purchases and Sold/Sales/Cost of Sales figures, plus This Year and Next Year -- useful both for entering pre-conversion historical data during a migration and, ongoing, for spotting seasonal buying patterns and avoiding tying up cash in inventory prematurely. Auto-Build defines the "recipe" of component items and quantities needed to build one unit of a finished item, tied to its own Minimum Level for Restocking Alert set to the most cost-effective production batch size. Locations shows on-hand quantity by location with the ability to Move Items between locations, and -- where a Web Store like Shopify is integrated -- lets a specific quantity be reserved for AccountEdge versus reserved for the online store, with a target "Remaining" buffer and an option to allow out-of-stock web sales. Variations supports up to three "Properties" per master item (for example, Origin and Blend for a coffee item, or Flavor and Format for tea), with unlimited Variation combinations auto-generated as individual sellable items once "Create Variations" is clicked. Serial Numbers (for items with serial tracking on) lets you drill into a specific serial number's complete transaction history -- purchase, sale, location, customer/vendor -- from one screen.
'Don't Inventory' & Other Item Configurations
Source: p.75-78
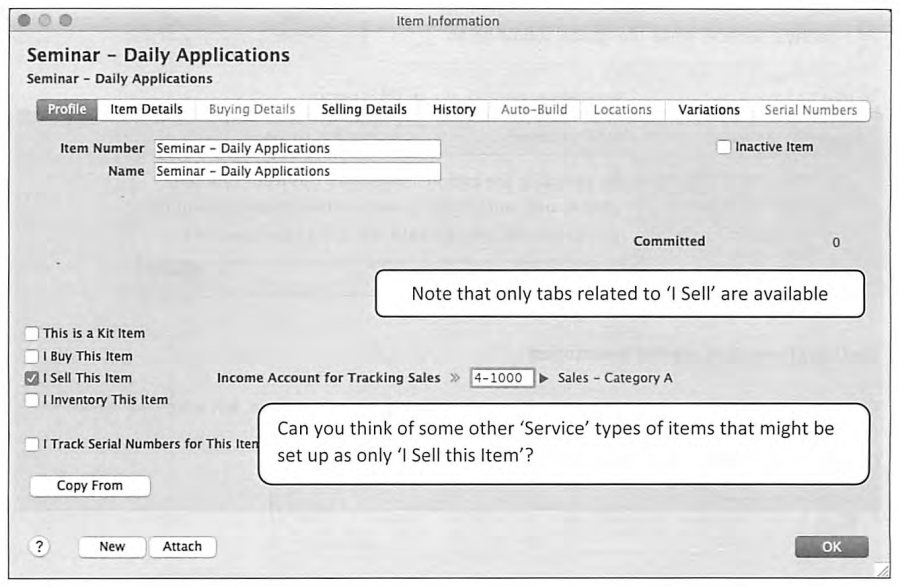
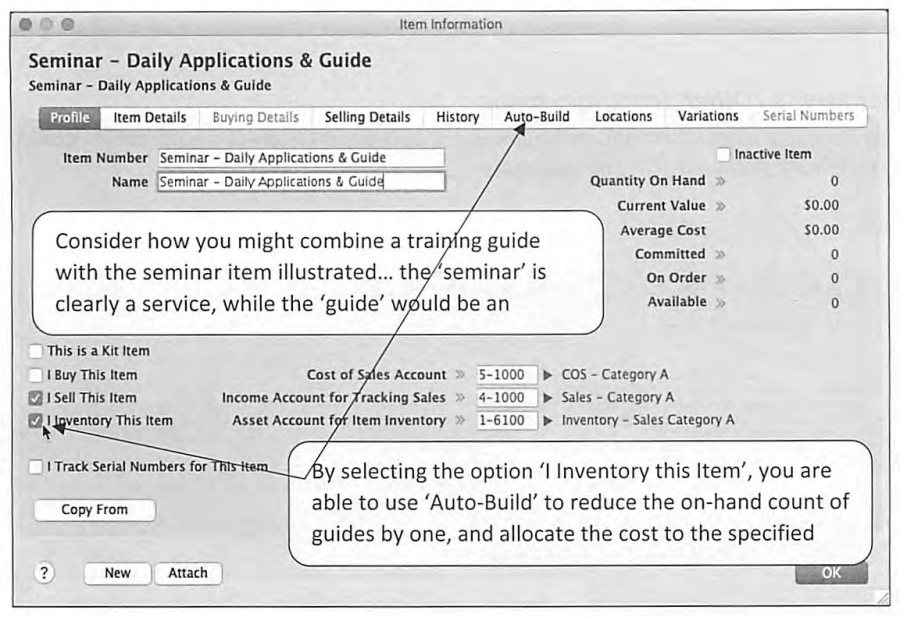
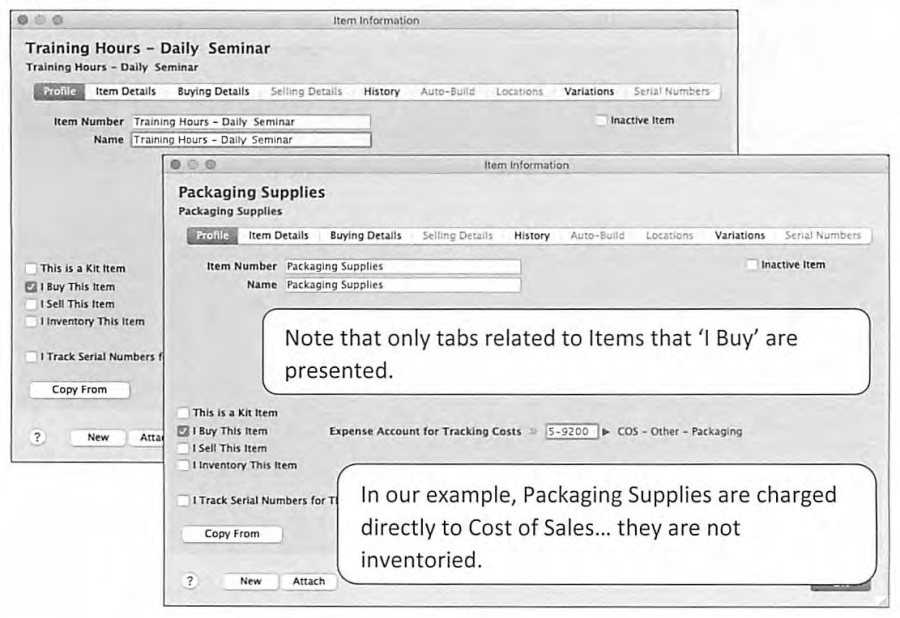
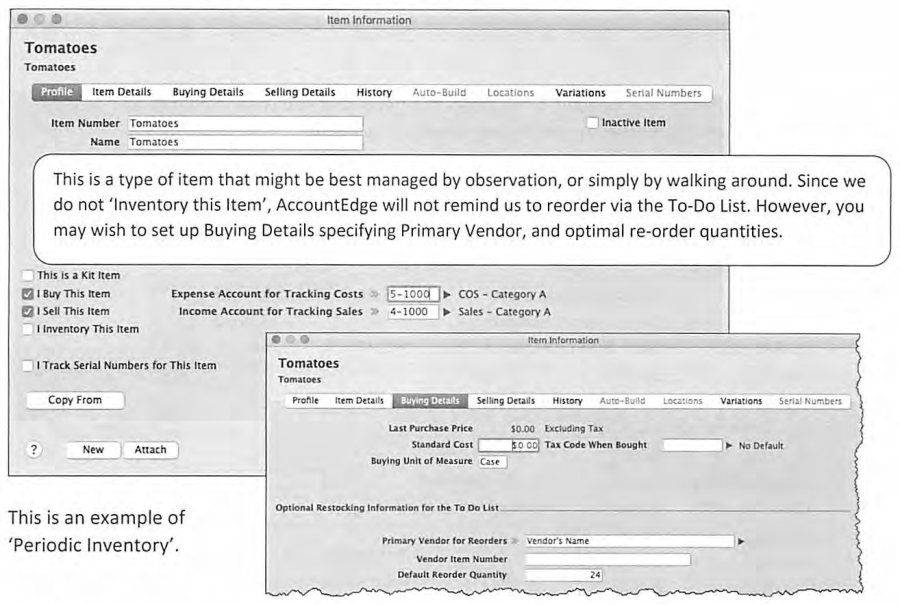
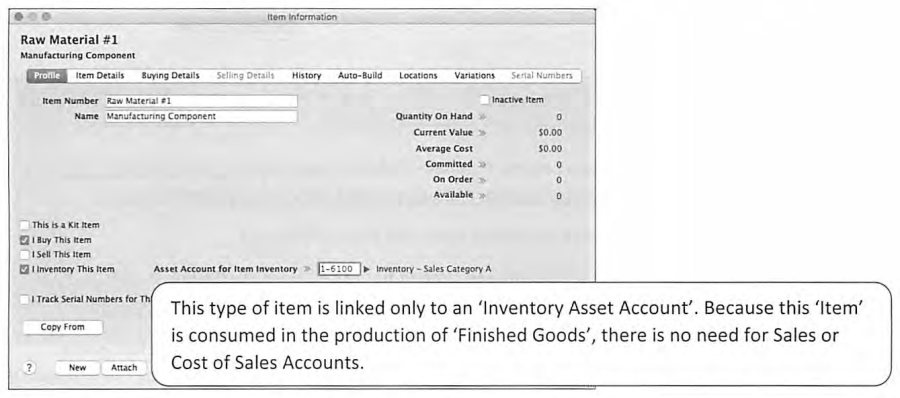
Not every "item" record represents physical stock. The guide walks through five configurations beyond the standard buy/sell/inventory pattern: pure Service Items (I Sell only -- a seminar, for instance) have only the tabs relevant to selling available; Service Items that are inventoried but not purchased (I Sell + I Inventory, no I Buy) let Auto-Build reduce an on-hand count and allocate cost without ever generating a purchase transaction -- useful for something like a training guide bundled with a seminar; Purchase Items that are not inventoried (I Buy only) suit things tracked purely as an expense, like packaging supplies charged straight to Cost of Sales; items Bought & Sold but Not Inventoried (I Buy + I Sell, no I Inventory) fit goods better managed "by observation, or simply by walking around" -- produce is the example given, representing "periodic," rather than perpetual, inventory, where AccountEdge won't prompt a reorder via the To Do List since there's no on-hand count to fall below a minimum; and Purchase Items that are Bought and Inventoried but Not Sold (I Buy + I Inventory, no I Sell) link only to an Inventory Asset account, appropriate for raw materials or manufacturing components consumed entirely into finished goods, with no need for Sales or Cost of Sales accounts at all. The guide's closing note here is a caution against over-engineering: "Only adopt procedures where the benefits clearly outweigh the efforts and discipline required."
Set Item Prices & the Items Register
Source: p.78-80
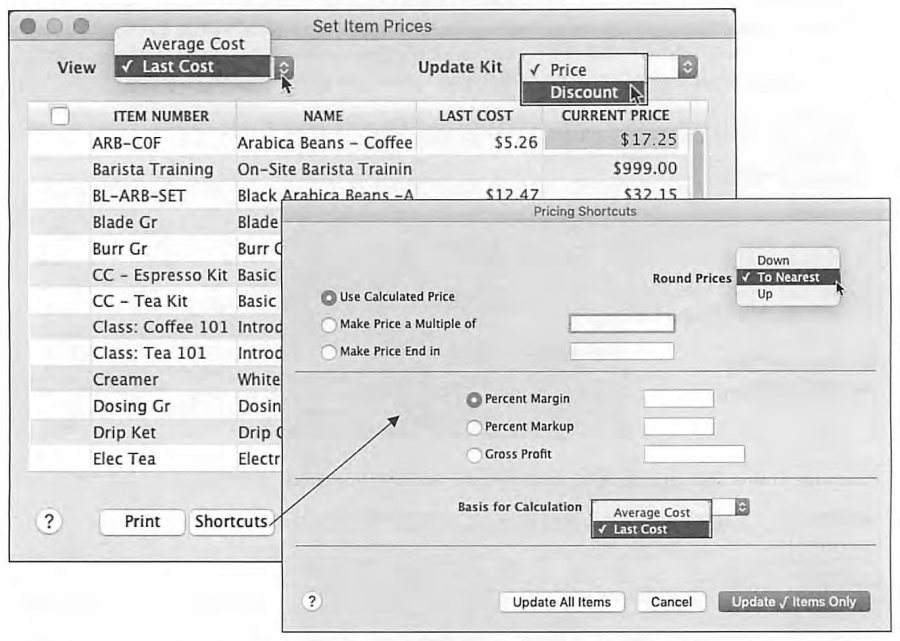
Set Item Prices lists every sellable item with its Last Cost and Current Price, editable directly or in bulk via "Shortcuts" -- Round Prices (up, or to a calculated multiple/ending digit) and pricing formulas based on Percent Margin, Percent Markup, or Gross Profit, calculated from either Average Cost or Last Cost as the basis. Kit pricing updates by editing either the Kit Price or the Kit Discount %, and a Web Store price can be set separately under Selling Details -- required if the item syncs to a Shopify store. Item prices can also be adjusted on the fly from within a Purchase Order by zooming into an item whose cost has changed.
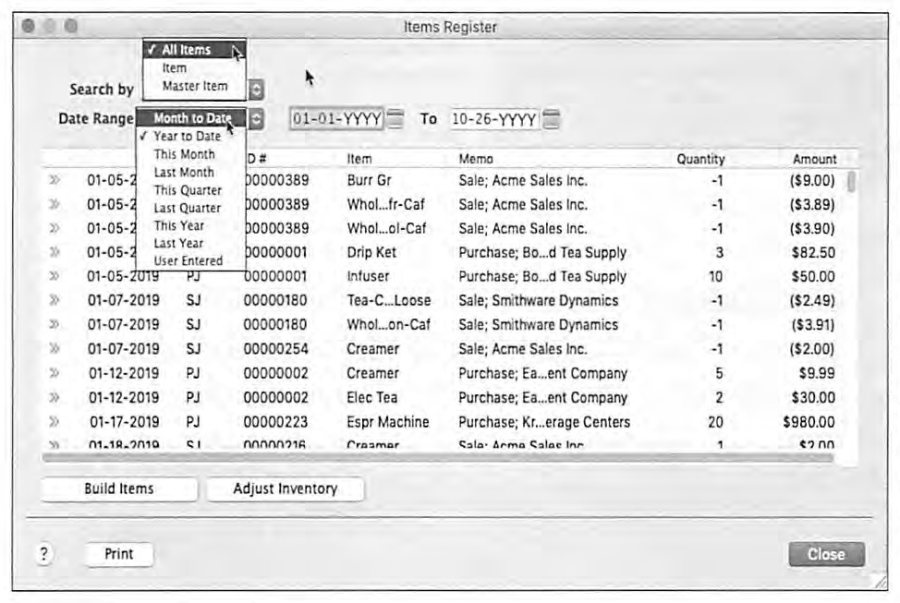
The Items Register is described as a differentiator versus far more expensive competing programs: it lets you review every transaction type touching a specific item -- not just purchases and sales, but adjustments, transfers, and count transactions -- and reconcile inventory valuation against the Balance Sheet at any prior point in time, all filtered to a date range and a single item, with a zoom arrow back to each original transaction.
Build Items & Auto-Build Items
Source: p.79-81
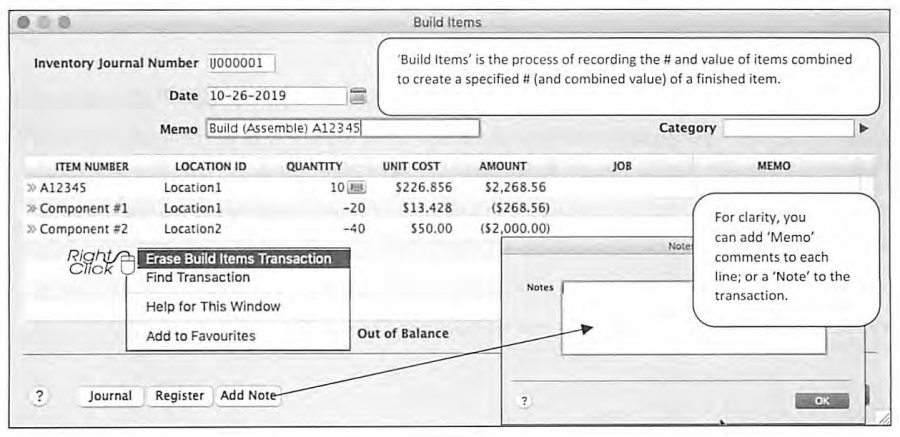
Build Items records the one-time consumption of component inventory to produce a finished item -- useful for a woodworking business building a special-order piece of furniture that won't be built the same way again. Where the same finished item is built repeatedly from the same component "recipe" often enough to be worth automating, Auto-Build Items (set up once under an item's Auto-Build tab) saves the recipe permanently: clicking the Auto-Build button, entering the quantity to build, and clicking Build Items auto-populates the Build Items transaction with the correct component quantities, ready to edit and record. Auto-Building can also trigger automatically at the moment of a sale if on-hand quantity is insufficient to cover it, offering to Build, Buy, or Backorder the shortfall right then.
Adjust Inventory & Count Inventory
Source: p.81-84
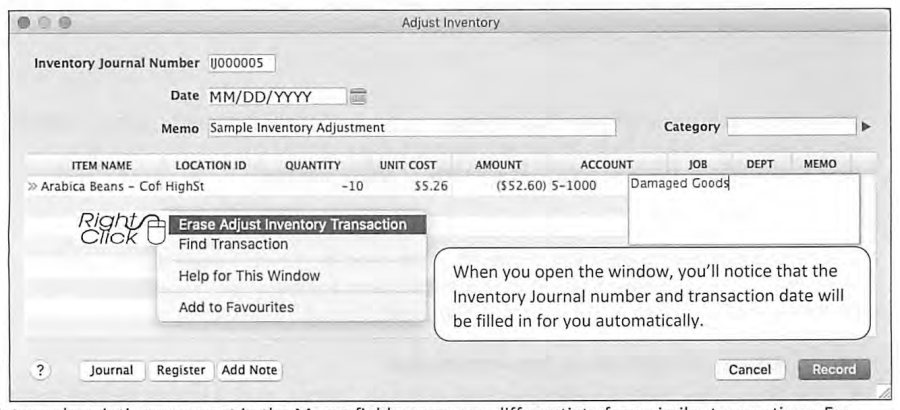
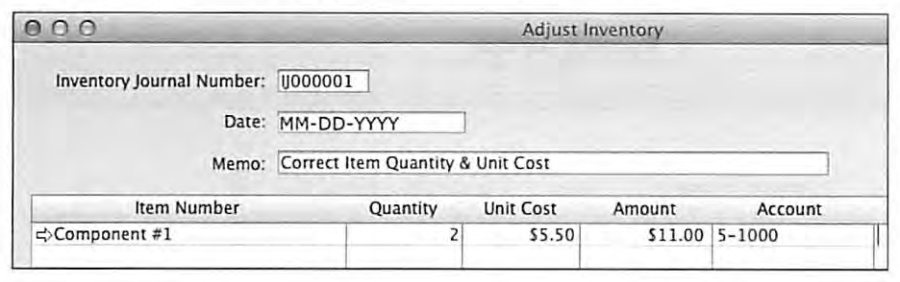
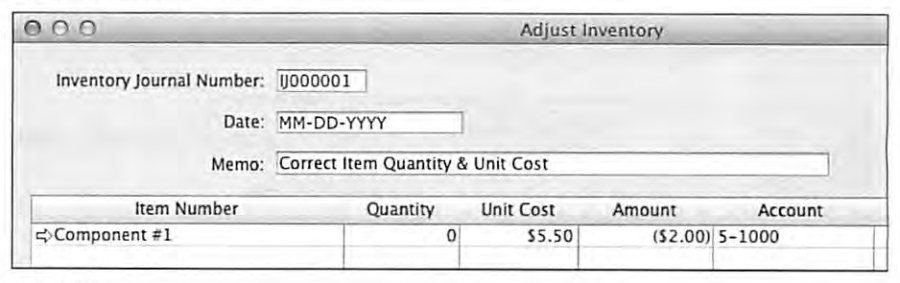
The guide frames inventory adjustments as something "most businesses probably don't need... very often" if items are set up properly and purchases/sales are posted accurately and promptly -- but walks through five distinct scenarios and which tool fits each: a typical adjustment for unexplained loss or theft (quantity is lower than records, value should follow); recording sales made without an item invoice (quantity is lower, post to the linked Cost of Sales account); recording purchases made without an item purchase order (quantity is higher, post to the same expense account used when the check was written); adjusting quantity and unit cost together when the actual quantity differs but the total dollar value is meant to stay the same; and adjusting total value and unit cost together when the quantity is correct but the dollar value or per-unit cost is wrong. Where many items are off at once, Count Inventory is the right tool rather than adjusting items one at a time -- that full physical-count reconciliation process is documented in the Period End Procedures guide.
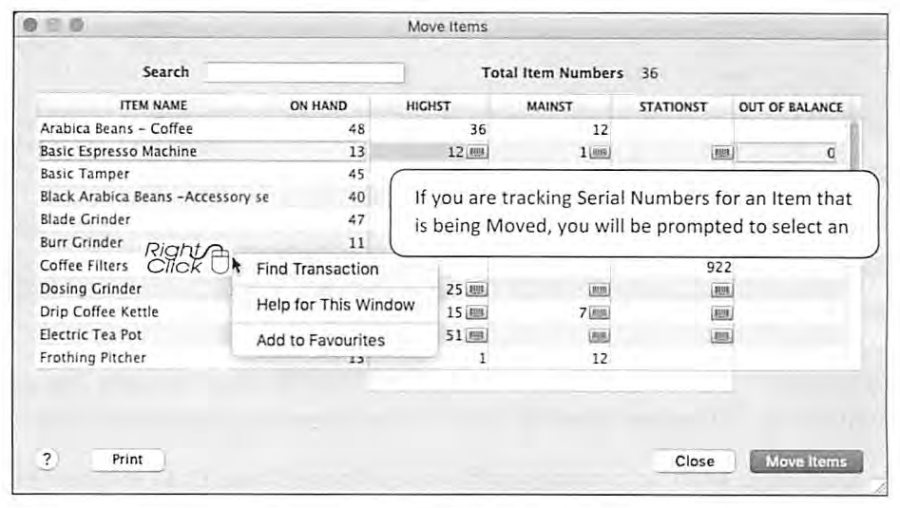
The Adjust Inventory transaction window auto-fills the Inventory Journal number and date; the guide's specific caution is to enter only the adjustment amount in the Quantity column (the change, not the new total) -- for example, entering -25 if records show 125 but the true count is 100, not entering "100." Move Items, which appears once two or more Locations exist, records and documents inventory moving between locations, with an on-screen prompt to select a specific serial number if the item being moved is serial-tracked. Inventory Adjustments (along with Inventory Accounts, Opening Stock, and Auto-Builds) can be imported/exported in bulk; full field definitions are in the AccountEdge Help Files.
Analyze Inventory & Inventory Reports
Source: p.85-86
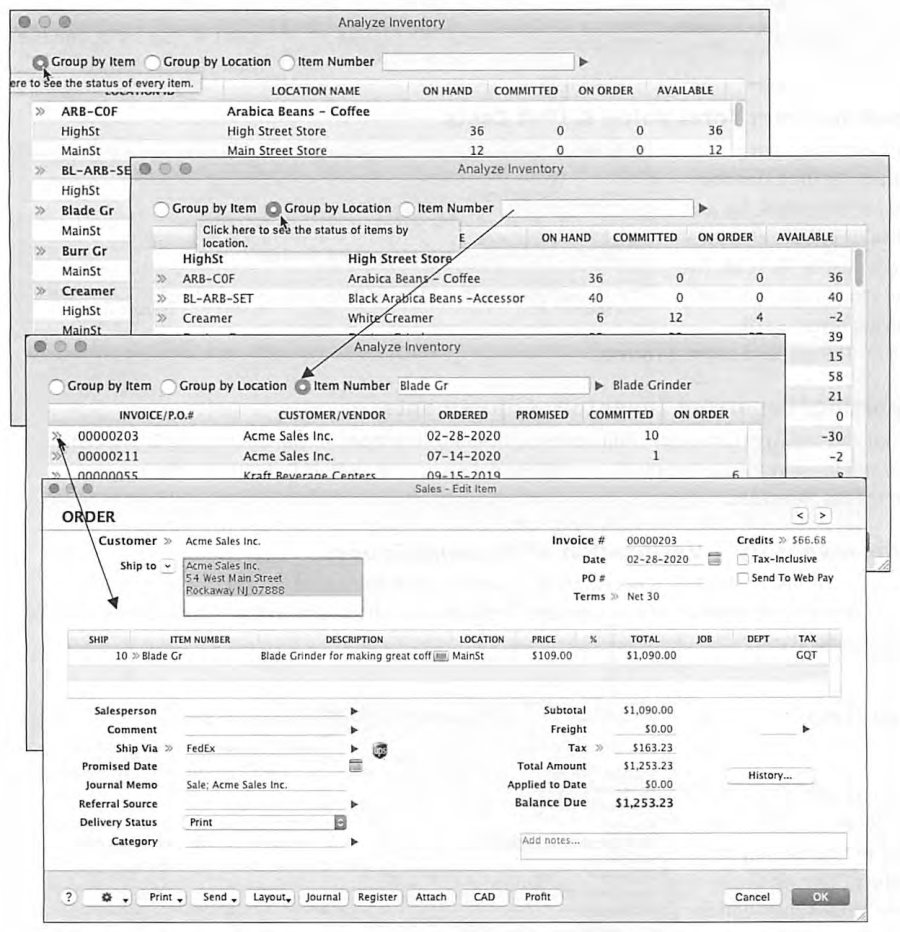
Analyze Inventory presents on-hand, committed, on-order, and available quantities grouped by Item or by Location, with a zoom arrow drilling from a specific item straight into the sales orders or purchase orders driving its committed/on-order figures -- a direct link the guide calls out as giving "quick access to the status of all inventoried items... and a direct link to pending sales and purchases." The Inventory Reports index (Reports > Inventory) covers Items List Summary/Detail, Items Register Summary/Detail, Item Transactions, Inventory Value Reconciliation, Analyze Inventory Summary/Detail, Auto-Build, Kit Details, Inventory Count Sheet, Sales History, Assigned Tags, a Pricing family (Summary, Detail, Analysis), Transaction Journals, a Locations family (Locations List, Items Location Summary, Item Movement Report), and a Serial Numbers family (Serial Number Transactions, Active Warranties) -- with related inventory reporting also worth checking under the Accounts, Sales, and Purchases report tabs.
Spend Money & Payment Notification Delivery
Source: p.88-91
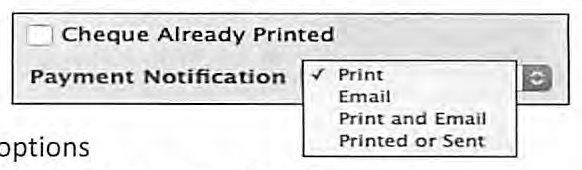
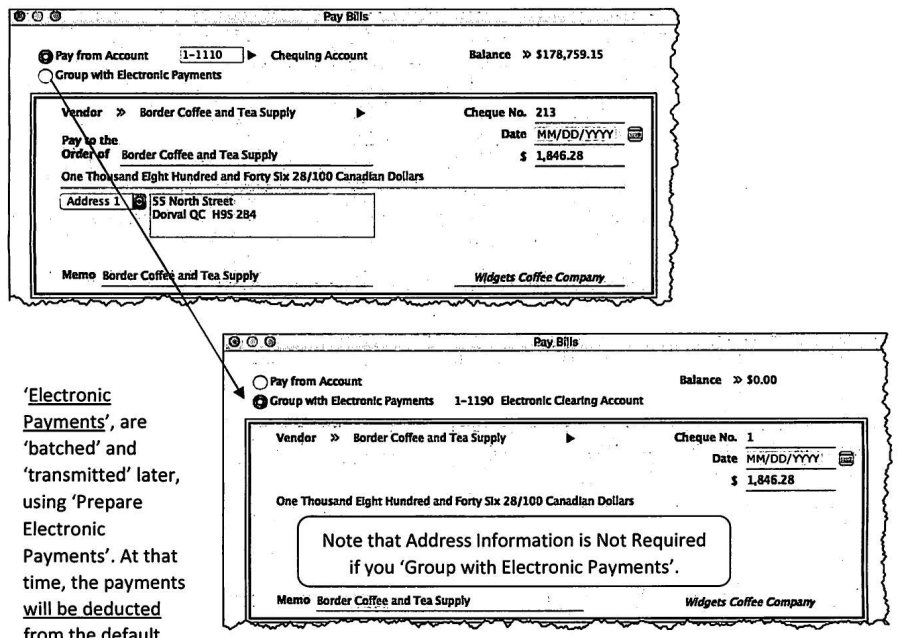
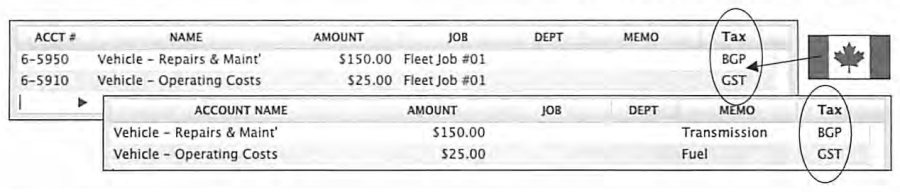
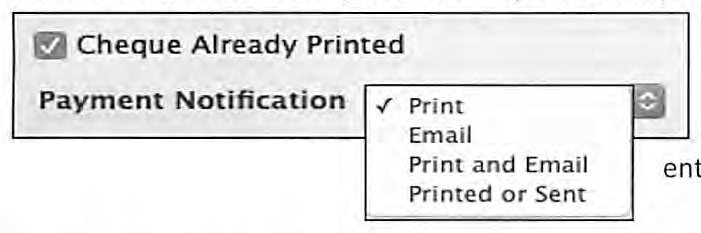
Spend Money pays from a chosen detail bank or credit card account and can optionally "Group with Electronic Payments" to queue the payment for later batch transmission. The Canadian edition supports Tax-Inclusive Spend Money transactions (relevant because GST/HST/QST can be refundable to the business, and some prices are quoted tax-inclusive) -- a $105 tax-inclusive gas purchase with $5.00 GST, for instance, allocates $100 to expense and $5 to GST/HST receivable automatically; the US edition does not handle sales tax inside Spend Money at all. Payment Notification Delivery Status defaults to "To Be Printed" but covers the full range a real payment might take: a manual check (Already Printed / To Be Printed), an electronic payment (To Be Printed, To Be Emailed, or both), or a mailed check -- and whichever is chosen becomes the card-specific default going forward.
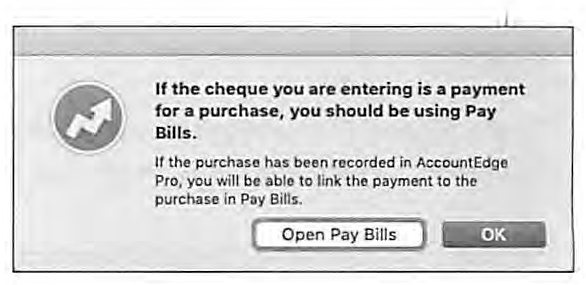
The guide is explicit about when Spend Money is the wrong tool: it should not be used where US sales taxes need to be tracked, where the US payee will require a 1099, or where the payment is settling a Bill already entered in Purchases -- in that last case, AccountEdge itself offers to redirect you to Pay Bills instead. Other Spend Money mechanics worth knowing: the "Select From" button lists only Detail Bank/Credit Card accounts; check numbers accept up to 8 alphanumeric characters, with the guide suggesting prefixes like "DR" for debit-card transactions or noting a handwritten check explicitly to help future bank reconciliation; Card records supply up to five printable addresses, but Spend Money transactions don't have to be linked to a card at all for a one-off payee; and Allocation Memo Comments (available on Journal Entries, Spend Money, and Receive Money alike) document individual lines for future review.
Prepare Electronic Payments & Print Checks
Source: p.91-93
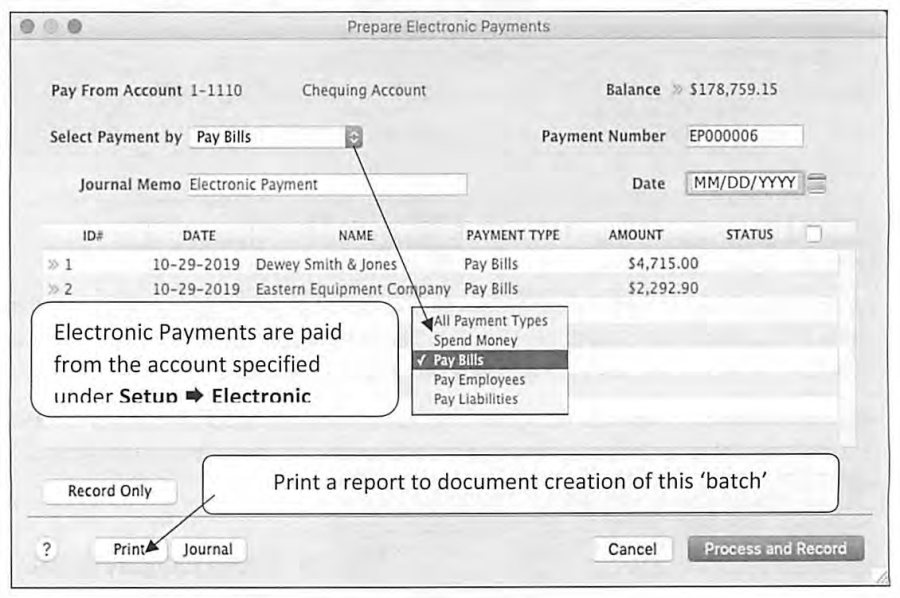
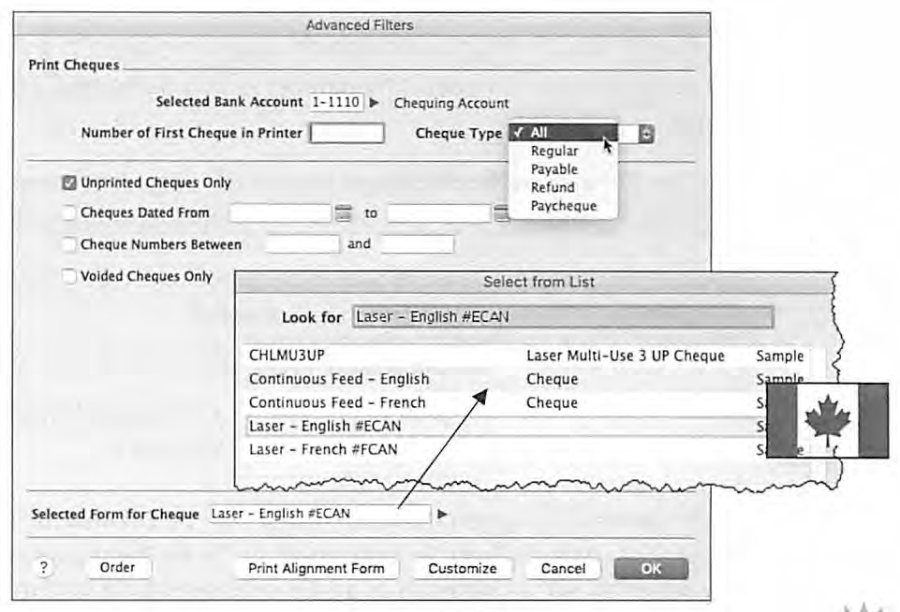
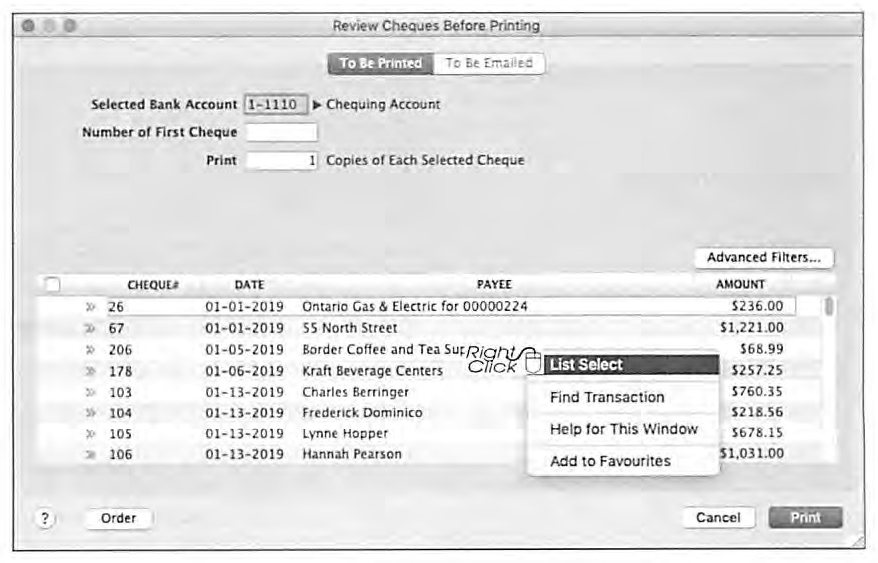
Prepare Electronic Payments requires AccountEdge Direct Deposit and Vendor Payments to be enabled (Setup > Electronic Payments) and exists specifically to maintain a full audit trail -- Authorization Codes, Transaction IDs -- while letting payments be batched for transmission on a schedule that doesn't have to match the day they were recorded (payroll direct deposits prepared mid-week but transmitted Friday is the example given). Print Checks offers Advanced Filters for selecting the bank account, check type, unprinted-only checks, a date range, or a check-number range, plus a Form selector supporting AccountEdge's built-in layouts or fully customized ones -- Canadian checks specifically comply with Canadian Payments Association formatting and can optionally spell the dollar amount in French. "Number of First Check in Printer" re-syncs the check numbering after a jam or a skipped/missing check. A Review Checks Before Printing screen lets you set copies per check and deselect specific checks from the run, with a zoom arrow back to any original transaction.
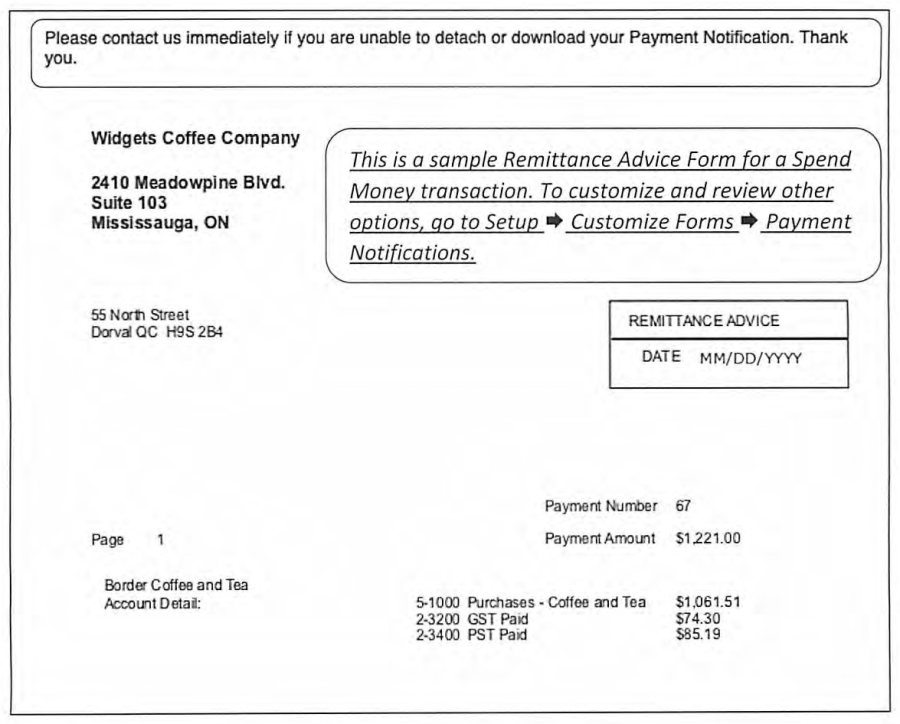
Print/Email Payment Notifications
Source: p.93-94
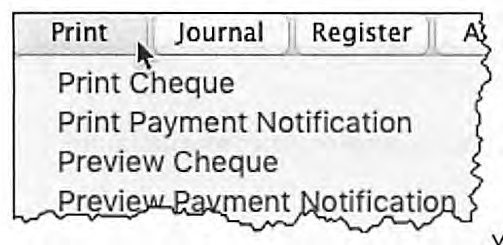
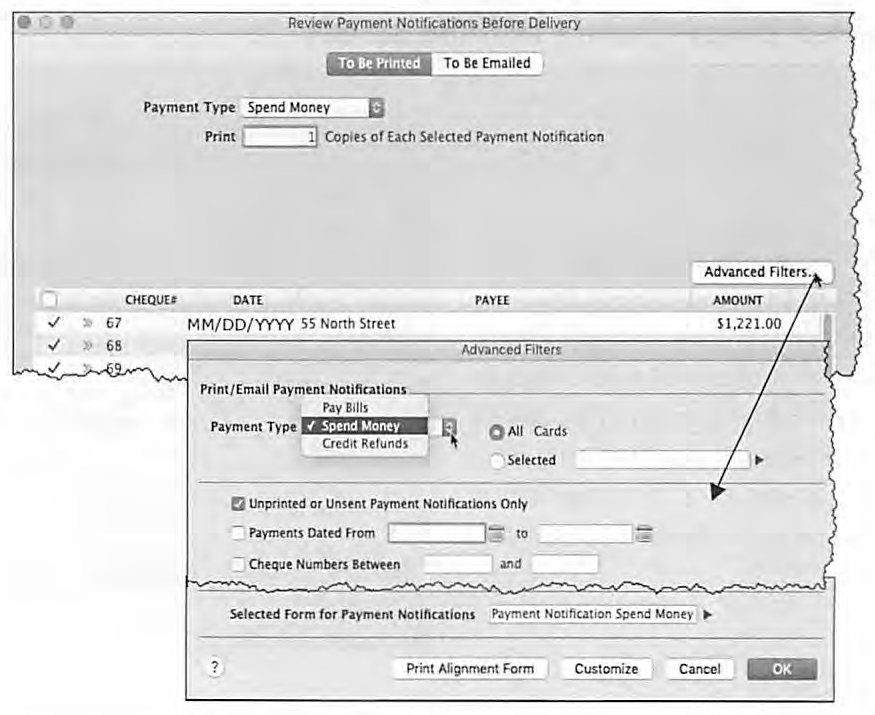
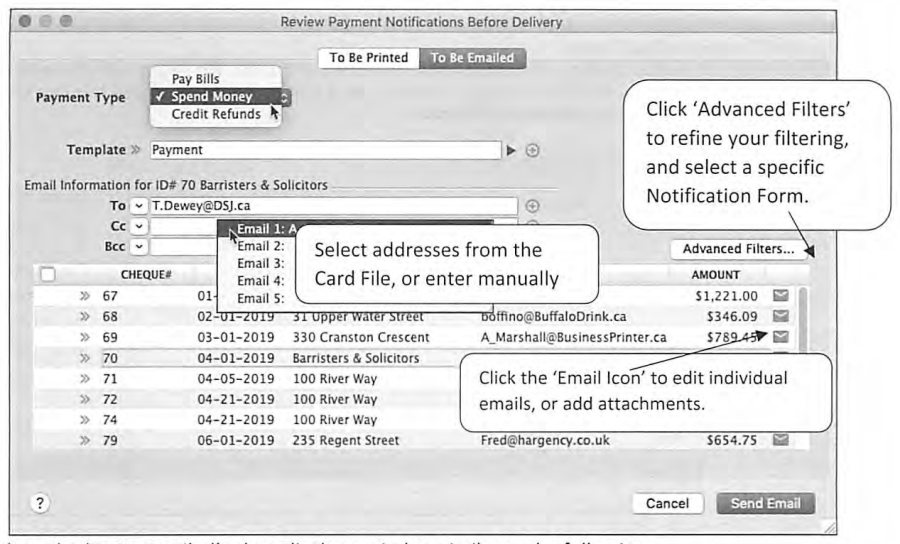
Print/Email Payment Notifications solves the classic problem of a check stub too small to itemize every bill being paid at once -- especially relevant for electronic payments, which have no physical stub at all. It supports multiple pages of stub detail and a full Print/Email/both choice, with the same Delivery Status options as Spend Money. Notifications can be handled in batch: based on each transaction's delivery-status setting, notifications queue up and are processed together from Print/Email Payment Notifications, with separate "To Be Printed" and "To Be Emailed" review tabs, each supporting Advanced Filters and, for email, per-recipient subject/message editing and manual or card-derived email addresses.
Receive Money
Source: p.95-96
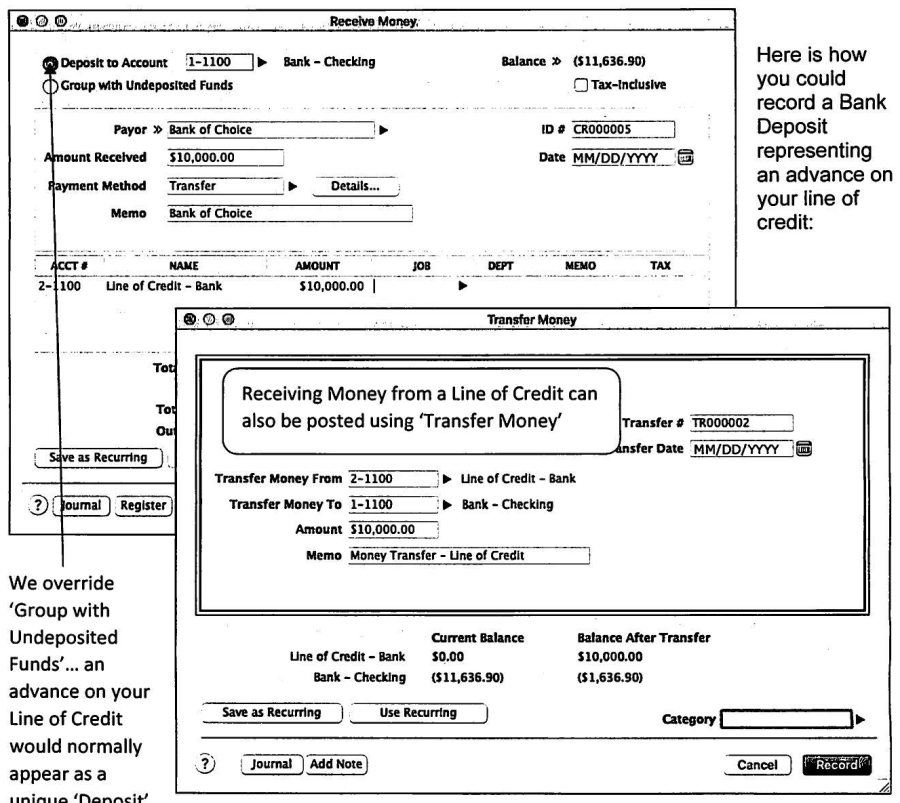
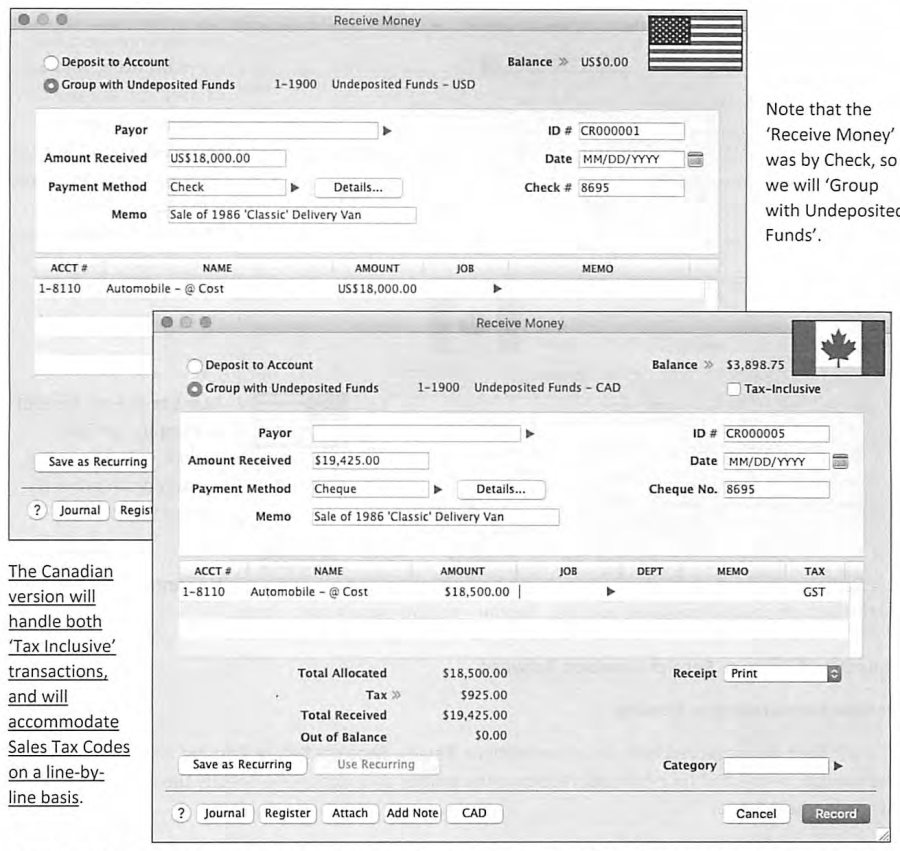
Receive Money deposits into any detail bank or credit-card account, in any enabled currency, and can "Group with Undeposited Funds" so that multiple receipts get consolidated into a single bank deposit later -- the guide notes foreign-currency receipts should not be grouped with home-currency Undeposited Funds, and recommends a separate Undeposited Funds account per foreign currency instead. Each receipt records a Payor and Payment Method. Worked examples cover receiving an advance on a line of credit (which can alternately be posted through Transfer Money) and receiving proceeds from the sale of a capital asset (crediting the asset's "at cost" account directly). The guide prompts readers to think through other Receive Money scenarios specific to their business -- a shareholder's advance, a partner's investment, a sales tax refund, loan proceeds -- since the mechanics are identical regardless of source.
Print Receipts
Source: p.97-98
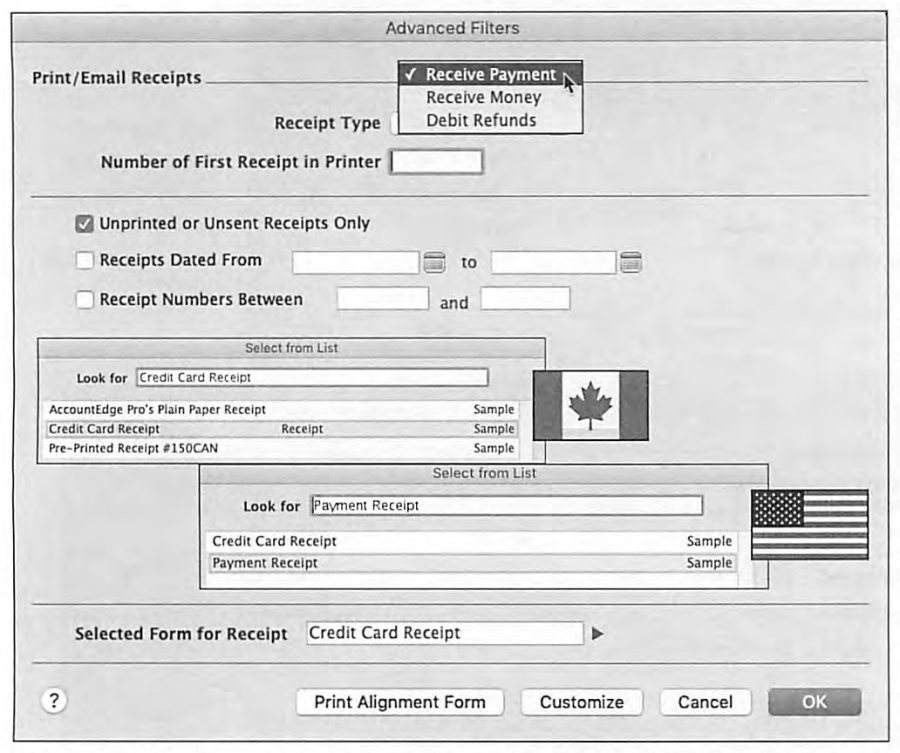
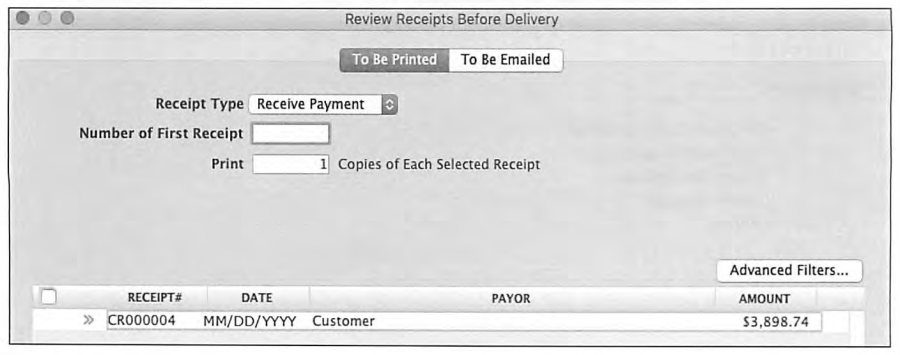
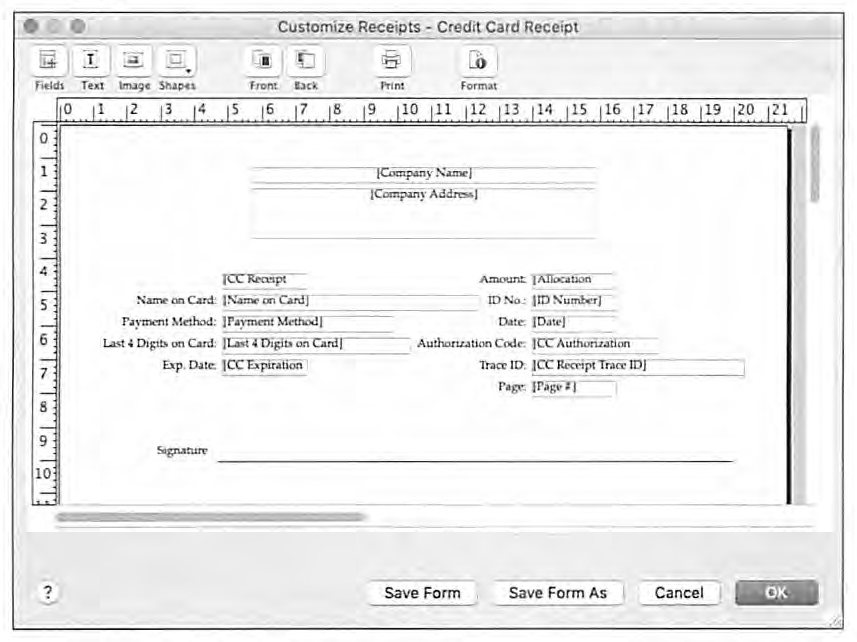
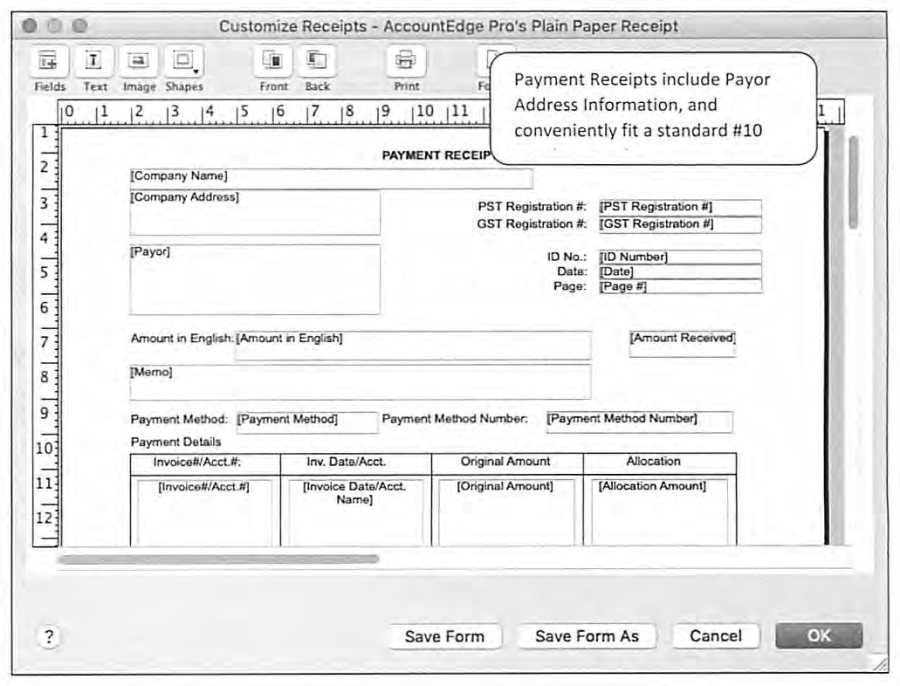
Print Receipts doesn't require Credit Card Processing to use, and works the same way as Print Checks -- Advanced Filters for receipt type, unprinted-only, date range or receipt-number range, and form selection, followed by a Review Receipts Before Printing screen. Two purpose-built receipt layouts are shown: a Credit Card Receipt, which adds Credit Card particulars, Authorization Code, Transaction ID, and a signature line for the customer (relevant because AccountEdge's Credit Card Processing doesn't require a separate in-house terminal, so this receipt substitutes for one), and a Payment Receipt, which adds full allocation detail across multiple invoices for customers who routinely pay several invoices with one payment.
Prepare Bank Deposit
Source: p.99-101
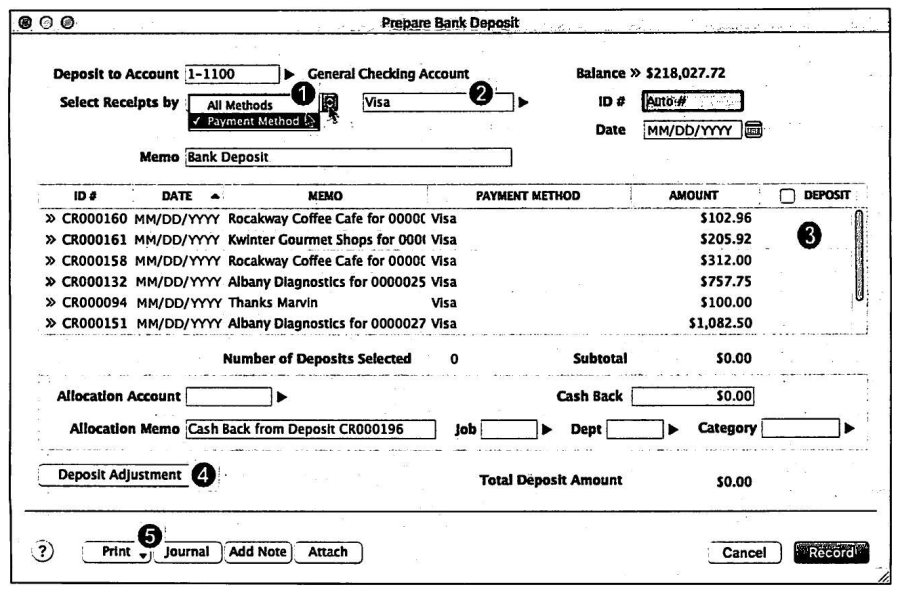
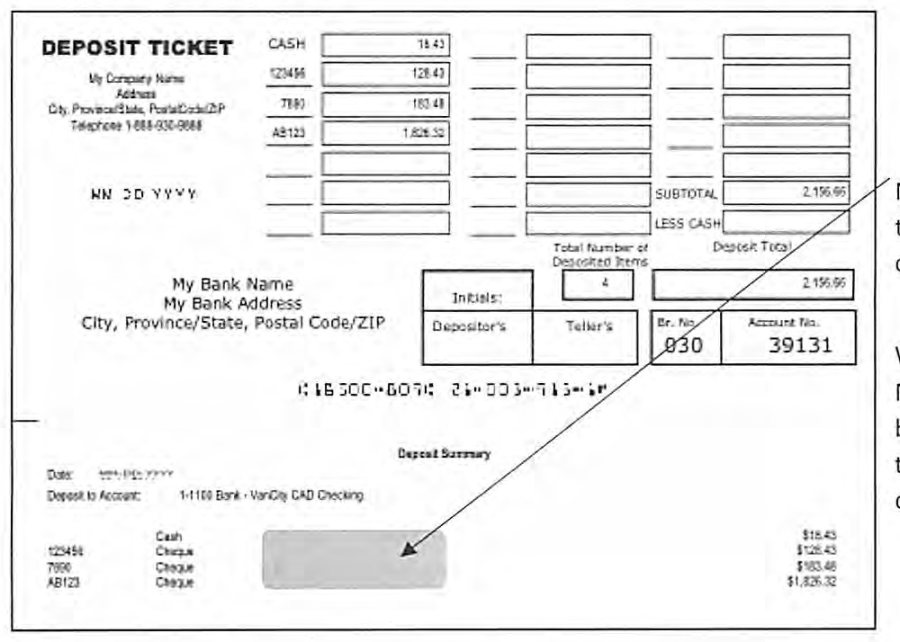
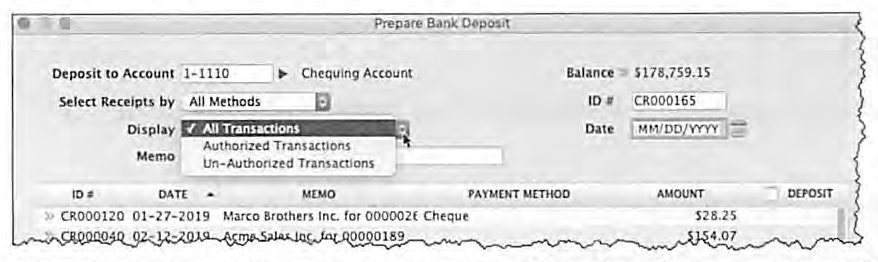
Prepare Bank Deposit is described as "one of the more valuable features of AccountEdge." Receipts grouped with Undeposited Funds accumulate there until Prepare Bank Deposit consolidates a selected set (filterable by All Methods or a specific method, such as isolating a day's VISA receipts for reconciliation) into one Deposit transaction to a chosen bank account -- this consolidation is what makes bank reconciliation dramatically easier and traps errors in deposit posting early. A Deposit Adjustment field handles Cash Back or discounts netted out of a deposit, and the deposit slip itself can be fully customized -- including MICR bank-routing encoding -- eliminating the need for pre-printed deposit slips entirely. Where Credit Card Processing is integrated, an additional "Display" filter distinguishes Authorized from Un-Authorized transactions, since credit card receipts post to Undeposited Funds immediately but require separate approval before they can be included in a deposit; day-end processing for authorized card transactions typically cuts off at 9:00 PM Pacific.
Deposit Adjustments -- Net Credit Card Deposits & Cash Back
Source: p.101-104
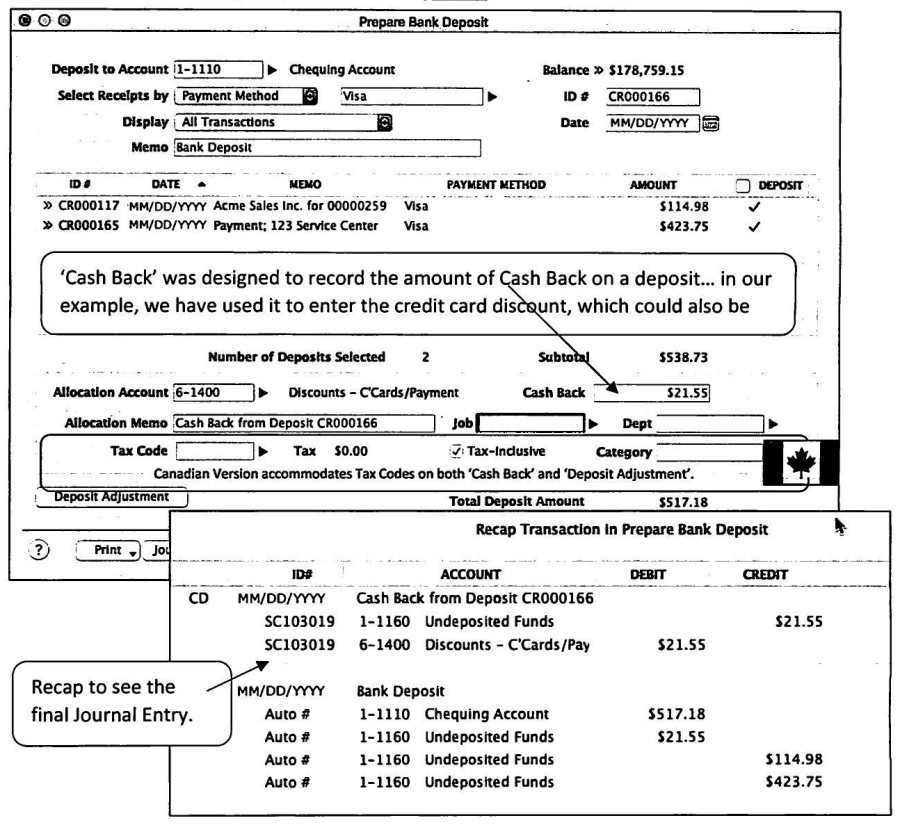
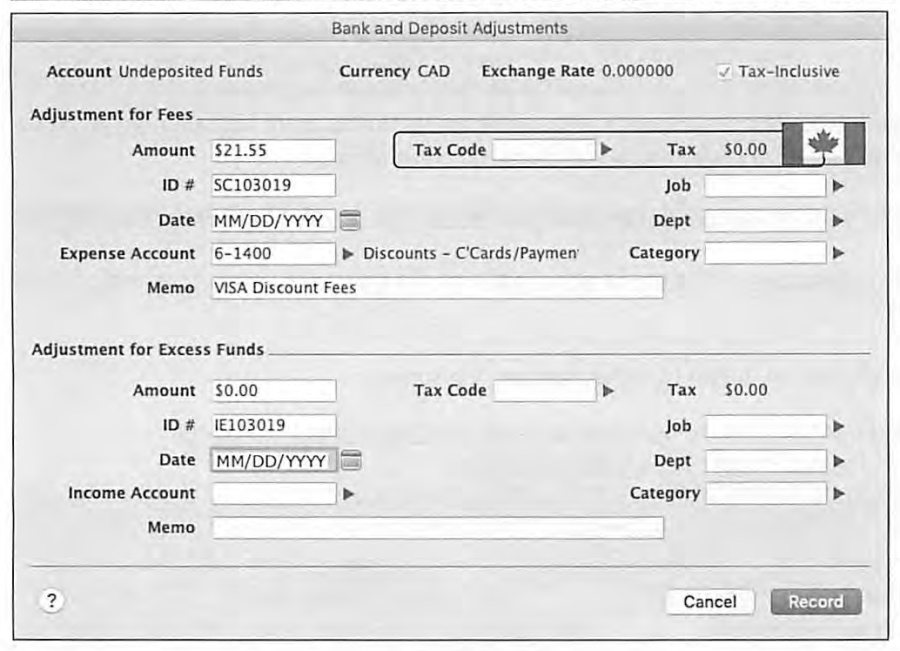
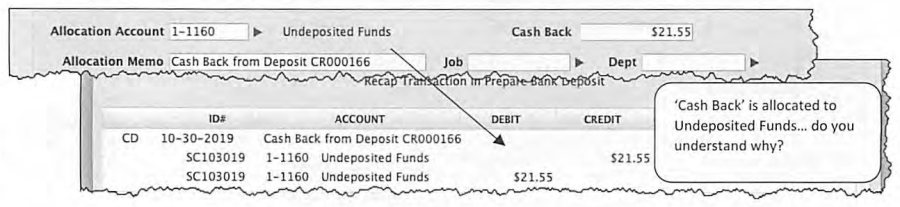
Credit card processors assess a discount on card transactions, charged either monthly in a lump sum or netted out of each individual deposit -- the Deposit Adjustment feature exists specifically to let a deposit be recorded exactly as it appears on the bank statement (net of the discount) while still depositing on the processor's own daily or weekly schedule. The guide walks through the mechanics of using "Cash Back" within Prepare Bank Deposit to record the card discount, versus using the standalone "Deposit Adjustment" window for the same purpose (posting to Undeposited Funds either way, then flowing through to an expense account like "Discounts - Credit Cards/Payment Processing"), with a note that after using Deposit Adjustment you may need to switch the Prepare Bank Deposit "Select Receipts by" filter to "All Methods" to actually see the adjustment take effect in the list. A separate "Cash Back" scenario applies to retail businesses topping off a cash drawer float, or reconciling a mismatch between total cash receipts and what actually gets deposited (a bank that won't accept coin in a night depository is the example given) -- both allocate to an Undeposited Funds sub-account rather than distorting the main cash figures.
Reconcile Accounts (Bank Reconciliation)
Source: p.104-105
The guide treats formal bank reconciliation as outside the scope of "Daily Applications" proper -- full procedures live in Period End Procedures -- but introduces the Reconcile Accounts window here: New Statement Balance (entered from the bank statement), Calculated Statement Balance (computed by AccountEdge from cleared items), and the resulting Out of Balance figure, with individual deposits and withdrawals marked cleared against the statement in a scrollable list. The guide's reassurance is characteristically direct: "you will not require a DNA transplant to handle reconciliations."
Bank Register
Source: p.105-106
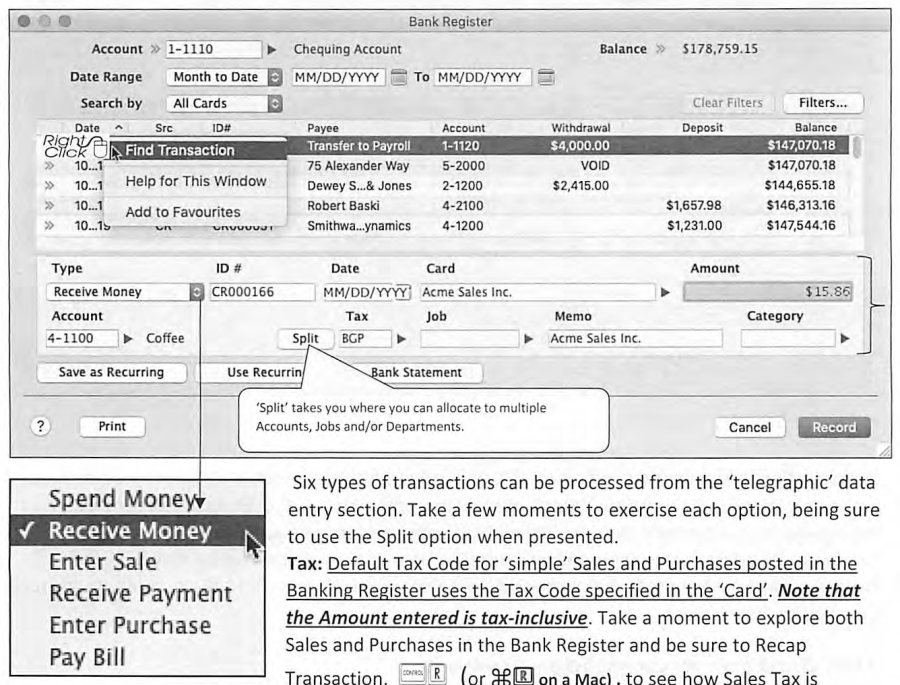
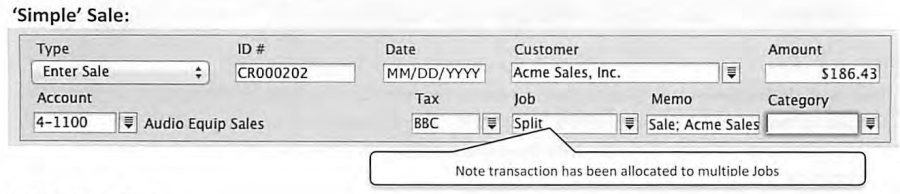
The Bank Register consolidates most banking functions into one window, with a "telegraphic" data-entry section at the bottom supporting six transaction types in a single compact row: Spend Money, Enter Sale, Receive Payment, Enter Purchase, Pay Bill, and Journal Entry. A "Split" option opens full allocation across multiple accounts, jobs, or departments when a one-line entry isn't enough. Default sales tax on these quick entries comes from the selected card, and the guide recommends using Recap Transaction (Ctrl-R, or Cmd-R on Mac) after any Bank Register entry to visually confirm how tax was actually applied before moving on.
Bank Statement Import (Bank Feeds) in the Bank Register
Source: p.106
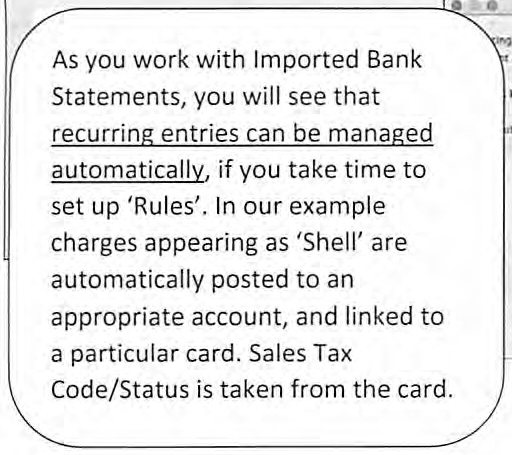
Most banks offer web-based statement downloads in one of roughly five common formats, which AccountEdge recognizes automatically in most cases (the guide suggests trial-and-error with the bank's export options if the first attempt doesn't import cleanly, and recommends saving downloads to a dedicated, clearly-named folder such as "Bank A -- Download Statements"). Clicking "Bank Statement" and selecting the downloaded file triggers AccountEdge to automatically match bank-file lines against existing company-file transactions, then presents the unmatched remainder for manual handling: match to an existing transaction, add a brand-new transaction, or define a Rule instructing AccountEdge how to handle this vendor/description automatically going forward (posting to a specific account, linking a specific card) -- Rules are what make recurring items like a "Shell" gas station charge post themselves correctly on future imports without manual intervention. Full instruction on working with imported bank statements is in the Period End Procedures guide.
Cash Flow Worksheet
Source: p.107
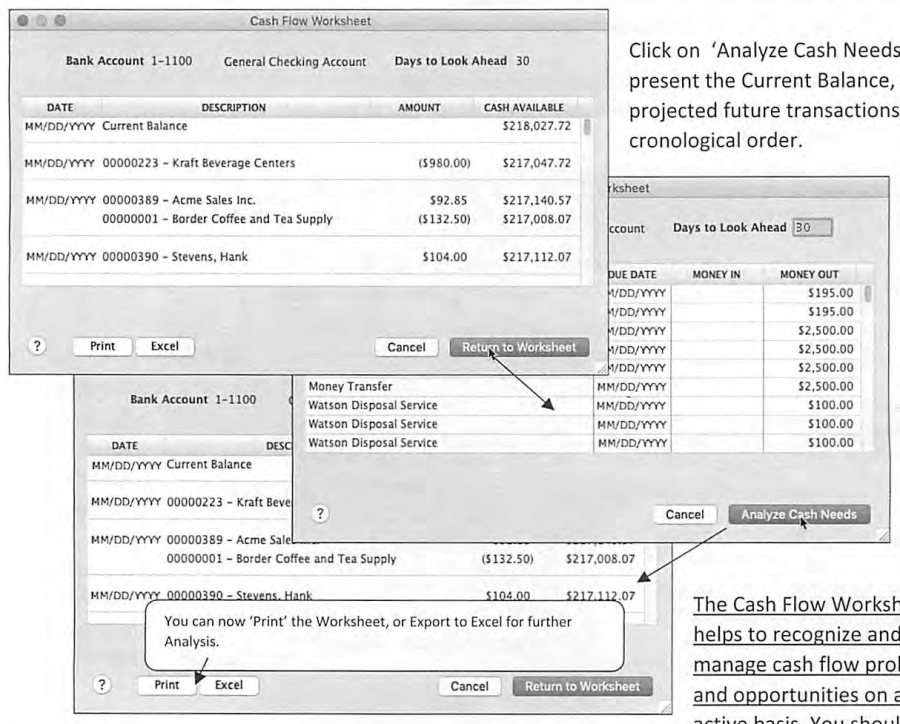
The Cash Flow Worksheet projects a chosen bank account's balance forward by a specified "Days to Look Ahead" (default 30), listing every known future transaction chronologically -- pending purchase and sales orders, recurring transactions due -- against the current balance, so cash shortfalls can be spotted and managed proactively rather than discovered from an overdraft notice. The guide's framing is pointed: "You should not have to rely on the bank telling you when you are over-drawn... Neither should you have excess money in a Bank Account when it could be earning a better return elsewhere." Results can be printed or exported to Excel for further analysis.
Reports on Banking
Source: p.108
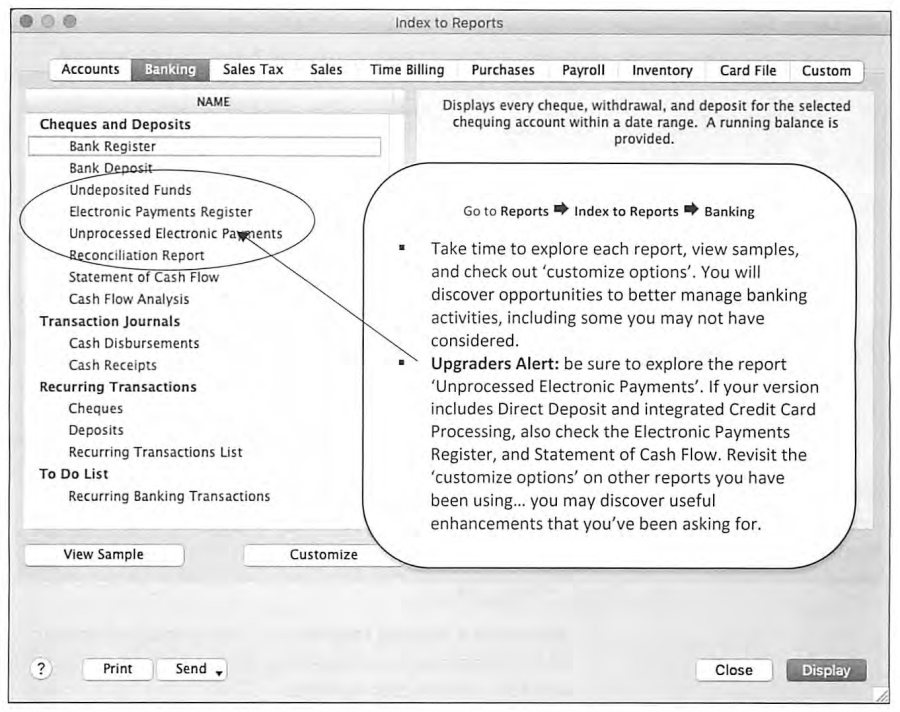
The Banking Reports index covers Cheques and Deposits, Bank Register, Bank Deposit, Undeposited Funds, Electronic Payments Register, Unprocessed Electronic Payments, Reconciliation Report, Statement of Cash Flow, Cash Flow Analysis, Transaction Journals (Cash Disbursements, Cash Receipts), Recurring Transactions, and a To Do List family (Cheques, Deposits, Recurring Transactions List, Recurring Banking Transactions). The guide singles out "Unprocessed Electronic Payments" as worth a specific look for anyone upgrading from an older version, and -- where Direct Deposit and integrated Credit Card Processing are in use -- the Electronic Payments Register and Statement of Cash Flow reports as well, alongside revisiting "customize" settings on reports already in regular use, since newer releases sometimes add fields to reports a business has used for years without noticing.
Sales & Purchases Information, and Commission Rate Levels
Source: p.109-110
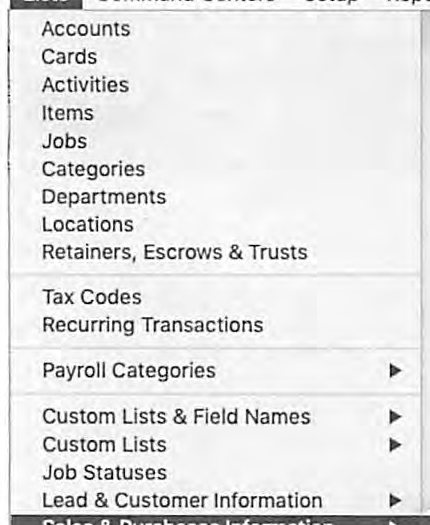
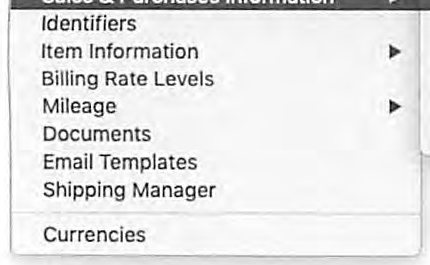
Lists > Sales & Purchases Information centralizes several small reference lists reused across both Sales and Purchases: Comments & Shipping Methods (drop-down choices, editable per card as a default), Referral Sources (selectable and printable on sales forms, feeding marketing-analysis reports), Payment Methods (used when receiving money, and useful for isolating a specific method inside Prepare Bank Deposit), and Notes (extended, selectable comments for printing on forms). Setup > Customize Forms > Default Forms sets global defaults for all new cards, with per-card overrides available under each card's Selling or Buying Details tab.
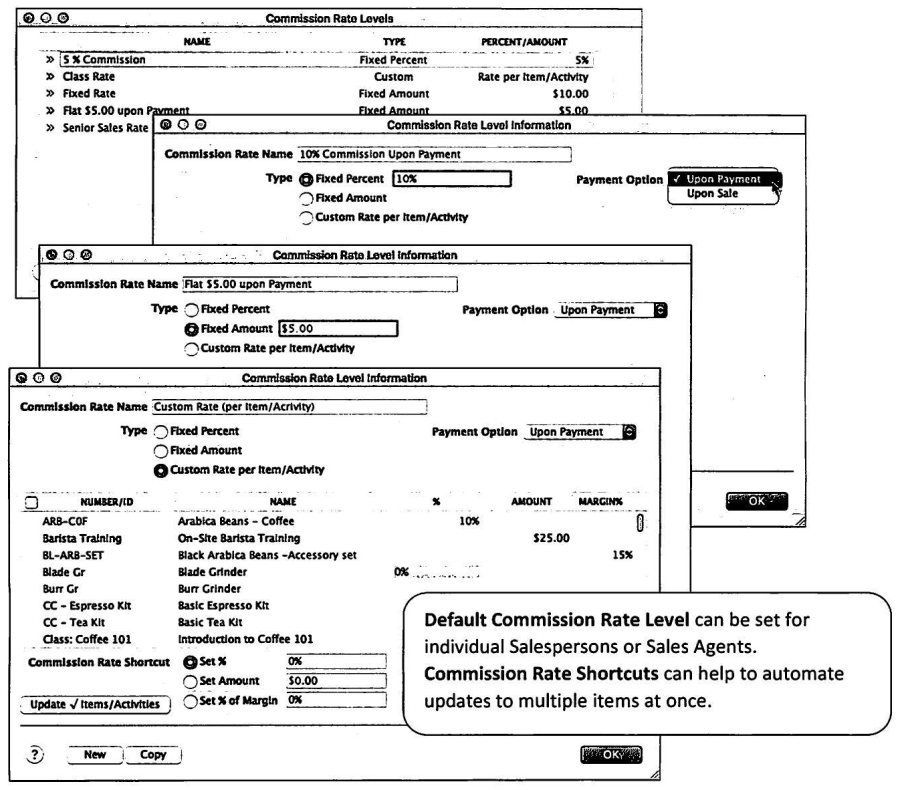
Commission Rate Levels automate calculating, tracking, and paying commissions to employees or sales agents/vendors. A rate can be a Fixed Percentage of the sale amount, a Fixed Amount, or a Custom Rate blended per item/activity, and separately configured to become due "Upon Sale" or "Upon Payment." Rate levels are set up under Lists > Sales & Purchases Information > Commission Rate Levels, and a Commission Rate Shortcut tool can bulk-update rates across selected items/activities either as a flat amount or as a percent of margin. A default Commission Rate Level can then be assigned to individual salespersons or sales agents.
Sales Entry Screen -- Overview, and the Five Sale Statuses
Source: p.111-112
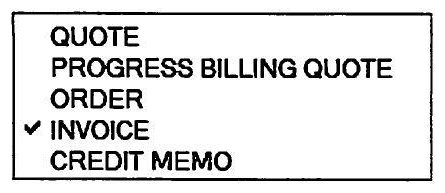
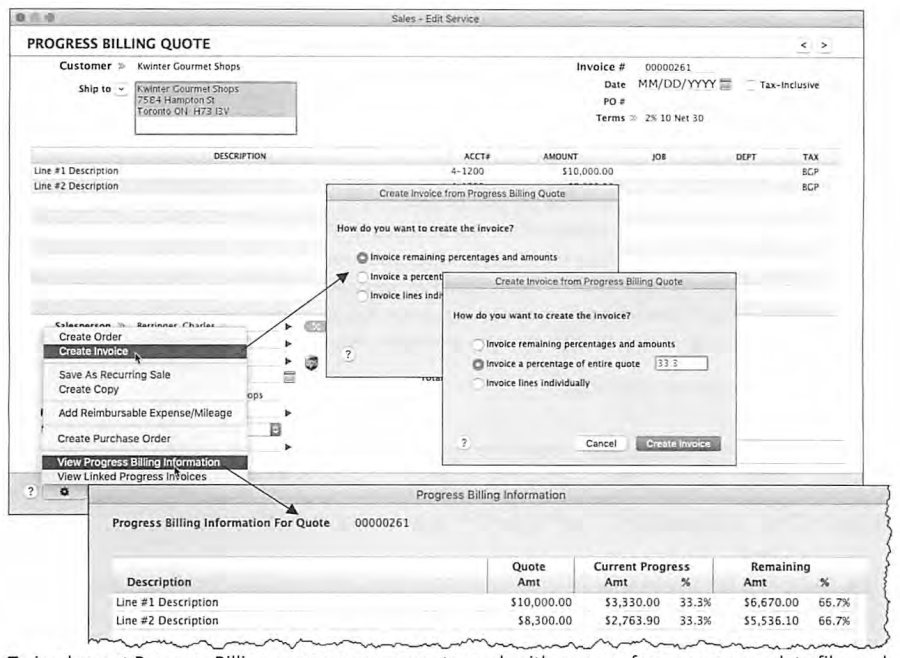
Enter Sales opens the transaction screen used to record everything sold, in one of five layouts (Service, Item, Professional, Time Billing, Miscellaneous) and one of four statuses. A Quote lets you prepare a quotation for client consideration -- it doesn't touch the To Do List's Stock Alert or Orders tabs, and payments cannot be applied to a Quote; it's tracked instead through the Sales Register's Promised/Follow-Up date fields. A Progress Billing Quote, common in construction, starts as a quotation and is then invoiced incrementally -- either as remaining percentages/amounts, a flat percentage of the entire quote, or line-by-line -- with a Progress Billing Information screen showing the quoted, current-progress, and remaining amount/percent per line; the guide encourages practicing this workflow on a copy of the live company file first, since "people often tend to overestimate the complexity of Progress Billing." An Order is a Quote the customer has accepted or confirmed -- it appears in both the To Do List and the Stock Alert tab (for inventory orders), and customer deposit payments can be applied to it. An Invoice represents goods or services actually delivered. A Credit Memo posts a return or refund using positive-quantity, plain-language entry rather than the negative-amount invoice trick from legacy versions -- staff just enter how much and how many, and can add a negative line for something like a restocking fee.
Customer, Terms & Ship To Fields
Source: p.113-114
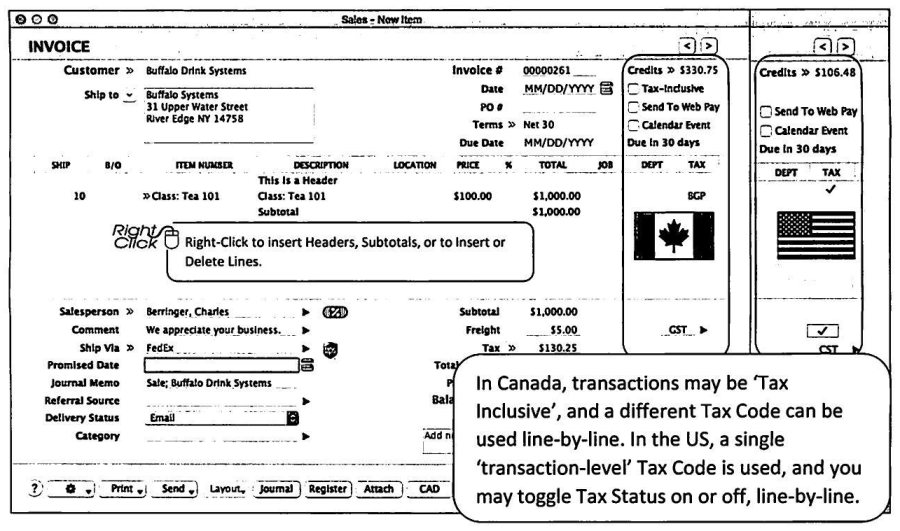
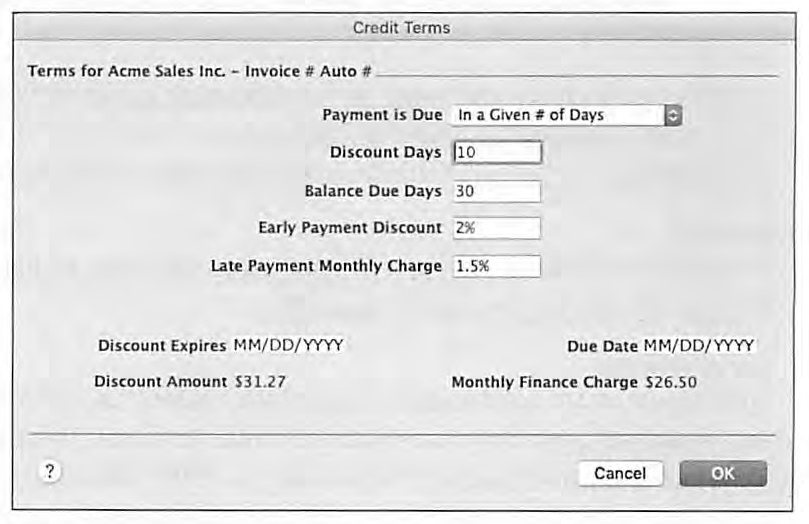
Typing a customer name with Easy Fill enabled completes the entry against the closest Card File match as you type; without an exact match, AccountEdge offers the closest "Select from List" result, "New" (jump to the full Card File entry screen), or "Easy-Add" (auto-create a minimal card with default terms, useful when a customer is waiting and full details can be filled in later). Terms default from the customer's Buying Details but can be edited per invoice via the Terms zoom-arrow. Ship To defaults from the card's set-up address, can be swapped for any of the card's five addresses or "Another Card" via the Select button, or typed directly for a one-off address. Invoice # defaults to "Auto #" (increments the last invoice number by one) but accepts a manual entry up to eight alphanumeric characters -- a specific trick applies when mixing computer-generated and handwritten serialized invoices: entering a manual number with an alpha suffix (e.g. "12345M") avoids disrupting the auto-numbering sequence for subsequent computer-generated invoices, whereas entering it as a plain number would. Date entry accepts shorthand -- typing just the day, or the month and day together, updates only that portion of the current date. Customer PO # accepts up to 20 alphanumeric characters.
Sales Layouts -- Header & Line-Entry Differences
Source: p.115-117
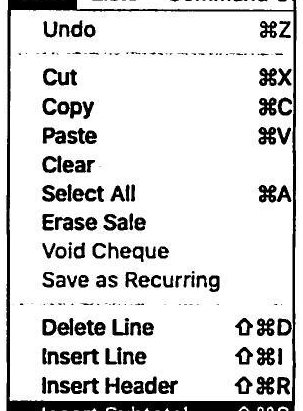
Five sales layouts share a common header but differ in their line-entry grid. Service and Professional layouts present Description (up to 1000 characters, with a "snap open" expandable field available under Setup > Preferences > Windows if descriptions routinely overflow), Acct#, Amount, Job/Dept, and Tax -- Professional adds a per-line Date column for the actual service date. Item layout adds Ship and B/O (Backorder) quantity columns, an Item Number with zoom-arrow drill-down into the underlying inventory record, a Location column (when multiple locations exist), Price (defaulting from the customer's assigned Price Level), and a Discount % (defaulting from the customer's Volume Discount setting). Time Billing layout presents Date, Hr/Unit, Activity, Notes (which can be the activity's short name, its longer description, the notes recorded on the original activity slip, or manually edited text), Rate (editable regardless of source), Job/Dept, and Tax. Miscellaneous layout is the simplest -- Description, Acct#, Amount, Job/Dept, Tax -- intended for recurring, non-itemized charges like a property manager's monthly rent billing, where the customer wouldn't expect a formal invoice; it's the one layout that can never be printed. Right-clicking (or the keyboard shortcuts shown on-screen) inserts Headers and Subtotals into the line-entry grid to organize longer invoices, and inserts or deletes individual lines.
Sales Summary Section & Action Menu
Source: p.117-121
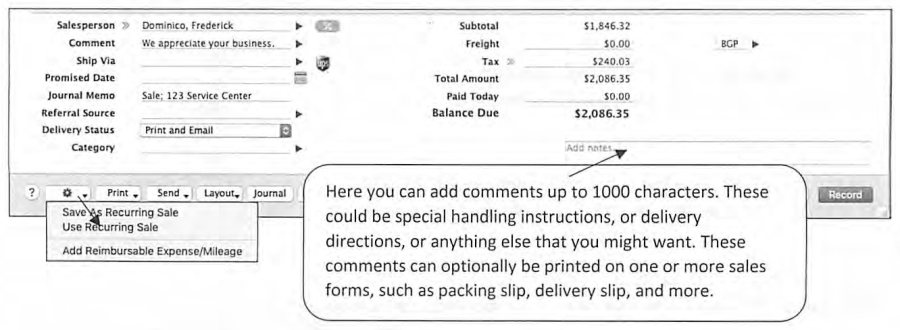
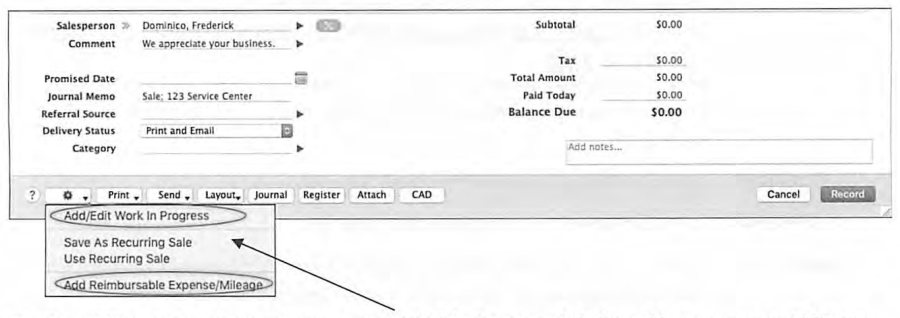
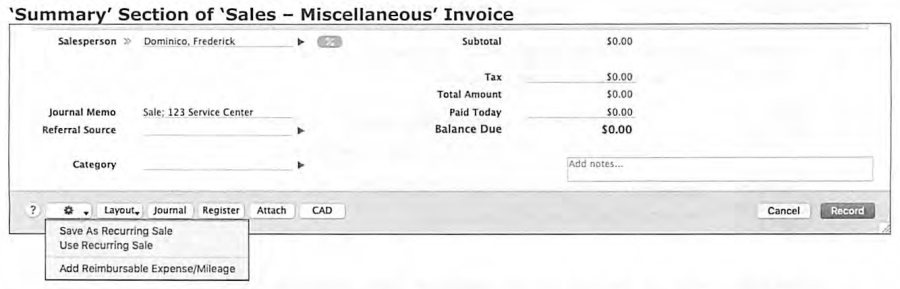
The Summary section (varying slightly by layout) captures Salesperson (which can double as an external sales agent for commission tracking), Comment (up to 1000 characters, optionally printed on forms), Ship Via, Promised Date (used by the Sales Register and To Do List to track outstanding quotes/orders), Freight (with its own tax default settable globally or per-customer), Tax total (editable via its own zoom-arrow), Total Amount, Journal Memo, Referral Source (for marketing analysis), Delivery Status, Category (a whole-transaction allocation, unlike Jobs which allocate per line), Paid Today, Payment Method, and Balance Due.
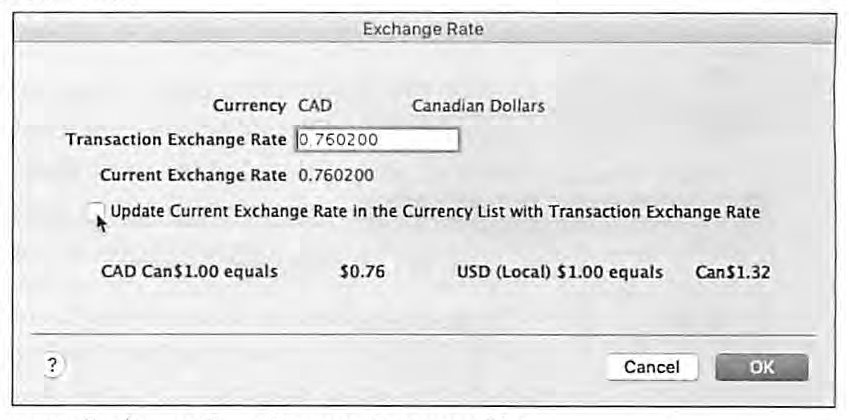
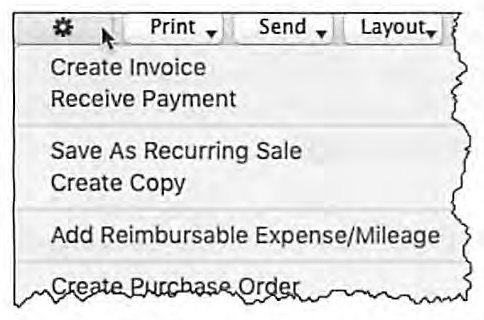
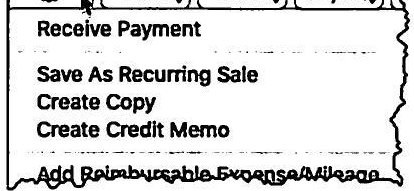
The Action Menu adds several transaction-type-specific tools: Add/Edit Work In Progress connects to unbilled Time Billing activities and Payroll timesheet entries; Save As Recurring Sale / Use Recurring Sale sets up templates the same way covered on page 23; Add Reimbursable Expense/Mileage pulls in job-linked reimbursable expenses (and, on a Professional layout, brings the original disbursement date along automatically) as detailed earlier on page 39; and, when editing an existing Item Invoice, Create Credit Memo assumes a full refund and auto-populates a Credit Memo, which can then be edited down if the return is partial or a restocking fee applies. The Currency icon, shown only once multi-currency is active, displays the customer's currency and transactional exchange rate and lets you update the running "current" rate from the same screen. On an Item Invoice, a Profit indicator shows line-level and whole-transaction profitability.
Bottom Icons, Sales Register & Editing Existing Sales
Source: p.121-124
The row of icons at the bottom of every sales screen -- Help, Actions, Print, Send To, Layout, Journal, Register, Attach, Currency, Profit, Spell, Cancel -- is consistent across layouts (the Miscellaneous layout omits Print/Send/Register/Attach, since it's never printed or tracked that way). Print records and prints in one click, with the option to select an alternate customized form or preview first; Send To generates a PDF for email or disk; Journal opens the current period's Sales Transaction Journal; Register opens the full Sales Register.
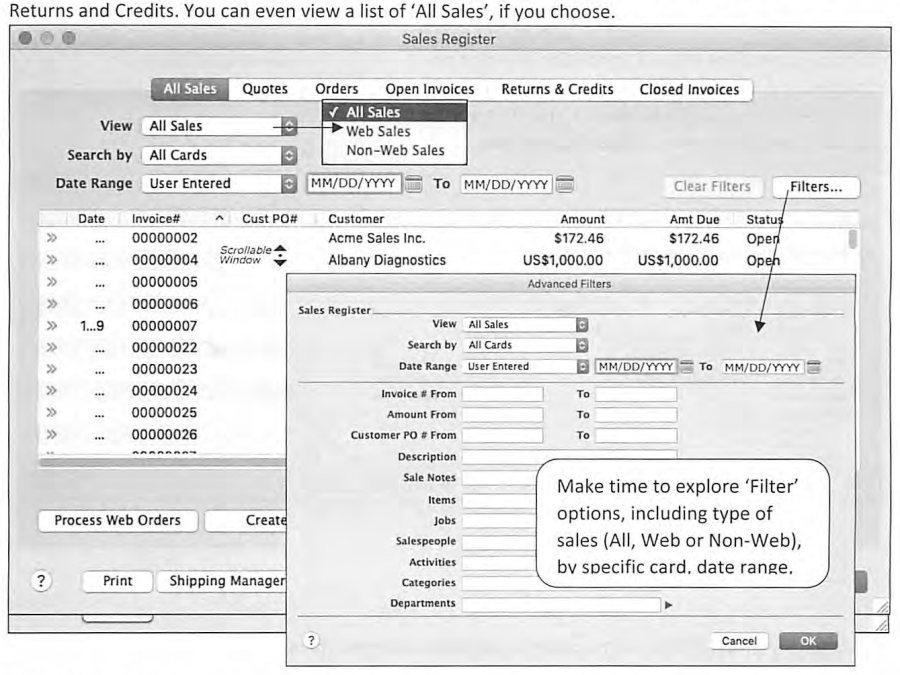
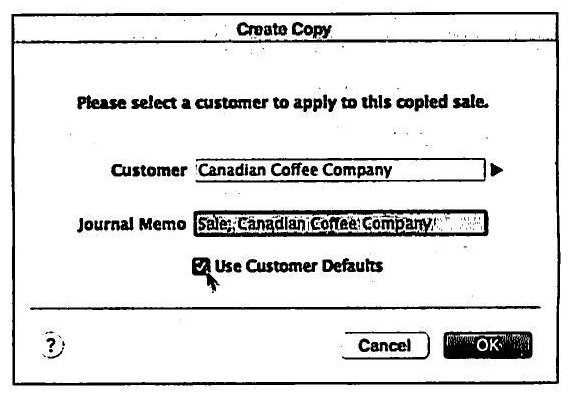
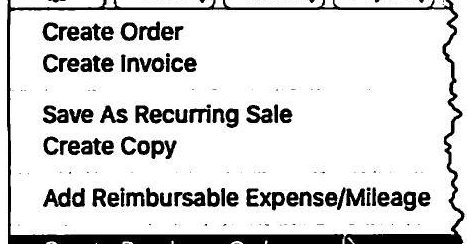
The Sales Register presents six tabs -- All Sales, Quotes, Orders, Open Invoices, Returns & Credits, Closed Invoices -- each filterable by card and date range with an Advanced Filters panel for invoice number, amount, customer PO, description, salesperson, item, and more. From any tab, double-clicking or the zoom arrow opens a transaction in Edit Mode, where -- depending on security preferences and the transaction's status -- a History icon shows payments applied to date, Action Menu > Receive Payment applies an additional payment, and Save As Recurring Sale, Create Copy, Create Credit Memo, and Add Reimbursable Expense/Mileage remain available. Create Copy (available under every register tab) duplicates a transaction for a different customer, with a "Use Customer Defaults" checkbox to re-apply the correct terms and tax treatment for the new customer rather than carrying over the original customer's settings by mistake.

Quotes & Orders Tabs -- Converting and Customer Deposits
Source: p.124-126
From the Quotes tab, a selected quote can Change to Order, Change to Invoice, be Deleted, or generate a Purchase Order directly -- with two related Setup > Preferences > Sales settings worth checking: "Retain Original Invoice # when Quotes are Converted" and "Delete Quotes upon Converting and Recording as an Order or Invoice." Leaving the second unchecked means converted quotes remain in the list with no visual indication they were ever acted on -- flagged explicitly as a trap. Retaining quotes deliberately can double as a way to preserve special negotiated pricing for future reference.
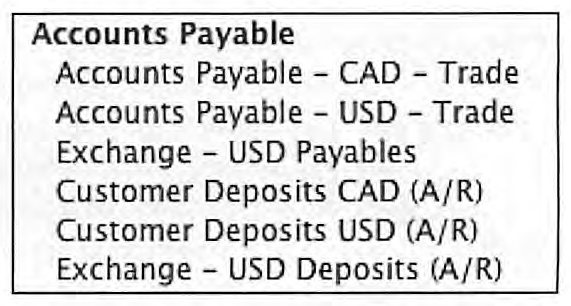
From the Orders tab, payments applied to an Order are automatically recognized as Customer Deposits rather than a receivable payment, since no invoice (and therefore no receivable) exists yet -- AccountEdge posts the deposit to a liability account such as "Customer Deposits Payable" (trackable by originating currency under multi-currency). When the order is later converted to an invoice, AccountEdge automatically withdraws the deposit total from that liability account and applies it as a payment on the new invoice. Customer statements normally exclude Quotes and Orders entirely (since neither carries receivable status), but can be customized to also display total deposits held on outstanding orders, for customers who want that confirmation. Create Purchase Order, available from either tab, auto-generates a PO using the same layout as the originating sales document, defaulting to the item's "Primary Vendor for Reorders" where one is set.
Open Invoices, Returns & Credits, and Closed Invoices Tabs
Source: p.126-127
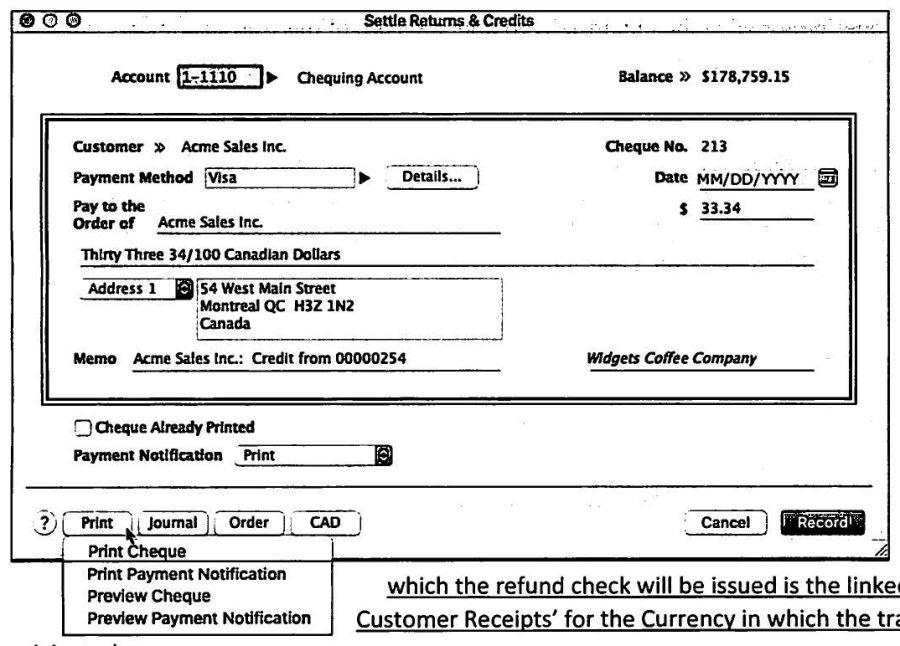
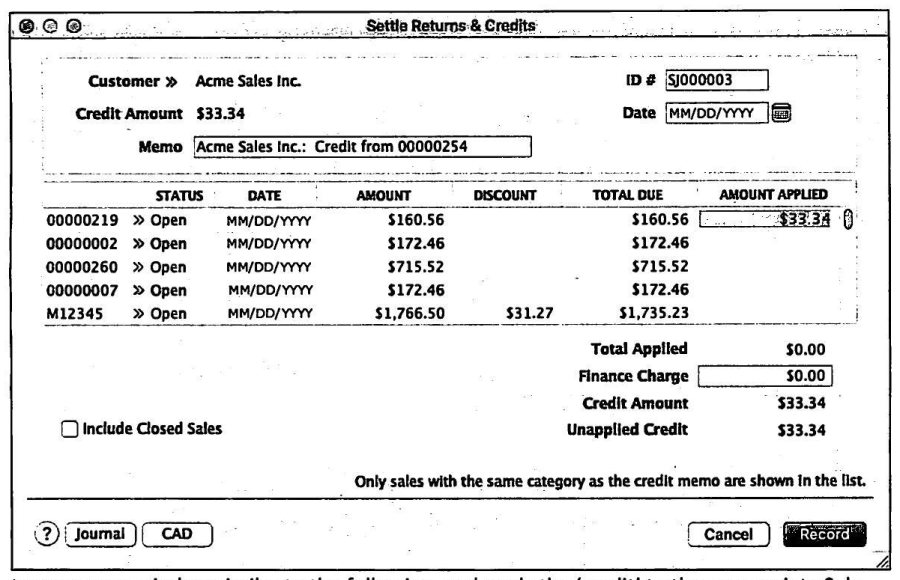
Open Invoices offers the same Edit Mode options already described. Returns & Credits offers Pay Refund (issues an actual refund check, defaulting to the linked Bank Account for Customer Receipts for the currency involved, though any account can be substituted) and Apply to Sale (settles the credit against a specific outstanding invoice or order -- intuitive when the credit is meant to void that transaction outright). A specific limitation the guide flags twice: AccountEdge provides no printable record of an Apply to Sale settlement to communicate to the customer, and outstanding Returns & Credits cannot be pulled into the regular Customer Payment window -- so a payment that already has a credit deducted from it must be handled as two separate steps rather than one combined transaction. Closed Invoices simply reviews settled sales within the chosen filters. Shipping Manager and Purge (for businesses generating a high volume of quotes that don't all convert) round out the register's tools.
Print/Email Invoices
Source: p.128-129
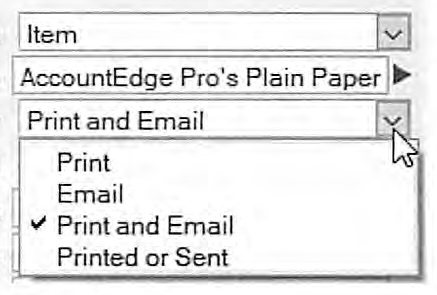
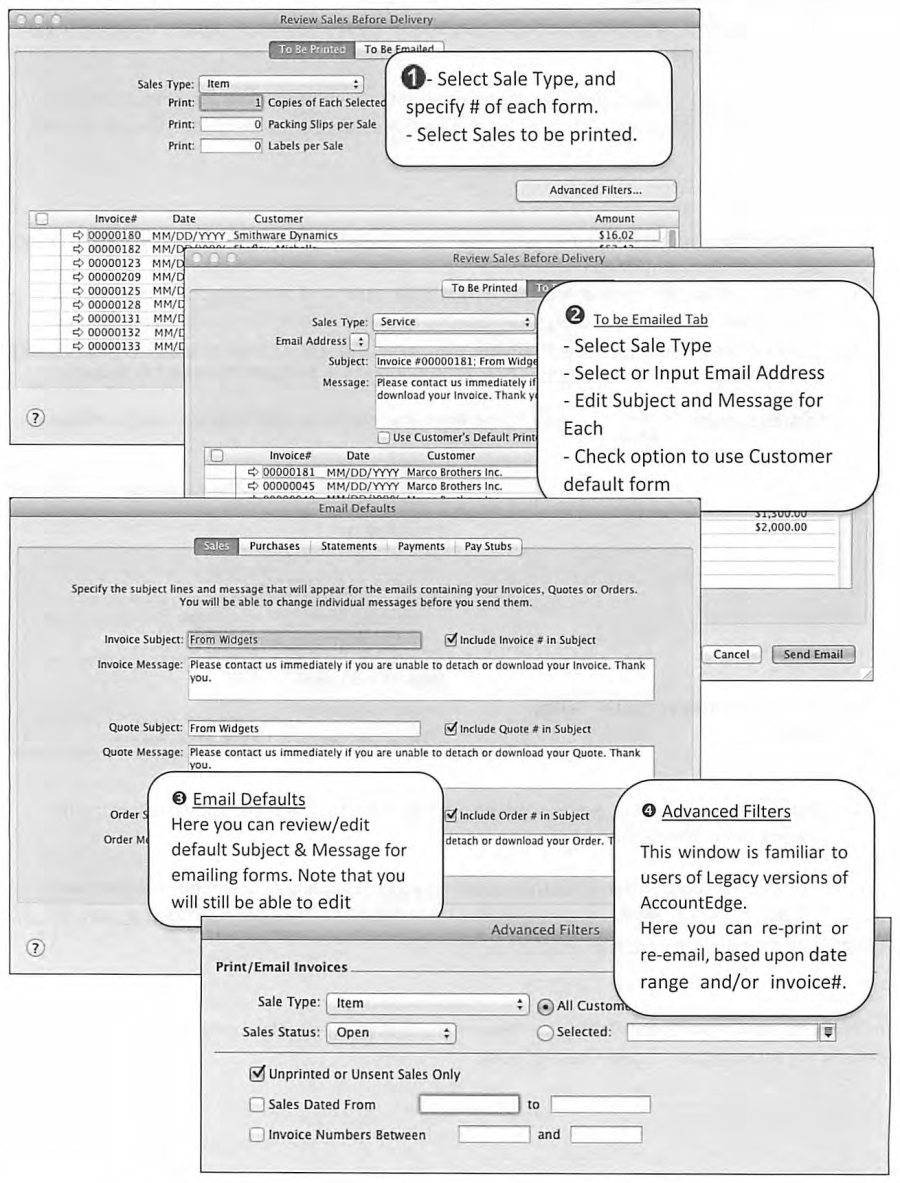
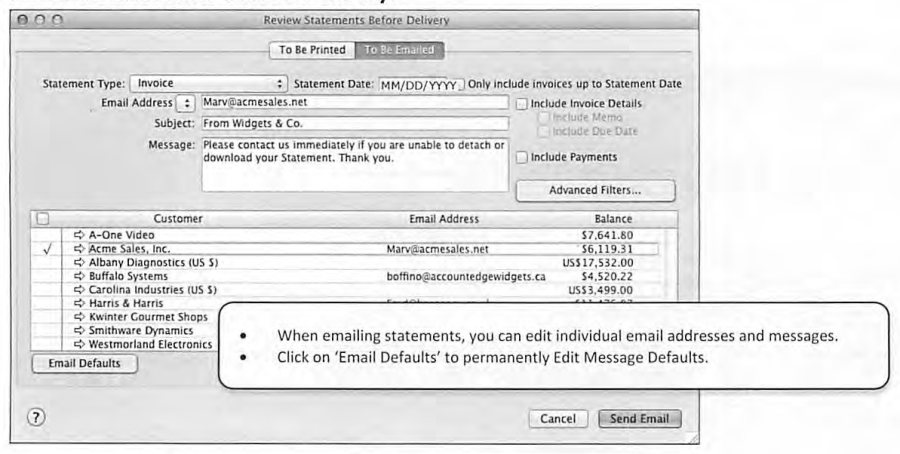
Print/Email Invoices suits batch printing/emailing workflows, and is also the right tool where pre-printed forms sit in a shared printer that can't be loaded on demand for one-off prints. AccountEdge supports unlimited customized forms (including company logos), a specific form assigned per customer, and -- via Setup > Preferences > Sales -- fully automatic Print, Email, Print and Email, or Save to Disk (PDF) behavior the moment a sale is recorded, plus automatic printing of Packing Slips and Labels right after the invoice itself. The guide frames this combination as reason enough for both new and upgrading users to "reconsider their approach to printing sales," citing real savings on both staff time and pre-printed form stock. The Review Sales Before Delivery screen (reached via Print/Email Invoices) supports selecting the sale type, specifying packing slips/labels per sale, and -- on the To Be Emailed tab -- editing the subject/message per recipient or bulk-editing defaults under Setup > Email Defaults, with separate default subject/message pairs for Invoices, Quotes, and Orders.
Receive Payments (Customers)
Source: p.130-131
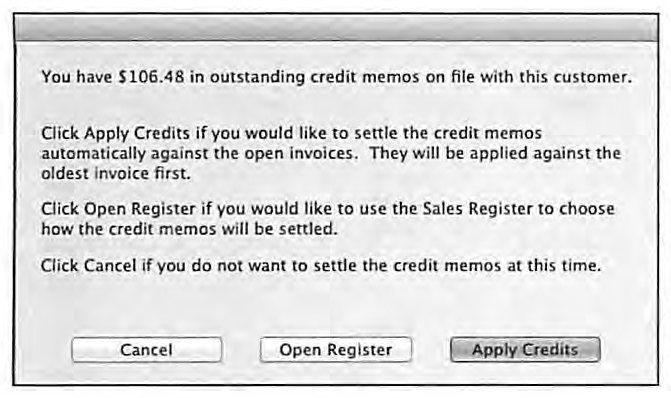
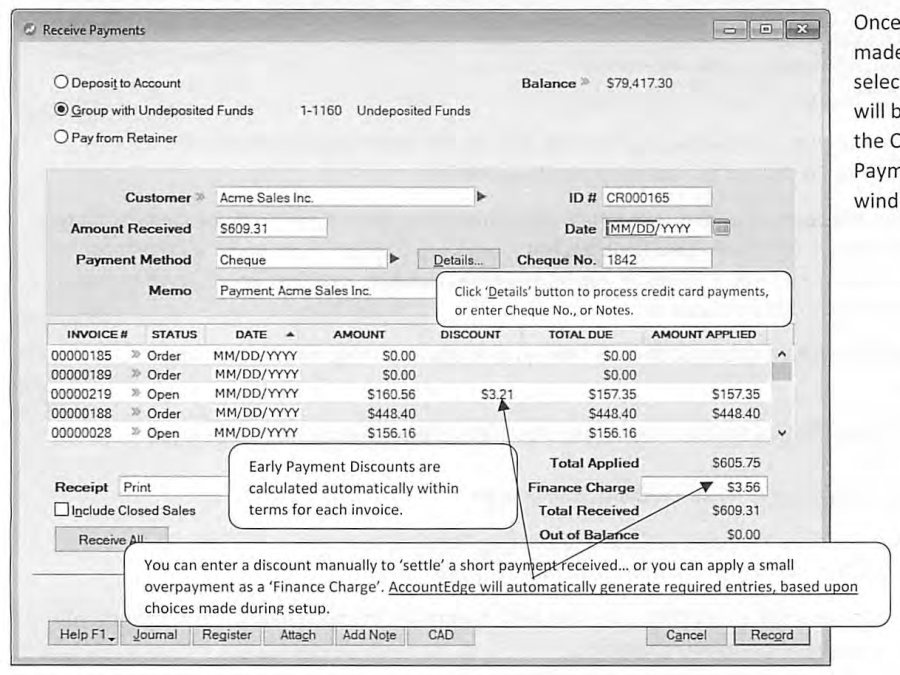
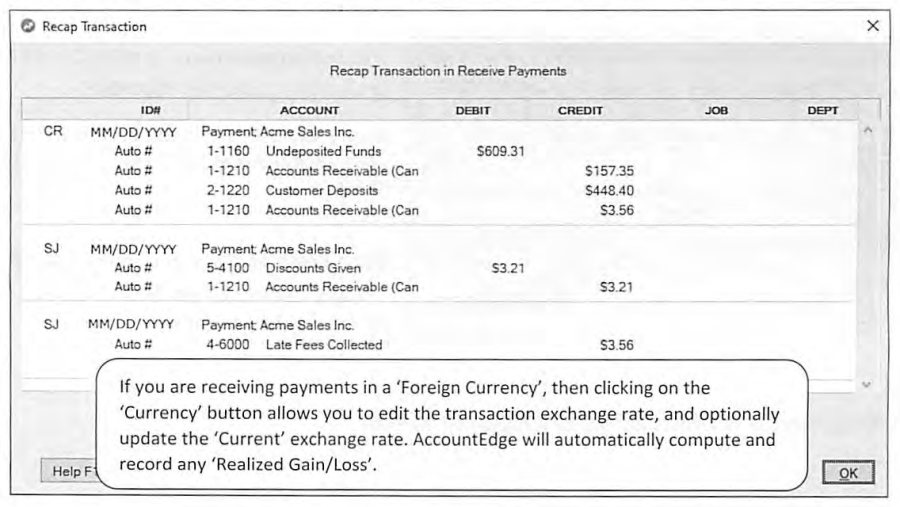
Customer payments are entered separately from the sale itself wherever receivables are carried. Deposit to Account defaults to the linked Checking Account for Customer Receipts (which can vary by currency), or can be grouped with Undeposited Funds -- the setting the guide recommends enabling by default under Setup > Preferences > Banking > "When I Receive Money, I Prefer to Group It with Other Undeposited Funds," specifically because it dovetails with Prepare Bank Deposit and simplifies reconciliation. Entering a customer name with outstanding Credit Memos on file triggers a prompt: Apply Credits settles them automatically against the oldest open invoices, Open Register hands control to the Sales Register for manual settlement, and Cancel skips it for now. Early Payment Discounts calculate automatically within each invoice's terms; a manually-entered discount can settle a short payment, and a small overpayment can be captured as a Finance Charge, with AccountEdge generating the required journal entries either way. Recap Transaction (Ctrl-R / Cmd-R) reveals the underlying entries -- useful for confirming exactly how a foreign-currency receipt's Realized Gain/Loss was computed when the Currency button is used to edit the transactional exchange rate.
Print/Email Statements
Source: p.132-134
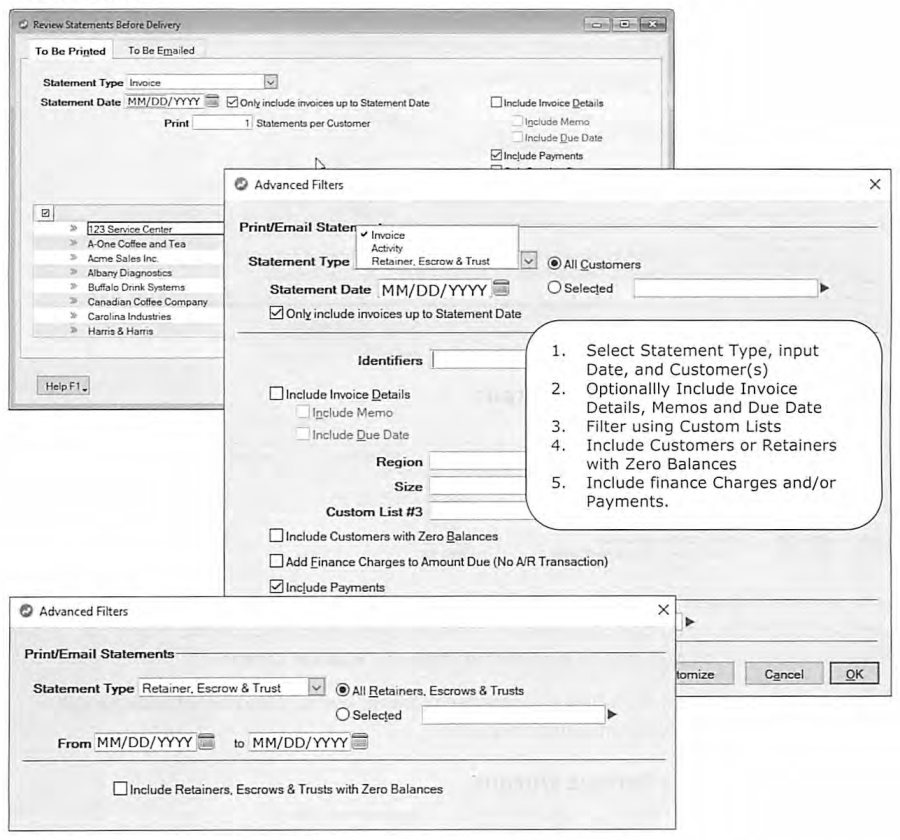
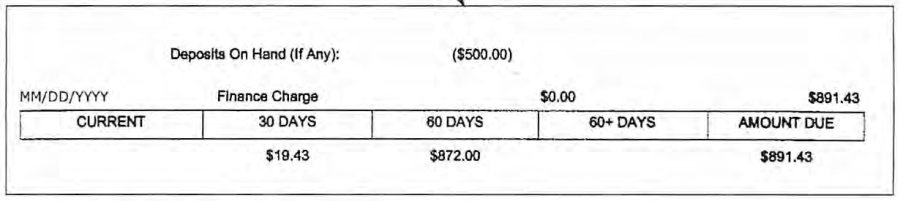
AccountEdge produces either Invoice-type or Activity-type statements, plus Retainer/Escrow/Trust statements where applicable. Advanced Filters cover Statement Date (with an option to only include invoices up to that date), invoice detail/memo/due-date inclusion, payments inclusion, and filtering by Identifiers or Custom Lists -- useful, the guide suggests, for splitting a customer base into statement runs on the 10th, 20th, and month-end. "Include Customers with Zero Balances" supports use cases like documenting Miscellaneous Invoices (which never print on their own) or simply producing a hard-copy activity record for a client file. "Add Finance Charges to Amount Due (No A/R Transaction)" computes late fees per each invoice's terms and adds them to the statement total without posting any actual receivable entry.
Invoice Statements list one line per open invoice with original charge, cumulative payments, and remaining balance -- accurate but potentially too thin for a customer trying to reconcile discrepancies. Activity Statements instead present every transaction chronologically from a Balance Forward figure, giving the customer a document they can match line-by-line against their own records. Customer Deposits and Finance (Late) Charges can each be presented on statements via form customization -- and specifically for Finance Charges, the guide explains why AccountEdge deliberately does not post them as an actual A/R transaction when a statement goes out: customers routinely ignore printed finance charges and simply pay the invoice balance, and a "legacy" program that had already posted the charge to the receivable then requires someone to manually reverse it -- a real, recurring source of busywork the current design avoids. When a finance charge is actually paid, AccountEdge creates the entry automatically at that point instead.
Transaction Journal, Analyze Sales & Analyze Receivables
Source: p.135-136
Transaction Journal, clicked from Sales, opens the Sales Journal for the current period, with a Receipts tab specifically for reviewing customer payments. Analyze Sales is described as powerful for every business, and for inventory-based businesses specifically lets you examine gross profit dollars or margins by item, unit sales, average costs, and graphical contribution-to-sales/profit views. Analyze Receivables presents current receivables in Summary, Customer Detail, or Sale Detail view, with zoom-arrow drill-down to original transactions, and a Filters option to switch the aging calculation from "Overdue Since Invoice Date" to "Overdue Using Invoice Terms" -- a distinction the guide calls out as potentially showing "quite a different picture" if actual invoice terms diverge from the traditional 30-60-90 assumption.
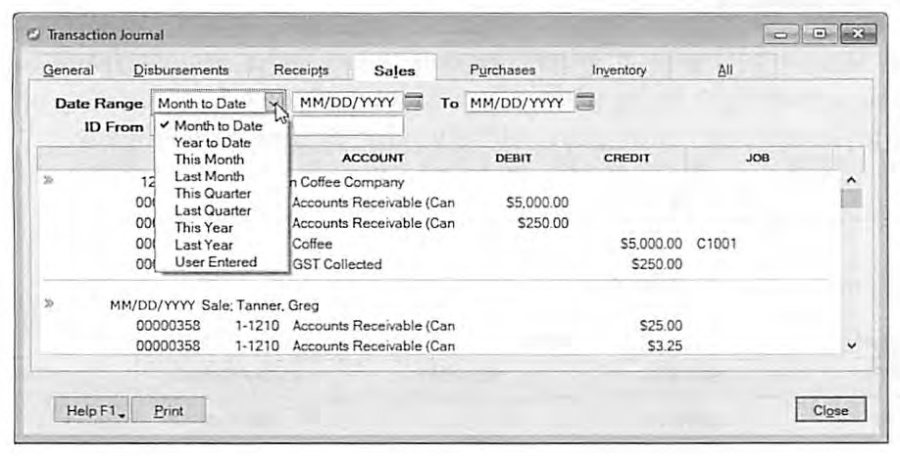
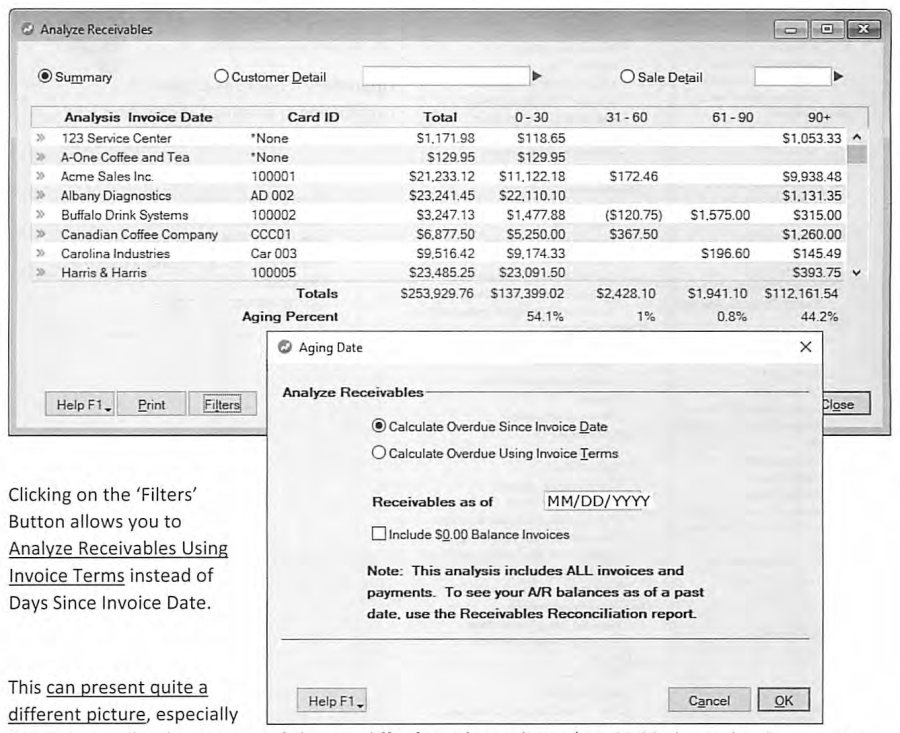
Sales Reports
Source: p.137
The Sales Reports index is organized by Item, Activity, Customer, Salesperson, and Lead, each with its own Summary/Detail/Analyze family, plus a dedicated Receivables group (Aging Summary/Detail, Reconciliation Summary/Detail, Summary With Tax), a Sales Register group mirroring the on-screen register tabs, a Commissions group (Earned, Paid, and Commission Rate Level reporting), Transaction Journals, and Recurring/To-Do groupings. The guide points upgraders specifically toward newer additions -- Summary with Tax, Customer Ledger, Tax Amount Variance, Progress Billing Transactions, Retainer/Escrow/Trust reports, and the Commission report family -- as worth a fresh look even for businesses that have used AccountEdge's Sales reports for years.
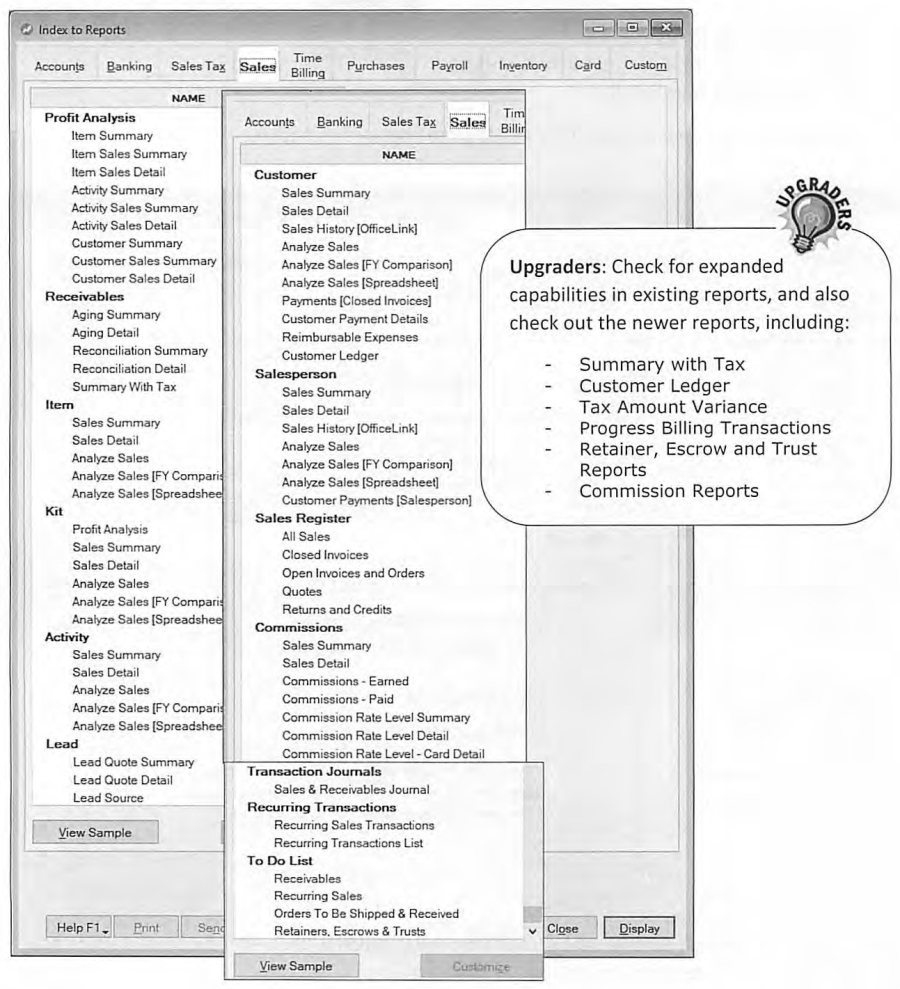
Time Billing Command Center -- Activity Profiles
Source: p.138-140
Time Billing tracks time and other billable activities, then bills customers for it, analyzes profitability by employee/vendor, and can combine time, inventory items, reimbursable expenses, mileage, and Work-In-Progress on a single invoice. Two System preferences unlock the full feature set: "Include Items and Activities on Item and Time Billing Invoices" (Setup > Preferences > System) lets one invoice carry both parts and labor, and "Use Timesheets for Time Billing and Payroll" enables the weekly Timesheet entry screen (with a companion "My Week Starts on" day setting).
Activities are classified by Type (Hourly or Non-Hourly) and Status (Chargeable or Non-chargeable), and each can bill at the Employee's/Vendor's own Billing Rate, a Customer Billing Rate, or a flat Activity Rate -- the guide's example being on-site consulting billed at a rate reflecting the specific consultant's experience, versus photocopying billed identically for every client. Cost of Sales for hourly activities is based on an Estimated Cost per hour set up in each Employee/Vendor's card, which underpins both activity profitability analysis and Work-In-Progress valuation. The Activity's History tab tracks monthly units, sales, and cost of sales for up to five years plus This/Next Year, mirroring the History tabs seen elsewhere in AccountEdge.
Billing Rate Levels let you build a matrix of activity-specific rates -- for example, marking up two particular activities by 10% for a premium project, or discounting an entire matrix 5% across the board for preferred clients -- and an existing level can be copied as the starting point for a new one. A specific Billing Rate Level is then applied to one or more qualifying clients.
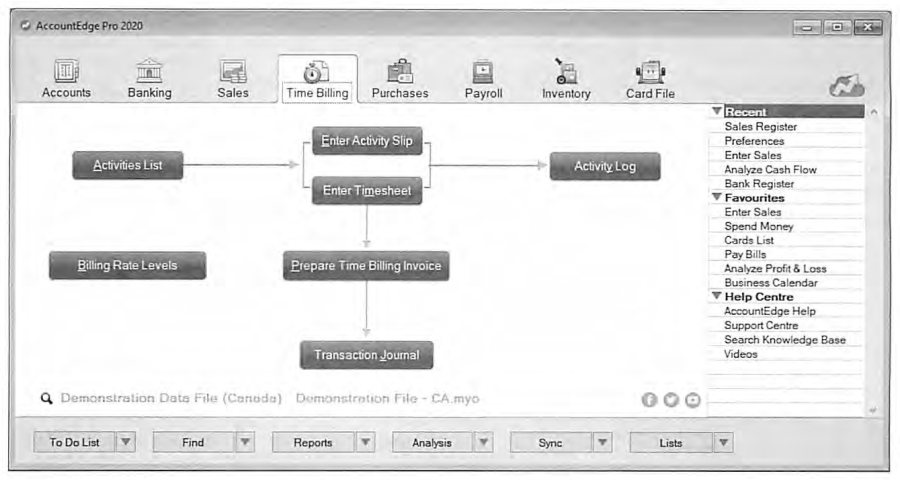
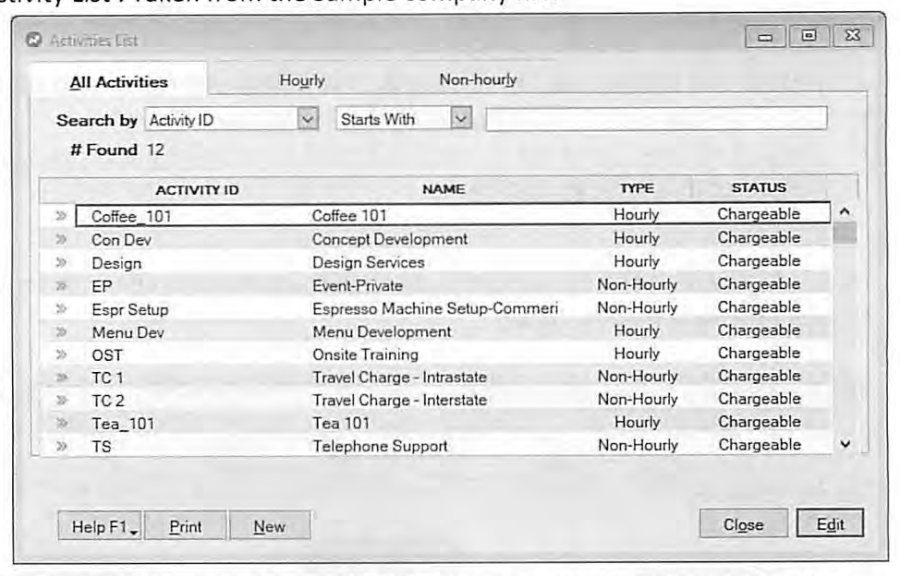
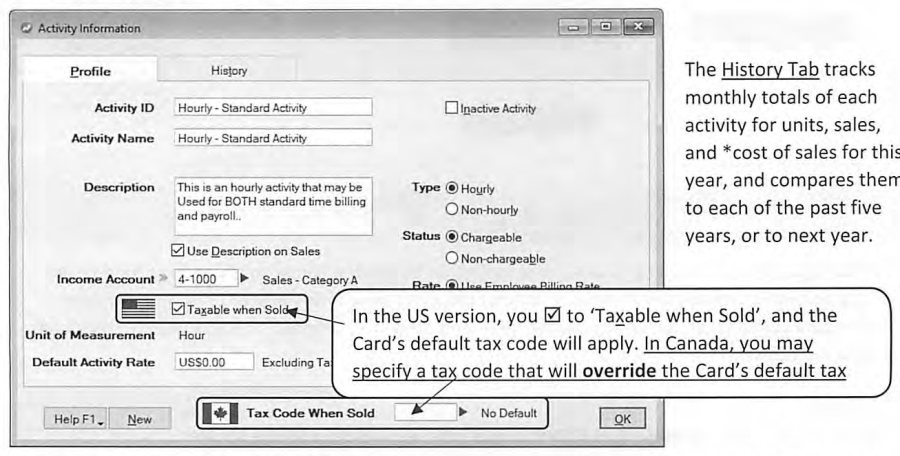
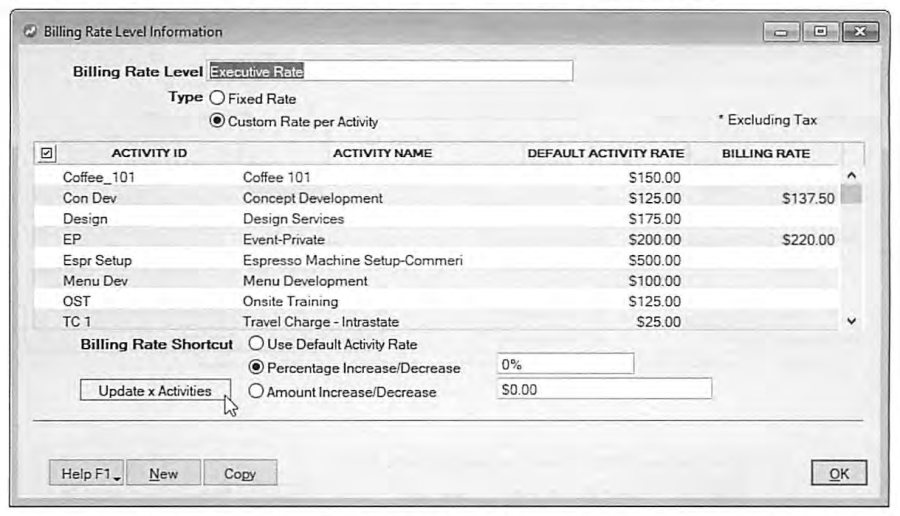
Entering Activity Slips & Timesheets
Source: p.141-143
Single Slip Entry captures every field available for one activity slip -- Employee/Vendor, Customer, Activity, Billing Rate source, Units, Rate, Job, Department, and Notes (which can substitute for the activity name/description on the eventual invoice) -- and supports either after-the-fact time entry or AccountEdge's live built-in timer (Start/Stop), with adjustments postable against the actual recorded time and automatic rounding to a configurable billing unit if desired. A slip can be Recorded for later billing, or sent straight to Create Invoice. Multiple Activity Slips presents a grid for entering several slips for the same employee at once -- described as convenient for a weekend catch-up session, processing a subcontractor's report, or reviewing a photocopy log.
Timesheets track activities for a specific employee primarily for payroll purposes, but can optionally double for Time Billing when the System preference is enabled. Where an Activity is Chargeable, its timesheet entry must be linked to a Customer; non-chargeable activities may still be allocated to a Job and/or Customer even though they won't be billed. If Timesheets are used for payroll only, the Activity and Customer columns simply don't appear. The View Activity Log offers a Diary View ("who," "what," and "when," without billing detail) and a Detail View (adding units, adjustments, net, billed, and balance), both zoomable into the underlying activity slip.
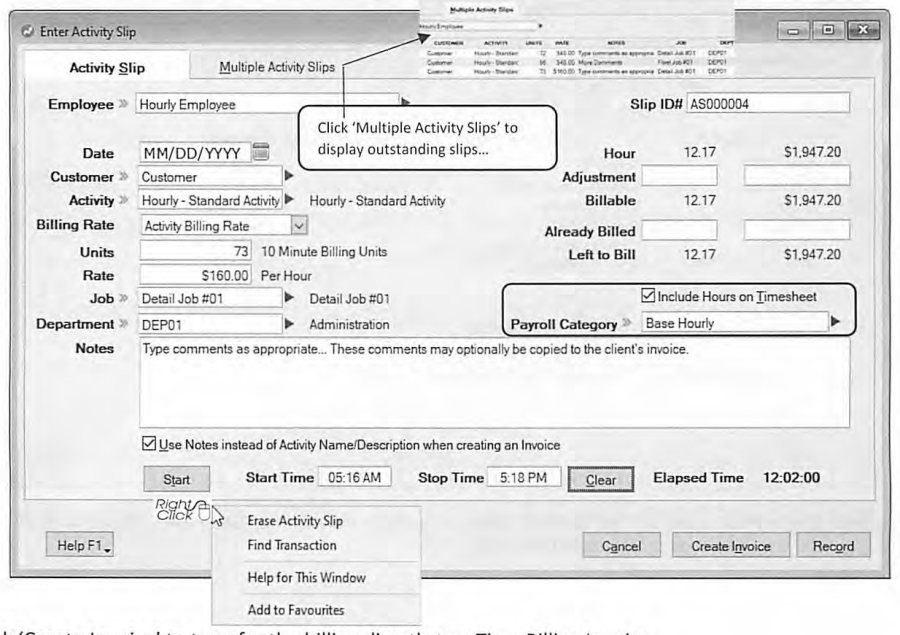
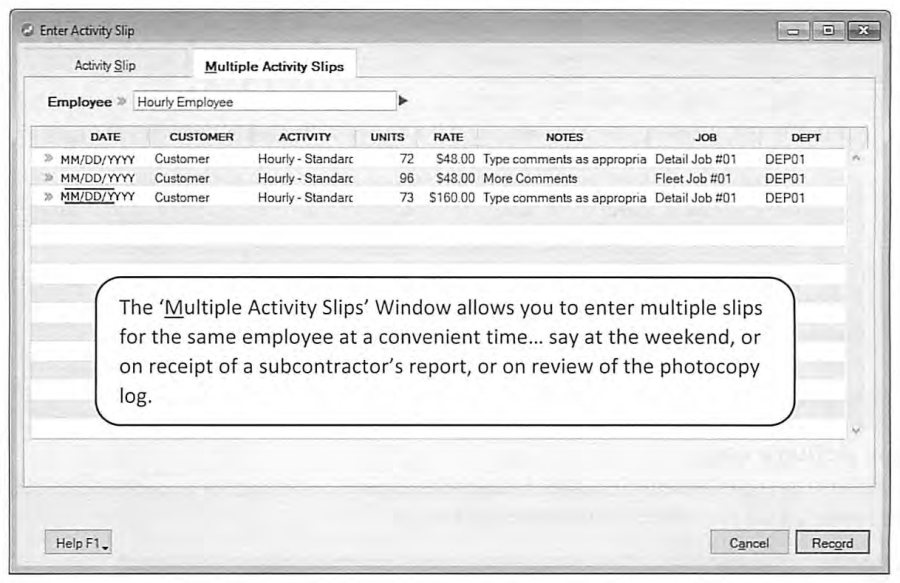
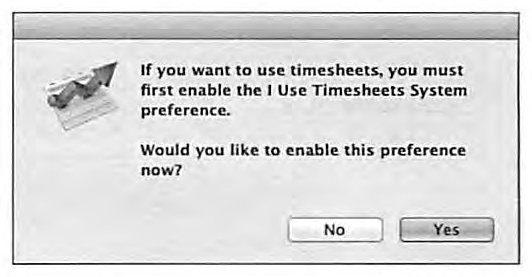
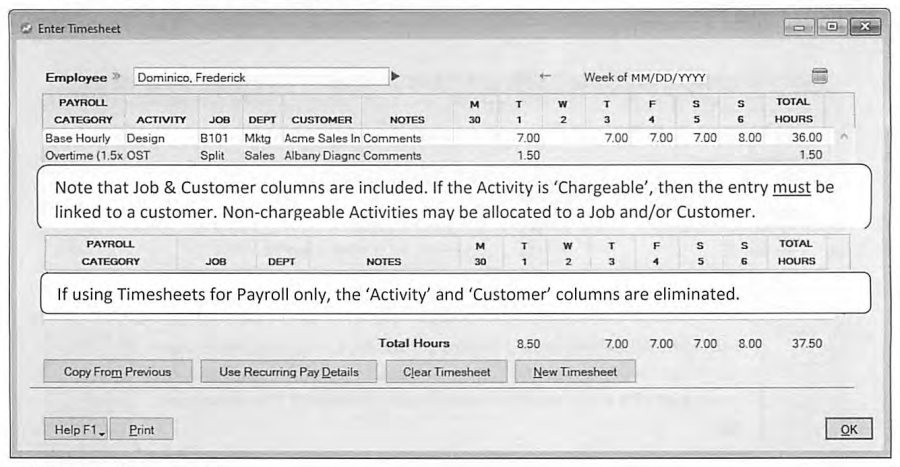
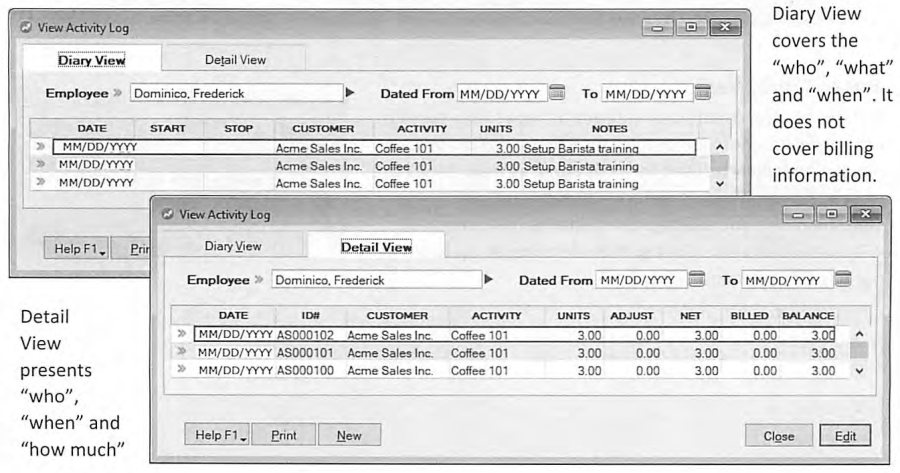
Preparing Time Billing Invoices
Source: p.144-146
Prepare Time Billing Invoice lists every customer with an open Work-In-Progress balance at retail (billing-rate) value -- WIP can alternately be valued at cost, using reports covered in Period End Procedures, and the guide advises discussing the right approach with an AccountEdge Certified Consultant or accounting professional wherever WIP could be material at period end. Selecting a customer shows their full WIP list, splittable between "Work in Progress" and "Completed Work" tabs, viewable by Employee/Vendor or Job, and toggleable between dollars and hours/units. Activities can be consolidated per customer/job before invoicing, organized with Headers and Subtotals for multiple jobs on one invoice, and billed using the original activity slip Notes instead of the default activity name. Once fully billed or adjusted, a slip's "Left to Bill" reaches zero and it moves to the Completed Work tab automatically. A worked example shows a Professional-layout Time Billing invoice combining time-billing charges, an inventory item sale, and reimbursable expenses on one document, with Headers and Subtotals separating each category clearly for the customer.
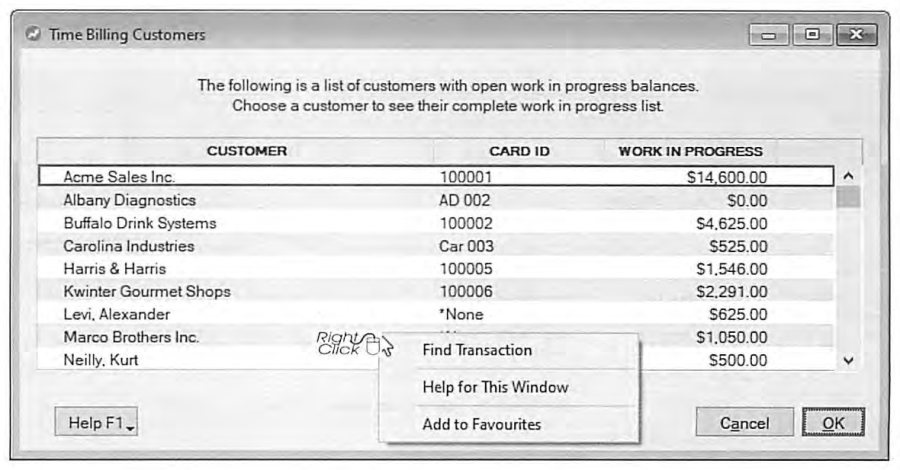
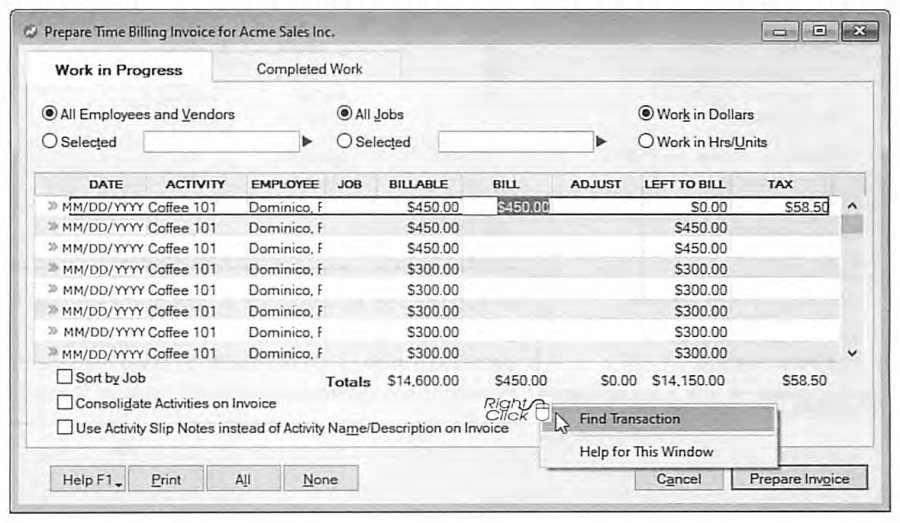
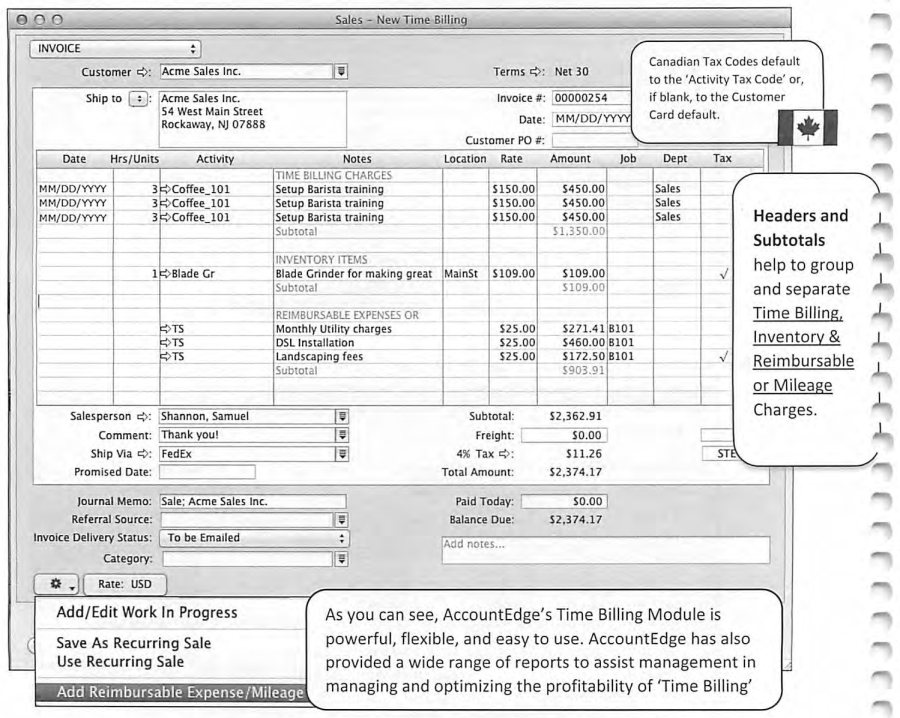
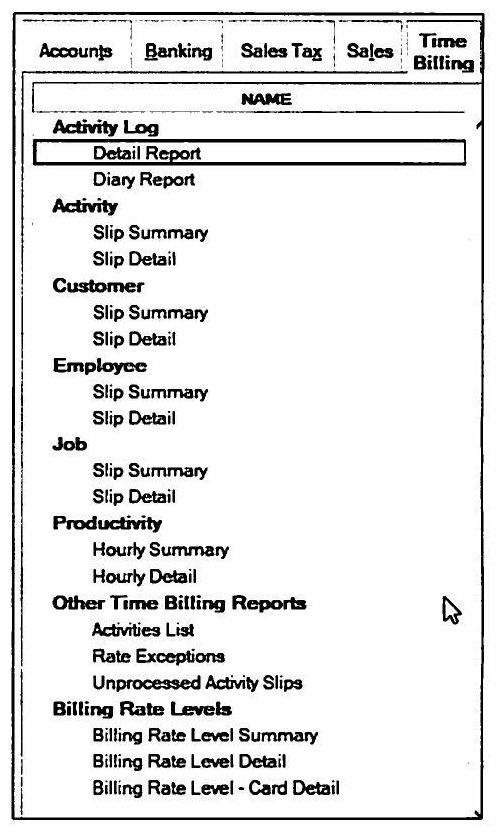
Time Billing Reports
Source: p.146
The Time Billing Reports index groups Slip Summary/Detail by Customer, by Employee, and by Job, a Productivity family (Hourly Summary/Detail), and Other Time Billing Reports covering Rate Exceptions, Unprocessed Activity Slips, and Billing Rate Levels (Summary, Detail, Card Detail). As elsewhere, the guide recommends deliberately exploring each report's Filter and Design/Customize options rather than assuming a report's default presentation is the only one available.
Purchases Entry Screen -- Overview and the Three Purchase Statuses
Source: p.147-148
Enter Purchases records what a business buys, in one of four layouts (Service, Item, Professional, Miscellaneous) and one of three statuses. A Quote stores a vendor's quotation -- it doesn't touch the To Do List's Stock Alert or Orders tabs, and is tracked instead through the Purchases Register's Promised/Follow-Up date fields. An Order is a Quote that's been accepted or confirmed, reflected in both the To Do List and Purchases Register, and impacting the Stock Alert tab for inventory orders. A Bill is the status where goods or services have actually been received and the transaction needs recording. Lists > Sales & Purchases Information (covered on page 109) supplies the same shared Comments, Shipping Methods, and defaults used on the sales side.
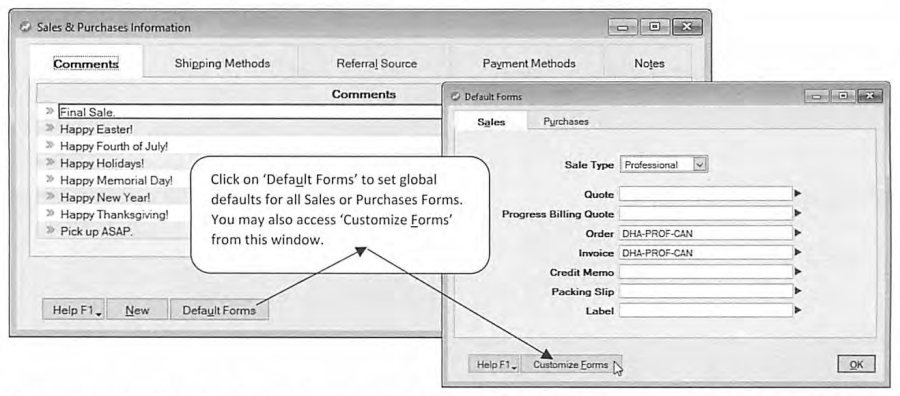
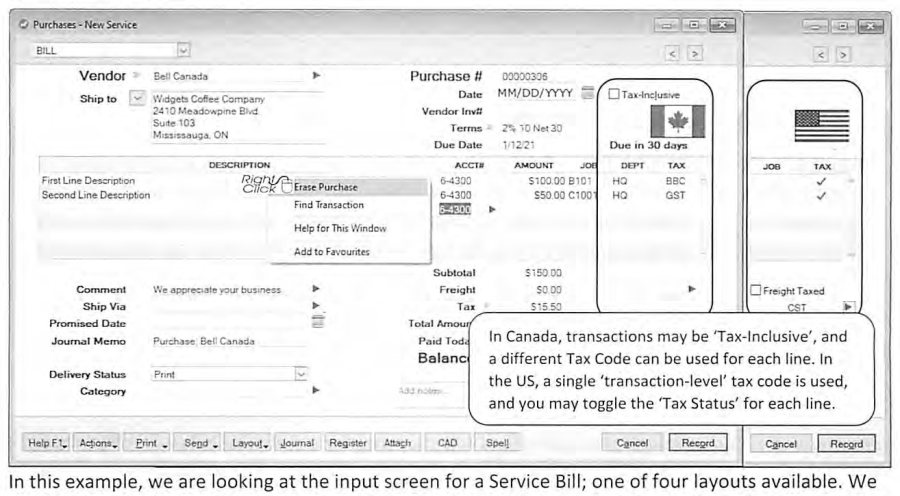
Vendor, Terms & Purchase # Fields
Source: p.149-150
Vendor entry works exactly like Customer entry on the sales side -- Easy Fill completion, "New" to jump into the full Card File, "Easy-Add" for a minimal card with default terms and buying information. Ship To defaults from the vendor's card, or can be swapped to "My Comp. Addr." (the company's own address), any of the vendor's five addresses, "Another Card," or typed manually; the guide highlights a specific use for project-based businesses like construction or renovation contractors: selecting a Customer's card as the "Ship To" on a Purchase Order issued to a subcontractor, so materials are shipped directly to the job site under the client's own address. Purchase # defaults via auto-increment but accepts up to eight alphanumeric characters, with the same alpha-suffix trick as sales invoices for mixing computer-generated and handwritten serialized purchase orders without breaking the numbering sequence. Vendor Inv # (up to 20 alphanumeric characters) records the vendor's own invoice number for cross-reference.
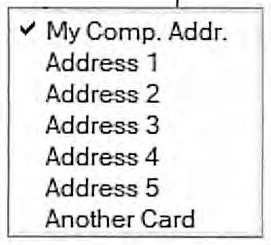
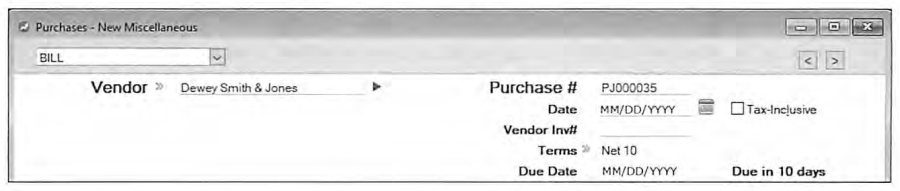
Purchases Layouts -- Header & Line-Entry Differences
Source: p.150-152
Service and Professional layouts present Description, Acct#, Amount, Job/Dept, and Tax, with Professional adding a per-line service Date; the Acct# defaults from the vendor's Buying Details. Item layout adds Bill and Received (read-only, tracking quantity received to date) quantity columns, Backorder, Item Number with zoom-arrow drill-down, a Serial Number indicator where relevant, Location (once multiple locations exist), Price (defaulting from Last Cost or Standard Cost per the Inventory preference, editable to match the actual bill), and Disc% (from the vendor's Volume Discount setting). Miscellaneous layout -- Description, Acct#, Amount, Job/Dept, Tax -- is for purchases where no printed form is needed at all. As on the sales side, Headers, Subtotals, and line insert/delete are available via right-click or keyboard shortcut throughout.
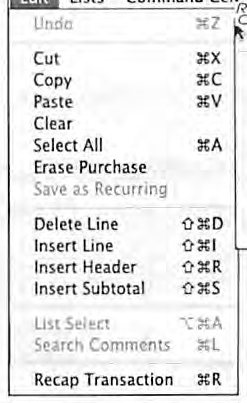
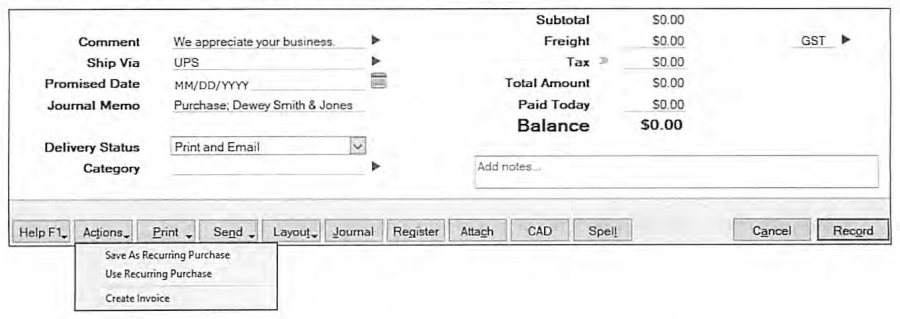
Purchases Summary Section & Bottom Icons
Source: p.152-154
The Summary section mirrors its sales-side counterpart: Comment, Ship Via, Promised Date (tied to the Purchases Register and To Do List), Freight (with its own tax default, settable globally or per-vendor), Tax total, Total Amount, Journal Memo, Paid Today (which queues a check against the default "Bank Account for Paying Bills" for the currency used, requiring confirmation of payment particulars at the moment the purchase is recorded), Bill Delivery Status, and Balance Due. The bottom icon row -- Help, Actions, Print, Send To, Layout, Journal, Register, Attach, Currency, Spell, Cancel, Record -- is consistent across layouts except Miscellaneous, which again omits Print, Send To, and Register since it's never printed or managed that way.
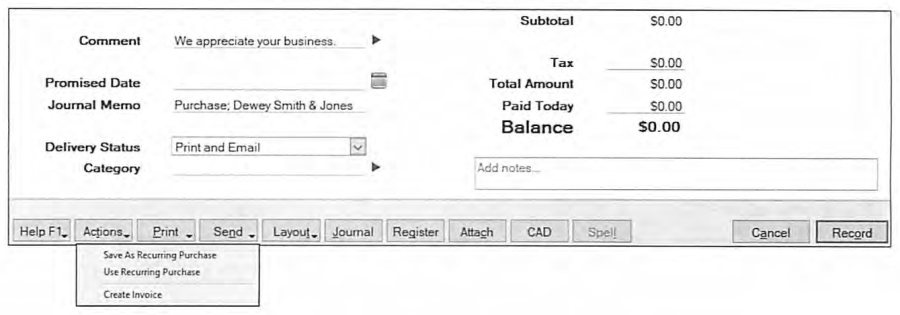
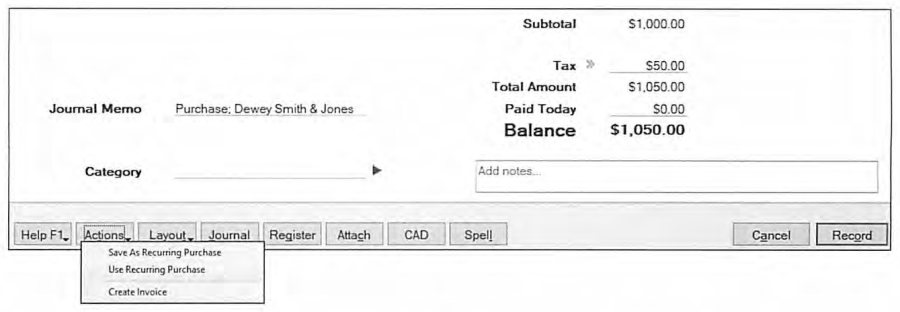
Purchases Register -- Editing, Quotes & Orders Tabs
Source: p.155-158
The Purchases Register mirrors the Sales Register's structure across All Purchases, Quotes, Orders, Open Bills, Returns & Debits, and Closed Bills tabs, each filterable by vendor and date range. In Edit Mode, a History icon reviews payments applied to date, Action Menu > Pay Bill applies an additional payment, and Action Menu > Create Invoice jumps directly to a new Sales Invoice pre-populated with the purchase order's line items and only requiring a customer selection -- specifically valuable for completing "special order" purchases made on a customer's behalf.
From the Quotes tab, a quote can Change to Order, Change to Bill, be Deleted, or Copied, governed by the same "Retain Original Invoice Number" and "Delete Quotes upon Converting" preferences (Setup > Preferences > Purchases) described on the sales side, with the identical trap if the delete-on-convert option is left unchecked. From the Orders tab, vendor payments applied to an order are automatically recognized as Vendor Deposits (an asset such as "Vendor Deposits Paid," trackable by originating currency) rather than a payable settlement, since no Bill -- and therefore no payable -- exists yet; converting the order to a Bill later automatically withdraws the deposit and applies it as payment. Receive Items lets received inventory become available for sale before the actual vendor bill arrives, posting a temporary value to an account such as "Accrued A/P -- Inventory" that self-corrects once the real bill is entered -- reconciling that account is flagged as an important Period End consideration.
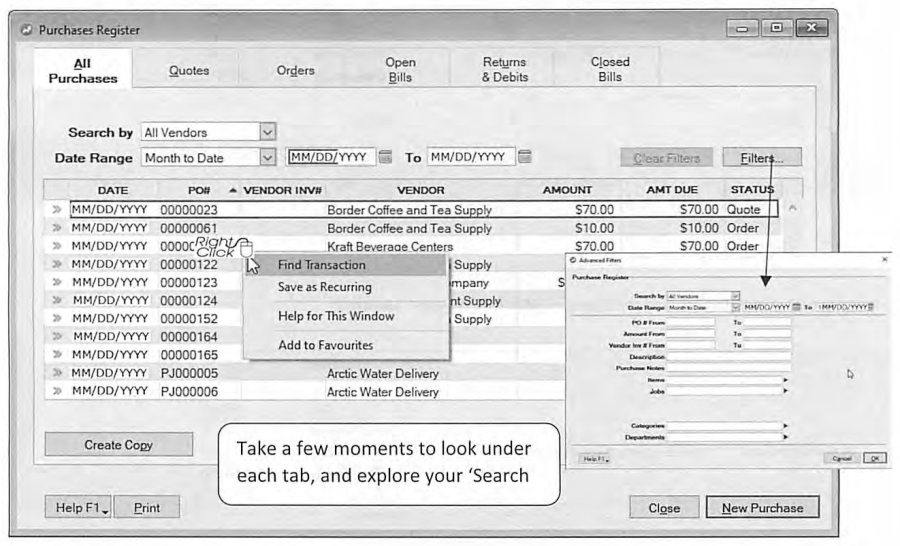
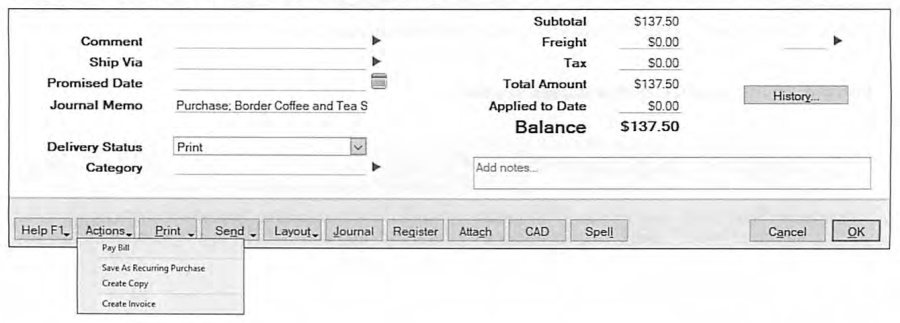
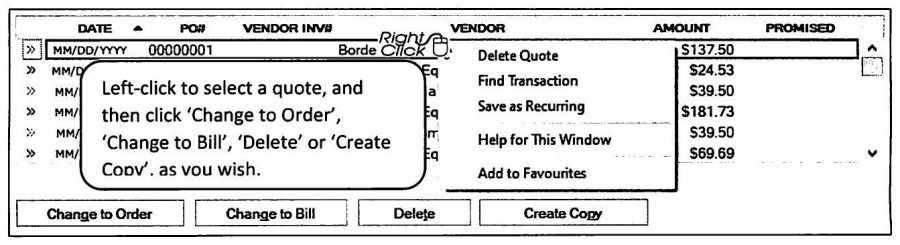
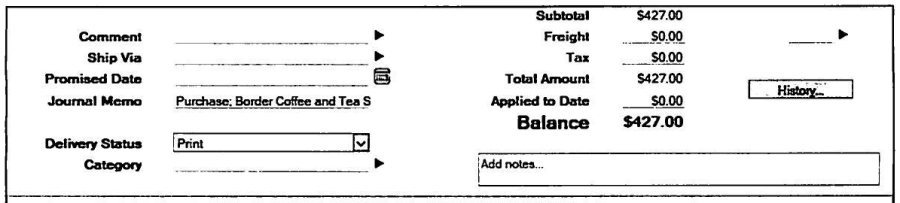
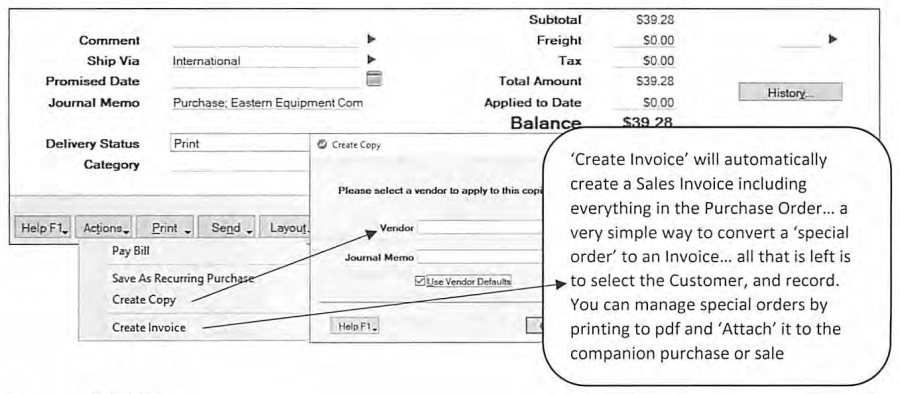
Returns & Debits, and Closed Bills Tabs
Source: p.158-160
Receive Refund records an actual refund from a vendor, defaulting to the linked Bank Account for Customer Receipts (adjustable, and dependent on the originating currency and the "Group with Undeposited Funds" preference). Apply to Purchase settles a debit memo against a specific outstanding Order or Bill -- intuitive when the debit is meant to cancel or void that purchase outright. As on the sales side, two limitations repeat here in mirror image: there's no printable record of an Apply to Purchase settlement for vendor communication, and outstanding Returns & Debits cannot be pulled into the standard Pay Bills window, so they must be settled as a separate step. Closed Bills reviews settled purchases within the chosen filters; the guide also notes that Recurring Templates, handled separately in legacy AccountEdge, are now managed entirely under Lists > Recurring Transactions instead of inside the Purchases Register.
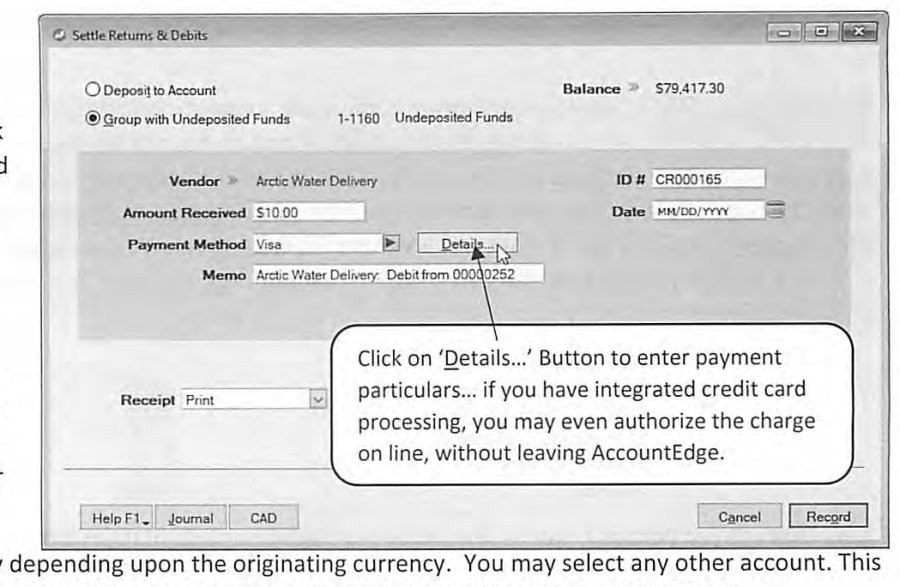
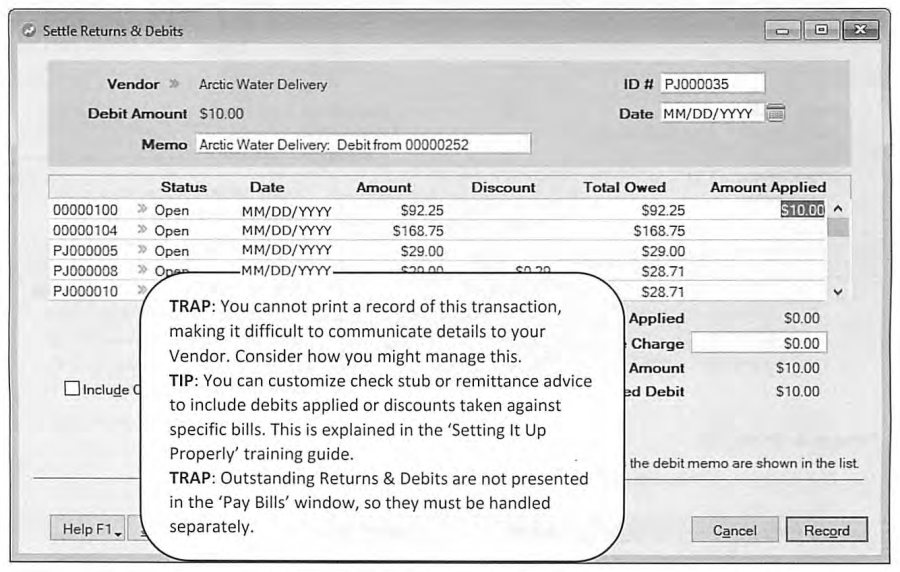
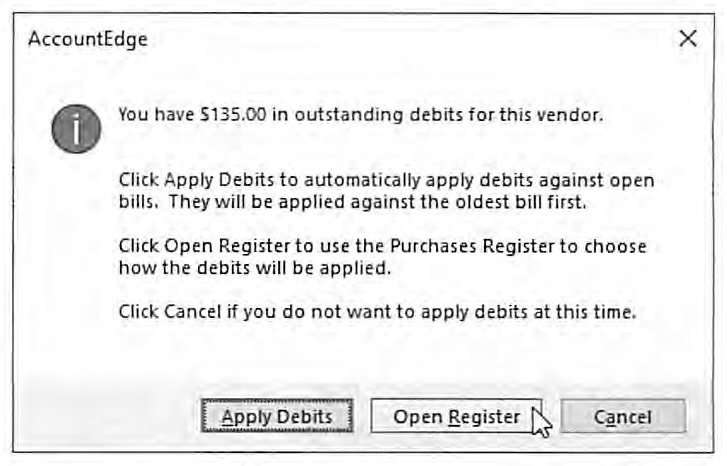
Pay Bills & Settling Vendor Debits
Source: p.160-163
Pay Bills opens from the Purchases Register's various "Pay Bill" buttons and, like Receive Payments, prompts to Apply Debits automatically (against the oldest open bill first), Open Register for manual settlement, or Cancel, whenever the selected vendor has outstanding Debit Memos. Pay from Account is the linked Checking Account for Paying Bills (which can vary by currency), with Group with Electronic Payments available where Electronic Payments has been set up -- in which case the payment posts immediately to an "Electronic Payments Clearing" account rather than the bank account itself, with the vendor actually paid later when Prepare Electronic Payments transmits the batch.
Discount amounts calculate automatically when Vendor Terms include an early-payment discount and the payment falls within that window (editable manually if needed), and AccountEdge's Expiring Discounts tab in the To Do List surfaces bills with a discount about to lapse, so they aren't missed. Setup > Preferences > Purchases > "Apply Vendor Payments Automatically to Oldest Bill First" is one of three ways amounts get applied -- the others being the "Pay All" button (pays every open bill at once, ignoring Orders) or manual per-purchase amount entry. Finance Charge captures a vendor-billed late fee or a "cents over" manual check discrepancy, again with AccountEdge generating the required journal entry automatically. Include Closed Purchases allows posting a payment against an already-closed purchase -- useful for correcting an inadvertent duplicate payment discovered later.
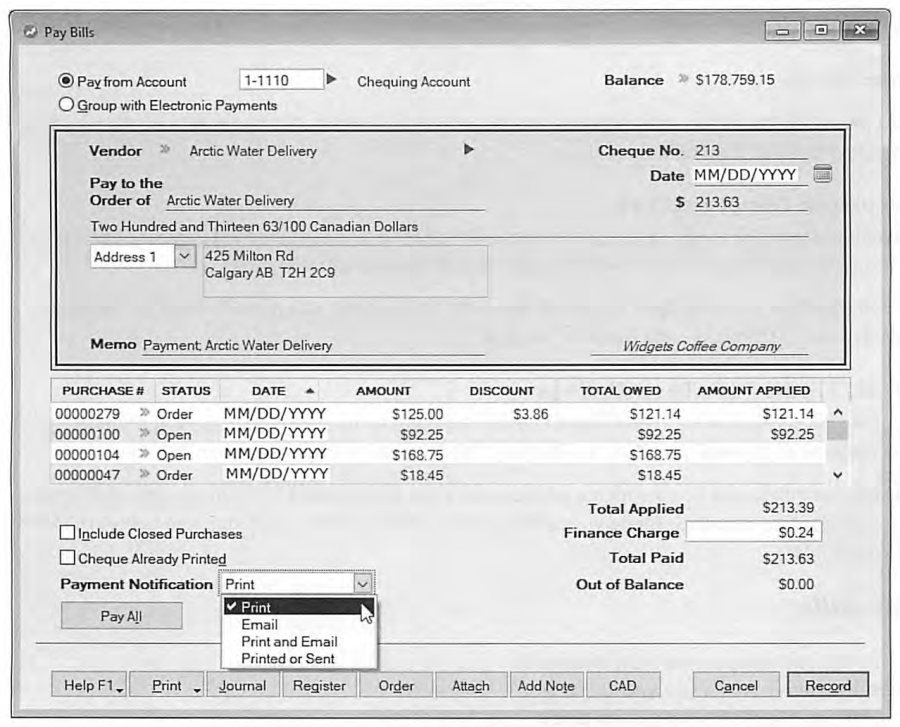
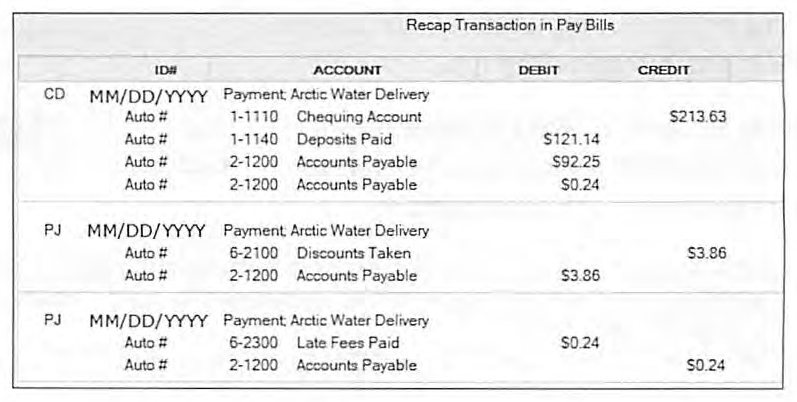
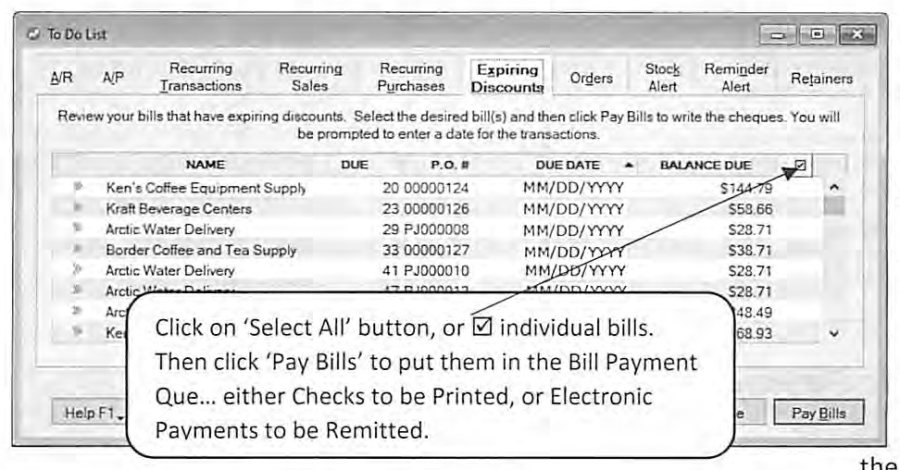
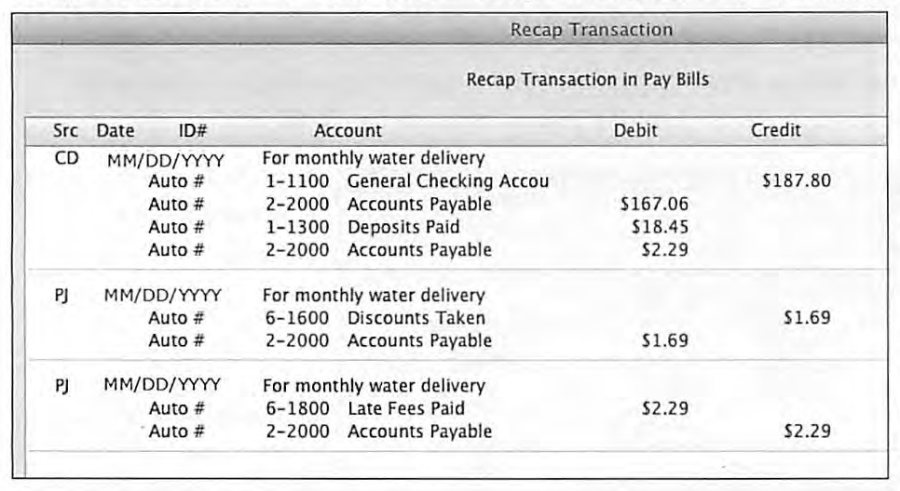
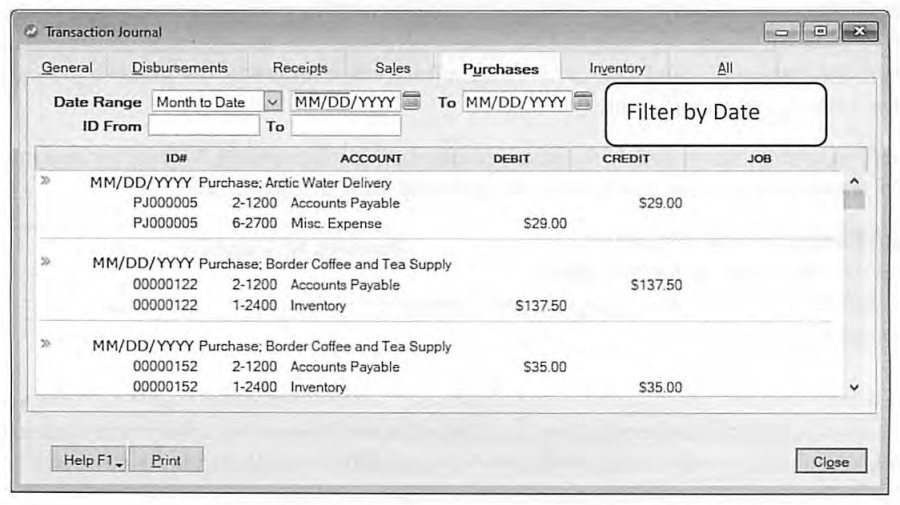
Analyze Payables & Purchases Reports
Source: p.164-166
Analyze Payables mirrors Analyze Receivables -- Summary, Vendor Detail, or Purchase Detail views with zoom-arrow drill-down, and a Filters option to switch aging from "Calculate Overdue Since Bill Date" to "Calculate Overdue Using Bill Terms," which the guide again notes can present "quite a different picture" versus the traditional 30-60-90 assumption; foreign-currency payables display converted to home currency in this screen. The Purchases Reports index groups Payables (Aging, Reconciliation, Summary With Tax), Item, Vendor (including Vendor Ledger), Purchase Register (mirroring the on-screen register tabs), Payments (Vendor Payment History, Vendor Payments, Vendor Payment Details), Other Purchase Reports, Transaction Journals, and Recurring/To-Do groupings -- with upgraders specifically pointed toward "Vendor Ledger" and the Recurring Transactions reports as recent additions worth a look.
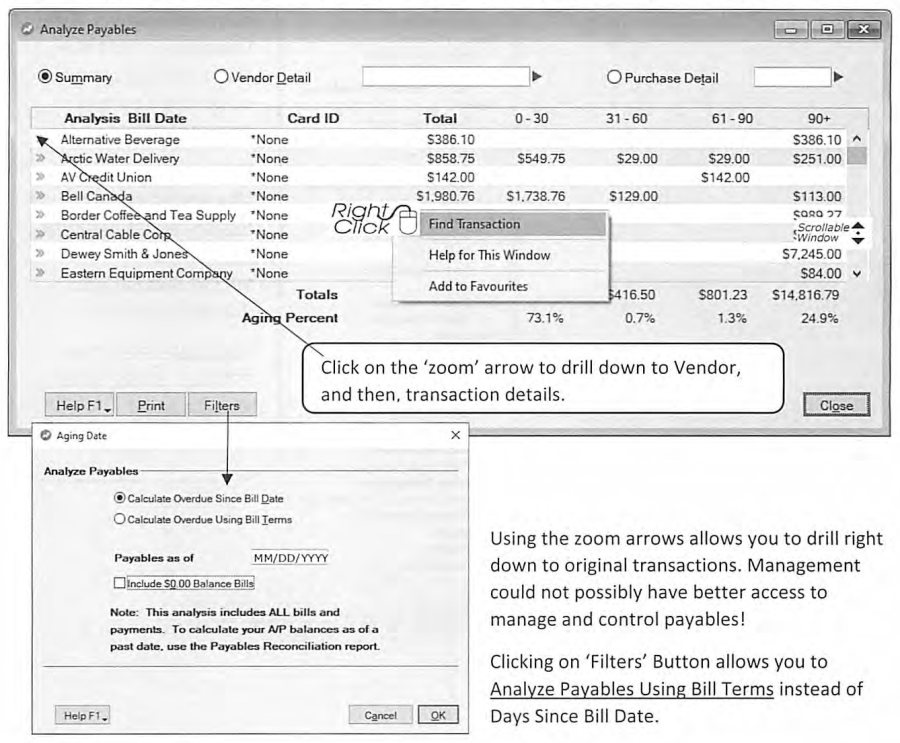
Print 1099s and 1096 (US)
Source: p.166-168
Preparing 1099s requires payroll to be set up even for businesses not using AccountEdge Payroll for actual pay runs, since 1099 tracking is keyed to the company file's Current Payroll Year (Setup > Payroll & 1099 Information). Non-payroll users still need Payroll Updates installed (current tax tables aren't required for 1099 purposes -- only that tables are loaded at all) and must confirm the Current Payroll Year is correct, starting a new payroll year if needed via File > Start a New Year > Start a New Payroll Year -- a step the guide flags with real caution, recommending multiple backups and an archival copy of the company file first, and cross-referencing the full Payroll training guide for anyone actively running payroll.
Each Vendor must be tagged with the correct 1099 category under its Buying Details tab, and tracking only begins from the date that category is set -- though AccountEdge can still generate correct 1099/1096 data with some manual entry at year-end if a vendor wasn't tagged from day one. Two important scope limits: 1099 reporting only includes transactions entered through the Purchases Command Center, so a payment made via Spend Money or a Record Journal Entry never counts toward a vendor's 1099 total; and exact filing procedures are deliberately left to AccountEdge's Help Files and product updates rather than fixed in the training guide, since 1099 rules and forms change at each calendar year-end -- support-plan subscribers receive these updates automatically, and others are directed to Help > Check for Product Updates. The workflow itself is straightforward: Purchases > Print 1099s and 1096 > select Form (1099 or 1096) and Payroll Year > select vendors and apply Advanced Filters (excluding specific accounts or payments as needed) > print, then repeat for the 1096 summary when prompted.
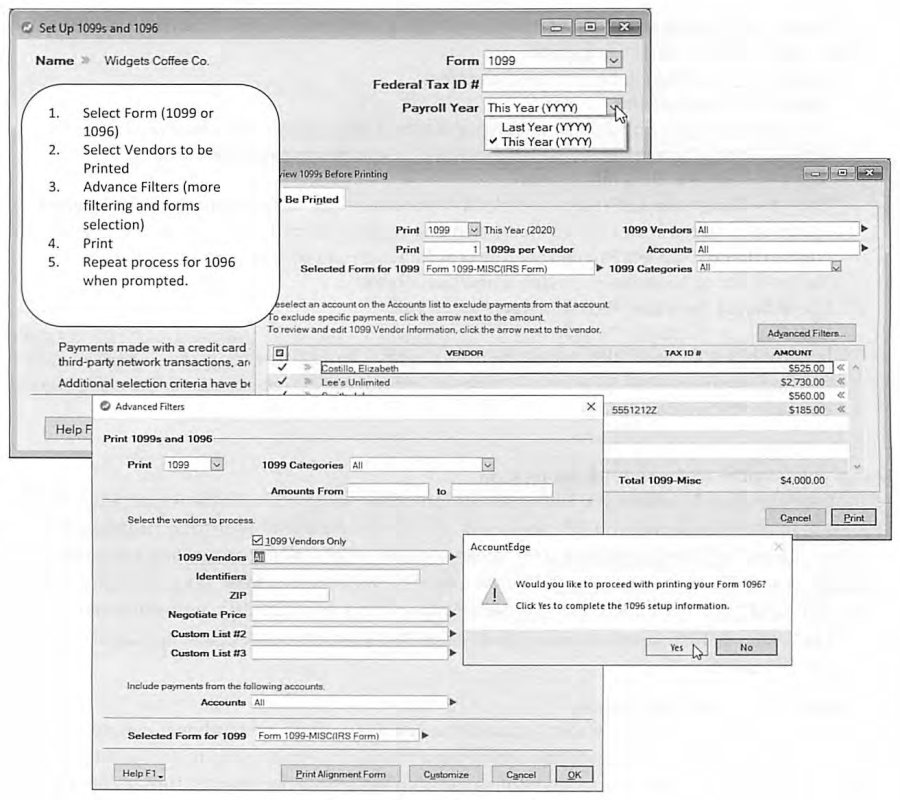
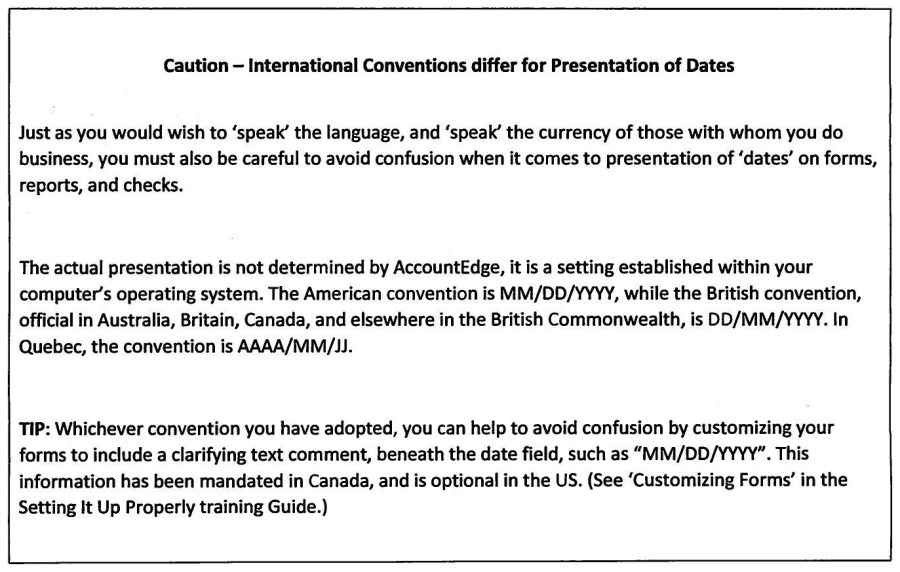
Multi-Currency -- Defining the Opportunity & Currency Exchange Accounts
Source: p.169-170
The guide frames multi-currency capability as a real competitive advantage in an era of free trade and e-commerce -- "speaking the currency" of trading partners the way a traveler might speak their language -- while stressing that financial statements must still "speak" only the business's home currency (US Dollar in the American edition, Canadian Dollar in the Canadian edition, and so on). AccountEdge's country editions are localized for local sales tax, payroll, and reporting conventions, so the guide notes plainly: if your default home currency looks wrong, "chances are that you have purchased the wrong version for your country." A related caution applies to date presentation -- the American MM/DD/YYYY convention, the British/Commonwealth DD/MM/YYYY convention (official in Australia, Britain, and Canada), and Quebec's AAAA/MM/JJ format are all determined by the computer's own operating system settings, not by AccountEdge, and a form customization adding a small "MM/DD/YYYY" clarifying label beneath the date field (mandatory in Canada, optional in the US) is offered as a simple way to avoid cross-border confusion.
Carrying a foreign-currency account balance requires a paired "Currency Exchange Account" linked to it, holding whatever adjustment is needed so the two balances together equal the correct home-currency value. The guide's worked example: a Canadian-dollar receivable of Can$1,000.00 paired with a Currency Exchange Account showing (US$215.10) nets to US$784.90 -- the correct home-currency valuation on a US-based Balance Sheet.
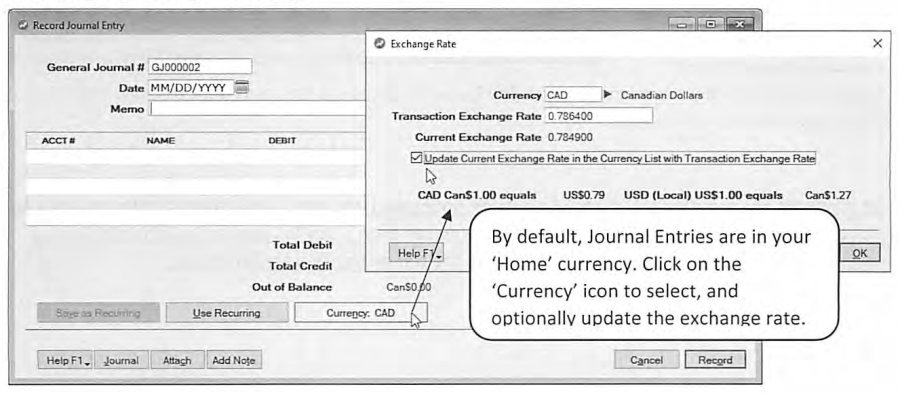
Entering Multi-Currency Transactions & Setting the Exchange Rate
Source: p.170-172
Cards default to the home currency; recording a Sale or Purchase in a foreign currency requires selecting that currency directly in the card file first, at which point AccountEdge uses it automatically on every transaction linked to that card. Journal Entries are normally processed in the home currency, but a Currency icon lets you select a foreign currency, view the Transaction (and Current) Exchange Rate, and optionally update the Current rate in the master Currency List at the same time. The guide's general practice recommendation for anyone new to multi-currency: Recap Transaction (Ctrl-R / Cmd-R) on every transaction until you're fully comfortable reading how the exchange calculation actually landed.
Because exchange rates can be volatile and differ between buying and selling a currency, AccountEdge also provides a Currency Calculator (under the Help menu) for the three common scenarios -- knowing the foreign amount and needing the home-currency equivalent, knowing the home amount and needing the foreign equivalent, or knowing both amounts and needing to solve for the implied rate. Entering any two of the three fields and clicking Calculate solves for the third, and "Copy & Close" places the result on the clipboard for pasting straight into the transaction being processed.
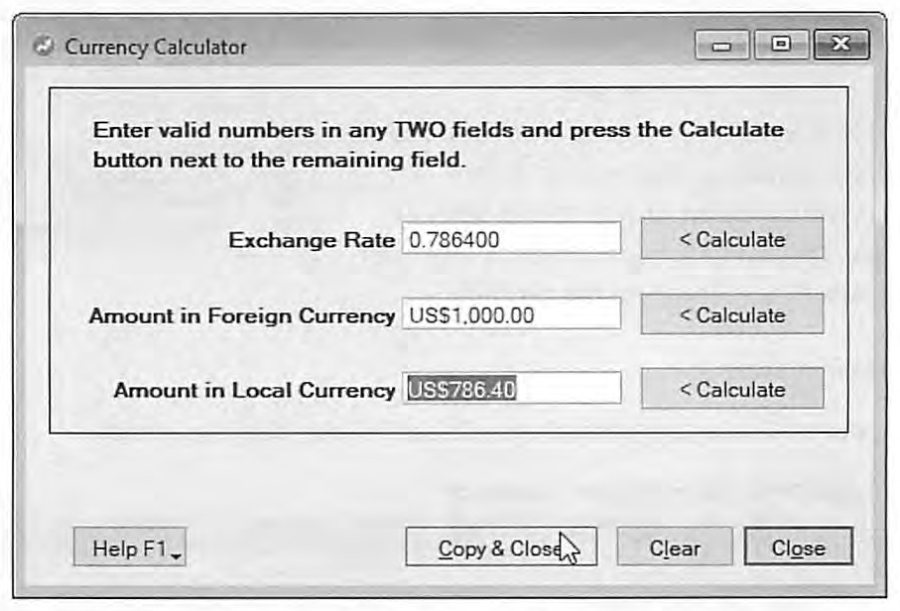
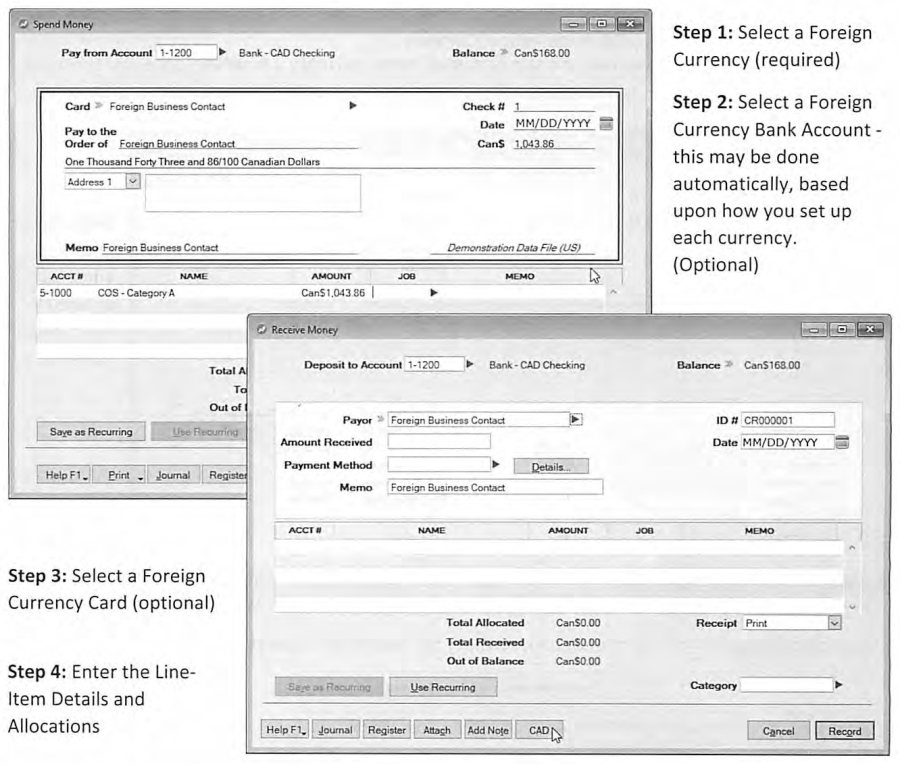
Spend/Receive Money, Sales & Realized/Unrealized Currency Gains
Source: p.172-175
Spend Money and Receive Money in a foreign currency follow a seven-step pattern: select the foreign currency, select (or let AccountEdge auto-select) a foreign-currency bank account, optionally select a foreign-currency card, enter line-item detail and allocations, set the transactional exchange rate, Recap the transaction to confirm it, and record. AccountEdge deliberately restricts access to home-currency bank accounts and cards until a foreign currency has been explicitly chosen, specifically to prevent accidental cross-currency postings.
Sales, Purchases, and Customer/Vendor Payments in a foreign currency require no special first step at all -- AccountEdge reads the currency straight from the selected card and enters the transaction in that currency automatically, with amounts on screen shown in the foreign currency throughout (a Recap Transaction can toggle between "Display in Local Currency" and "Display in Originating Currency" to check the conversion). Two distinct gain/loss concepts matter here: a Currency Gain/Loss Realized is recognized automatically the moment a payment is applied to a foreign-currency receivable or payable and the payment-date exchange rate differs from the original invoice-date rate, with AccountEdge computing and posting the difference as part of applying the payment; a Currency Gain/Loss Unrealized instead relates to the change in home-currency value of foreign balances still outstanding at the time financial statements are prepared, and must be calculated and entered deliberately to keep statements accurate -- a process covered in full in the Period End Procedures guide and the AccountEdge Help Files. The guide's framing is direct about the stakes: unmanaged currency exposure "can cost you significantly (or you can make money)," which is precisely why AccountEdge automates the realized side and provides the tools to manage the unrealized side deliberately at each reporting date.
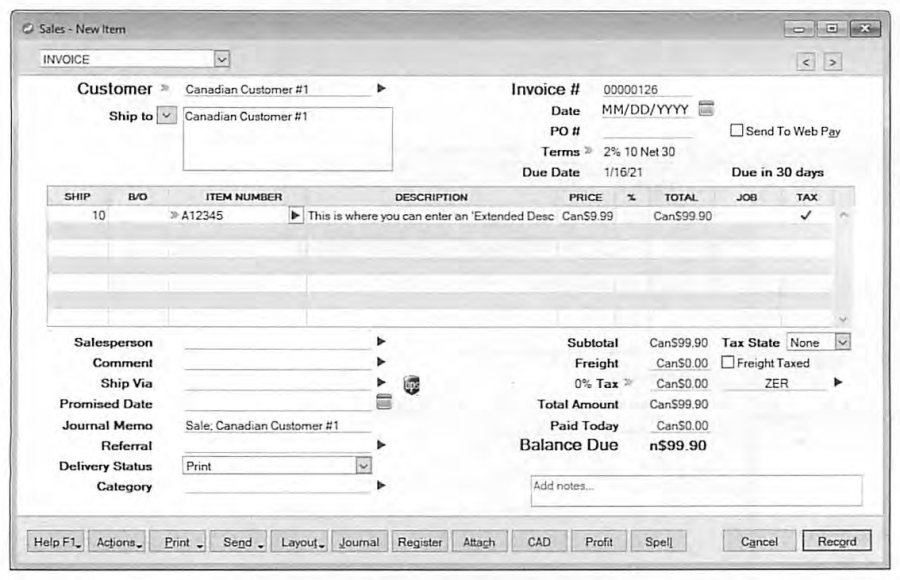
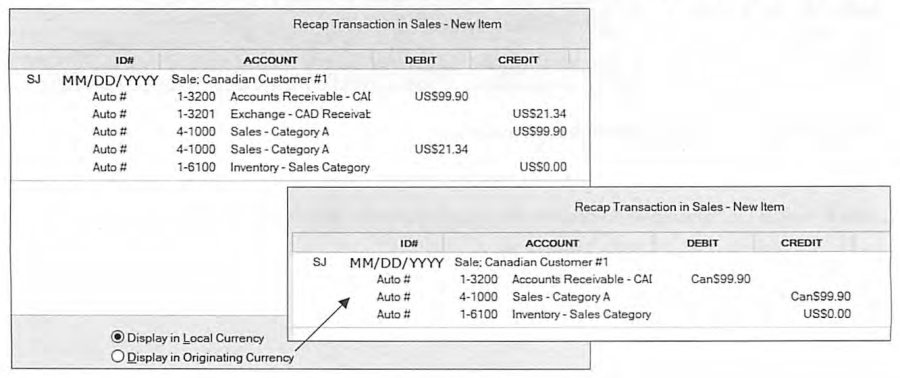
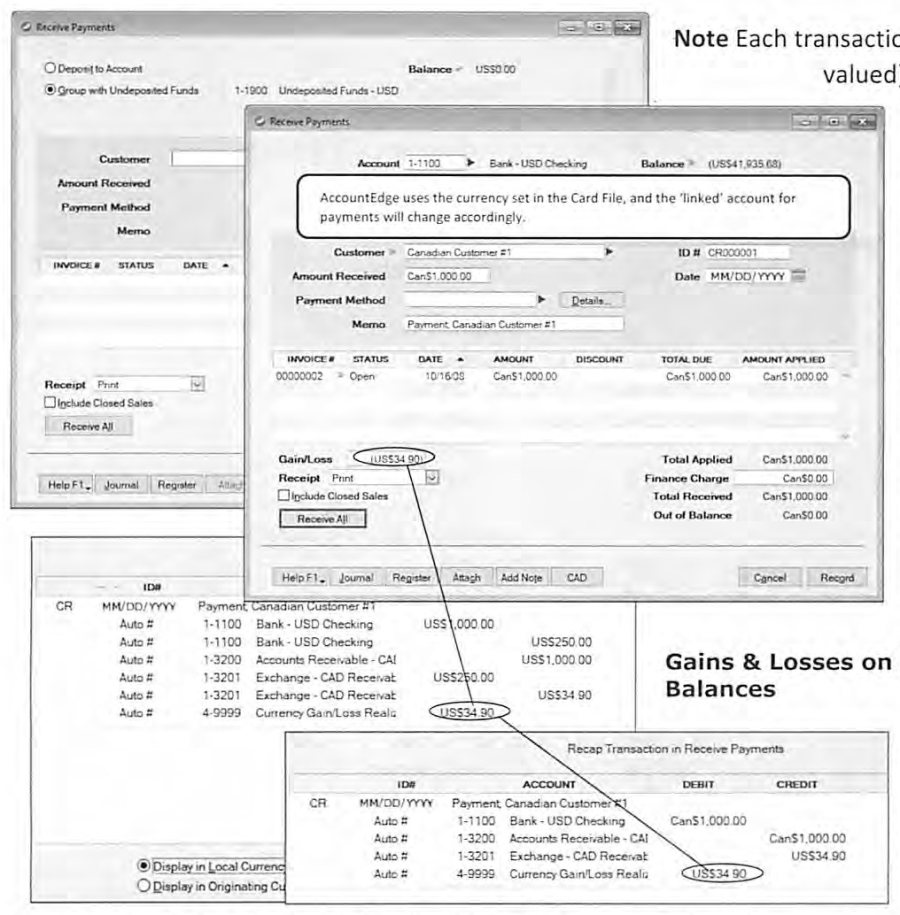
Full topic index
All 179 pages, headings as they appear in the original course guide. Page numbers refer to the source PDF. This is the longest of the four training guides; the index below is a representative selection rather than every page.
| Page | Topic |
|---|---|
| p.2 | Intermediate AccountEdge -- Daily Applications (course overview) |
| p.3 | Summary Table of Contents |
| p.5 | Setting Up Jobs / Header Jobs (Non-Postable) |
| p.7 | Time Billing Command Center |
| p.8 | Entering Multi-Currency Transactions |
| p.9 | Introduction to AccountEdge -- An Overview |
| p.10 | The Menu Bar |
| p.11 | Navigating in AccountEdge |
| p.13 | Right Mouse Click |
| p.14 | Find |
| p.16 | Report Customization Tools |
| p.17 | Report Customization -- Finishing |
| p.19 | Using Registers (Bank, Sales, Purchases & Item) |
| p.21 | To Create Mileage Slips |
| p.22 | Transfer Money |
| p.24 | Recurring Transactions -- Setting Up (An Overview) |
| p.26 | Recurring Transactions -- Alert Options (Remind or Notify) |
| p.27 | Recurring Transactions -- Editing Transaction Details |
| p.28 | Recurring Transactions -- Editing Schedule |
| p.29 | Company Data Auditor |
| p.31 | Business Insights |
| p.33 | Job Costing (see above) |
| p.34 | Job Numbering Conventions |
| p.38 | Job Details Tab |
| p.39 | Assigning Transactions to Jobs |
| p.40 | Locating the Job Column in Transaction Entry Windows |
| p.41 | Customer Reimbursable Expenses |
| p.43 | Reports on Job Costing |
| p.44 | Departmental Accounting |
| p.46 | Reports on Departments |
| p.47 | Card File Command Center (see above) |
| p.48 | Cards List |
| p.49 | Synchronize Cards |
| p.52 | Card Details Tab |
| p.53 | Custom List and Field Names |
| p.55 | Selling/Buying Details Tab |
| p.59 | Reminder (Contact) Log |
| p.61 | History Tab |
| p.62 | Inventory Command Center |
| p.63 | Setting Up Inventory Preferences |
| p.66 | Kit Items |
| p.67 | Serial Numbers |
| p.69 | Custom Lists |
| p.70 | Modifying Custom List Selections |
| p.72 | Item Information -- Selling Details Tab |
| p.73 | Customizing Price Level Names |
| p.76 | 'Don't Inventory' & 'Other' Inventory Items |
| p.79 | Set Item Prices |
| p.80 | Items Register |
| p.81 | Auto-Build Items |
| p.82 | Adjust Inventory |
| p.84 | Adjusting Item Quantities & Unit Costs |
| p.85 | Analyze Inventory |
| Page | Topic |
|---|---|
| p.87 | Banking Command Center (see above) |
| p.88 | Spend Money (see above) |
| p.92 | Print Checks |
| p.93 | Print/Email Payment Notifications |
| p.95 | Receive Money |
| p.97 | Print Receipts |
| p.99 | Prepare Bank Deposit |
| p.101 | Prepare Bank Deposit (With Electronic Payments Active) |
| p.104 | Reconcile Accounts (Bank Reconciliation) (see above) |
| p.105 | Bank Register (Bringing It All Together) |
| p.107 | Cash Flow Worksheet (Analysis) |
| p.108 | Reports on Banking |
| p.109 | Sales Command Center |
| p.111 | Sales Entry Screen -- Overview |
| p.112 | Progress Billing Quote |
| p.122 | Sales Register |
| p.124 | Quotes Tab |
| p.125 | Orders Tab |
| p.128 | Print/Email Invoices (see above) |
| p.130 | Receive Payments (Customers) |
| p.132 | Print Receipts (Receive Customer Payments) |
| p.135 | Transaction Journal |
| p.137 | Sales Reports |
| p.139 | Activity Profiles |
| p.141 | Entering Activity Slips |
| p.143 | Timesheets for Time Billing and Payroll (see above) |
| p.146 | Time Billing Reports |
| p.147 | Purchases Command Center |
| p.148 | Purchases Entry Screen -- Overview |
| p.155 | Purchases Register |
| p.157 | Orders Tab (Purchases) |
| p.160 | Closed Bills Tab |
| p.164 | Analyze Payables |
| p.165 | The Purchases Reports |
| p.171 | Setting the Transaction Exchange Rate |
| p.173 | Sales & Customer Payments, Purchases & Vendor Payments |
| p.175 | Index |