Course aims
Source: Enhanced US Payroll, p.2 & Enhanced Canadian Payroll, p.2
Key topics in depth
These five topics were pulled out in full because they directly back up existing Payroll Troubleshooting / Payroll Forms content on the Hub.
Setting up the Payroll Module
Source: Enhanced US Payroll, p.7-8
Paying Payroll Liabilities
Source: Enhanced US Payroll, p.65-67
Preparing Payroll Tax Forms & Printing 940/941
Source: Enhanced US Payroll, p.68-69
Reviewing & Editing Employee's T4 Information
Source: Enhanced Canadian Payroll, p.71-72
Starting a New Payroll Year
Source: Enhanced Canadian Payroll, p.75-76
US Payroll -- full walkthrough (p.1-78)
This section works through all 78 pages of the "Enhanced US Payroll" course guide in order, grouped by topic rather than page-by-page, covering setup through year-end procedures.
Course Aims, Prerequisites & the Tips/Tricks/Traps Icons
Source: Enhanced US Payroll, p.2-3
The course targets existing and prospective business owners, bookkeepers, and the accounting professionals who support them, with a Management Accounting focus running "from Setup through Period End Procedures." Recommended prerequisites are completion of Setting It Up Properly and Daily Applications, or equivalent AccountEdge experience -- Payroll is deliberately the last course in the sequence, building on Job Costing, Departmental Accounting, and Card File concepts already covered. The guide explicitly does not teach general computer operation, and is candid that it "does not provide legal or tax advice" -- examples reflect a subjective interpretation of regulations, and readers are responsible for confirming requirements and obtaining appropriate professional advice, since payroll regulation changes constantly.
Throughout the guide, four margin icons flag recurring types of guidance: Tips, Tricks, Traps, and "Print & Save" reminders for information worth retaining in an employee's physical file. A fifth marker calls out special notes for users upgrading from earlier AccountEdge versions, since payroll setup often carries forward assumptions from a prior system that are worth revisiting rather than assuming still apply.

Expanded Data Import/Export -- Timesheets & Employee Payroll Details
Source: p.5-6
Import/Export functions, reached from the File menu in any Command Center, let "power users" integrate AccountEdge with outside Time Sheet/Clock systems or other HR software. Two payroll-specific uses stand out: exporting or importing Timesheet data directly from an external clock system (so hours don't have to be re-keyed by hand, and imported data flows straight into payroll processing and reporting), and bulk-importing or bulk-updating Employee Card payroll details -- described as especially valuable when adding a large batch of new employees at once, or pushing a company-wide change like an across-the-board raise, without editing each card individually.
Setting Up Payroll Using the Easy Setup Assistant -- Steps One through Four
Source: p.6-9
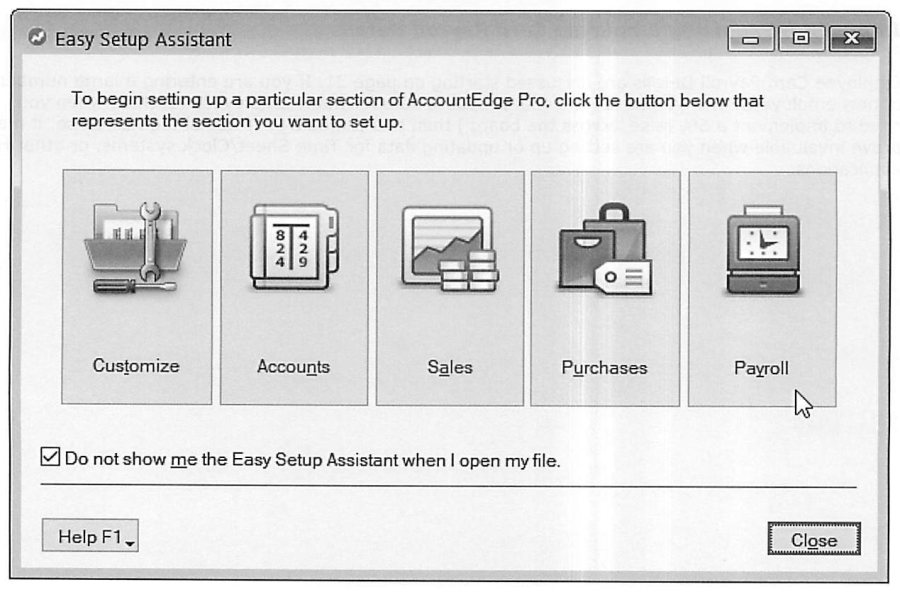
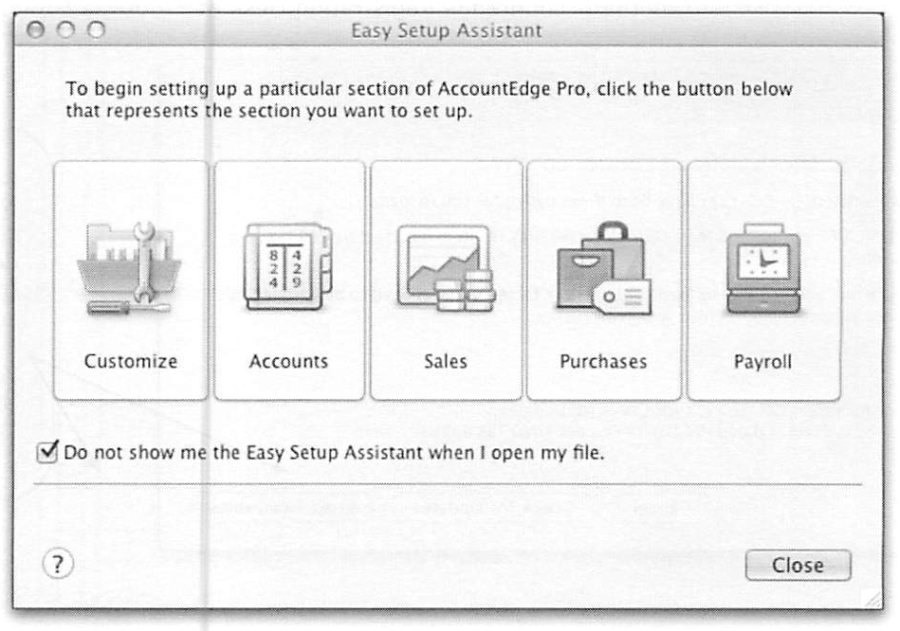
AccountEdge's payroll setup can accommodate unlimited Payroll Categories across Wages, Accruals, Deductions, Expenses, and Taxes, and the guide's strong recommendation is to read the entire training guide once before touching setup, since early decisions cascade forward. The Easy Setup Assistant (Setup > Easy Setup Assistant > Payroll) walks through loading tax tables, linking payroll accounts for wages/deductions/expenses, setting payroll defaults, entering employees, and adjusting the default Wages/Accruals/Deductions/Employer Expenses lists -- notably, it does not provide access to the Taxes list, which has to be managed separately.
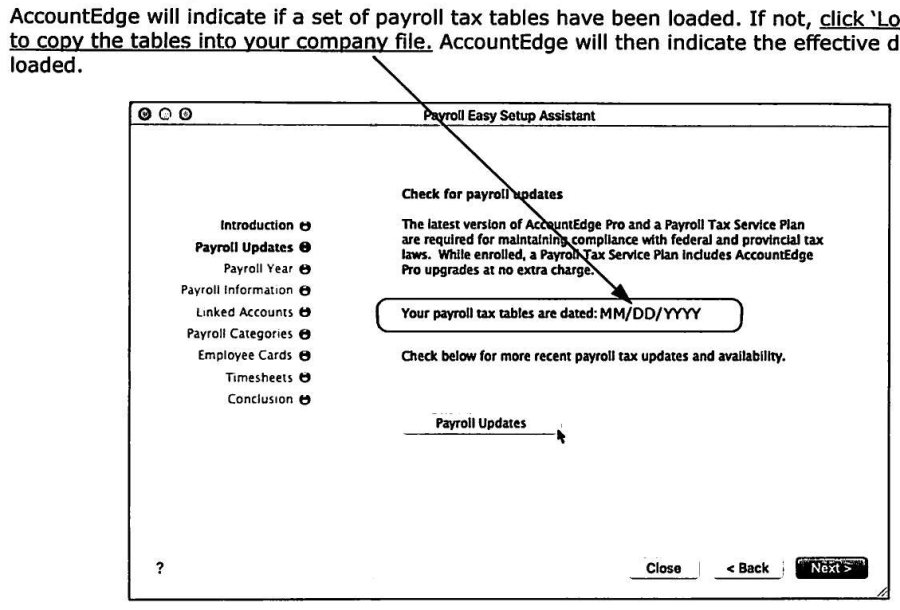
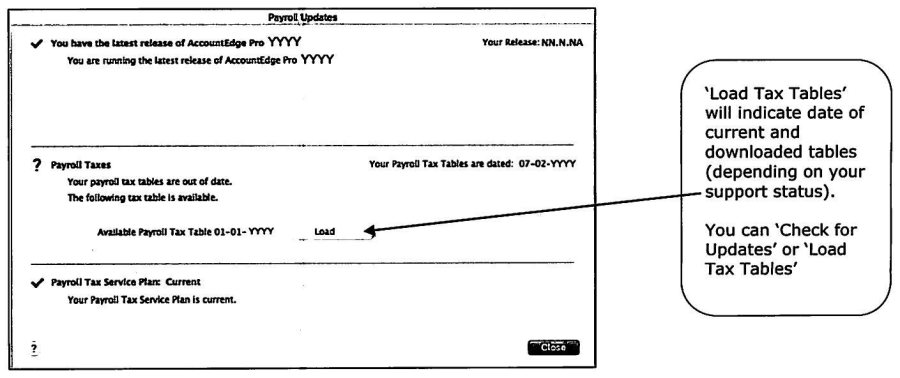
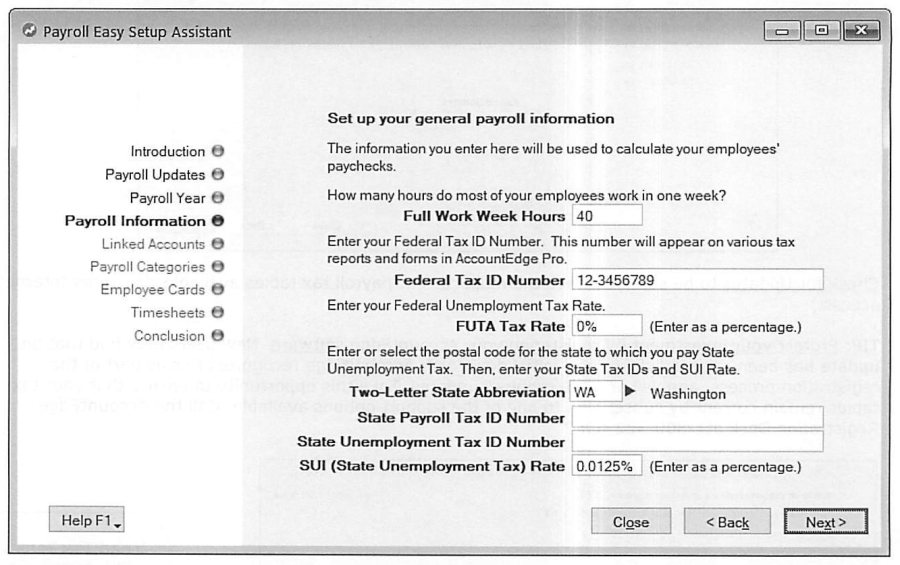
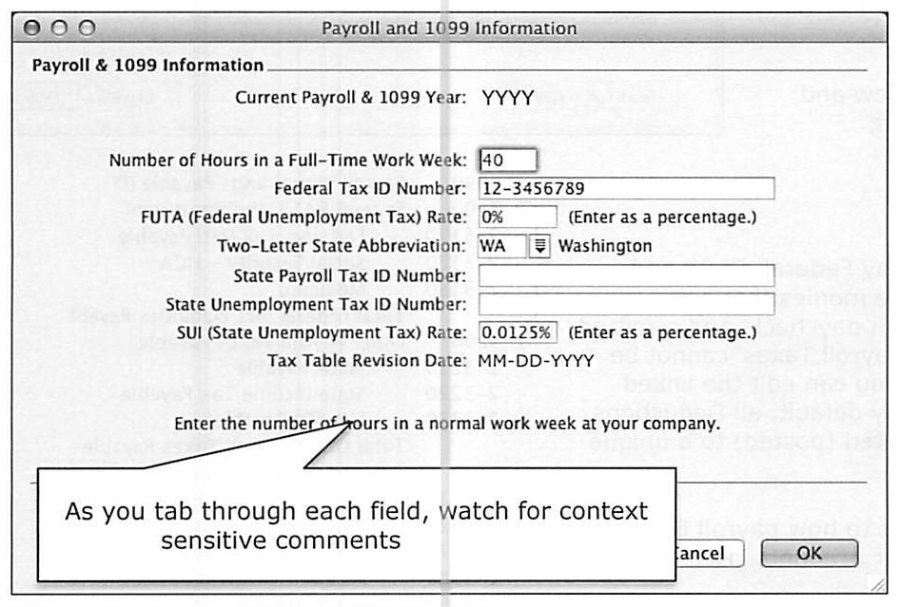
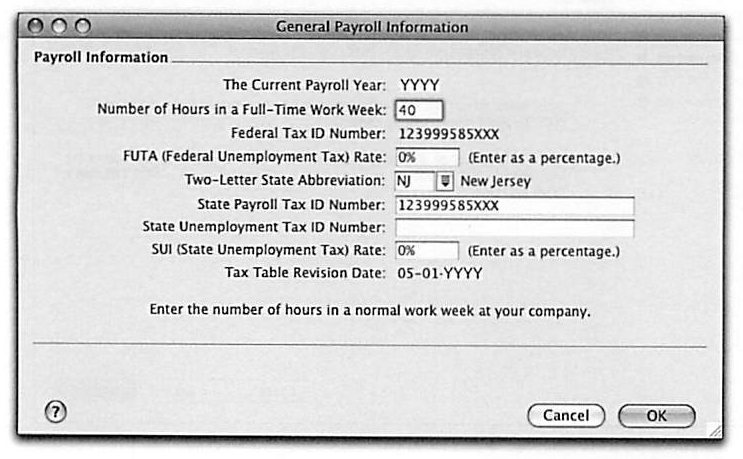
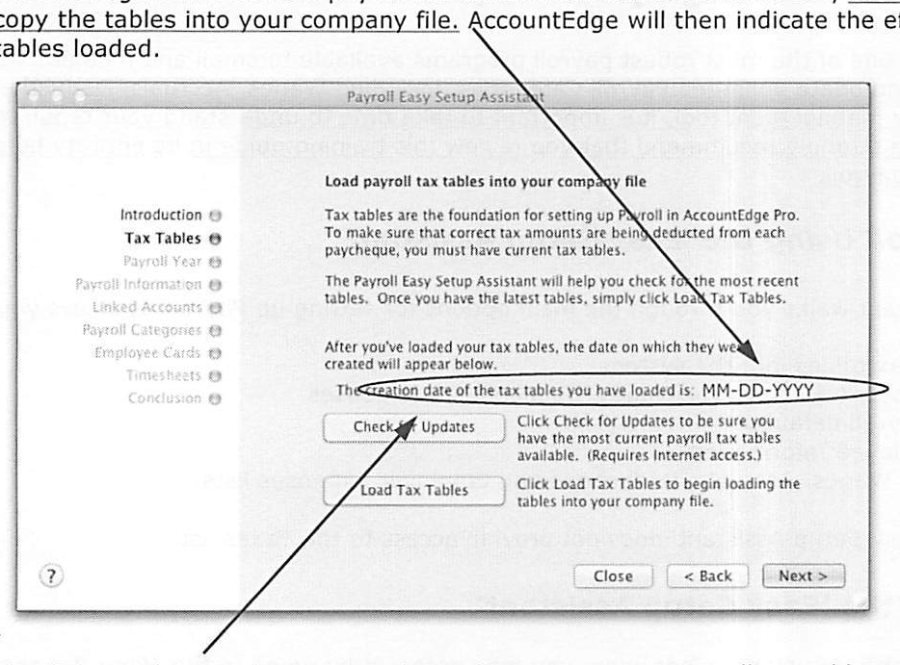
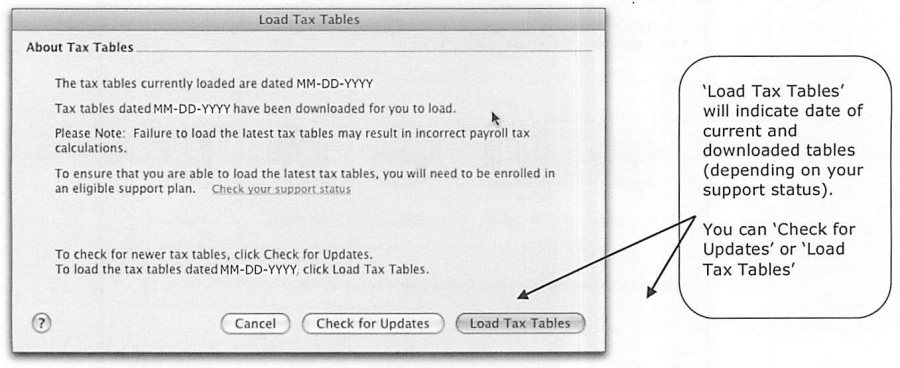
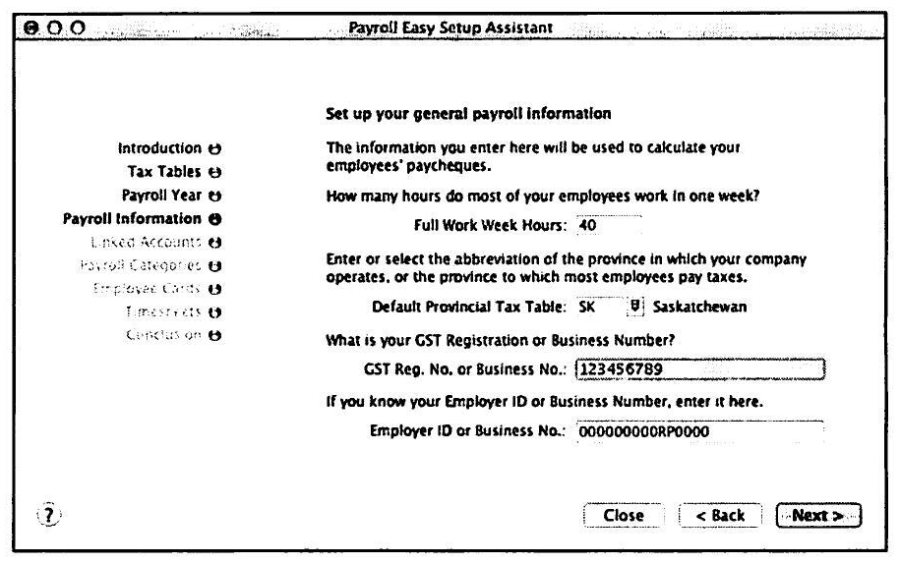
Step One sets up payroll generally; Step Two confirms Payroll Tax Tables are loaded, with AccountEdge displaying the effective date of whatever table is currently loaded and a "Load Tax Tables" button if none is present -- current users are warned that loading a new table over an existing one can change rates and limits on categories already in use, and should confirm with an AccountEdge Certified Consultant before proceeding if unsure. A Payroll Tax Service Plan is what keeps tables current; the guide includes the registration phone number for readers who need to confirm their subscription status. Step Three sets the Current Payroll Year, always a calendar year running January to December regardless of the company's fiscal year, confirmed with a second prompt before it takes effect. Step Four enters General Payroll Information: hours in a Full Time Work Week (used to calculate default regular hours per pay period for hourly staff, and to derive an hourly-equivalent rate for salaried staff when other wage categories like overtime need an hourly basis), Federal Tax ID Number, FUTA Tax Rate, and the default state for State Unemployment Tax along with that state's Payroll Tax ID and SUI Rate -- all editable later per employee for out-of-state cases.
Step Five -- Linked Accounts, and the Three-Level Hierarchy
Source: p.9-13
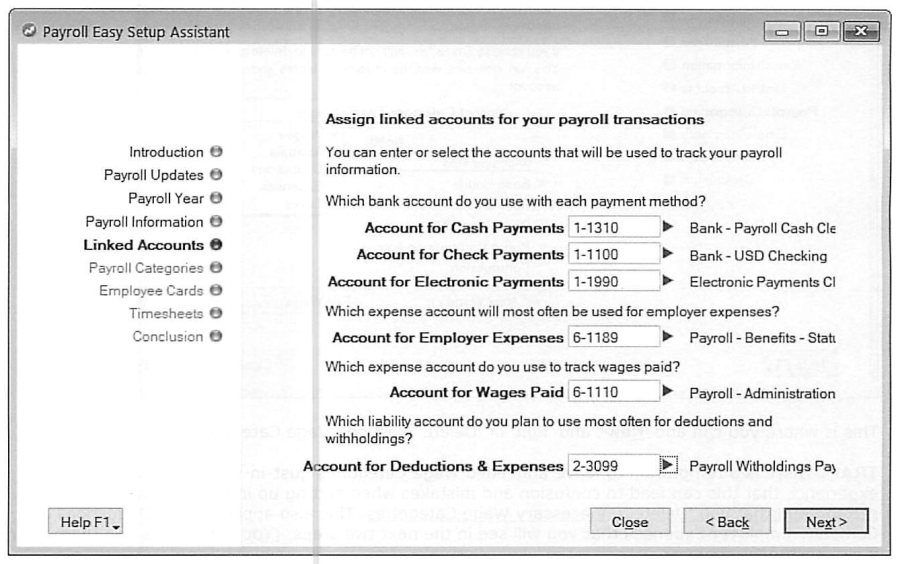
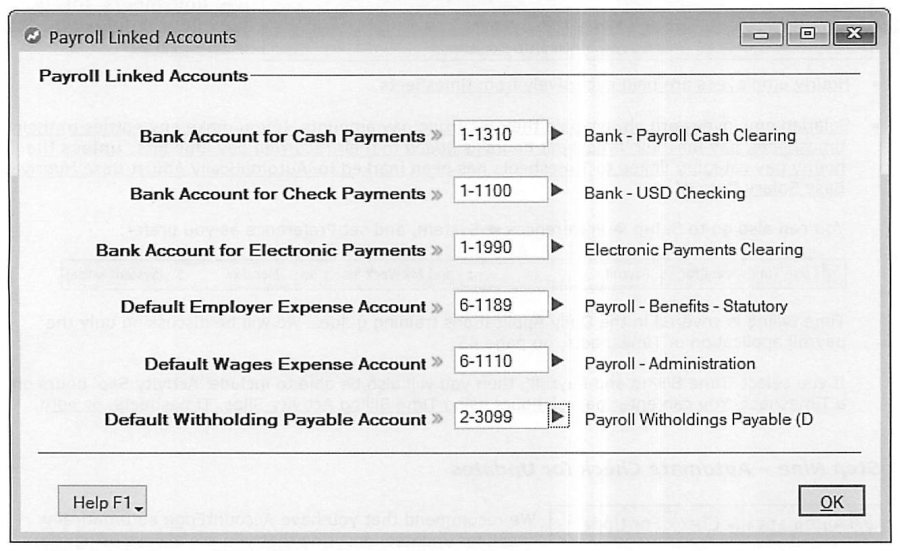
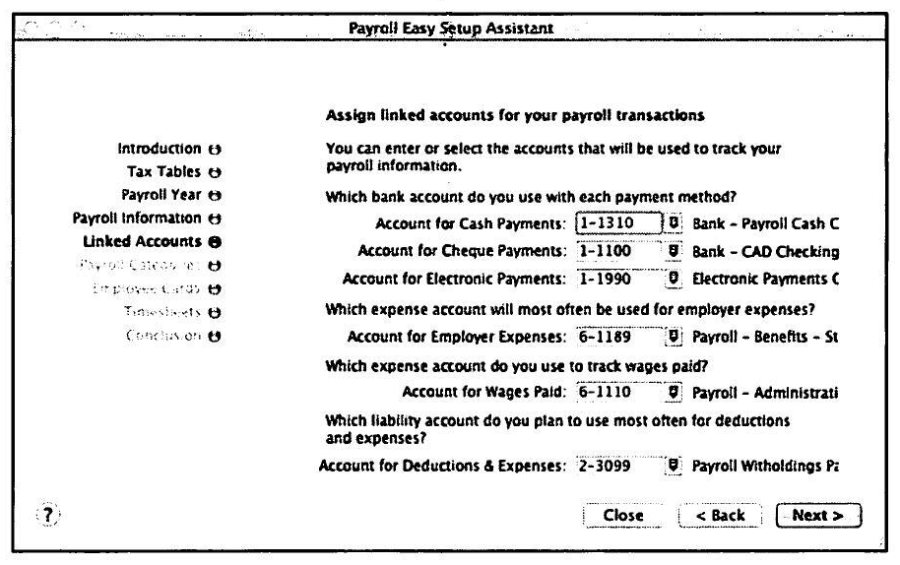
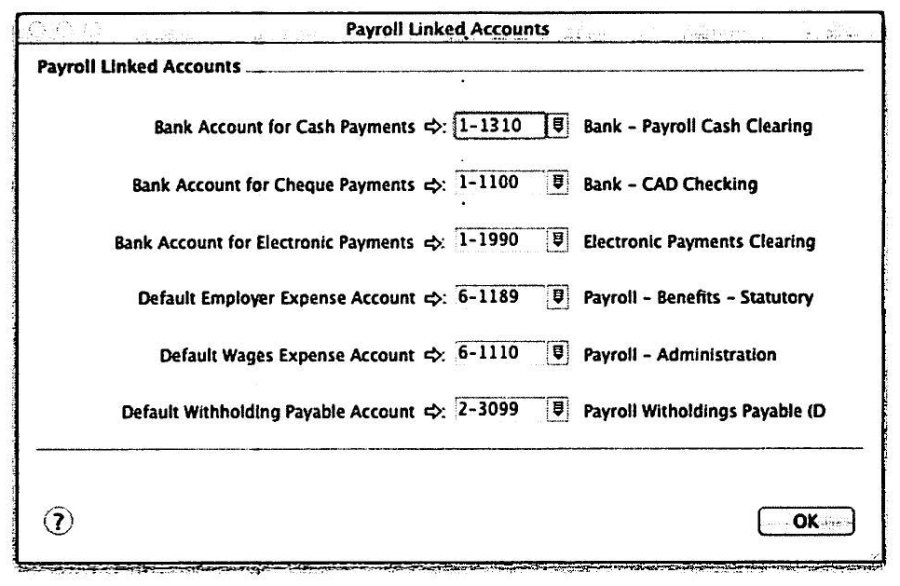
The guide flags Step Five as a genuine trap: global default linked accounts should be set now, before the rest of payroll setup, because changes made later only apply to newly-created payroll categories, not ones already configured. Six linked accounts drive every payroll transaction: Account for Cash Payments, Account for Check Payments, and Account for Electronic Payments (the default Detail Bank accounts payroll draws from, by payment method, though an alternate can still be chosen inside Process Payroll), Account for Employer Expenses (the default expense account for statutory costs the business incurs beyond base pay), Account for Wages Paid (the default expense account for base salary or hourly pay), and Account for Deductions & Expenses (the default liability account for amounts withheld and payable).
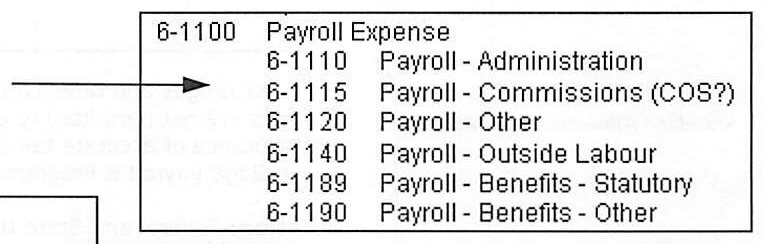
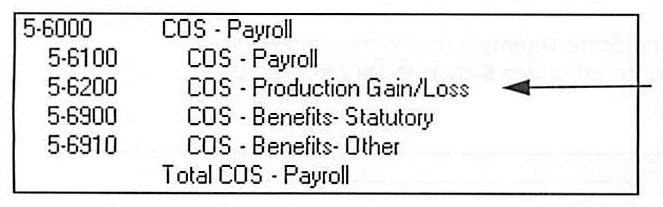
These form a three-level hierarchy. Level 1 (Setup > Linked Accounts > Payroll Accounts) is the set of global defaults just described. Level 2 applies to specific Payroll Categories individually -- a new deduction, for instance, inherits the global default liability account automatically, but can be redirected to something more specific, like linking a Garnishee deduction to its own "Garnishees" liability account rather than the generic withholding-payable account. Level 3 applies at the employee level, specifically to the Base Hourly and Base Salary wage categories every employee is assigned -- each employee defaults to the global Wages Expense Account, but a specific employee's wages can be charged to an alternate account, overriding the global default just for that person (useful, for example, when one employee's cost belongs in Cost of Sales rather than Administration).
Step Six -- Payroll Categories, and the Case Against Keeping Unused Ones
Source: p.11
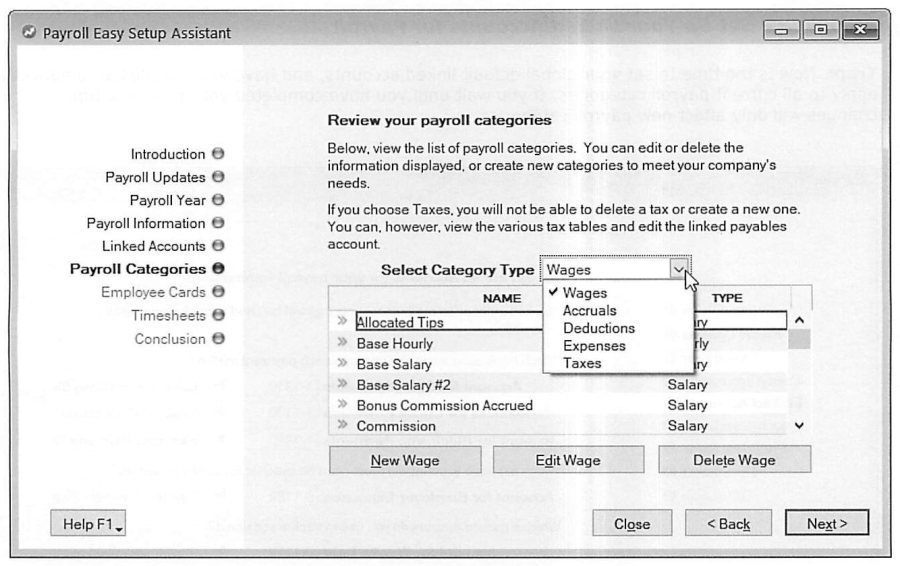
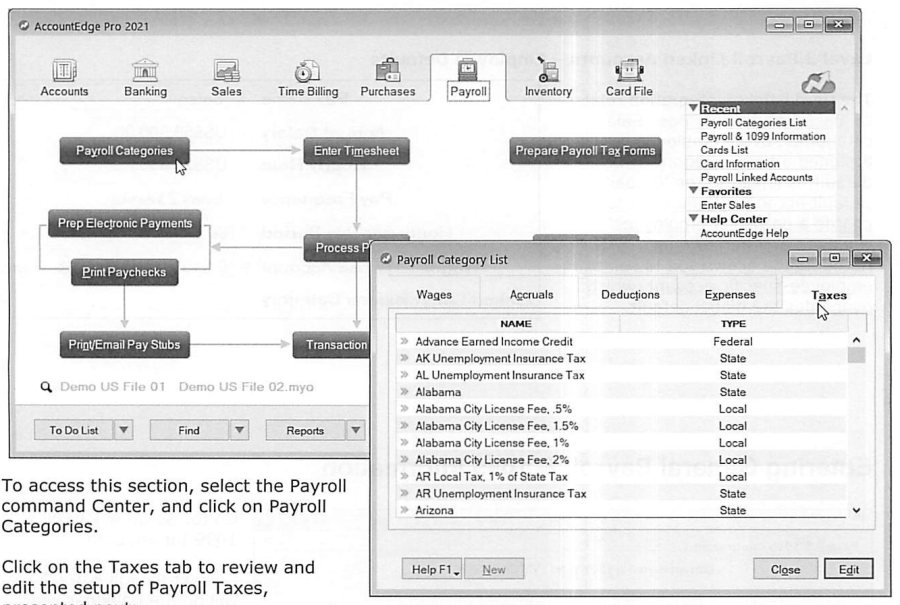
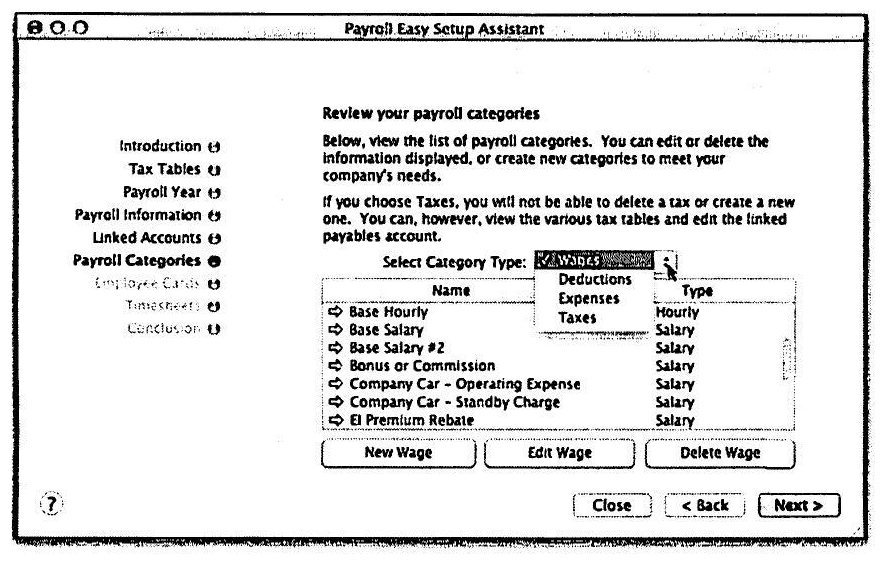
Step Six presents the full Payroll Category list by tab -- Wages, Accruals, Deductions, Expenses, Taxes -- for review, editing, deletion, or creation of new categories. Taxes cannot be deleted or created (only their linked payable account can be edited, since tax rate tables themselves are legislated and maintained by AccountEdge's update service), but the other four tabs are fully editable. The guide pushes back directly against a common instinct to leave unused Wage, Deduction, or Expense categories in place "just in case": in its experience, this "can lead to confusion and mistakes when setting up individual employees," and the recommendation is to delete anything not actually needed -- categories can always be recreated later if circumstances change. One dependency to know: a Wage Category can't be deleted while a Deduction or Employer Expense is still linked to it; the linked category has to be removed first. A related trick avoids proliferating near-duplicate Wage Categories: a single "Base Hourly" category linked, say, to a Cost of Sales account can serve double duty for administrative payroll too -- the specific expense account is simply overridden per employee when the card is set up, rather than creating a second "hourly" category that only differs by its linked account.
Steps Seven Through Nine, and the Alternate (Manual) Setup Approach
Source: p.10-11
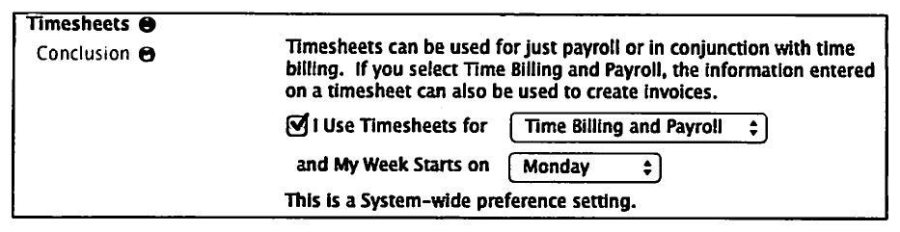
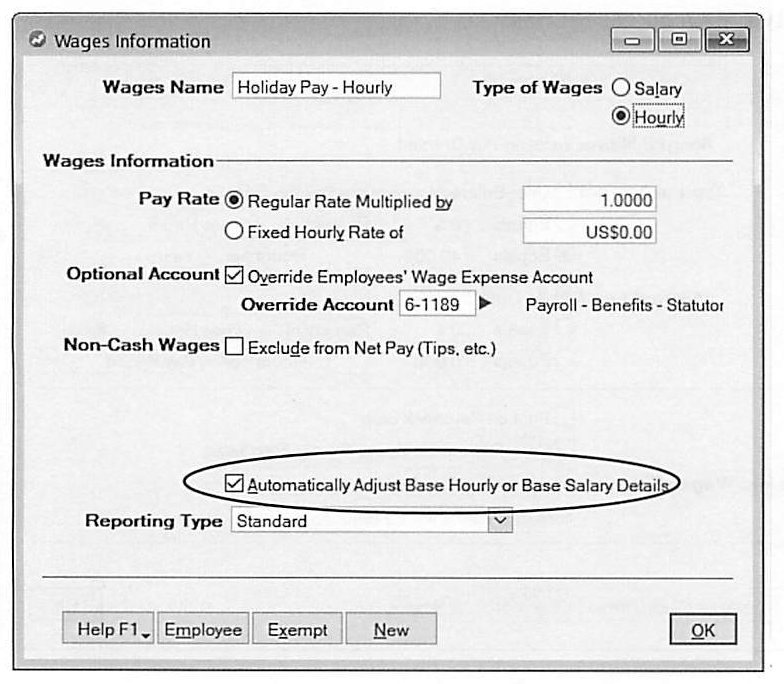
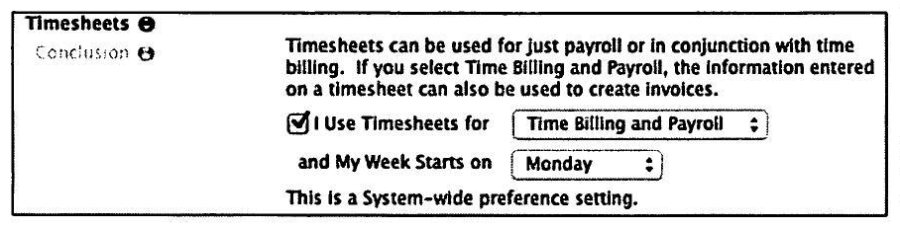
Step Seven builds the Employee List -- additions, changes, or deletions as needed, covered in full starting on page 32 of the guide. Step Eight decides whether Timesheets will be used, and in what mode: "Time Billing and Payroll" lets timesheet hours flow into both invoicing and pay, while "Payroll" alone keeps timesheets purely internal; either way this is a System-wide preference (Setup > Preferences > System) that also sets which day the work week starts on. A key mechanical distinction: hourly employees are paid exclusively from their timesheets once this preference is on, while salaried employees are always paid their recurring pay amount regardless, with any timesheet hours simply added on top -- unless the linked hourly pay category has specifically been marked to "Automatically Adjust Base Hourly or Base Salary Details," in which case timesheet entries adjust the base pay itself instead of adding to it. Step Nine turns on Automate Check for Updates, which the guide recommends unconditionally, since staying current on tax tables and programming both depend on it.
For readers who prefer not to use the wizard, the "Alternate Approach" section walks the same setup manually: Setup > Payroll Updates > Load Payroll Tax Tables loads whatever table version is already installed on the computer (registering the software is the surest way to guarantee the latest table is what actually gets installed in the first place), with the same caution as the wizard about existing users needing to confirm with Acclivity or a Certified Consultant before loading a table that could shift rates already in use.
Setting Up Payroll Taxes
Source: p.13-16
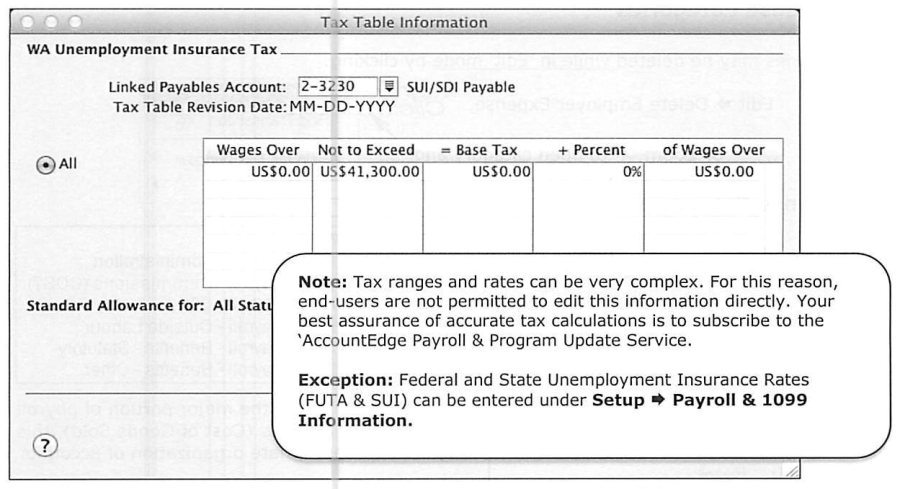
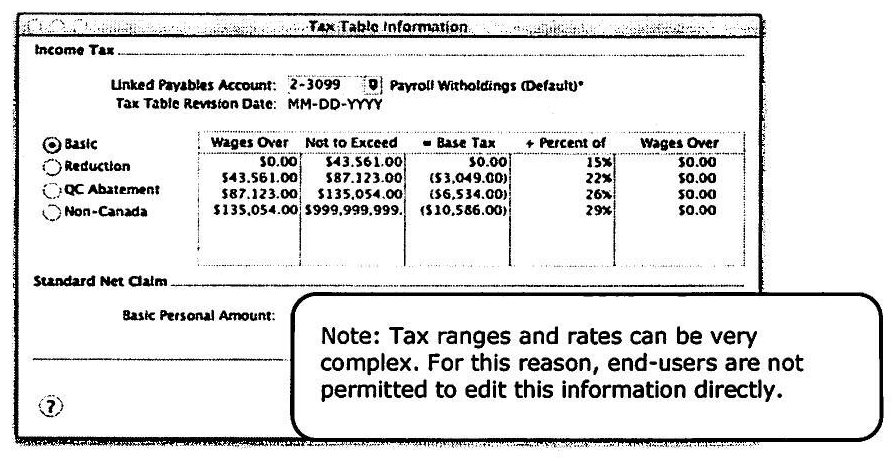
Payroll Taxes are legislated at the Federal, State, and Local level -- amounts withheld from each paycheck and remitted on the employee's behalf -- and for that reason cannot be added or deleted, only redirected to a different linked payable account. By default, every Deduction, Expense, and Tax posts to a single shared default liability account; the guide suggests organizing the Accounts List with a header account (like "Federal 941 Liabilities") and detail sub-accounts beneath it for clarity, while also cautioning that "most businesses do not need complex payroll liability accounts" -- AccountEdge's Pay Liabilities function and Payroll Liabilities Reconciliation report have largely eliminated the old reasons for granular liability accounts, and upgraders specifically are encouraged to consider consolidating existing accounts rather than preserving inherited complexity. Editing a tax's linked account is done via the zoom arrow next to its name in the Payroll Category list; the underlying tax rate tables themselves are locked against direct editing (with two specific exceptions -- FUTA and SUI rates, entered under Setup > Payroll & 1099 Information), since AccountEdge's Payroll & Program Update Service is the intended path for keeping rate tables accurate.
Setting Up Payroll Expenses
Source: p.15-20
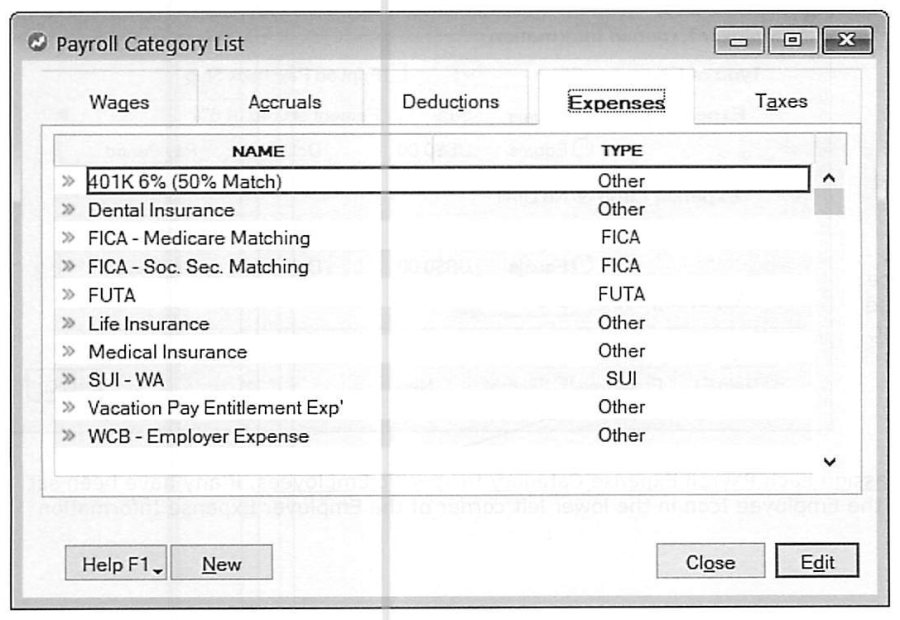
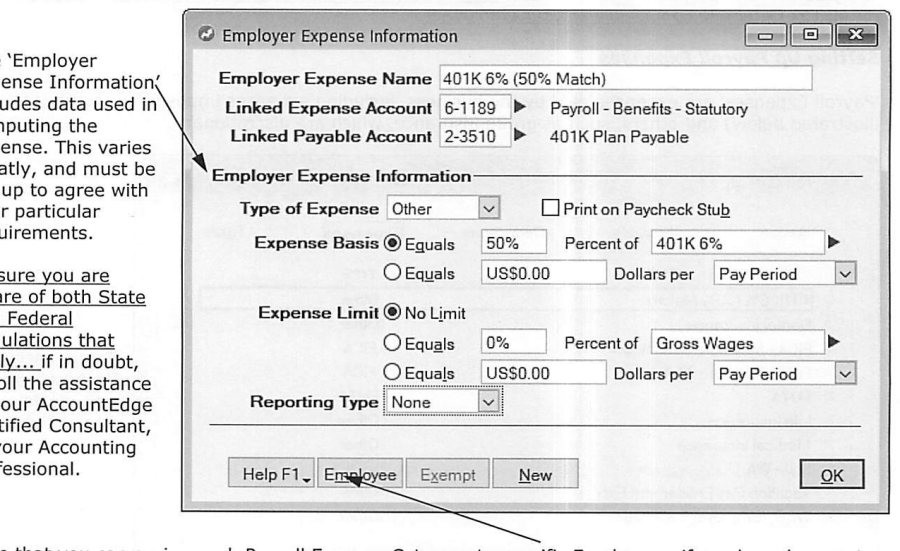
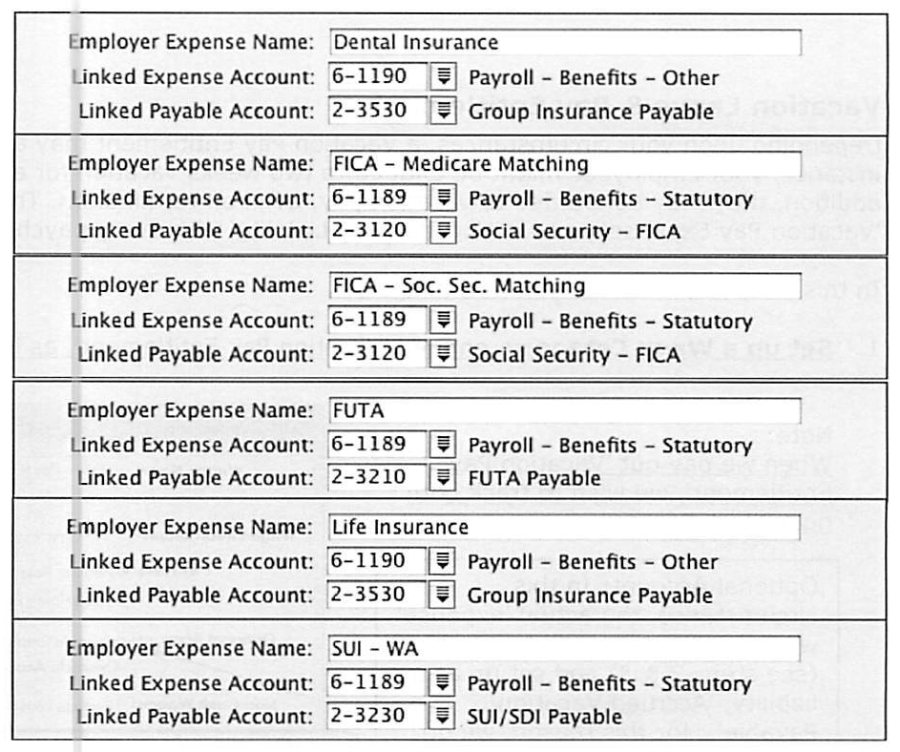
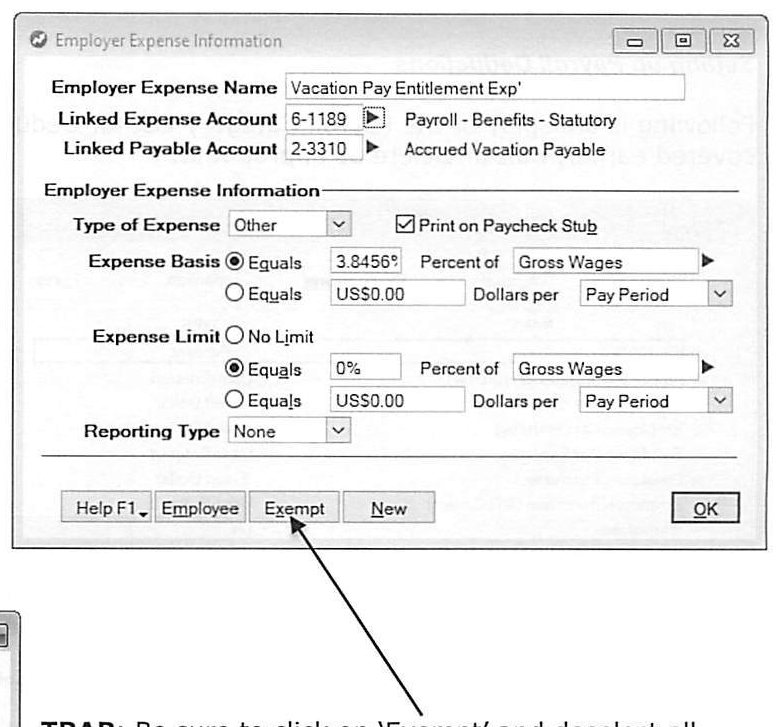
Payroll Expenses are the employer's own costs -- both statutory (FICA matching, FUTA) and discretionary (group insurance, a 401K match). Each is set up with an Employer Expense Name, a Linked Expense Account, and a Linked Payable Account, plus an Expense Basis (a percent of gross wages, or a flat dollar amount, per pay period or other interval) and an optional Expense Limit. The guide walks through several concrete examples with their account linkages -- 401K match, dental and medical insurance, FICA Medicare and Social Security matching, FUTA, and life insurance -- generally recommending the global default Withholding Payable account unless there's a specific reason to break an expense out separately; the illustrated "Linked Payable Accounts" are offered for discussion, not as a required structure, and the guide notes most real implementations will be simpler.
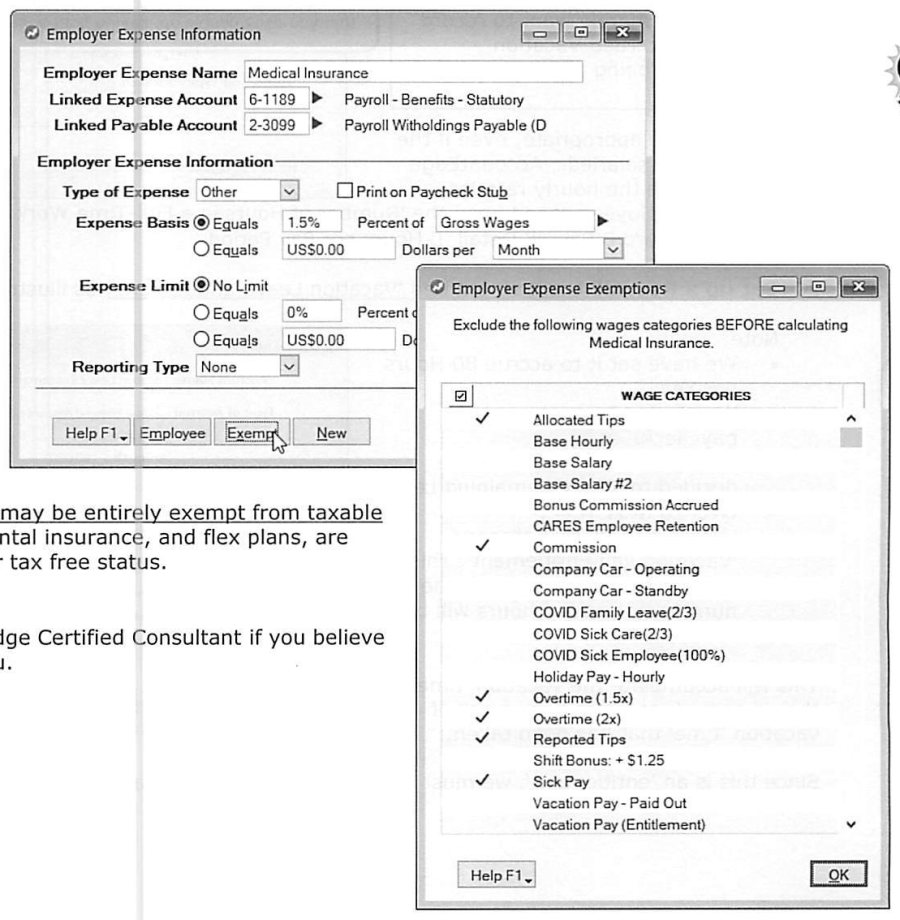
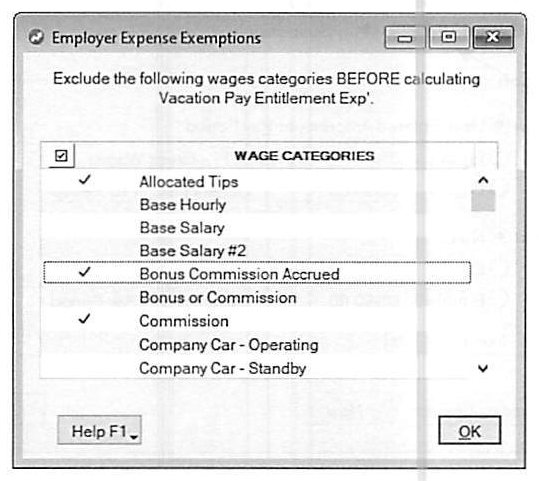
The Employer Expense Exemptions screen lets specific Wage Categories be excluded before an expense is calculated -- Medical Insurance expense, for instance, might reasonably be excluded from Overtime, Sick Pay, or Tips, since those aren't the intended base for a benefits calculation. Deleting an Expense Category is done from Edit mode (Edit > Delete Employer Expense, or via the zoom arrow into the category). Each Employer Expense can also be assigned to specific employees only, via the Employee icon in the lower-left of the Employer Expense Information screen -- useful where a benefit doesn't apply company-wide.
Vacation Leave & Pay Entitlement -- the Three-Category Pattern
Source: p.18-19
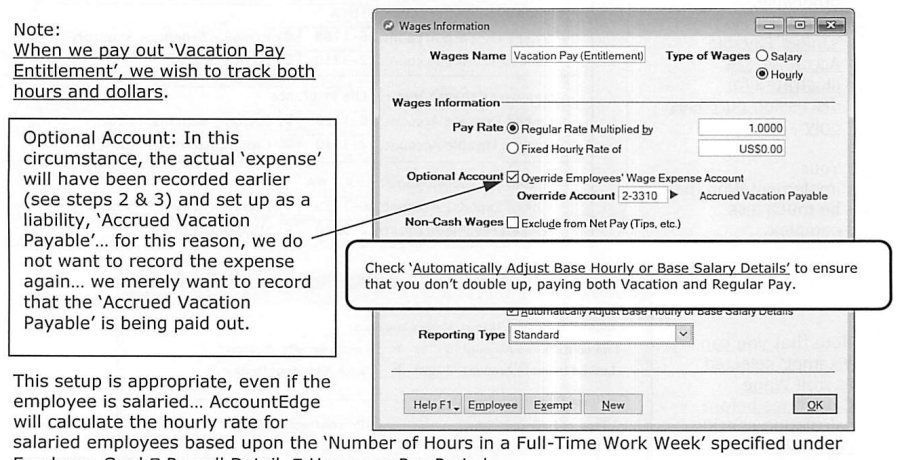
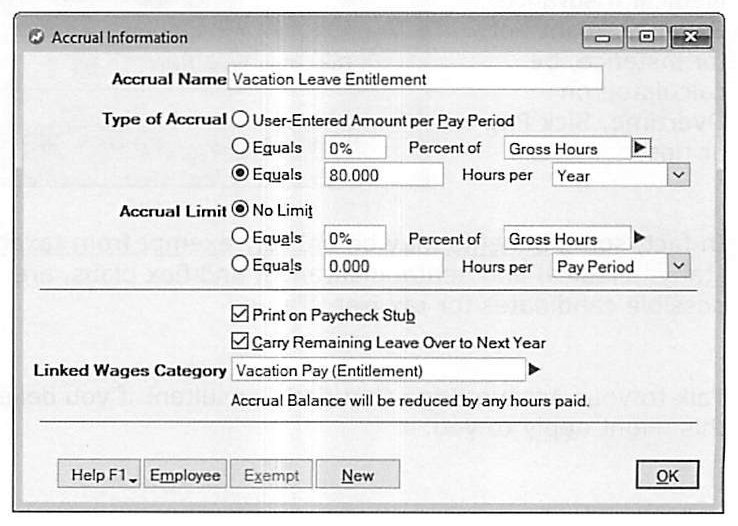
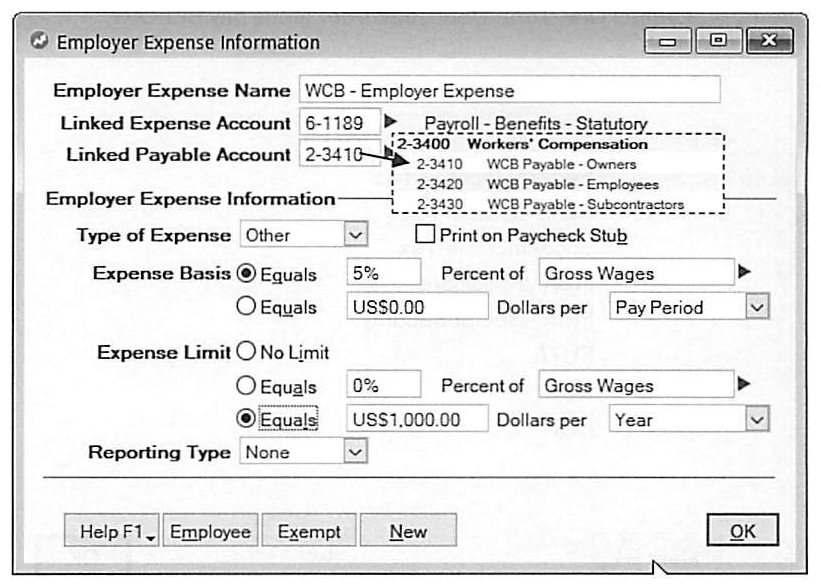
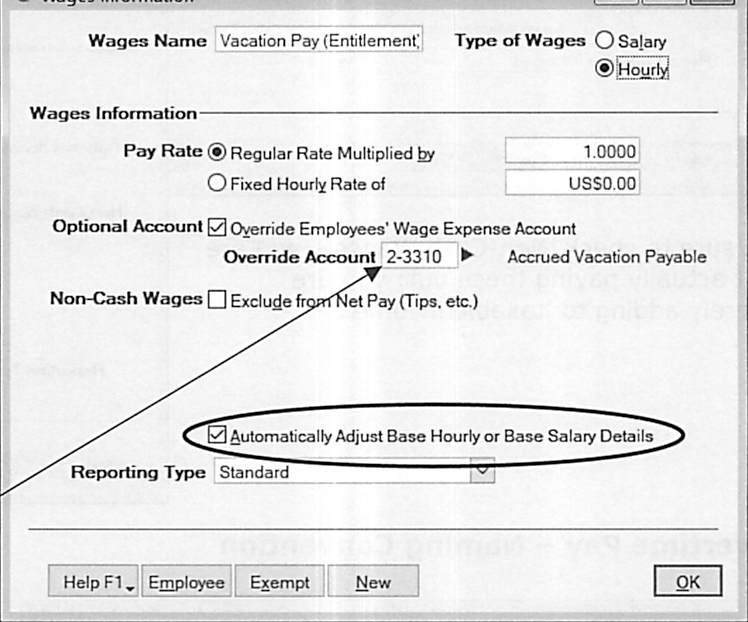
Where employees are legally entitled to vacation pay (payable even on termination), the guide walks through a three-category setup pattern that recurs throughout the rest of the guide for similar "entitlement" scenarios. First, a Wage Category ("Vacation Pay (Entitlement)") is set up to track both hours and dollars when the entitlement is actually paid out -- with "Automatically Adjust Base Hourly or Base Salary Details" checked, so paying out vacation doesn't inadvertently double-pay on top of regular wages, and this setup works correctly even for salaried employees, since AccountEdge derives an hourly equivalent from the Full-Time Work Week hours setting. Second, a Payroll Accrual Category ("Vacation Leave Entitlement") accumulates the earned time -- in the worked example, 80 hours per year, printed on each paycheck stub, with unused leave carried over to the next year, and linked to the Vacation Pay wage category so that hours paid out automatically reduce the accrual balance. Third, an Employer Expense ("Vacation Pay Entitlement Exp'") recognizes both the expense and the corresponding "Accrued Vacation Payable" liability with every single paycheck -- calculated in the worked example as 80 hours divided by a 2,080-hour year, or 3.846% of gross wages -- so the business always has an accurate, current liability balance rather than discovering the true cost only when vacation is actually taken. A related worked example (WCB -- Employer Contribution) applies the identical three-part logic to Workers' Compensation Insurance, calculated as a percent of gross pay up to an annual insurable-earnings cap.
Setting Up Payroll Deductions
Source: p.21
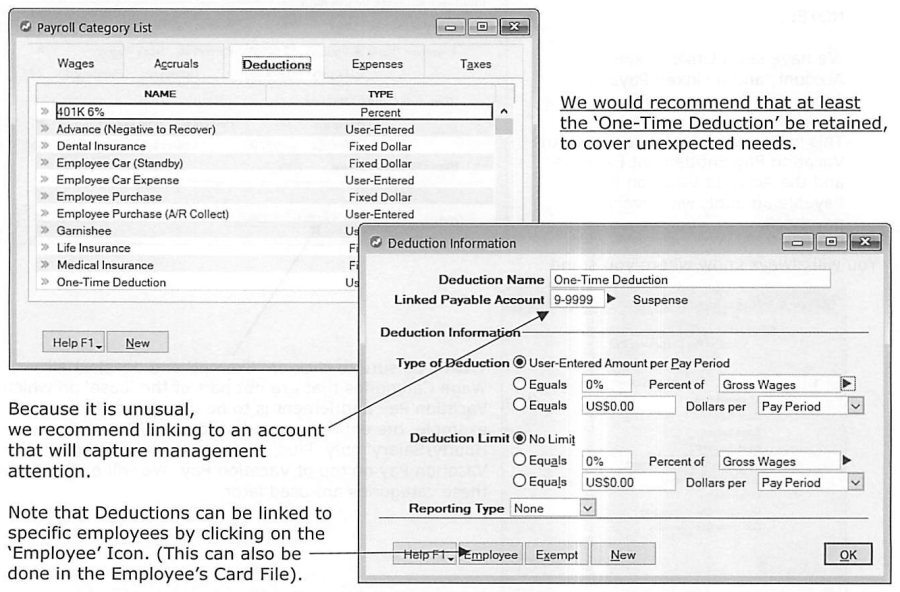
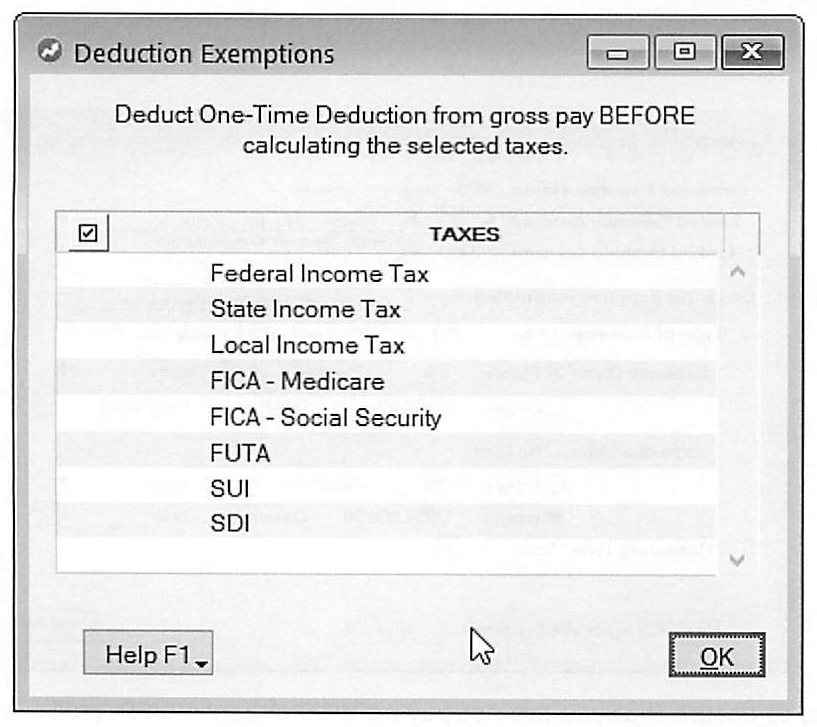
Deductions reduce an employee's net pay -- amounts withheld from the paycheck rather than costs the employer separately incurs. The default category list can be edited or deleted using the same methods as Wages and Expenses; the guide specifically recommends retaining at least a generic "One-Time Deduction" category (linked to a Suspense account precisely because it's meant to be unusual and should draw management's attention when used) to cover unanticipated needs without having to build a new category on the fly. Deductions can be linked to specific employees via the Employee icon (or set from within the employee's own Card File), and -- like Expenses -- can be exempted from specific taxes via the Deduction Exemptions screen, deducting the amount from gross pay before those particular taxes are calculated.
Adding New Deduction Categories -- Advances, Employee Car, Employee Purchases
Source: p.22-23
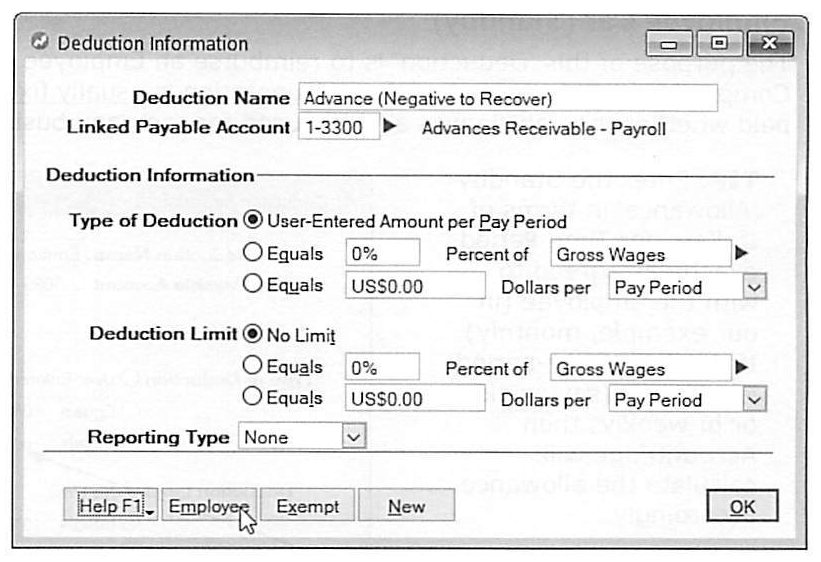
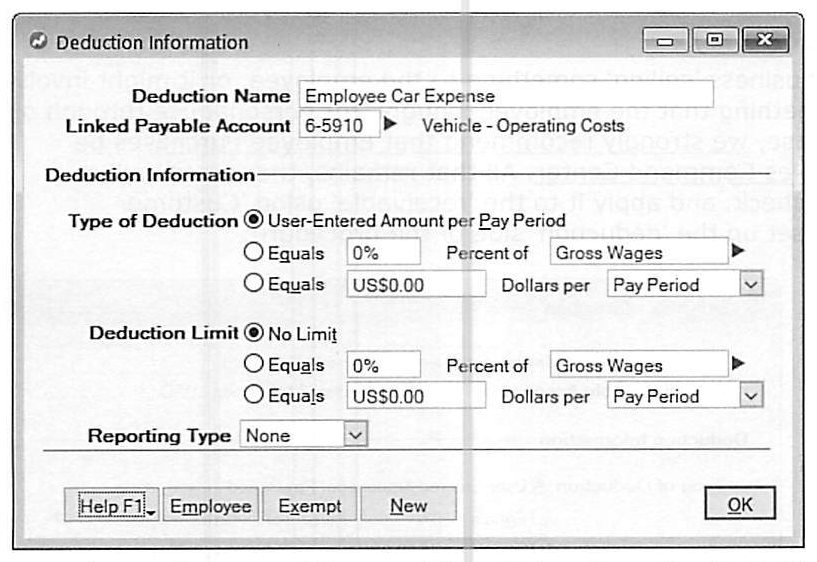
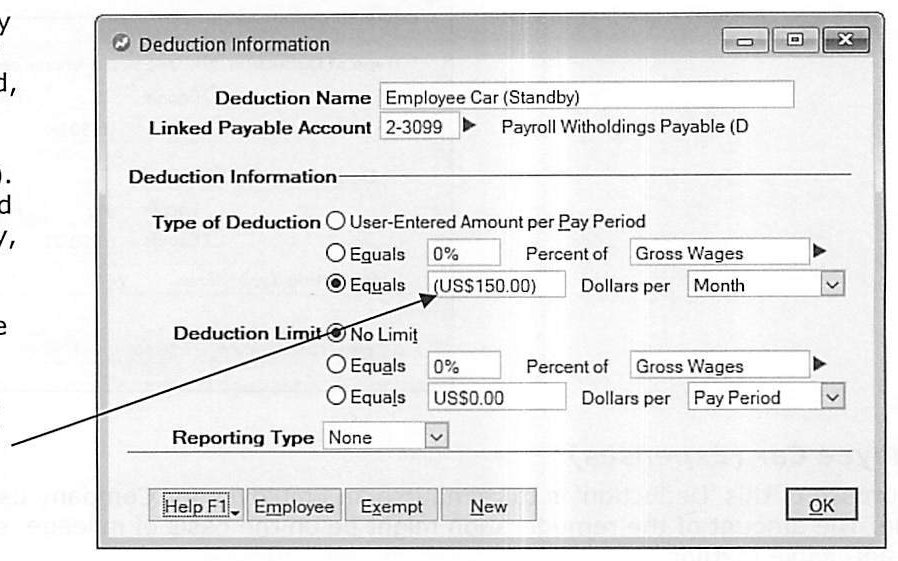
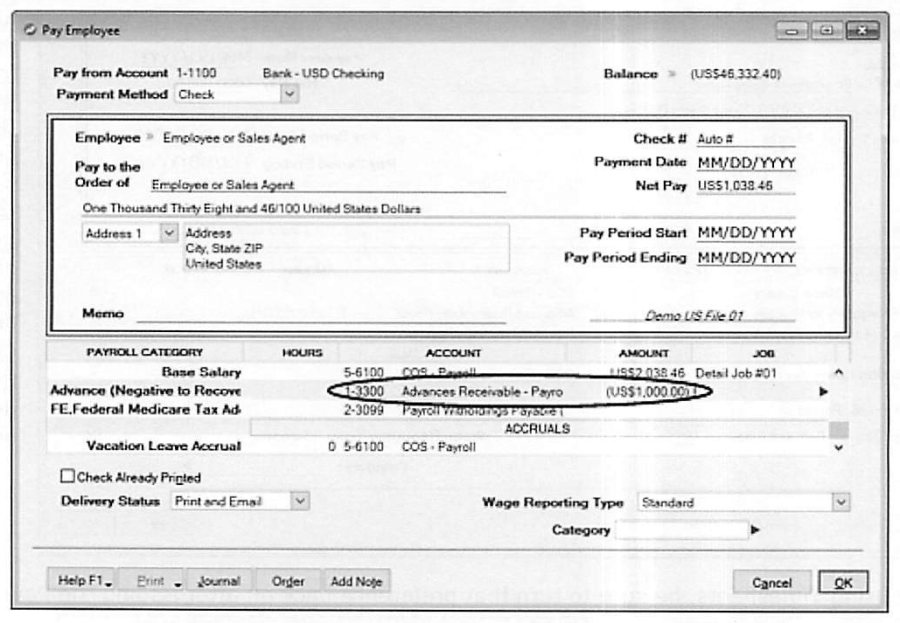
Payroll Advances are set up as a "User-Entered Amount per Pay Period" deduction, linked to an "Advances Receivable -- Payroll" asset account, entered as a negative amount when the advance is issued so it flows correctly against net pay. Employee Car (Expenses) reimburses personal use of a personal vehicle for company business, deliberately set up as a Deduction rather than a Wage category -- the guide flags this as a specific trap, since setting it up as Wages would have it counted in Gross Wages, potentially distorting any other calculation based on gross pay, even though a Deduction-based setup looks slightly less clean on the check stub. Employee Car (Standby) compensates an employee for keeping their vehicle available for company use regardless of actual use in a given period, entered as a fixed dollar amount per time period (commonly monthly), with AccountEdge automatically prorating it if the actual pay frequency differs.
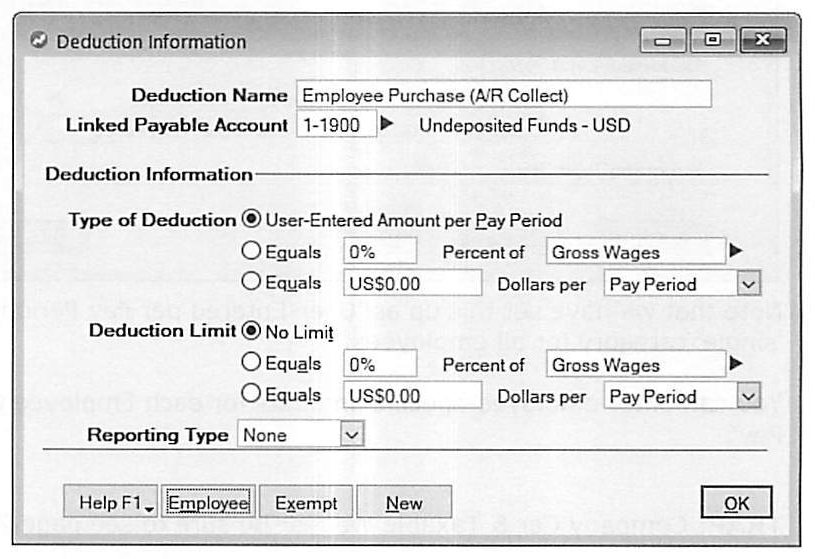
Employee Purchases (A/R Collections) -- whether the business sold something to the employee, or the employee bought something personal through a company supplier -- are handled by recording the purchase as a normal Sales Command Center receivable first, then using this deduction purely to collect against that receivable from the paycheck; the guide specifically warns not to forget the second half of the process, actually applying the deducted payment to the outstanding receivable via Receive Payments once payroll is finished. A dedicated "Payroll" Payment Method is suggested to make later bank-deposit reconciliation easier, since the deduction and the offsetting receivable payment should net to zero when both sides are selected together in Prepare Bank Deposit -- and the guide notes that even though the total is zero, the deposit still needs to be recorded to clear both transactions out of Undeposited Funds.
Garnishee, Life Insurance & Reimbursable Expenses (Deductions)
Source: p.24-25
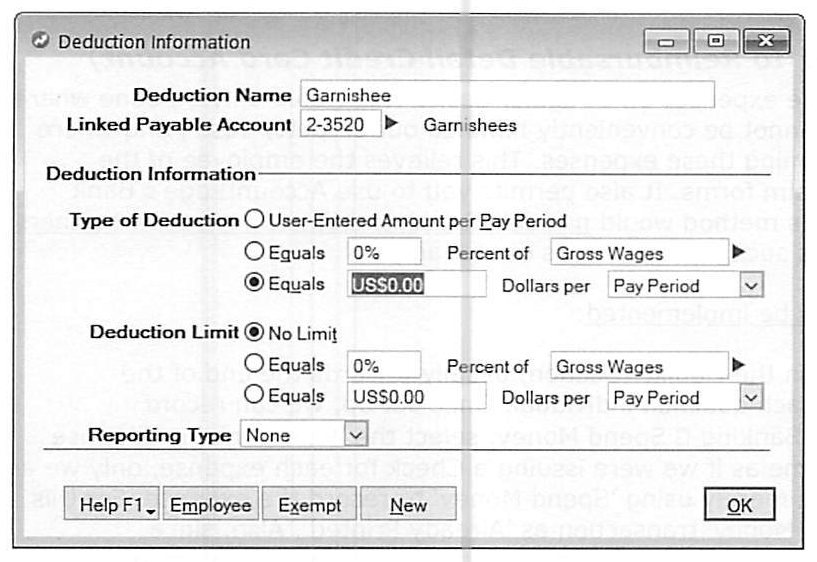
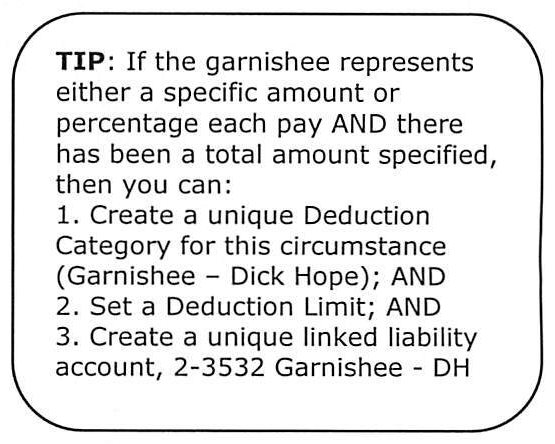
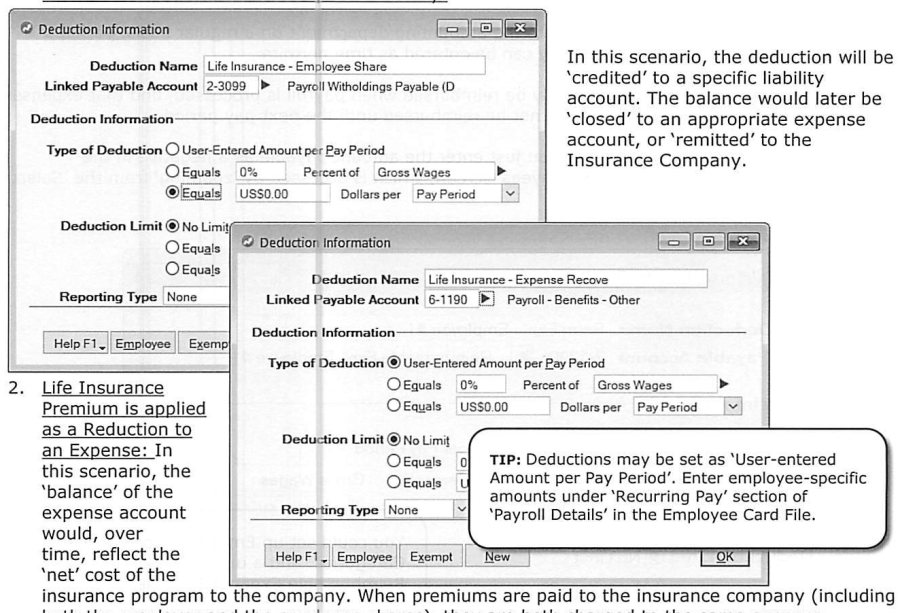
Garnishee deductions link to a "Garnishees" liability account; where a garnishment specifies both a per-pay amount or percentage and a lifetime total, the guide's tip is to create a garnishee-specific Deduction Category (rather than reusing a generic one), apply a Deduction Limit for the specified total, and link it to its own unique liability sub-account so it's trivially easy to track how much of the total obligation remains. Life Insurance premiums can be handled two ways depending on the management-accounting preference: as a Liability (the deduction credits a specific payable account, later closed to expense or remitted to the insurer directly) or as a Reduction to an Expense (both the employer and employee shares post to the same expense account, so that account's running balance shows the net cost to the company over time, and management can verify the correct percentage is being recovered from employees just by reviewing that account's activity).
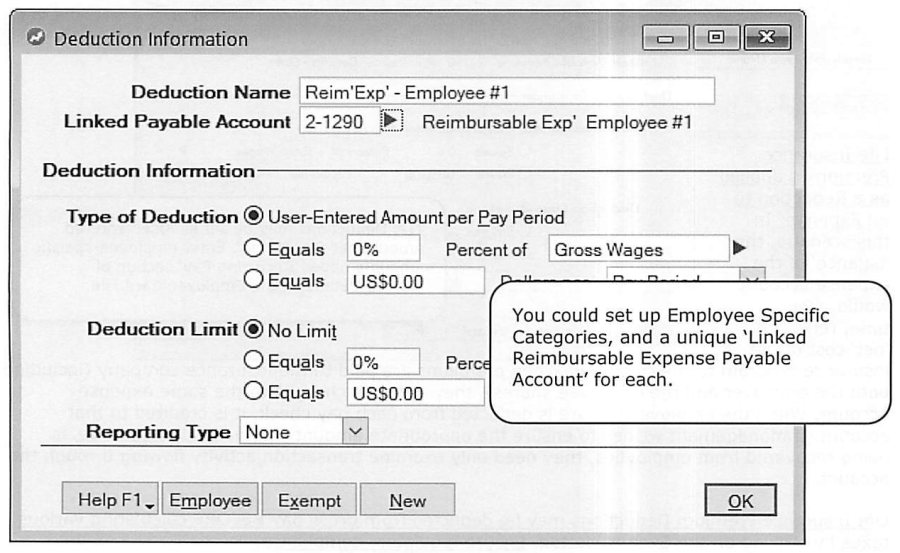
Reimbursable Expenses set up as a payroll deduction is reserved for a narrow use case: paying qualified individuals (typically active partners, shareholders, or key managers) for routine reimbursable expenses through payroll rather than petty cash, when volume and frequency justify it. The mechanics: set up a dedicated detail credit-card liability account per qualified individual, record each expense via Banking > Spend Money against that account (marked "Already Printed" since no actual check is being cut), hand-write the resulting check number onto the original receipt for audit purposes, and enter the accumulated total as a negative amount directly on the Pay Employees screen when payroll runs -- effectively using AccountEdge's Bank Reconciliation tools as an ad hoc expense-audit trail rather than requiring formal expense-claim forms from busy senior staff.
401K Savings Plan & Payroll Accruals
Source: p.25-26
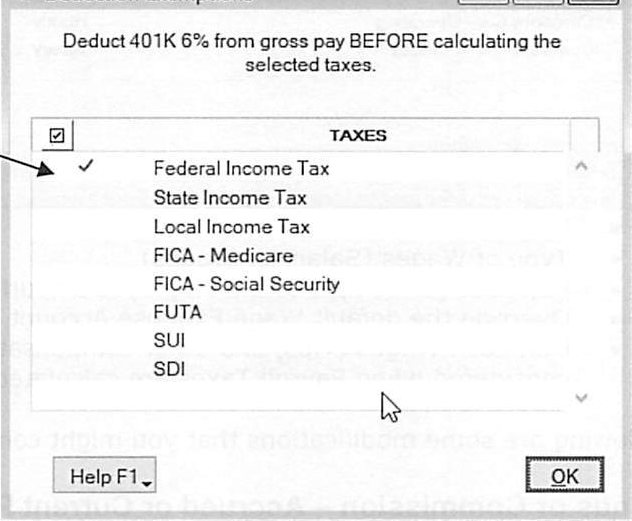
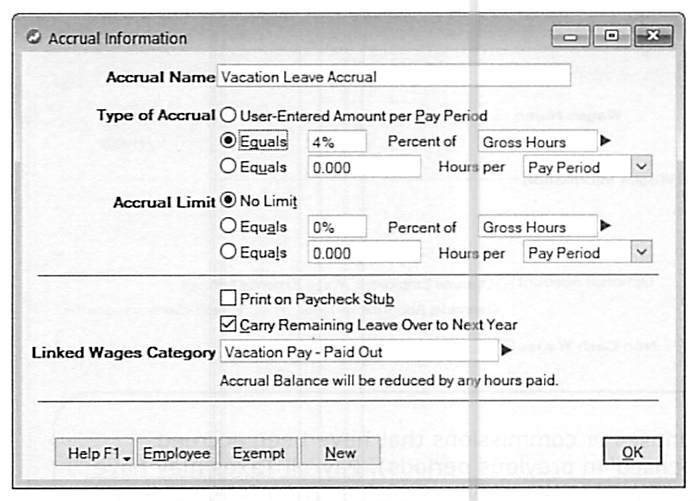
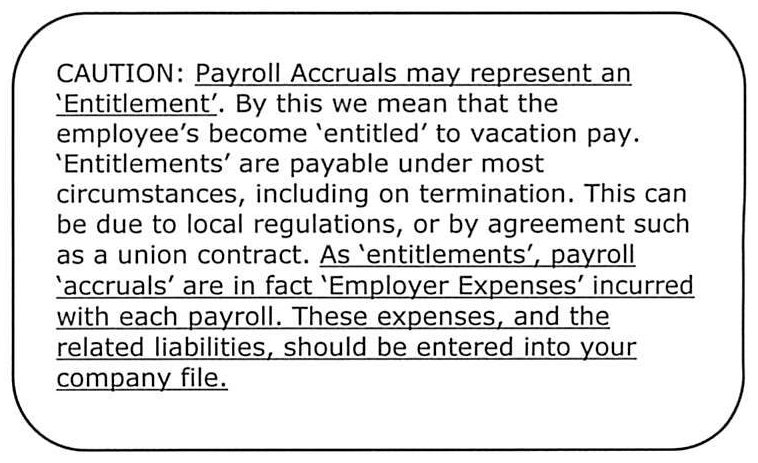
A 401K deduction is set up as a percent of gross wages (6% in the worked example) with an annual dollar Deduction Limit, and by default reduces gross pay before Federal Income Tax is calculated -- whether that pre-tax treatment is correct for a given plan should be confirmed with a tax advisor and adjusted via the Exempt button if needed. Payroll Accruals -- time-based accumulations like sick leave or vacation -- can be calculated three ways: a User-Entered Amount per Pay Period, a calculated percent of gross hours (accrued automatically every pay run), or a fixed number of hours per pay period. The guide's caution here concerns entitlements specifically: where an accrual represents a legal or contractual entitlement (payable even on termination, per local regulation or a union contract), the related expense and liability need to actually be recorded in the company file with each payroll run using the three-category pattern described earlier -- simply accruing hours without also recognizing the corresponding expense and liability understates the true cost of the entitlement on the books.
Setting Up Wage Categories
Source: p.27
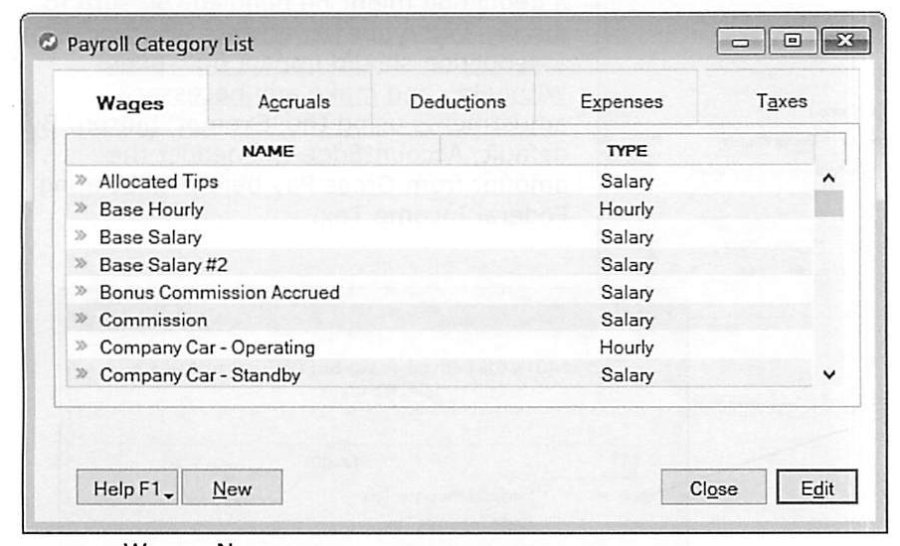
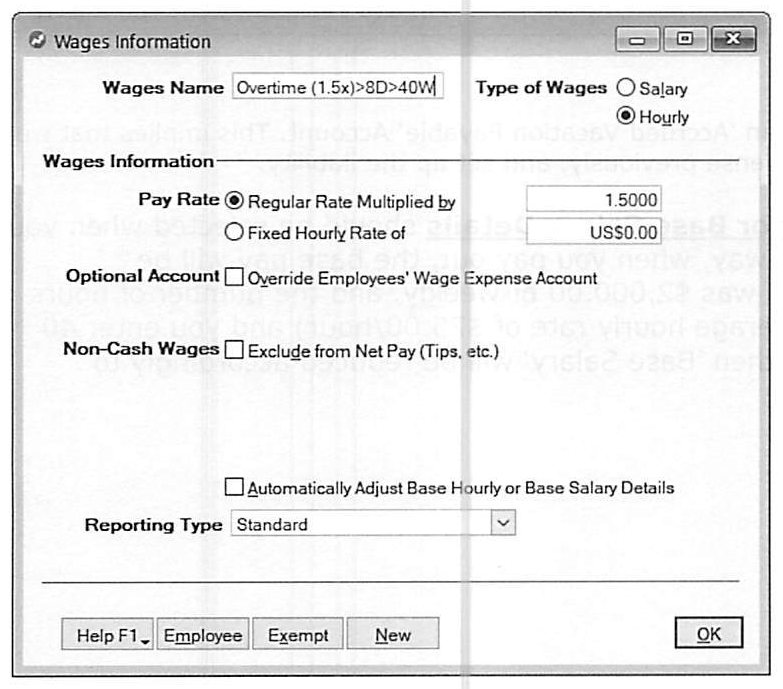
Base Hourly and Base Salary are the two Wage Categories that cannot be deleted, since every employee must be attached to one of them -- their names can be edited, but the guide's advice is to leave them exactly as installed to avoid confusing downstream reports and reconciliations. Every other Wage Category can be freely edited or deleted, with the same fields at play throughout: Wages Name, Type (Salary or Hourly), Pay Rate (either a multiple of the employee's regular hourly rate -- 1.5 for time-and-a-half overtime, for instance -- or a fixed hourly rate independent of the employee's own rate), an optional override of the default Wage Expense Account, and a Non-Cash Wages flag for compensation (like allocated tips) that counts toward taxable income without actually being included in net pay.
Bonus/Commission, Company Car & Overtime Naming Conventions
Source: p.26-27
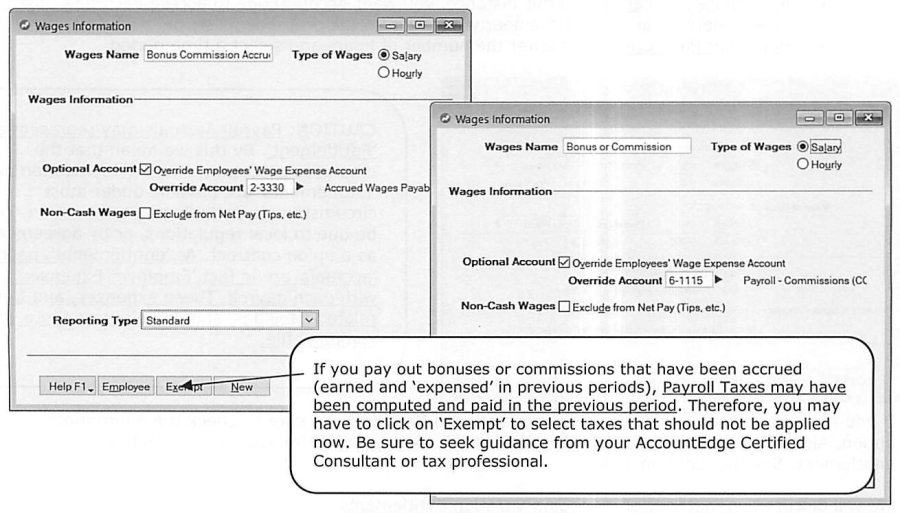
Bonus or Commission can link to a unique expense account -- potentially even a Cost-of-Sales account, if that better reflects how the business thinks about compensation tied directly to sales. A specific caution applies to paying out previously-accrued bonuses or commissions: because payroll taxes may already have been computed and paid in the period the amount was originally accrued and expensed, the Exempt button may need to be used to prevent double taxation, and the guide recommends confirming the correct treatment with a Certified Consultant or tax professional rather than guessing.
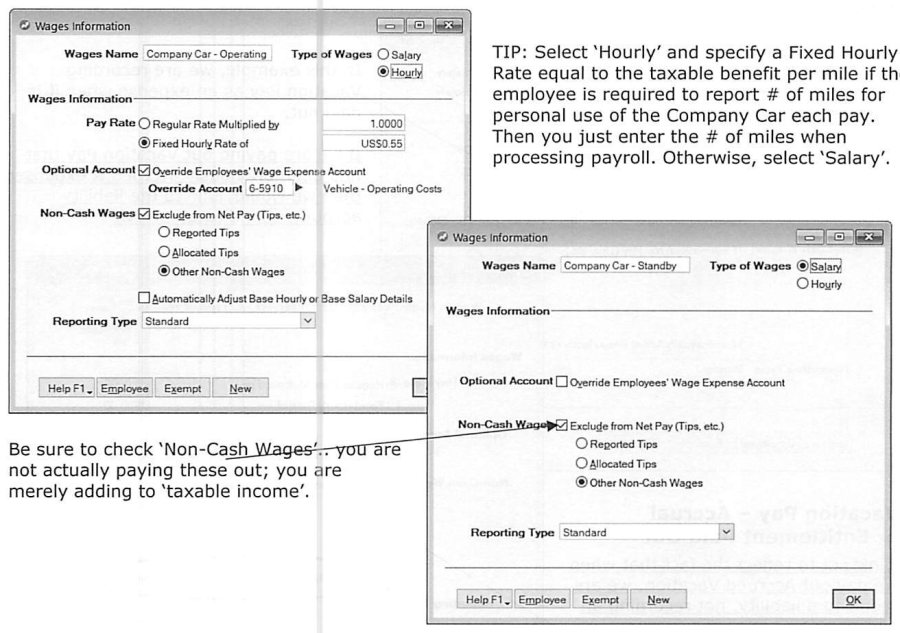
Company Car benefits split into two wage categories reflecting two different taxable-benefit calculations: Company Car -- Operating Expense covers the proportional cost of actual operating expenses attributable to personal use (set up as Hourly with a Fixed Hourly Rate equal to the taxable benefit per mile, so processing payroll is just a matter of entering the employee's reported personal-use miles each pay period), while Company Car -- Standby covers the cost of having the vehicle available at all, whether used personally or not, typically set up as Salary. Both are marked Non-Cash Wages, since the point is to add to taxable income without actually disbursing cash -- the guide's explicit reminder is to check that box, since forgetting it would incorrectly pay out cash the employee never should have received.
Overtime categories are best renamed to describe their actual trigger rather than left generically as "Overtime" -- the worked example renames one to "Overtime (1.5x)>8D>40W" to document, right in the category name, that it pays after 8 hours in a day or 40 in a week. Because overtime regulations vary significantly by jurisdiction, the guide's point is less about the specific rate and more about building a naming convention that keeps the actual trigger legible to anyone reviewing the payroll setup later.
Vacation Paid Out, Vacation Granted & New Wage Categories
Source: p.28-30
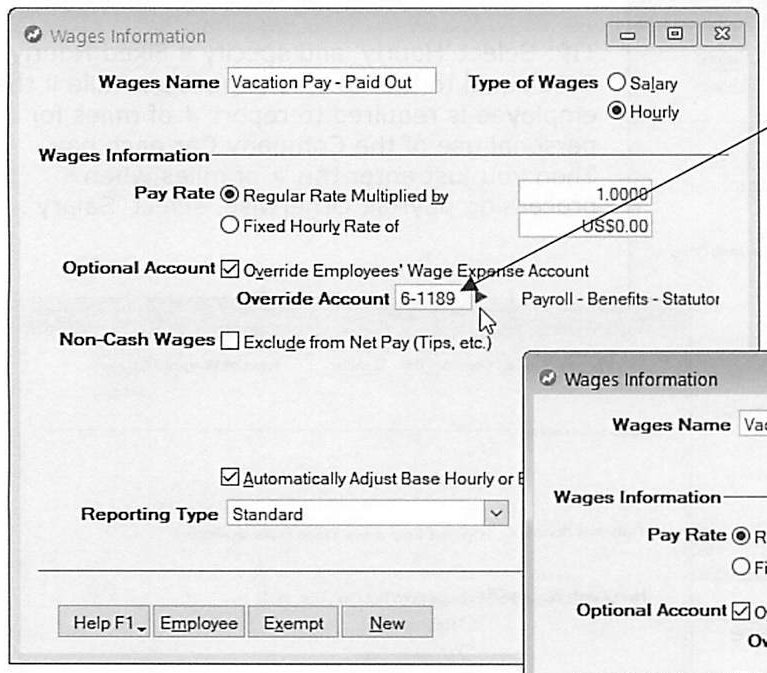
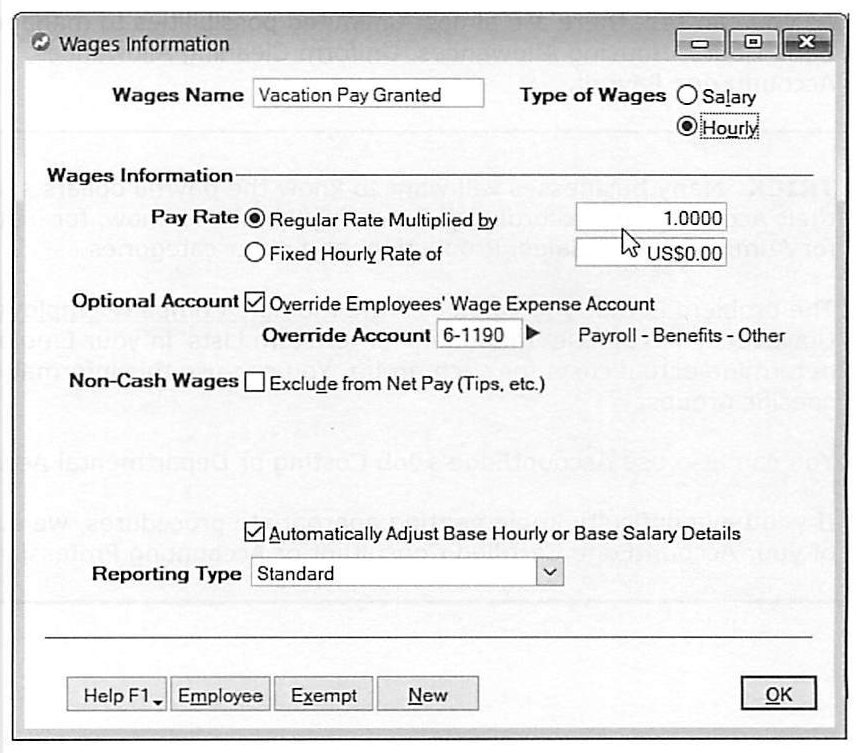
The guide distinguishes two different vacation-pay scenarios requiring different account linkages. Vacation Pay -- Paid Out (Not Accrued) records the expense at the moment it's actually paid, appropriate when vacation wasn't tracked as an accruing liability beforehand. Vacation Pay -- Accrual or Entitlement Paid Out instead links to the liability account (Accrued Vacation Payable) set up earlier, since the expense was already recognized when the entitlement accrued -- paying it out now just reduces that liability rather than creating a new expense. Both should have "Automatically Adjust Base Hourly or Base Salary Details" checked, so paying out, say, 40 hours of vacation correctly reduces the same pay period's regular base pay by the equivalent amount rather than paying both in full.
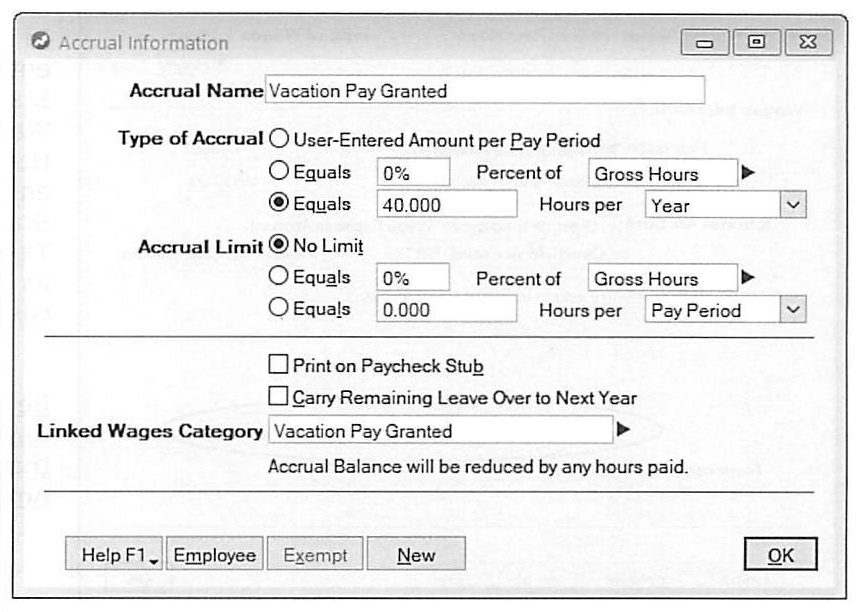
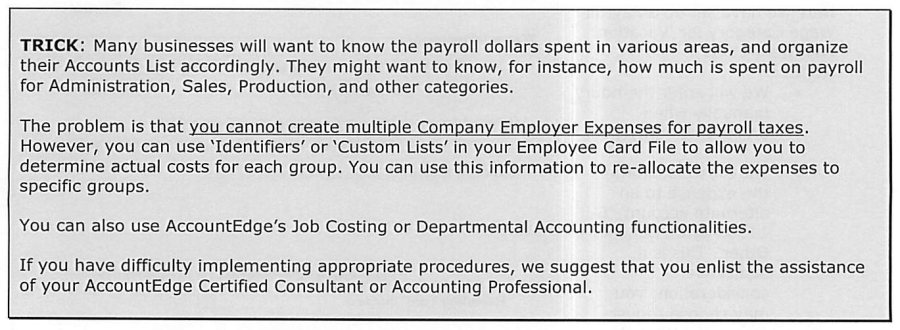
Vacation Pay -- Granted (No Entitlement) covers a distinct, non-legal case: an employer voluntarily grants a block of vacation (a week after one year of service, in the example) at their own discretion, with no vesting and no entitlement -- if unused by year end, it's simply forfeited. This requires two linked categories rather than three, since there's no ongoing statutory liability to track: a User-Entered Accrual Category with leave not carried over at year end, and a matching Wage Category for when it's actually taken, with hours entered manually at the time. The guide closes this section noting that almost any unusual payroll scenario -- Bank Hours, Housing Allowances, Uniform Cleaning Allowances -- can be handled with the same building blocks, and offers a specific trick for businesses wanting payroll cost visibility by department: because AccountEdge doesn't allow multiple Employer Expense categories for the same statutory tax, Identifiers, Custom Lists, Job Costing, or Departmental Accounting on the Employee Card are the tools to use instead, letting actual departmental costs be determined and reallocated after the fact.
Entering Employees -- Identifiers & Custom Lists
Source: p.31-33
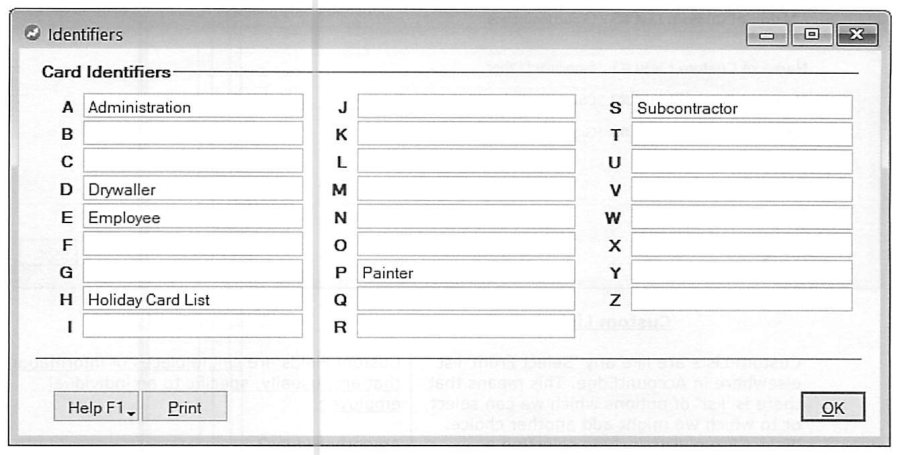
Once the Payroll Module itself is configured -- tax tables loaded, general information entered, linked accounts set, categories built -- individual employees can be entered. Identifiers (Lists > Identifiers) assign an attribute to each letter of the alphabet, up to ten per card, and are shared across every card type in AccountEdge -- so an identifier flagged "H" for Holiday Card List would pull every tagged Customer, Vendor, Employee, or Personal card at once on a mailing-label run, not just Employees. The guide suggests exploring Custom Lists and Custom Fields before defaulting to Identifiers for more nuanced employee attributes.
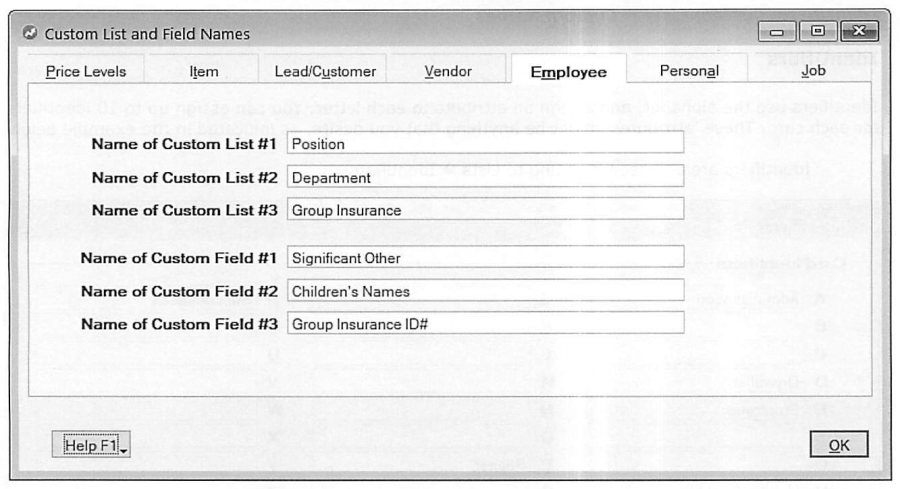
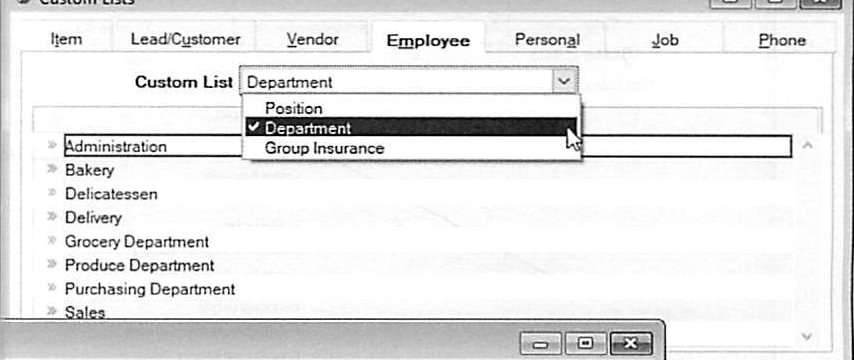
Custom Lists & Fields (Lists > Custom List & Field Names > Employees) let up to six custom fields be named for the Employee Card File specifically -- the guide's worked examples include Position, Department, and Group Insurance as Custom Lists, and Significant Other, Children's Names, and Group Insurance ID# as Custom Fields. Custom Lists behave like any other "select from" list in AccountEdge and can be used to filter reports; Custom Fields hold one free-form piece of information specific to an individual employee and, while not usable for filtering, can still appear printed on reports. Once the categories are named, the actual selectable entries for each Custom List are populated under Lists > Custom Lists > Employees.
Profile Tab
Source: p.33-35
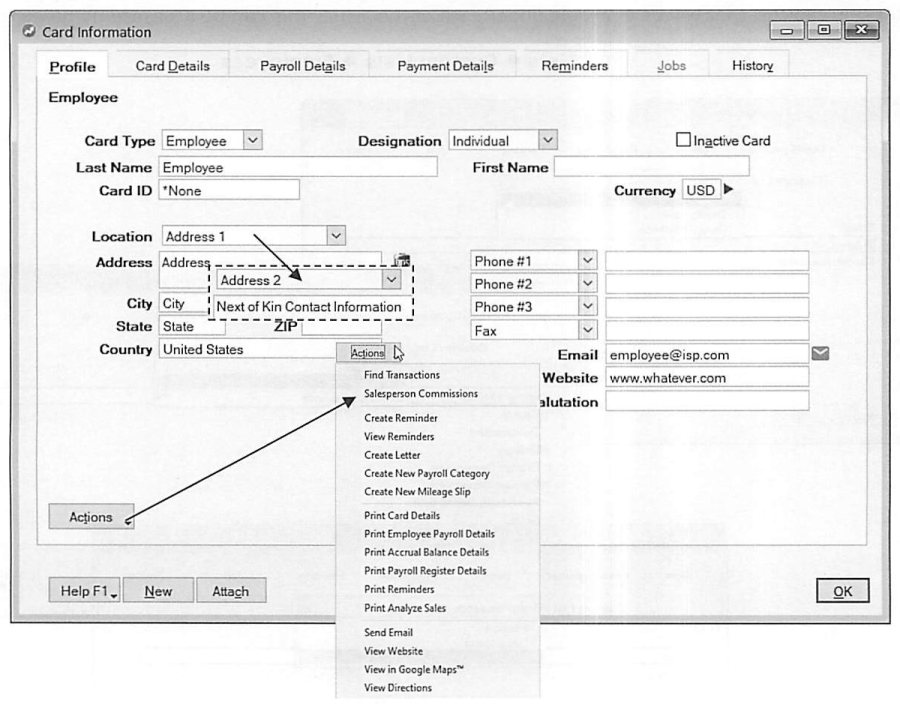
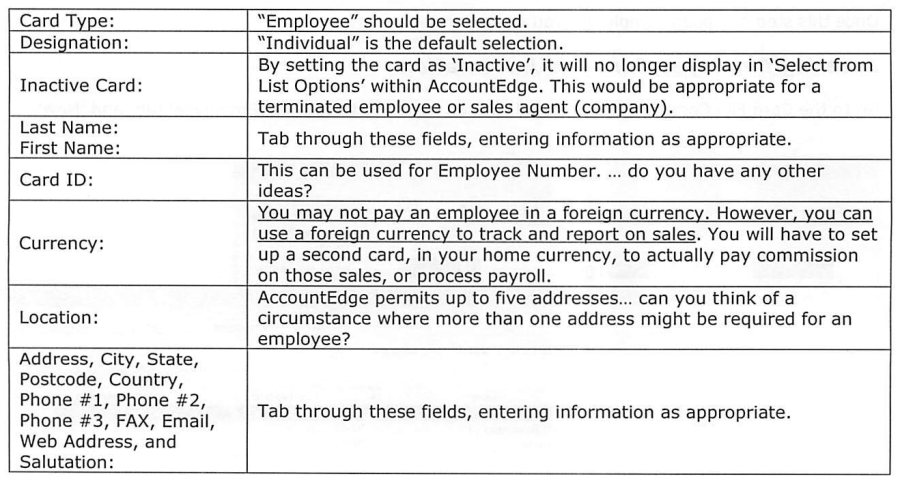
Employee cards are created from the Card File Command Center's Employee tab. The Profile Tab captures Card Type (Employee), Designation (defaults to Individual), Inactive status (appropriate once an employee or sales agent is terminated -- it removes the card from "Select from List" options everywhere), Last Name, First Name, Card ID (usable as an employee number), Currency, and up to five Locations with full address, phone, fax, email, web, and salutation detail. One specific note on Currency: an employee cannot actually be paid in a foreign currency, though a foreign currency can be used to track and report on their sales -- paying commission or processing payroll for that person still requires a second, home-currency card.
Card Details Tab
Source: p.35-36
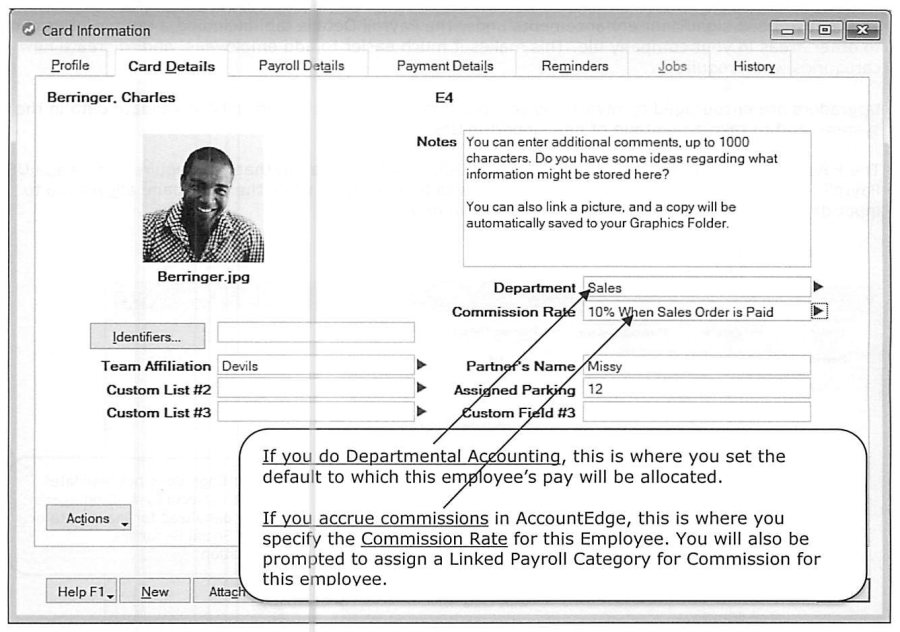
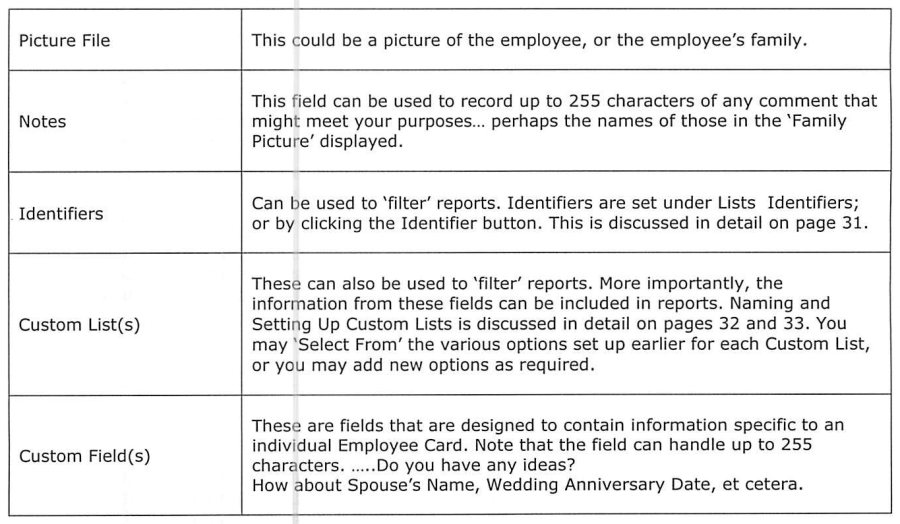
The Card Details Tab holds optional information not strictly required for payroll to function: a linked picture (automatically copied to the company file's Graphics folder), free-form Notes (up to 1000 characters), Identifiers, up to three Custom Lists, and up to three Custom Fields, plus (where relevant) a Commission Rate for employees or sales agents who earn sales commission, alongside the Payroll Category that commission should be linked to when it's calculated and paid.
Payroll Details Tab -- Personal Details & Wages
Source: p.36-38
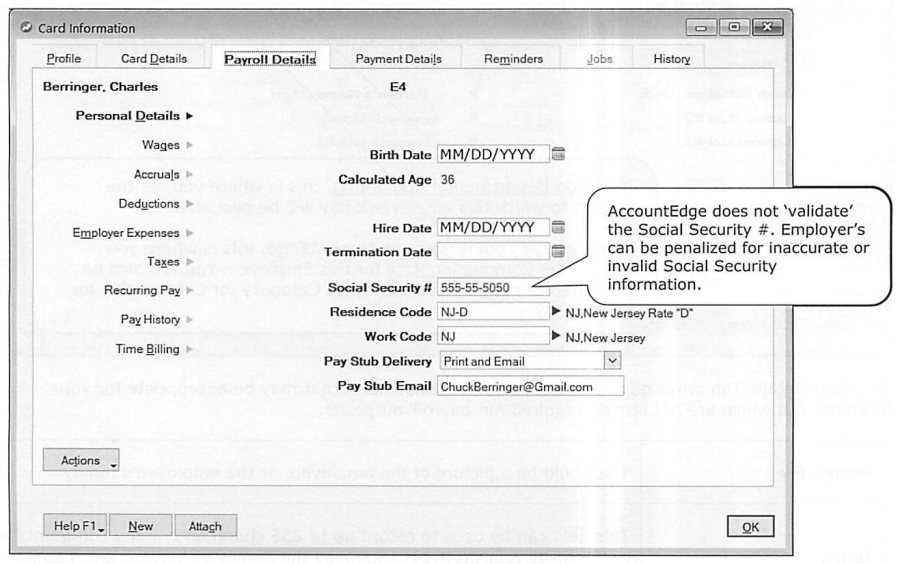
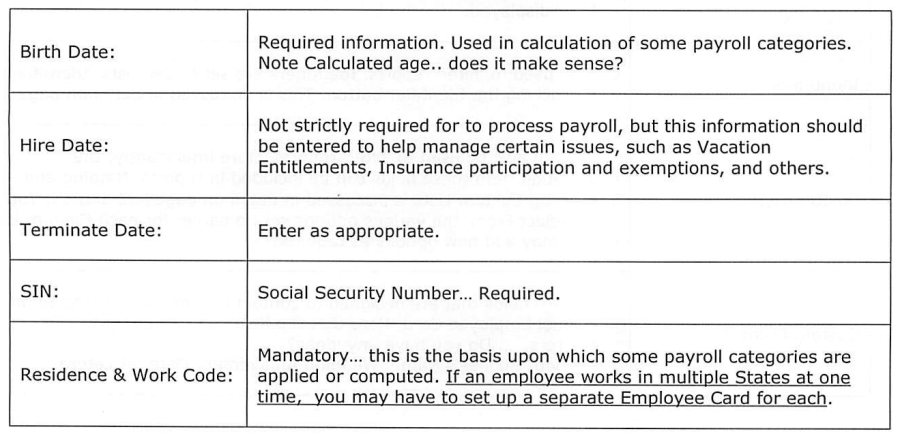
The Payroll Details Tab is where day-to-day payroll setup for an individual employee actually lives, organized as a left-hand navigation pane (Personal Details, Wages, Accruals, Deductions, Employer Expenses, Taxes, Recurring Pay, Pay History, Time Billing) with the corresponding data entry on the right. Personal Details captures Birth Date (AccountEdge calculates and displays current age automatically), Hire Date and Termination Date (not strictly required to process payroll but important for managing vacation entitlements, insurance eligibility, and similar issues), Social Security Number (required -- and the guide notes AccountEdge does not validate the number, so an inaccurate SSN is the employer's own compliance risk), and Residence Code / Work Code (mandatory, since some payroll categories are applied or computed based on these; an employee working in multiple states simultaneously may require a separate Employee Card per state).
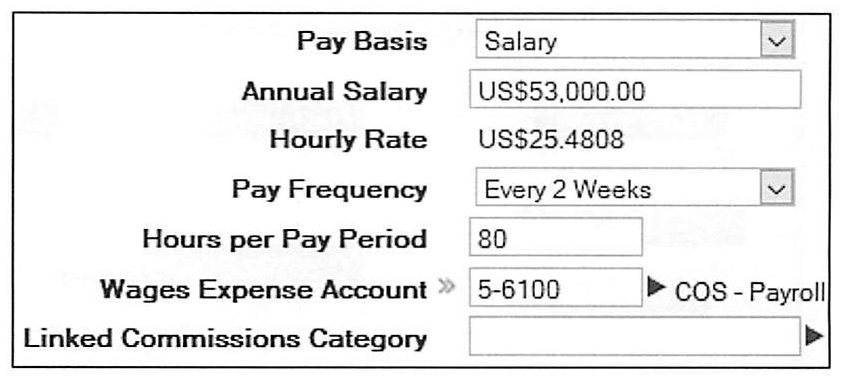
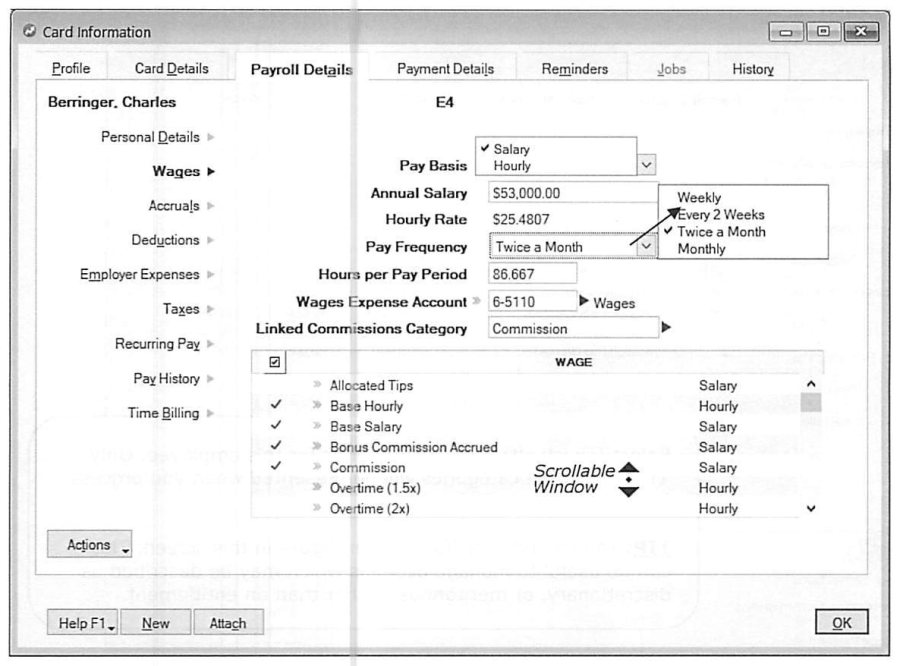
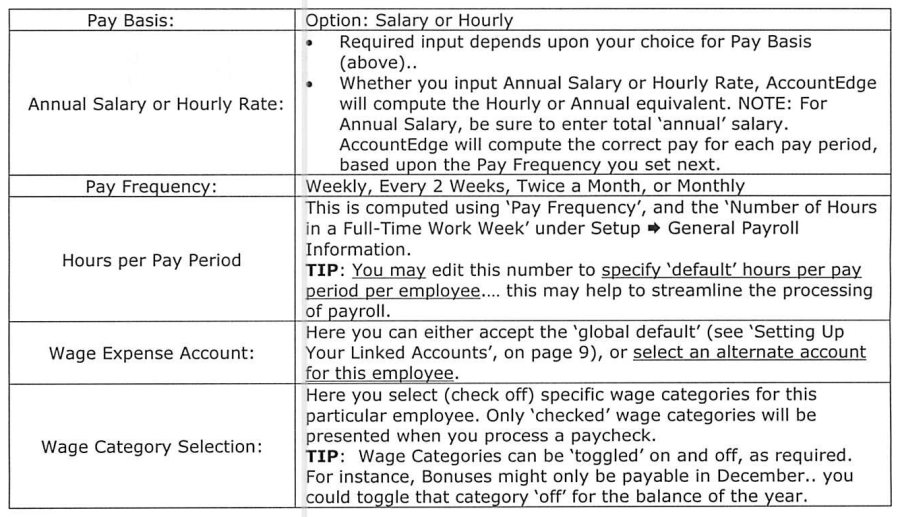
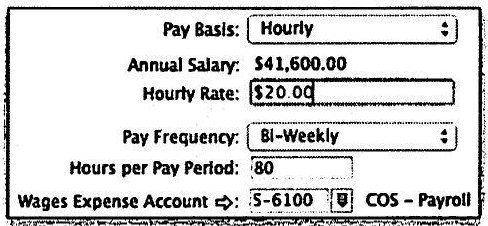
Wages sets Pay Basis (Salary or Hourly), the corresponding Annual Salary or Hourly Rate (AccountEdge computes the other automatically, so entering either is sufficient -- for a salaried employee, always enter the true annual total, since pay-period amounts are computed from the chosen Pay Frequency), Pay Frequency (Weekly, Every 2 Weeks, Twice a Month, or Monthly), Hours per Pay Period (computed from Pay Frequency and the company-wide Full-Time Work Week hours, but editable per employee as a shortcut for anyone whose normal schedule differs), an optional Wage Expense Account override, and finally a checklist of which specific Wage Categories apply to this employee -- only checked categories appear when processing that employee's paycheck, and categories can be toggled on and off as circumstances change (a December-only bonus category, for example, can simply be unchecked the rest of the year).
Payroll Details Tab -- Accruals, Deductions, Employer Expenses & Taxes
Source: p.38-40
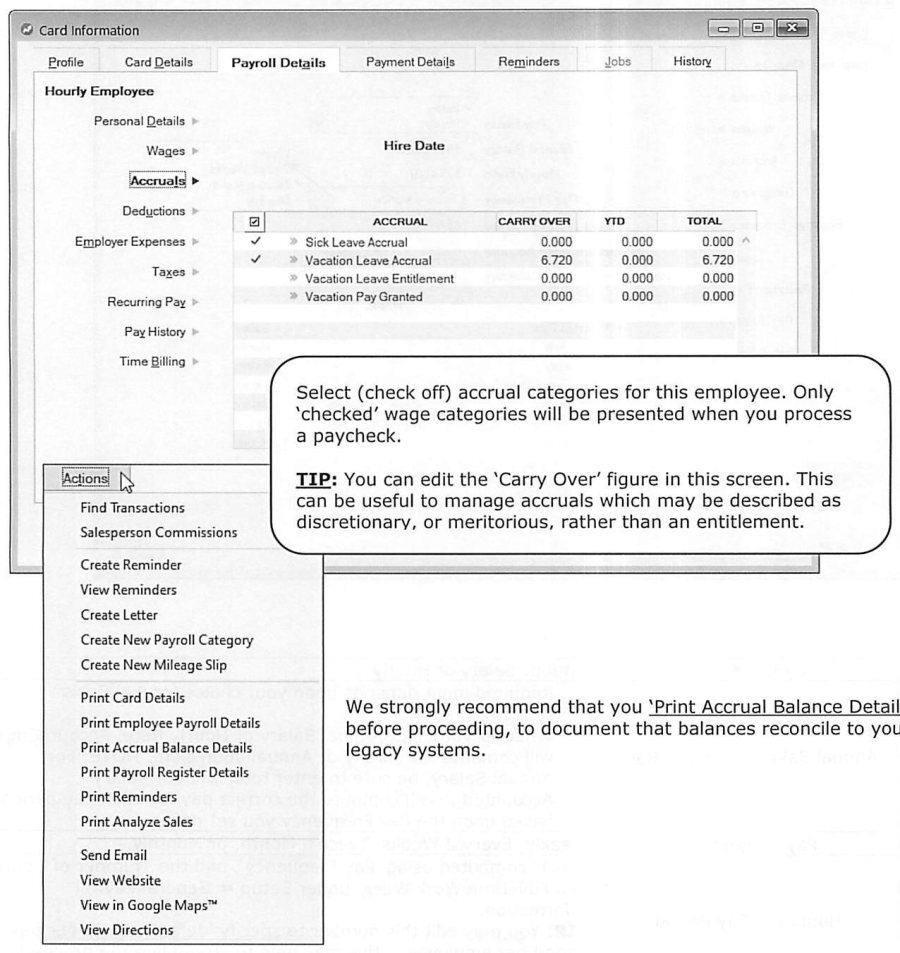
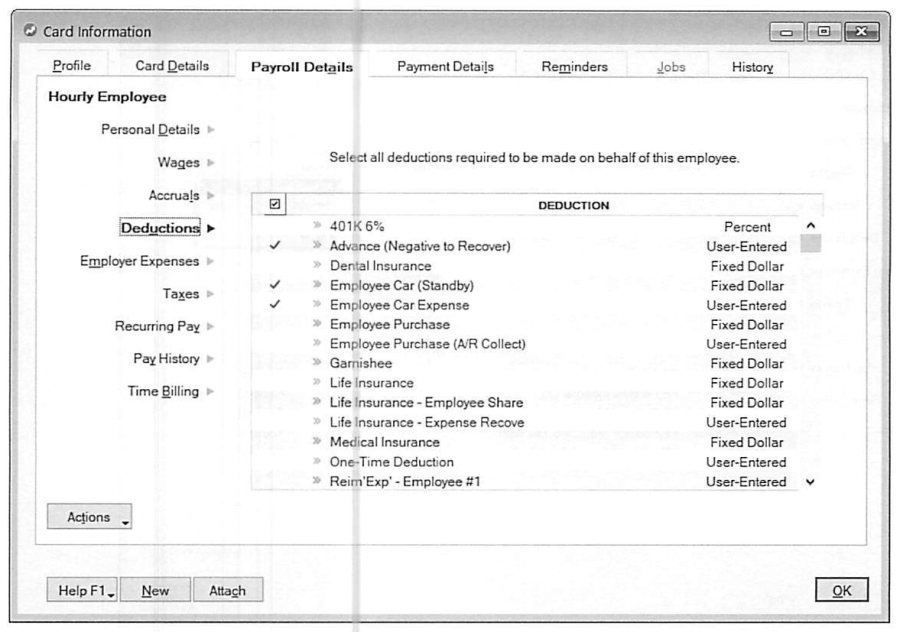
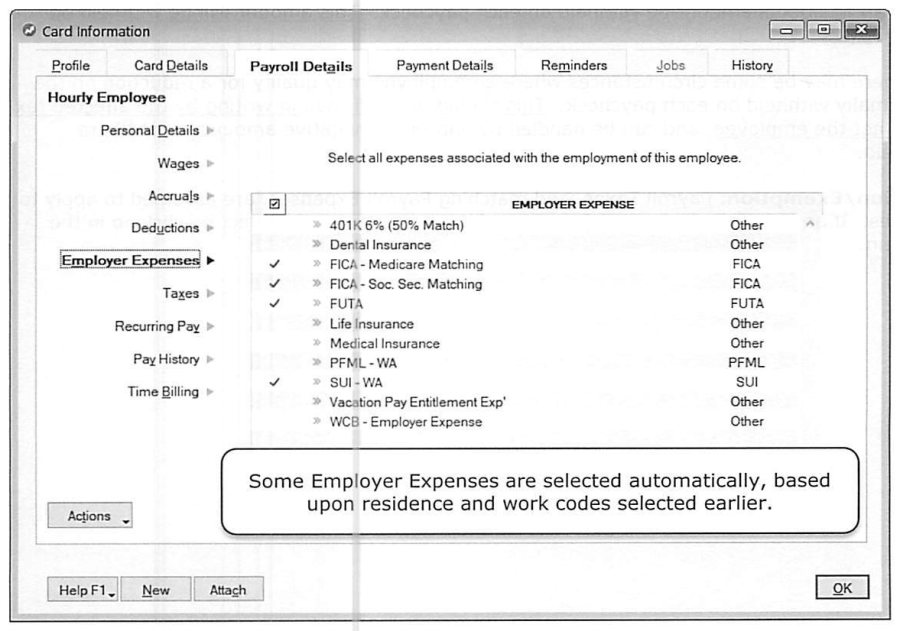
The Accruals screen shows Carry Over and Year-to-Date totals for each accrual category selected for the employee, and the Carry Over figure can be directly edited here -- useful for accruals that are discretionary or meritorious rather than a strict legal entitlement. The guide strongly recommends printing an Accrual Balance Details report before going live, to confirm every employee's opening balances reconcile against whatever legacy system is being replaced. Deductions and Employer Expenses each present a checklist of applicable categories for the employee, with the note that Employer Expenses are partly pre-selected automatically based on the Residence and Work Code chosen under Personal Details, since certain statutory expenses follow directly from where the employee lives and works.
Taxes sets Tax Level (Federal Marital Status: Single, Married, Head of House, or Other), Allowances (number of dependents), and Extra Withheld -- an additional fixed amount withheld every paycheck, used when an employee has outside taxable income with no source withholding and has requested (in writing, on the appropriate form) extra withholding to compensate. A negative Extra Withheld amount can reduce normal withholding instead, but only on written confirmation from the tax authority itself, not merely the employee's request. Below that sits the same kind of checklist pattern as Deductions and Employer Expenses -- individual taxes can be deselected for an employee who is legitimately exempt from a specific one.
Recurring Pay
Source: p.42
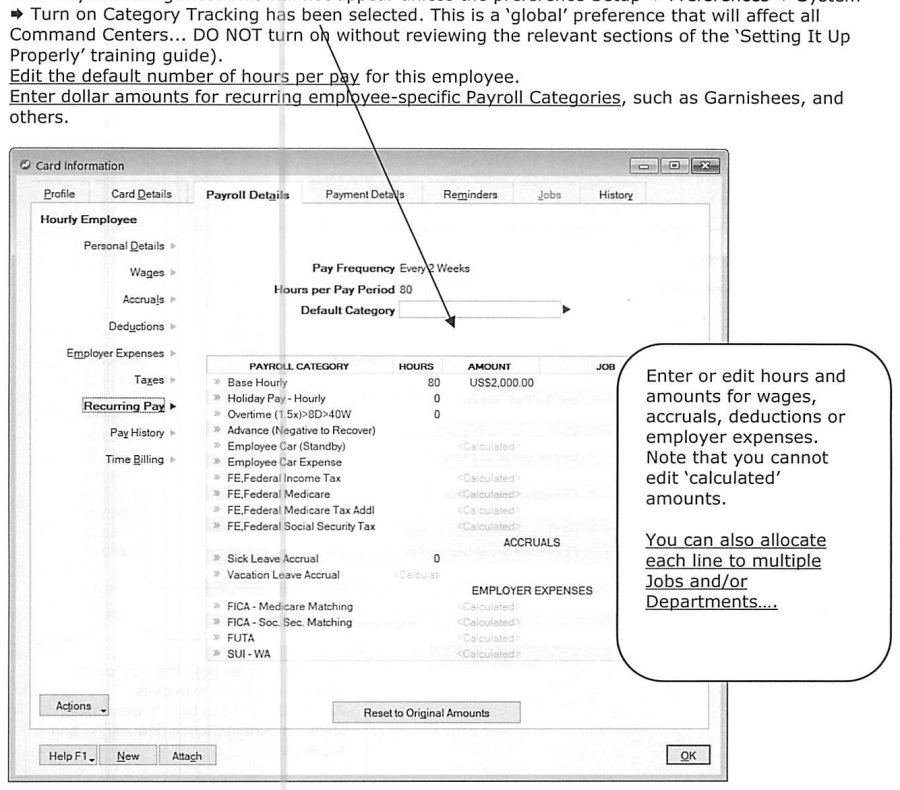
Recurring Pay, combined with Timesheets, is described as "the foundation on which processing payroll is based." It lets a Default Category (a Department/Division allocation, distinct from Payroll Categories -- only visible if Category Tracking has been turned on system-wide, a decision the guide says should not be made without reviewing the relevant Setting It Up Properly material first, since it's a global preference touching every Command Center) be set for the employee, lets the default hours per pay be edited, and is where dollar amounts for recurring employee-specific categories -- a fixed garnishee amount, for instance -- actually get entered. Each Recurring Pay line can be split across multiple Jobs and/or Departments. The guide is explicit that Recurring Pay transactions are structurally different from other AccountEdge recurring transactions: their schedule is driven entirely by the employee's own Pay Frequency, and they are not managed through Lists > Recurring Transactions the way other recurring items are. Recurring Pay details are built up automatically as the preceding Payroll Details screens (Personal Details through Taxes) are completed; this screen is simply where they're finalized or adjusted for anything employee-specific. Where Timesheets are in use, hours entered there override the recurring hours for hourly employees, and add on top of recurring pay for salaried employees (unless the linked wage category is set to auto-adjust base pay instead, as discussed under Timesheet setup).
Pay History & Time Billing (Payroll Details)
Source: p.43-44
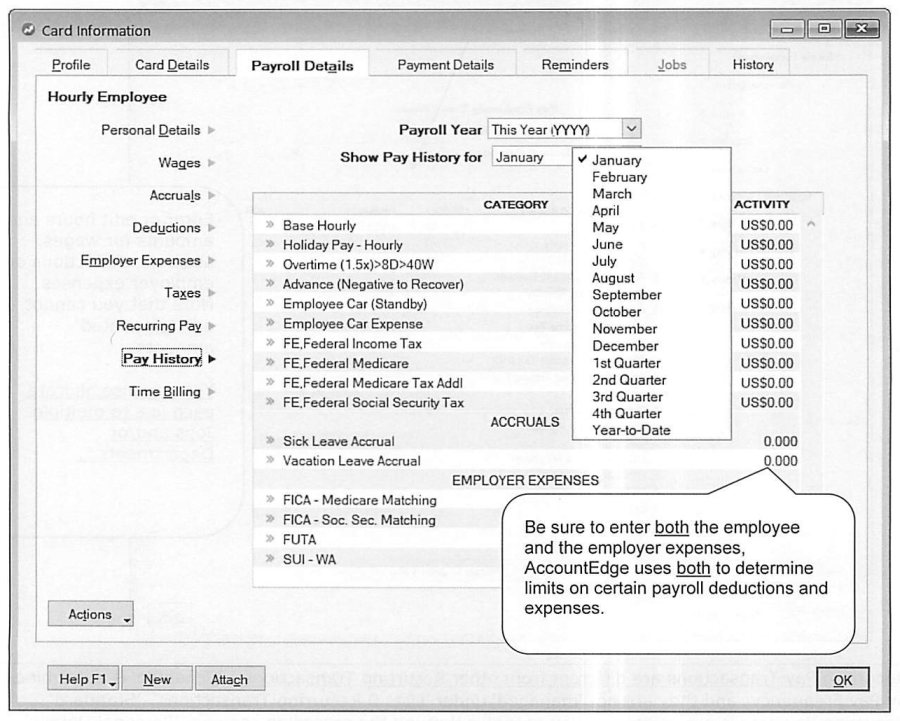
Pay History matters specifically for mid-year conversions: any business switching to AccountEdge Payroll partway through a calendar year needs to input each employee's payroll history up to the conversion date, so that annual-limit calculations (401K caps, FUTA/SUI wage bases) and year-end reporting (W-2s) come out correct. The screen presents each applicable Payroll Category by month, quarter, and year-to-date, requiring both employee and employer figures (AccountEdge uses both sides to correctly compute limits on certain deductions and expenses), with all figures entered as positive numbers -- AccountEdge itself already knows which categories need to be treated as reductions from Gross Wages. The guide's strong recommendation once history entry is complete: print a Year-to-Date report for every employee and reconcile it against legacy payroll records before going live, retaining the printout in each employee's file.
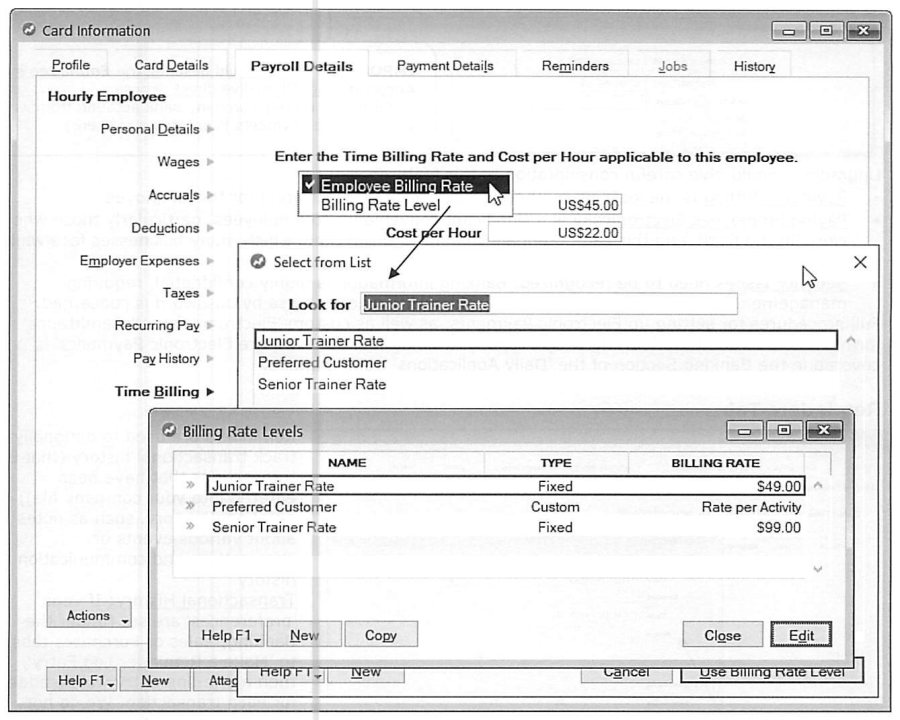
Time Billing (only relevant if Time Billing is in use) sets an Employee Billing Rate or a Billing Rate Level (a matrix of fixed or activity-specific rates that can be shared across multiple employees), plus Cost per Hour -- an estimated hourly cost used specifically for Time Billing profitability analysis, deliberately higher than base hourly pay since it should also reflect Employer Expenses and the reality that not every working hour is actually billable (an employee billing 20 of 40 weekly hours effectively costs at least double their base rate per billed hour).
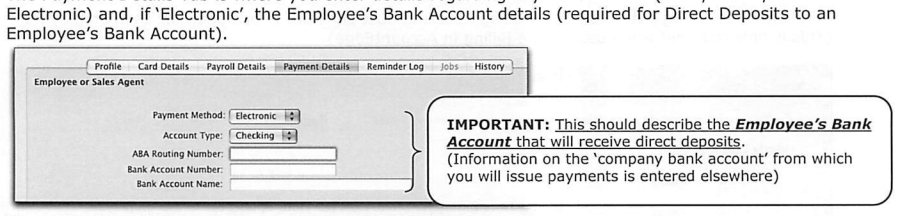
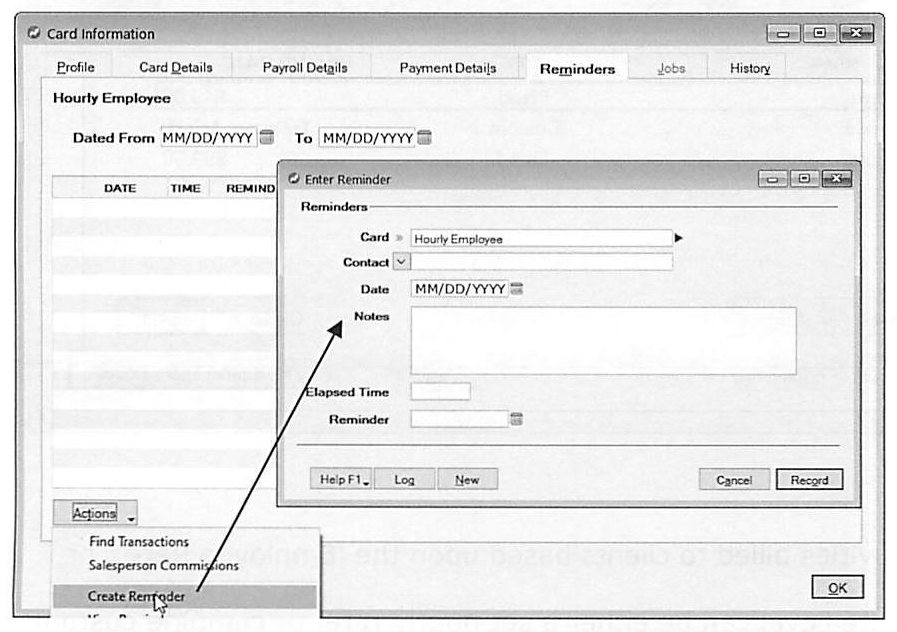
Payment Details Tab & Reminder Log Tab
Source: p.44
The Payment Details Tab sets Payment Method (Cash, Check, or Electronic) and, for Electronic, the employee's own bank account details required for direct deposit -- Account Type, Routing Number, Bank Account Number and Name. The guide flags this as an area upgraders should think through carefully: electronic pay is a real convenience, particularly for field employees who'd otherwise lose work time doing personal banking on payday, but it also means highly confidential banking data now lives in the company file, which should prompt a fresh look at password and security protocols specifically around who can view or edit Payment Details.
The Reminders Tab tracks Transactional History (a one-line automatic log entry per transaction if the relevant preference is enabled -- the guide again recommends against turning this on, since it's mostly redundant and inflates company file size unnecessarily), Notational History (pay rate notes, discipline records, performance appraisal reminders, category-status change reminders), and Communication History (commendations, disciplinary actions, and other noteworthy exchanges) -- log entries with a Recontact date surface automatically on the To Do List. Given the sensitivity of HR-related log entries specifically, the guide flags password restriction as worth discussing with an AccountEdge Certified Consultant if there's any immediate concern.
History Tab (Sales)
Source: p.46
AccountEdge automatically tracks monthly sales totals by employee whenever that employee is selected as Salesperson on a Sales Invoice, covering five years of history plus the Current and Next Year, with pre-conversion totals enterable manually -- giving upgraders from another system, or from a legacy AccountEdge version, a foundation for analyzing an individual employee's sales trends from day one rather than starting the history blank.
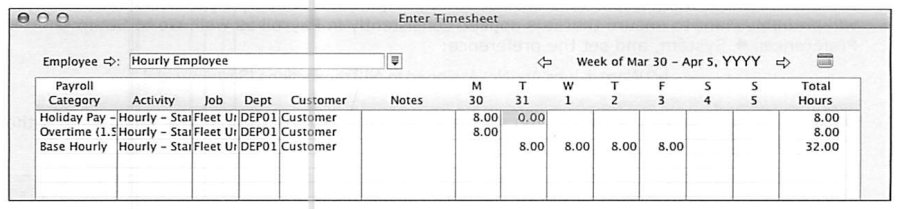
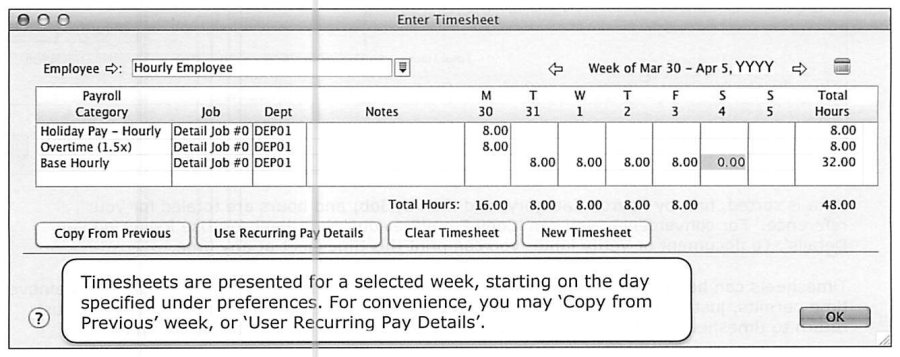
Payroll Timesheets -- For Time Billing and Payroll, or Payroll Only
Source: p.45
Timesheets provide a convenient way to record hours by payroll category per day, and -- as covered in the Daily Applications guide -- can double for Time Billing at the same time. If not already enabled, clicking "Enter Timesheet" routes directly to Setup > Preferences > System to turn the feature on. With "Time Billing and Payroll" selected, the resulting timesheet grid includes Activity, Job, Department, and Customer columns, and (per the Daily Applications guide) any Chargeable Activity must be linked to a customer while non-chargeable activities may optionally be. For US Payroll's purposes specifically, the guide narrows focus to "Timesheets for Payroll Only," which produces a simpler grid -- Payroll Category, Job, Department, Notes -- with no Activity or Customer columns at all, since there's no Time Billing invoicing involved.
Entering a Payroll Timesheet
Source: p.46-47
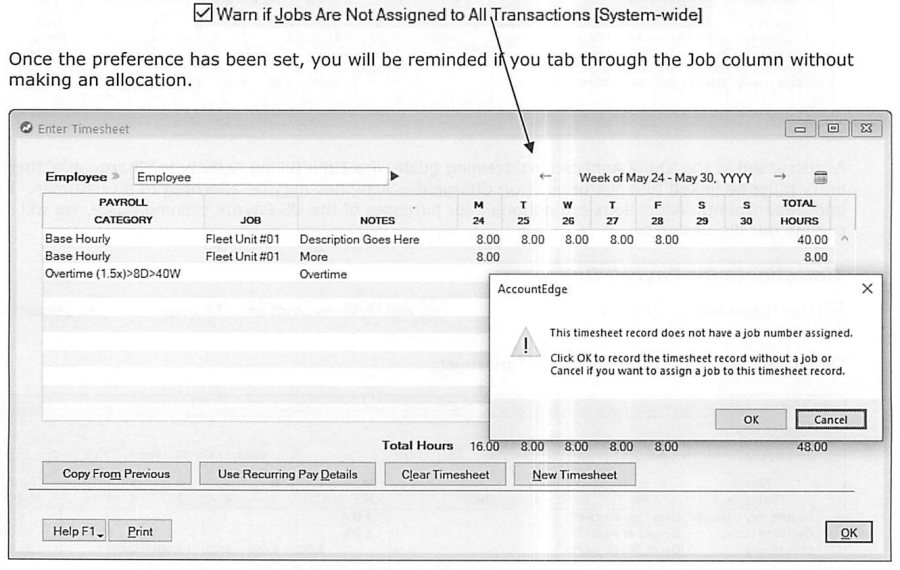
The entry sequence: click Enter Timesheet (available from either the Payroll or Time Billing Command Center), select the Employee and the pay week (via arrows or the calendar icon), select a Payroll Category (which must already be checked as applicable under that employee's Payroll Details > Wages/Accruals tab), and optionally allocate to a Job and/or Department. Where Job Costing is used elsewhere in the business, the guide recommends applying it consistently in Payroll too, enabled via Setup > Preferences > System > "Warn if Jobs Are Not Assigned to All Transactions" -- once set, tabbing through the Job column without an allocation triggers a reminder prompt. Data on the timesheet is sorted first by Payroll Category, then by Job, with running hour totals for reference; "Copy From Previous" and "Use Recurring Pay Details" both speed up entry for a typical week, and the sheet can be printed at any point to document or verify what's been entered. Timesheets don't have to be completed in one sitting -- hours can be added daily or whenever convenient, simply by returning to the same employee and week and continuing.
Timesheet Reports
Source: p.47-51
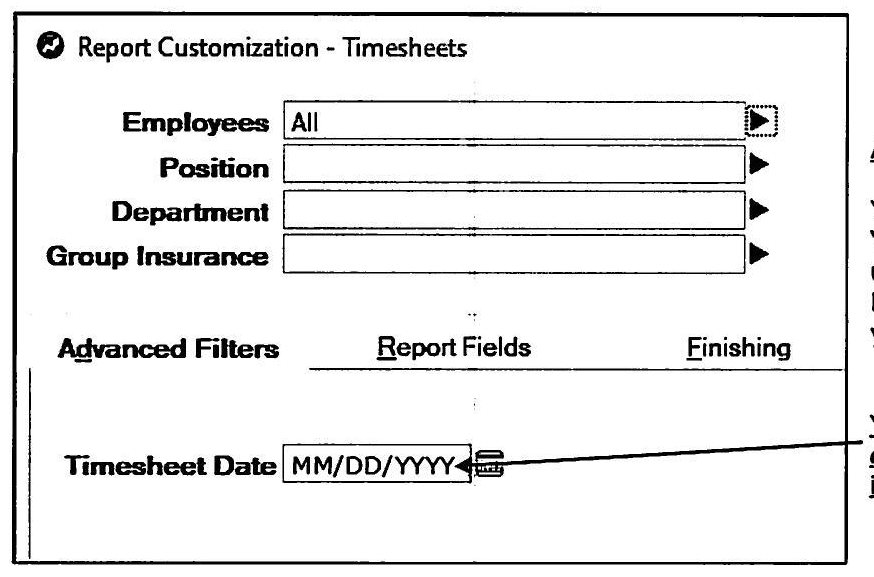
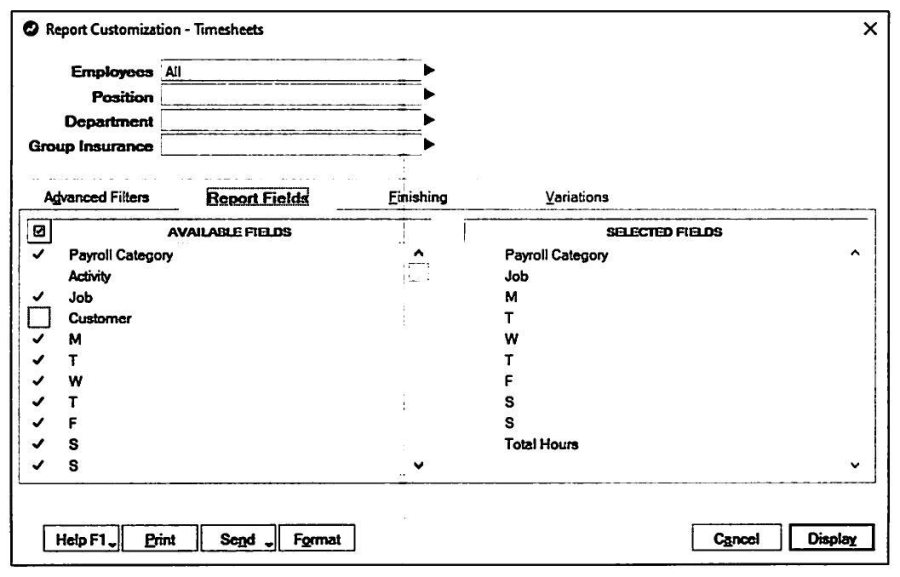
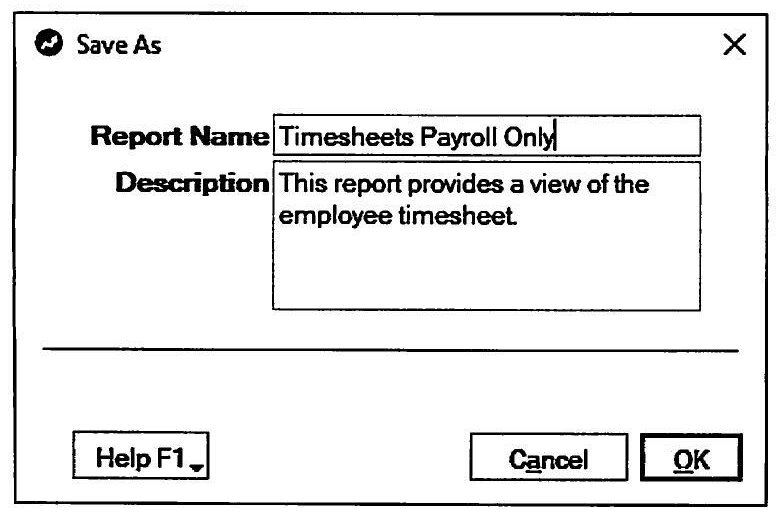
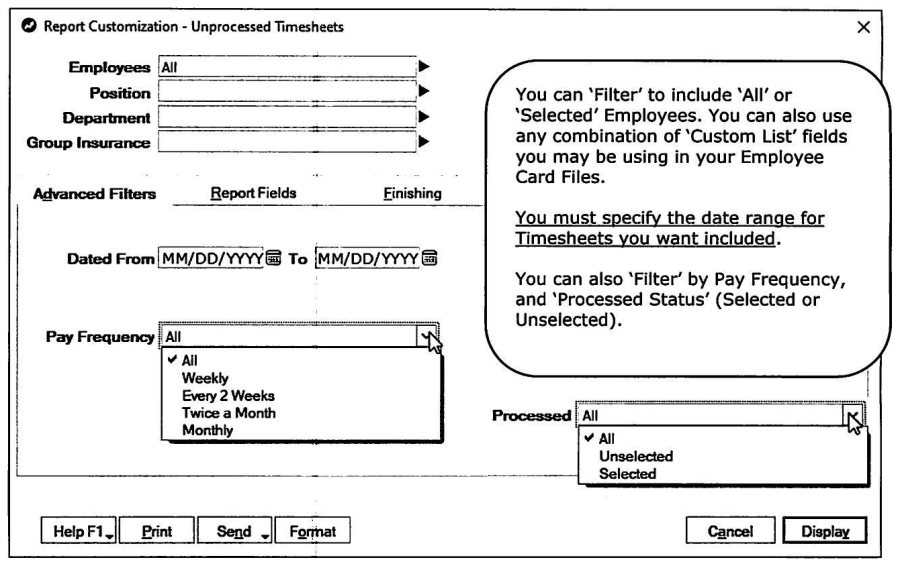
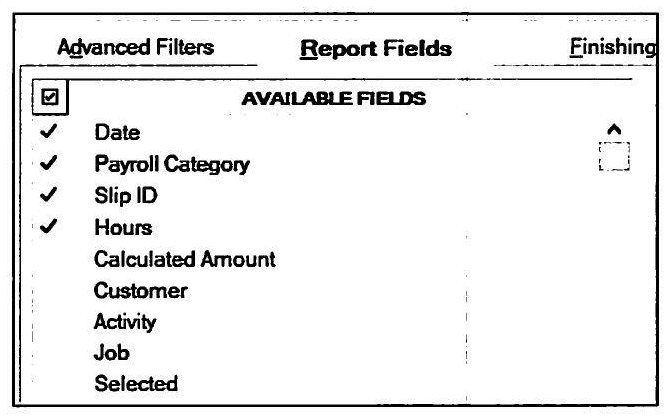
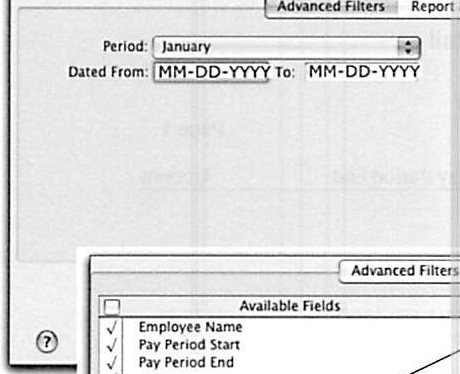
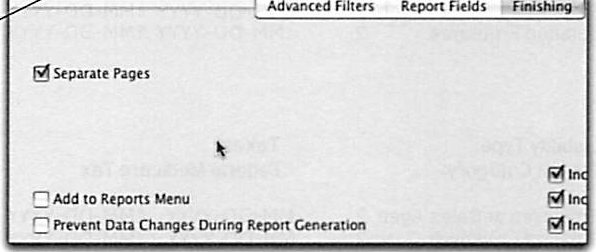
The Timesheets Report (Reports > Index to Reports > Payroll) mirrors what prints directly from the Timesheet screen, but with more customization: Advanced Filters can scope to All or Selected employees, filterable by whatever Custom List fields are in use on the Employee Card (Position, Department, Group Insurance in the worked example); Report Fields lets Activity, Job, and Customer columns be included or dropped depending on whether Time Billing is relevant (the guide's own example deselects both Activity and Customer, since for pure payroll purposes only Payroll Category and Job matter); and Finishing offers Separate Pages per employee, useful depending on how timesheets get authorized or distributed for review. A report customized this way can be saved permanently under a new name via the Save As icon, filed under the Custom tab of the reports menu, and optionally pinned to the Reports Menu itself for one-click future access.
The Unprocessed Timesheets Report shows every timesheet entry not yet used to process payroll, filterable by employee, date range, Pay Frequency, and Processed Status (Selected or Unselected), with optional fields for Calculated Amount (Dollars), Customer and Activity (Time Billing), Job, and Selected status -- sorted by date, then category, then job, giving a different view than the standard Timesheets Report. The guide specifically calls out a Period End use for this report: including both Job Allocation and Calculated Amounts makes it possible to value and accrue the cost of not-yet-processed time as of a specific date -- effectively a Work-in-Process calculation for unprocessed payroll hours.
Processing Payroll -- Select Employees to Pay
Source: p.51-52
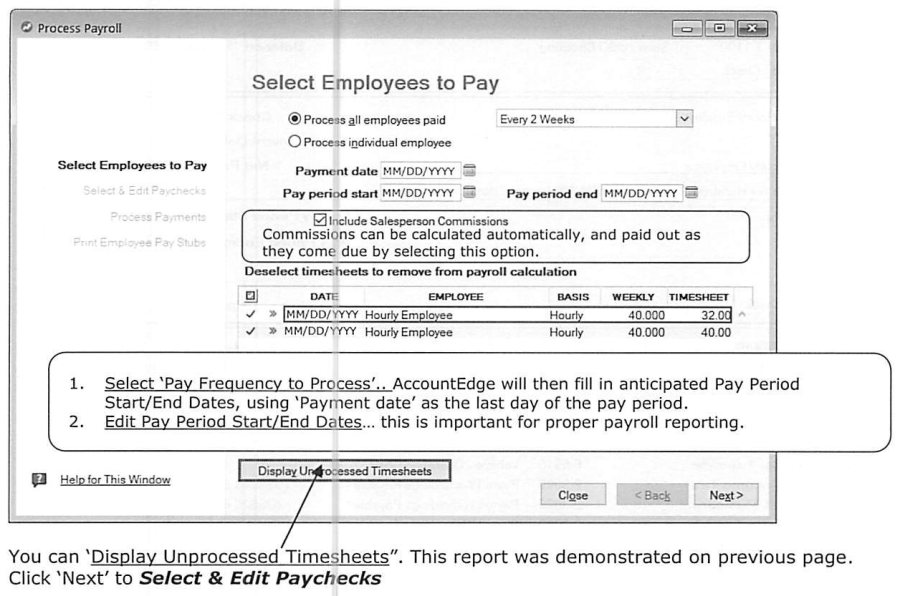
Processing payroll starts with Select Employees to Pay: choose whether to process all employees sharing a given Pay Frequency, or an individual employee, then confirm or edit the Payment Date, Pay Period Start, and Pay Period End -- getting these dates right matters directly for payroll reporting accuracy. "Include Salesperson Commissions" lets commissions calculate and pay out automatically as they come due within this batch. Where Timesheets are used, individual timesheet entries can be deselected here to exclude them from this particular payroll run if needed, and "Display Unprocessed Timesheets" opens the same report described above directly from this screen for a quick sanity check before proceeding.
Select & Edit Paychecks
Source: p.51-52
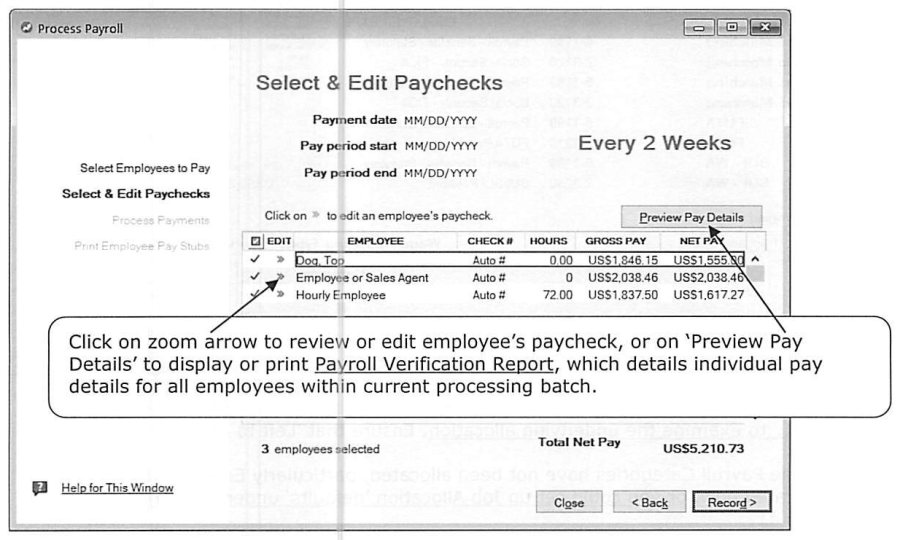
Select & Edit Paychecks lists every employee in the current batch with Check#, Hours, Gross Pay, and Net -- clicking the zoom arrow next to any employee opens their individual paycheck for review or editing before it's recorded, while "Preview Pay Details" displays or prints a Payroll Verification Report summarizing every employee's pay details for the whole batch at once, a natural point to catch errors before checks are actually cut.
Reviewing an Individual Paycheck
Source: p.52-53
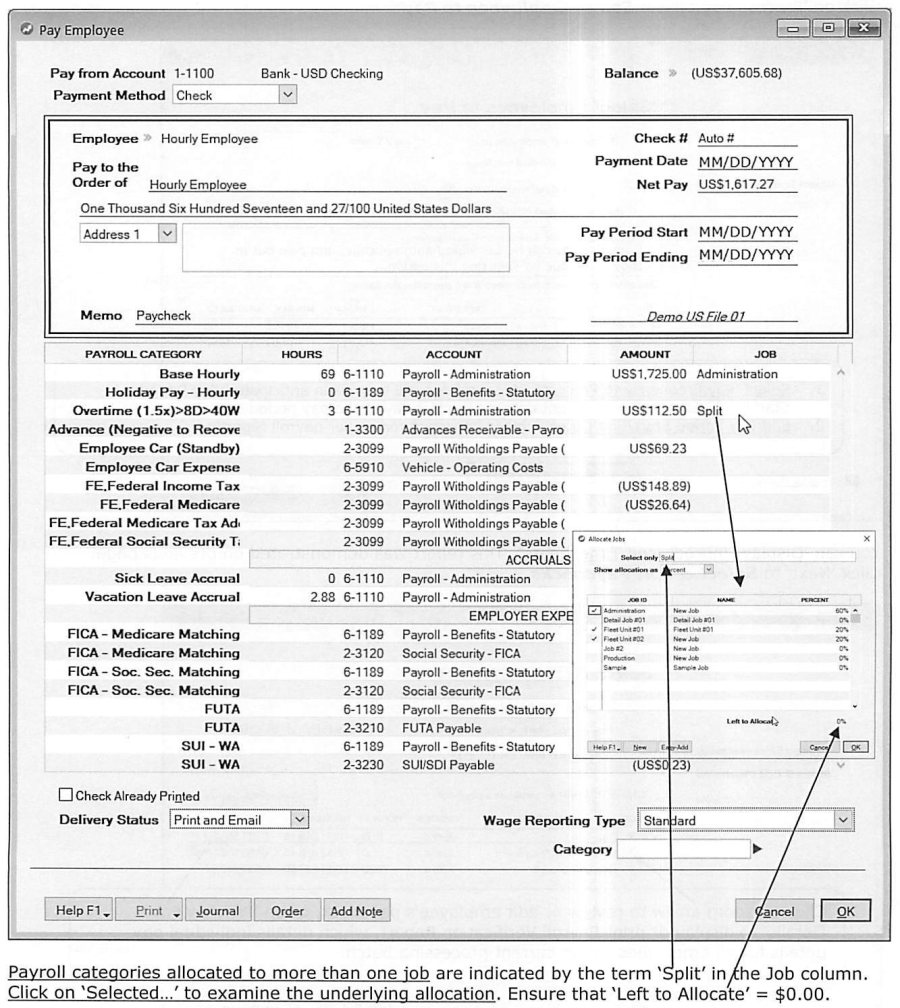
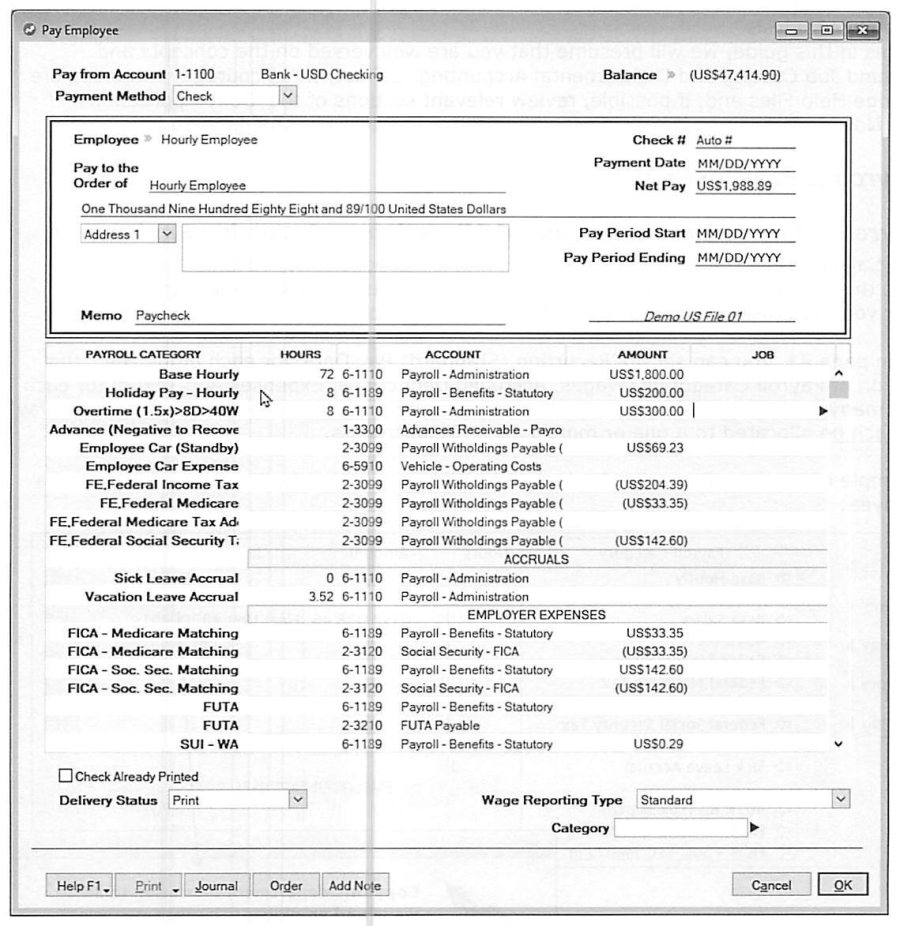
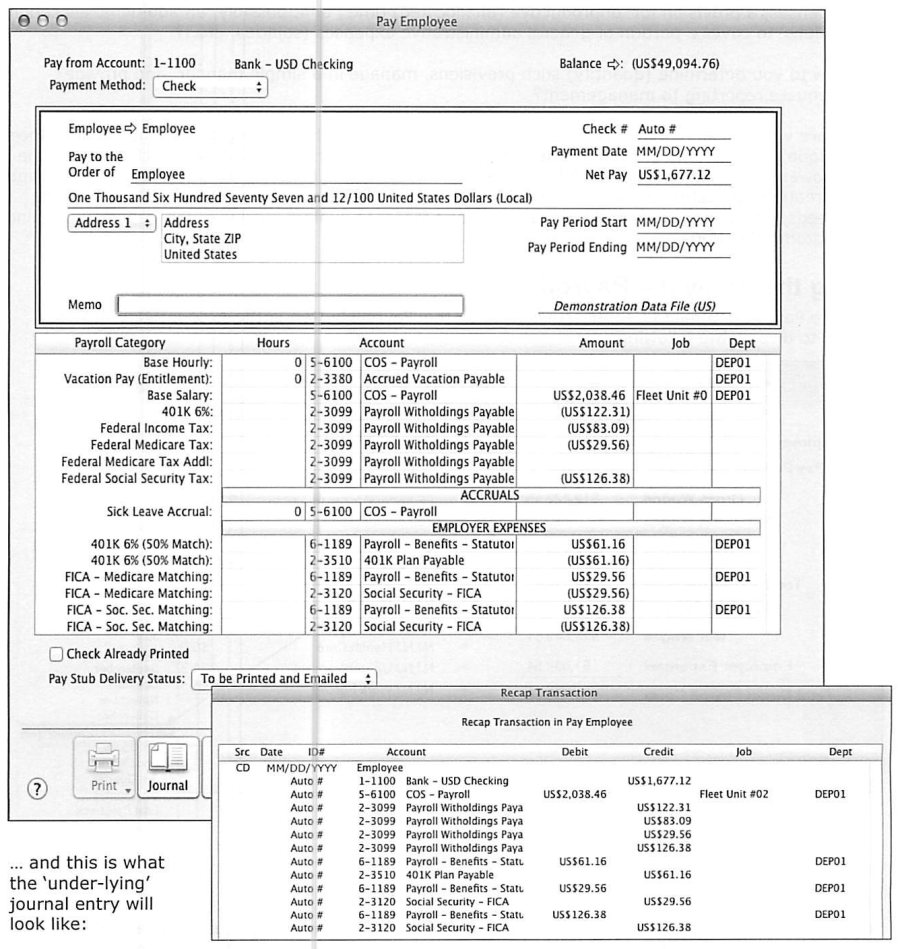
The individual Pay Employee screen displays every applicable Payroll Category with Hours, linked Account, Amount, and Job -- categories allocated across more than one job show "Split" in the Job column, with a zoom into that line revealing the underlying allocation breakdown (worth confirming that "Left to Allocate" reads $0.00 before moving on). Employer Expense categories in particular are frequently left unallocated by default at this stage; they can be allocated here directly, or -- better, for anything recurring -- set up as a default allocation under Recurring Pay so it's handled automatically on every future paycheck rather than needing manual attention each pay run. Clicking OK returns to Select & Edit Paychecks, and Record there moves the batch forward to Process Payments.
Process Payments -- Checks, Cash & Electronic Payments
Source: p.53-55
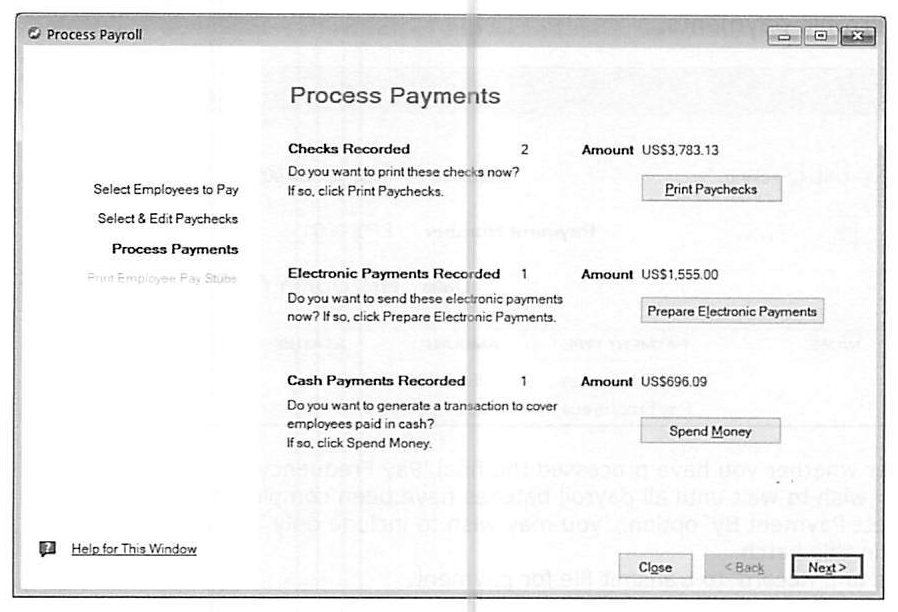
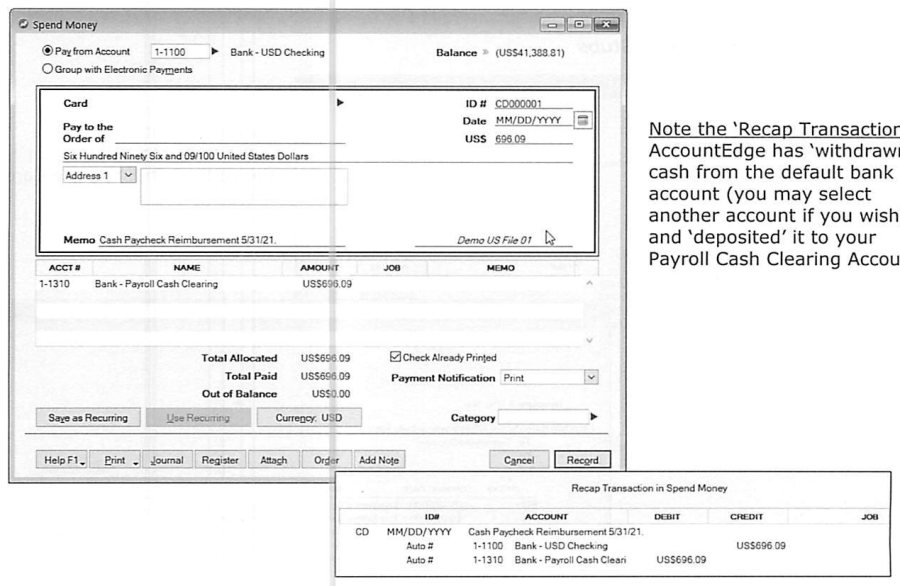
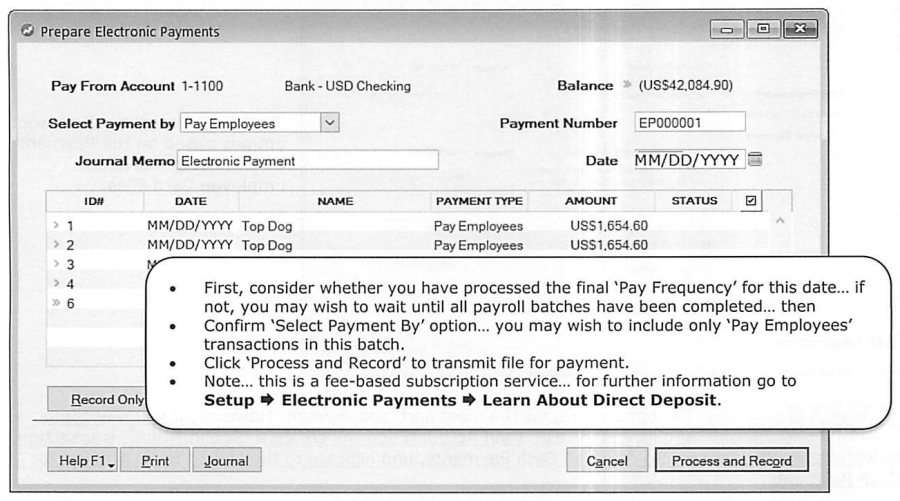
Process Payments presents options that reflect each employee's own Payment Details settings: Print Paychecks for check-paid employees, Prepare Electronic Payments for direct-deposit employees, and -- specifically for anyone paid in cash -- AccountEdge automatically generates a Spend Money transaction withdrawing sufficient cash from the linked Bank Account for Cash Payments and depositing it into the Payroll Cash Clearing account, which the guide illustrates directly via a Recap Transaction. Prepare Electronic Payments is a fee-based subscription service (Setup > Electronic Payments > Learn About Direct Deposit has full details); the recommended workflow is to confirm this is genuinely the final Pay Frequency batch for the date before transmitting, confirm the "Select Payment By" filter is scoped correctly (typically just "Pay Employees" transactions), and click Process and Record to actually transmit the file.
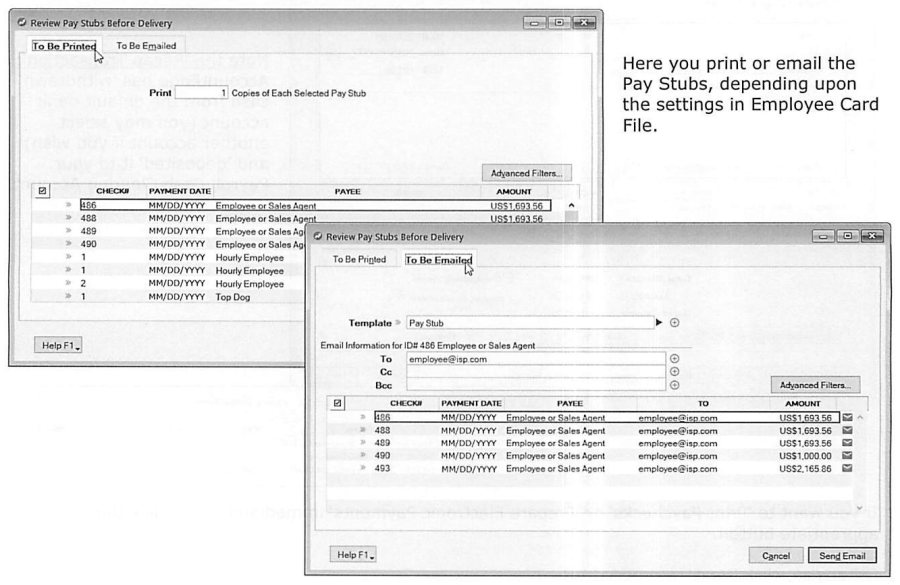
Print or Email Employee Pay Stubs opens a Review Pay Stubs Before Delivery screen with To Be Printed and To Be Emailed tabs, following the same delivery-status pattern used elsewhere in AccountEdge (invoices, payment notifications) -- print copies can be specified per stub, and email delivery supports a reusable Template with per-recipient To/Cc/Bcc addressing.
Display & Print Payroll Earnings
Source: p.56
The Payroll Earnings Report is designed to print on separate pages per employee -- particularly useful for anyone paid in cash, who needs a physical earnings record in place of a check stub -- showing Gross Pay, Net Pay, Pay Frequency, Pay Period, Annual Salary, and a line-by-line breakdown of every Payroll Category with Hours, Calculated Rate, Amount, and running Year-to-Date total. Once payroll has actually processed through to this point, the guide's tone shifts to a small congratulatory note: "the job of actually 'Processing Payroll' is a breeze" once the categories and employees have been properly set up -- the heavy lifting is genuinely front-loaded into setup, not repeated every pay run.
Paying Out Accrued Vacation Pay
Source: p.55-56
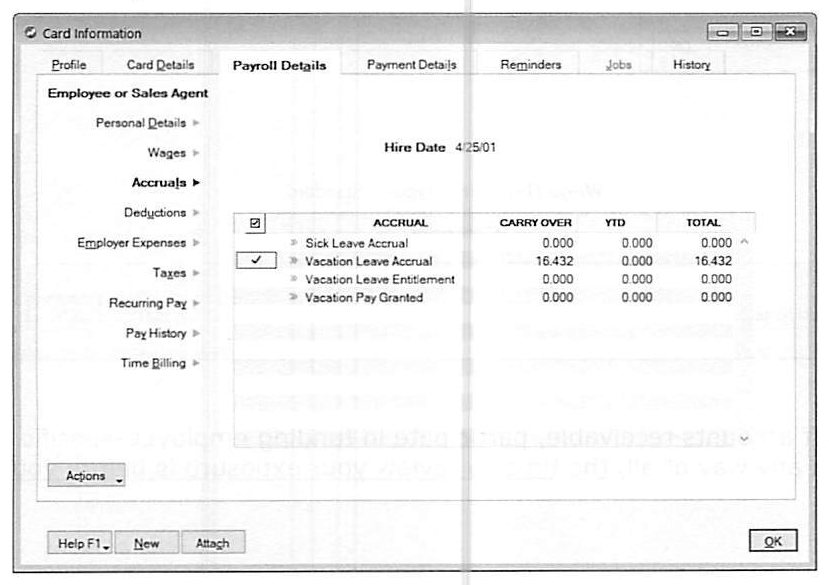
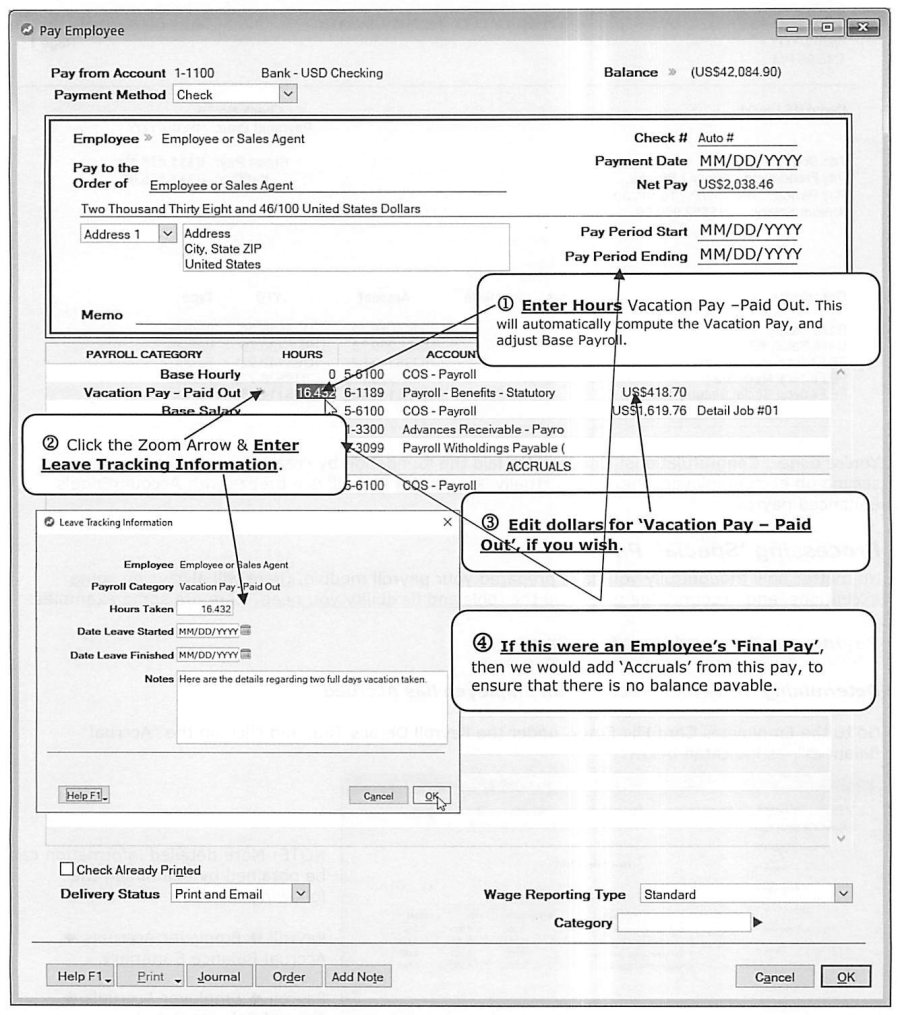
To check how much vacation an employee has accrued, the Employee Card's Payroll Details > Accrual Balances screen is the fastest reference point on screen, though the guide points to two dedicated reports -- Accrual Balance Summary and Accrual Balance Detail (Reports > Payroll > Employer Accruals) -- for more complete detail. To actually pay it out, entering the appropriate hours against the Vacation Pay -- Paid Out wage category on the Pay Employee screen automatically computes the dollar amount and adjusts Base Payroll accordingly (assuming "Automatically Adjust Base Hourly or Base Salary Details" was set up correctly, as described earlier). A specific mechanic worth knowing: clicking the zoom arrow next to a vacation payout line opens a Leave Tracking Information window to record Hours Taken, Date Leave Started, Date Leave Finished, and free-form Notes -- useful documentation for HR purposes beyond just the accounting entry. The guide's trap for final paychecks specifically: before issuing anyone's very last check, review every other form of financial exposure the business might have with that employee first -- outstanding advances, staff receivables, or participation in any employee-funded program -- since there won't be another paycheck to net any of it against afterward.
Processing Payroll Advances
Source: p.57-58
The guide is candid that payroll advances historically served two purposes, and only endorses one of them: avoiding the need to separately calculate and withhold taxes on an off-cycle mid-month payment (a problem AccountEdge's payroll engine has "virtually eliminated," since it handles arbitrary pay runs correctly on its own) versus outright lending money to employees, which the guide "would discourage entirely" except in rare cases, since it rarely serves either the business's interests or the professionalism of the employer-employee relationship. A genuine compliance caution accompanies advances regardless of purpose: depending on when an advance is actually recovered, issuing one can inadvertently defer the withholding and remittance of payroll taxes in a way that some tax authorities prohibit and penalize -- worth confirming exposure before initiating or continuing the practice.
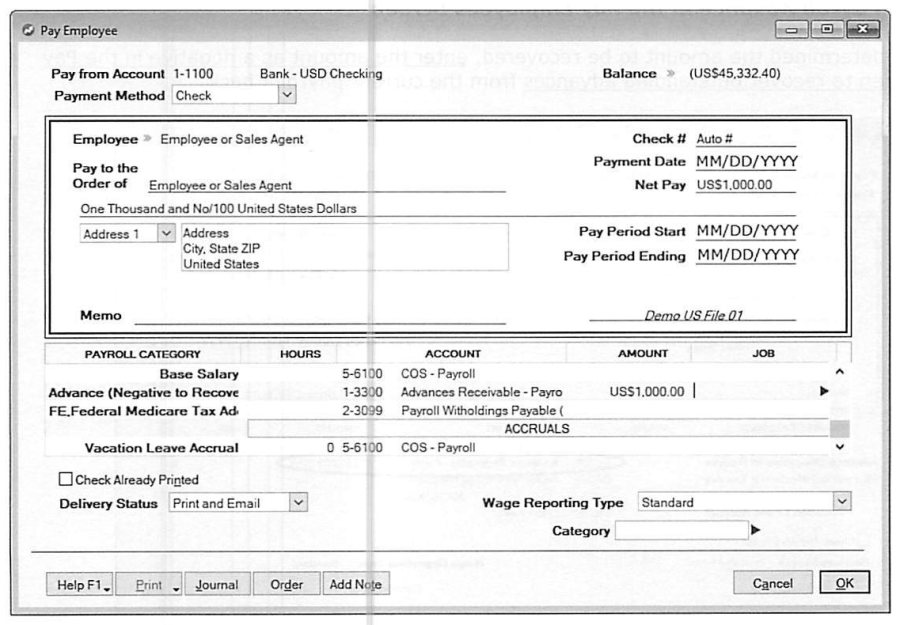
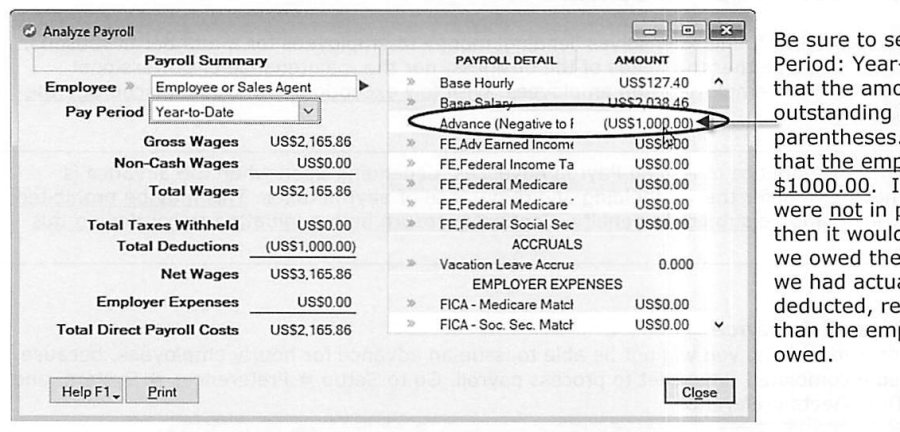
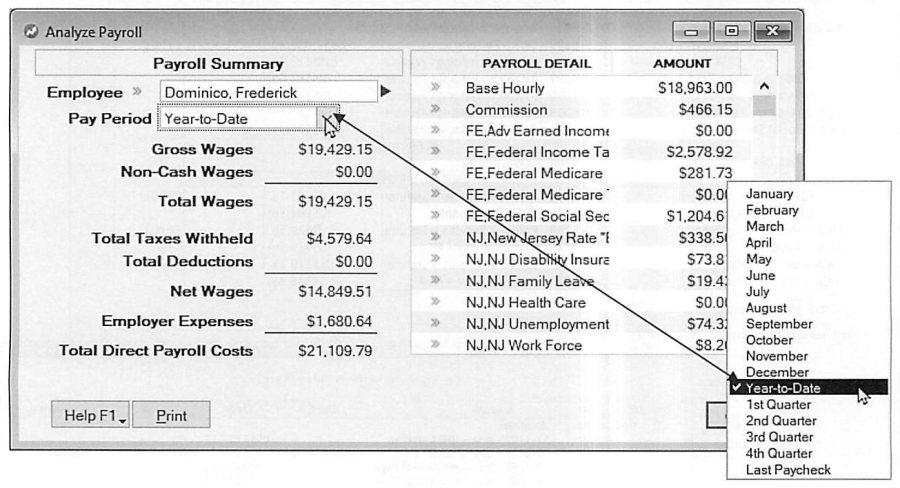
Mechanically, if Timesheets are in use for hourly employees, an advance can't be issued through the normal flow (since hourly pay requires a completed timesheet) -- the Timesheets preference has to be temporarily turned off, the advance processed via Payroll > Process Payroll > Process Individual Employee with all deductions removed from that one paycheck except the advance itself, and the Timesheets preference turned back on immediately afterward. To determine total advances outstanding at any point, the Payroll Analyst screen (see below) for a given employee, filtered to Pay Period: Year-to-Date, shows the Advance category balance in parentheses if the employee currently owes the business money (or without parentheses if the business has somehow over-recovered and owes the employee instead). Recovering an advance on a future paycheck is simply a matter of entering the amount to be recovered as a negative directly on the Pay Employee screen.
Paying for Statutory Holidays
Source: p.59-60
Statutory Holiday Pay Entitlement varies state to state (and can even vary within a single state depending on circumstances), so the employer bears responsibility for understanding the applicable regulatory requirement directly -- the one constant the guide identifies is that Statutory Holiday Pay should be managed and budgeted like any other statutory payroll tax, alongside FICA, SUI, Vacation Pay Entitlements, and Workers' Compensation, rather than treated as an occasional exception. A worked example shows an employee who worked 80 hours across a two-week period that included a statutory holiday, entitled to overtime for hours worked beyond 32 in the week the holiday fell -- with regular Overtime charged to the same expense account as normal pay (since it resulted from a scheduling decision) while Statutory Holiday Pay itself is charged alongside other employer expenses (since it's a statutory cost, not a scheduling choice). In the worked example, the fully-loaded cost of having a regular employee work on a statutory holiday comes out to two-and-a-half times regular pay once overtime and holiday premium both apply -- illustrating why the guide treats managing this category as genuinely consequential to overall payroll cost control, not a minor administrative detail.
Job and/or Departmental Costing & Payroll
Source: p.60-61
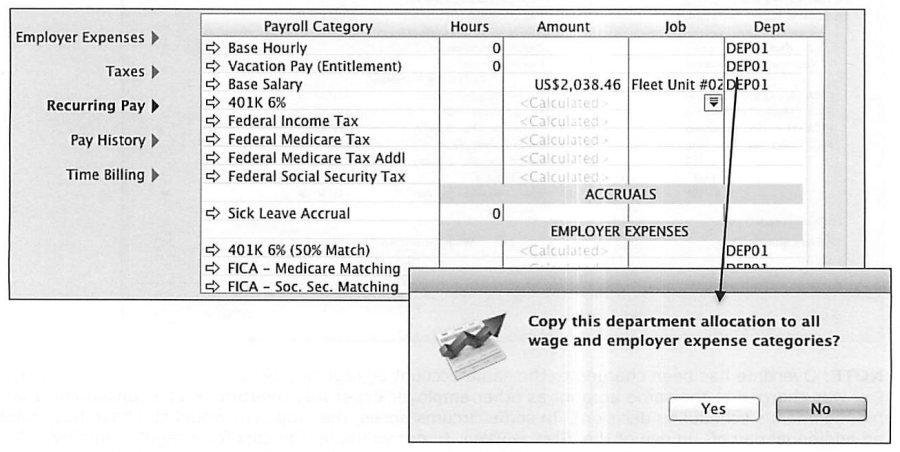
Job and Departmental Costing concepts themselves were covered in full in Daily Applications -- creating and organizing jobs, budgets, allocating transaction detail, invoicing customers for reimbursables, and the related reporting -- and this section assumes that background, focusing narrowly on how payroll detail specifically gets allocated to jobs or departments. For salaried employees working consistently in one area of the business, allocating the entire paycheck to a single job is the simple case; for anyone spanning multiple jobs, Recurring Pay (set under the employee's Payroll Details tab, described earlier on page 41) lets each wage, accrual, deduction, and expense line -- including calculated amounts like taxes -- be allocated to one or more Jobs or Departments as a standing default, with a convenience prompt offering to copy one allocation across every wage and employer expense category on the card at once rather than repeating the same allocation line by line.
Once Recurring Pay allocations are set this way, processing that employee's payroll requires no additional allocation work at all -- the guide walks through a Recap Transaction showing every line of the resulting paycheck, including the calculated tax and employer-expense lines, correctly carrying the same job/department allocation automatically. For more sophisticated needs -- building in a provision for overhead, unproductive time, or a share of general administrative expense onto job costs -- the guide is candid this goes beyond what a training guide can prescribe generically, since the right approach depends entirely on a given business's specific circumstances; the recommendation is simply to explore the available Job reports and their Customize options once the basic allocation mechanics are understood.
Using the Analyst -- Payroll, and Payroll & Sales Report Options
Source: p.62-64
With the Payroll Command Center active, the Payroll Analyst button displays a single employee's Payroll Summary -- Gross Wages, Non-Cash Wages, Total Wages, Total Taxes Withheld, Total Deductions, Net Wages, Employer Expenses, and Total Direct Payroll Costs -- alongside a detail pane breaking out every individual Payroll Category amount, filterable by Month, Quarter, Year-to-Date, or Last Paycheck. Where this summary view isn't detailed enough, the guide points toward the broader Payroll Reports index.
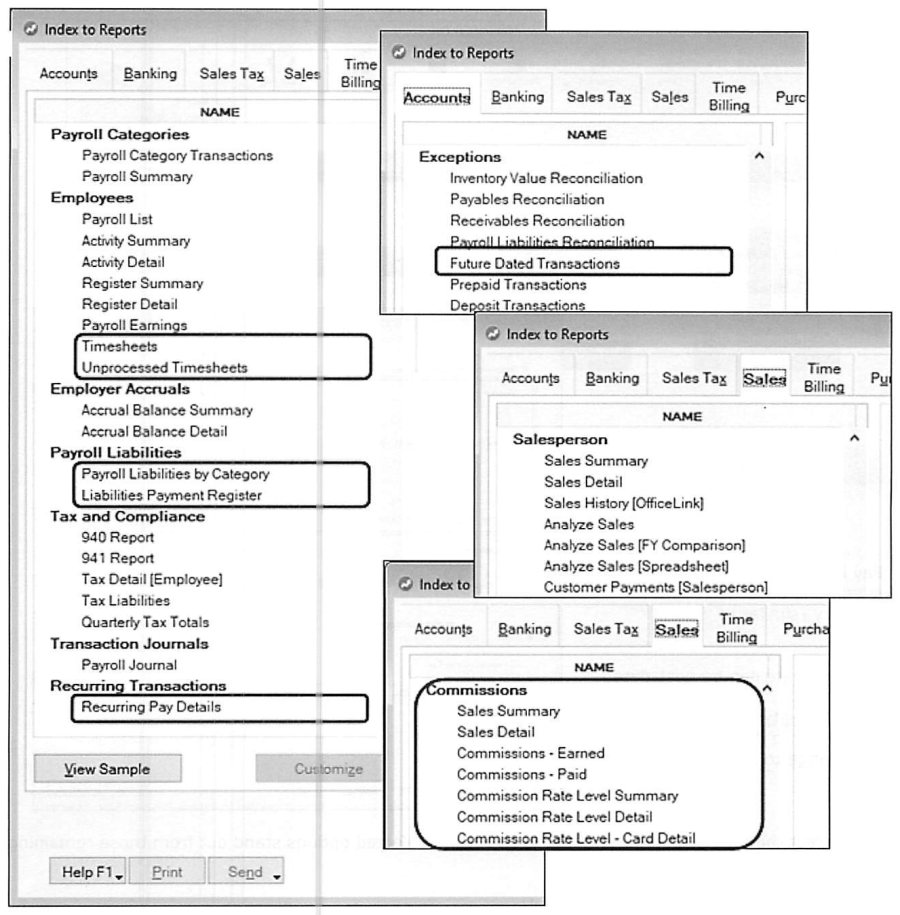
Reports > Index to Reports > Payroll groups Payroll Categories/Category Transactions, Payroll Summary, Employees (Payroll List, Activity Summary/Detail, Register Summary/Detail, Payroll Earnings, Timesheets, Accrual Balance Summary/Detail), Payroll Liabilities (by Category, Liabilities Payment Register), Tax and Compliance (940/941 Reports, Tax Detail [Employee], Tax Liabilities, Quarterly Tax Totals), and Transaction Journals (Payroll Journal, Recurring). The guide's specific advice to upgraders: pay particular attention to the reports it circles for special attention, and separately, if sales are tracked by Salesperson or commissions are automated, the Sales Reports index (Salesperson family: Sales Summary/Detail, Sales History, Analyze Sales, Customer Payments [Salesperson]; Commissions family: Sales Summary/Detail, Commissions Earned/Paid, Commission Rate Level reporting) is worth exploring alongside the payroll-specific reports, since payroll and sales-by-employee data connect directly through the Card File.
Paying Payroll Liabilities
Source: p.65-66
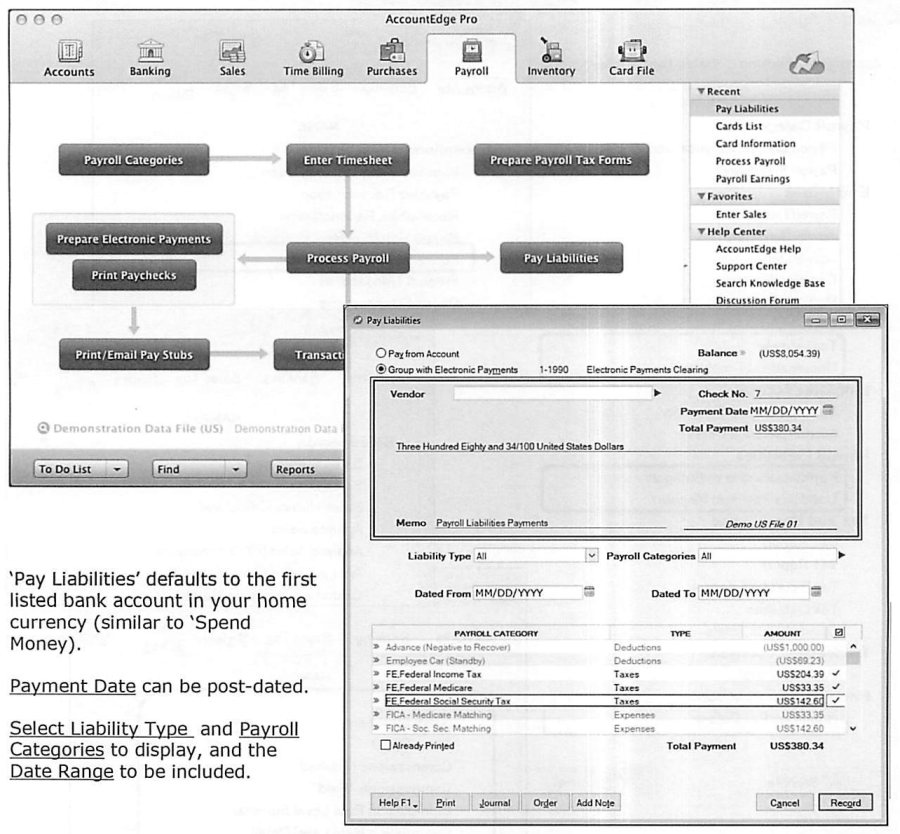
Pay Liabilities (from the Payroll Command Center) defaults to the first-listed home-currency bank account, the same pattern as Spend Money, though "Group with Electronic Payments" is available for remitting liabilities electronically once a vendor's bank account details exist under their Card File's Payment Details tab. Select Liability Type and specific Payroll Categories to display, along with a date range, then choose the vendor the payment is being remitted to (payroll liabilities are typically owed to a tax authority or benefits provider set up as a Vendor). The guide recommends Recap Transaction (Ctrl/Cmd-R) before recording: because every included liability line shows a debit, AccountEdge is marking each one as paid, which is exactly what makes it possible to see the clean "paid" status of every payroll liability afterward, rather than having to infer it from a raw liability account balance.
This "paid" marking underpins two management reports. The Payroll Liabilities by Category Report (Reports > Index to Reports > Payroll Liabilities > Payroll Liabilities by Category) displays every transaction linked to a chosen category, filterable by Liability Type, specific Payroll Categories, date range, and Status Type (paid/not paid), with optional fields for Employee Name, Pay Period Start/End, Amount, Status, and Payment Date, and an option for separate pages per category. The Liabilities Payment Register Report presents a similar view specifically of what's already been paid, with comparable customize options -- both are described as having "greatly simplified the business process of handling Payroll Liabilities," setting up the Payroll Liabilities Reconciliation Exception Report covered in the year-end section as the natural next check.
AccountEdge Payroll Forms Service & Preparing Tax Forms
Source: p.68
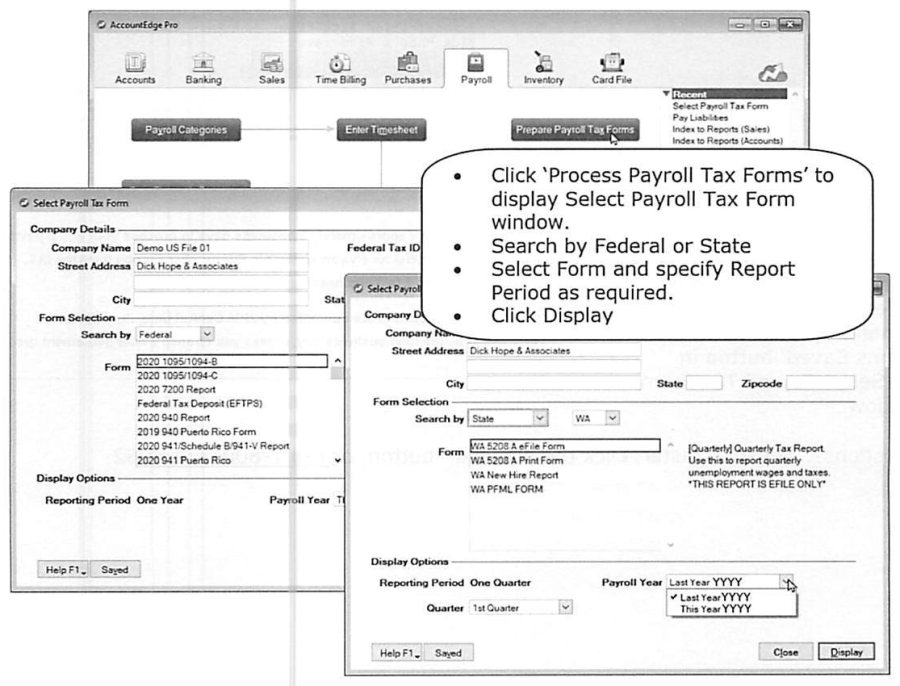
The Payroll Forms Service prepares and prints official, current copies of every federal and state payroll tax form the business is required to file, including W-2 and W-3, pulling directly from company file data and prompting for anything that's missing. Free with AccountEdge: one automatic update of all federal and state forms the first time the feature is accessed (requires internet), full preparation of ready-to-file W-2/W-3 forms, and full preparation of every other Federal/State form in "Demo Mode" -- demo forms carry a watermark and can't actually be filed, but are fully accurate, so the underlying figures can be manually transcribed to blank official forms if a paid subscription isn't in place. A paid subscription to the Payroll Forms Service adds automatic notification of downloadable form updates, full (non-demo) preparation of every Federal/State form, and an optional eFile add-on, even for agencies that don't otherwise support electronic filing directly. Selecting Payroll > Prepare Payroll Tax Forms opens Select Payroll Tax Form, where forms are searched by Federal or State, selected, scoped to a Reporting Period, and displayed -- the Payroll Form Viewer walks through registration or "Use as Demo" from there.
Printing 940 & 941 Reports
Source: p.69
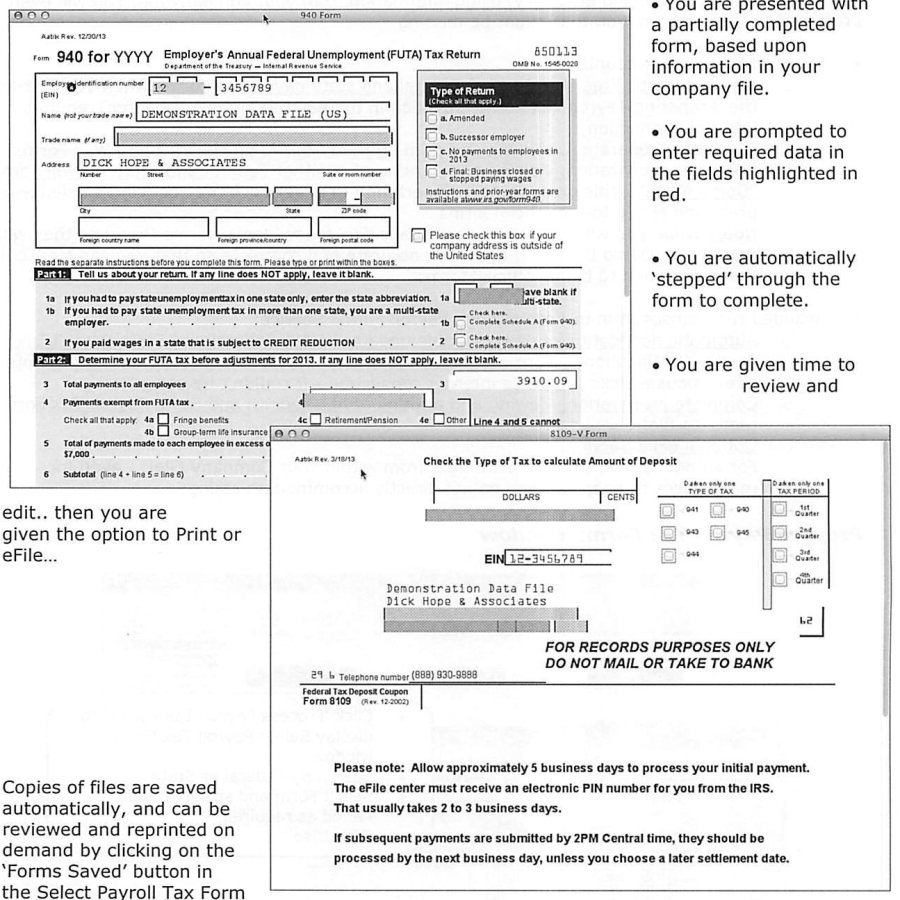
Printing a 940 (Employer's Annual Federal Unemployment/FUTA Tax Return) presents a partially completed form pre-filled from company file data, with fields requiring manual confirmation highlighted -- AccountEdge steps through the form section by section automatically, giving time to review each field before continuing, and offers Print or eFile once complete. The guide notes copies of every prepared form are saved automatically and can be reviewed or reprinted on demand via the "Forms Saved" button within the Select Payroll Tax Form window -- so a form doesn't need to be regenerated from scratch if it's needed again later. eFile processing timing: an initial eFile submission requires an electronic PIN from the IRS on file, which typically takes 2-3 business days to arrive, and once that's in place, subsequent submissions made before 2PM Central are generally processed the next business day unless a later settlement date is specifically chosen.
W-2 & W-3 Forms, and Preparing to Close the Payroll Year
Source: p.69-71
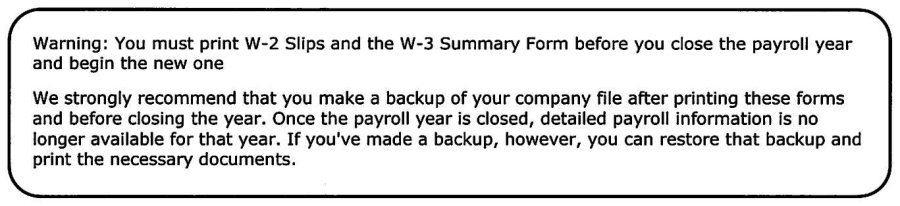
The guide is upfront that annual W-2/W-3 procedures shift from year to year as regulatory requirements change, so it covers only the core steps and points readers toward the documentation bundled with each January tax table update and the Help menu's "What's New in This Release?" for anything current-year-specific. The one hard rule that doesn't change: W-2 Slips and the W-3 Summary must be printed before the payroll year is closed and a new one begun, since detailed payroll information for a closed year is no longer accessible afterward except by restoring a backup -- a company file backup taken right after printing these forms, and before closing the year, is described as essential rather than optional. For businesses that need to process payroll again almost immediately in January, the guide's specific trick is to make two separate backups on separate media -- one labeled "Payroll Year YYYY" and a second labeled "Final Payroll -- Year YYYY" -- restore and rename the second copy to something like "My Company -- Final Payroll -- YYYY," and lock that copy (Setup > Preferences > Security) so year-end reports remain permanently accessible from an untouched snapshot even after the live file has moved into the new year. AccountEdge will not permit the first paycheck of a new payroll year to be recorded until the current year has actually been closed.
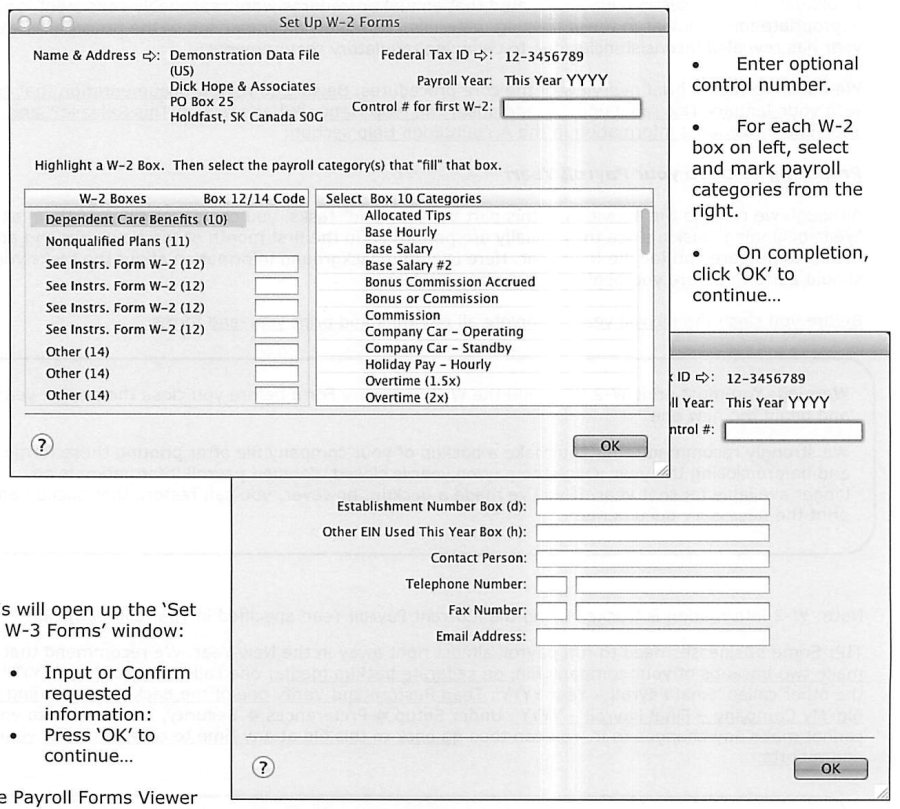
To prepare W-2s: Payroll > Prepare Payroll Tax Forms > Federal > the applicable year's W-2 (free), then Display to open Set Up W-2 Forms -- confirm company name, address, and Federal Tax ID, optionally enter a starting control number, and for each numbered W-2 box, select which Payroll Categories should fill that box (Dependent Care Benefits, Nonqualified Plans, and several "See Instructions" and "Other" boxes for miscellaneous categories like Company Car benefits or overtime types). Completing that flows into Set Up W-3 Forms, confirming or entering EIN, Establishment Number, Other EIN Used This Year, and contact details (person, phone, fax, email) before the Payroll Forms Viewer walks through the remainder of the process.
1099 Statements & 1096 Reports
Source: p.70
1099s and their companion 1096 summary aren't strictly payroll functions, but their reporting is tied to the same "This Year" / "Last Year" Current Payroll Year concept, and both get purged from the company file -- exactly like W-2/W-3 data -- when a new payroll year is started. Where 1099s and the 1096 (and W-2s/W-3s) haven't yet been generated but a new payroll year genuinely must be started anyway, the guide's recommended safeguard is twofold: make every effort first to enter complete Vendor 1099 data for the year ending, and separately create a dedicated "Special Payroll Folder" containing a full copy of the current company file, preserved specifically for producing these year-end reports later from an untouched snapshot rather than the live, rolled-forward file.
Payroll Year-End -- Prior Period Adjustments & the Trial Balance Check
Source: p.71-72
Errors discovered after payroll liabilities for a period have already been remitted -- meaning the amount actually sent differs from what should have been sent -- are best caught by periodically verifying that payroll liability account balances on the Balance Sheet reconcile against the Payroll Liabilities by Category report for the same period, rather than discovered for the first time at year end. Upgraders specifically are told to perform this reconciliation immediately after upgrading if it hasn't been done before, and certainly before advancing into a new Payroll Year -- if discrepancies turn up and the correction isn't obvious, the guide recommends enlisting an Accounting Professional or AccountEdge Certified Consultant rather than guessing at a fix.
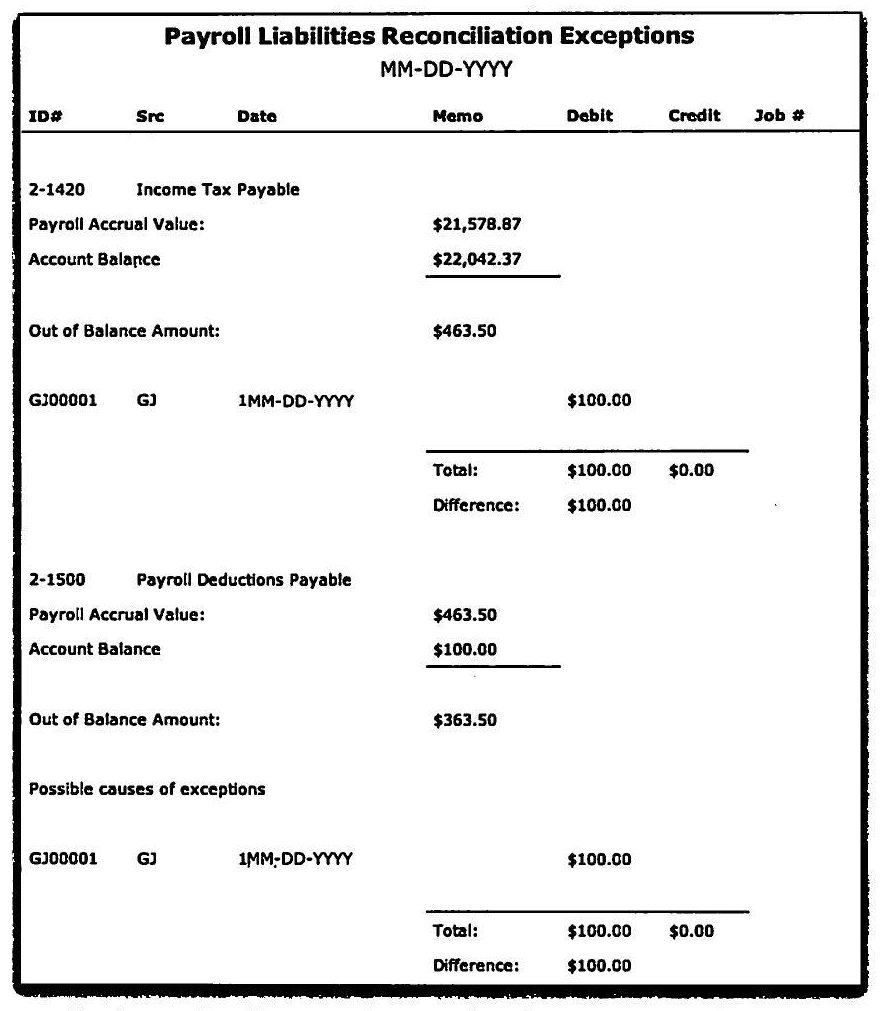
The mechanical check: run a Trial Balance Summary (Reports > Accounts > General Ledger Trial Balance > Trial Balance Summary) for the Payroll Year-to-date, scoped to just the payroll liability accounts with "Include Accounts with No Activity" checked, then run Payroll Liabilities by Category (Reports > Payroll) for the same date range with Status Type set to "Not Paid," run separately by Liability Type (Deductions, Expenses, Taxes) since each needs its own report. The two sets of balances should match account for account; where they don't, the Payroll Liabilities Reconciliation Exception Report (Reports > Accounts > Exceptions > Payroll Liabilities Reconciliation) displays each payroll category's accrual value alongside its actual account balance and the specific transactions responsible for any imbalance, with zoom-arrow drill-down directly into the exception transactions so corrections can be made without a manual hunt.
Backup Procedures & Starting a New Payroll Year
Source: p.72-75
Because closing a payroll year purges much of the underlying detail, and AccountEdge will not allow payroll transactions to be entered into a new year until the current one is formally closed, the guide's recommendation is a dedicated "Special Payroll Folder" containing a full copy of the company file for the year just ending, plus at minimum two verified backups stored off-premises -- verified specifically by test-restoring them to a different computer before actually starting the new year, not merely confirming the backup file exists.
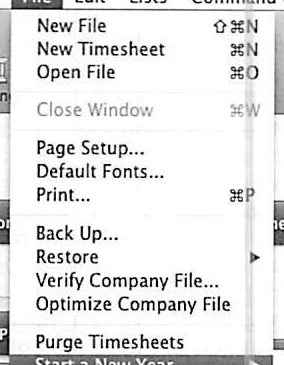
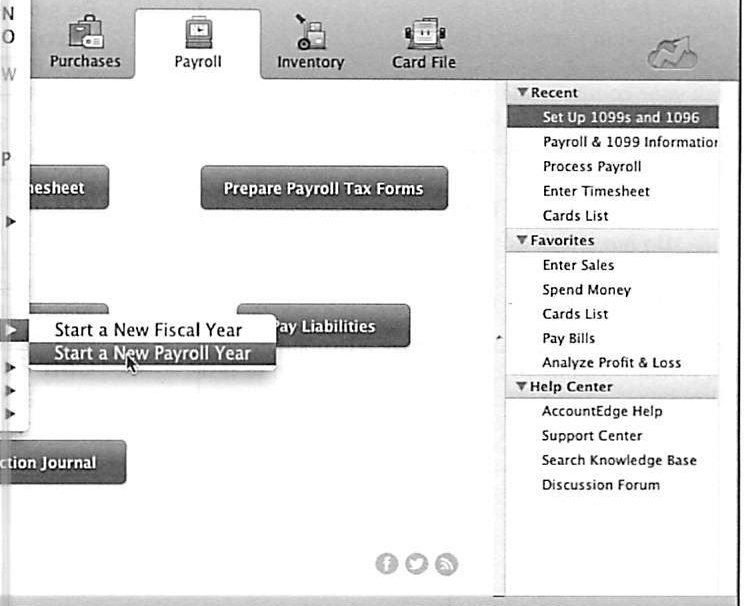
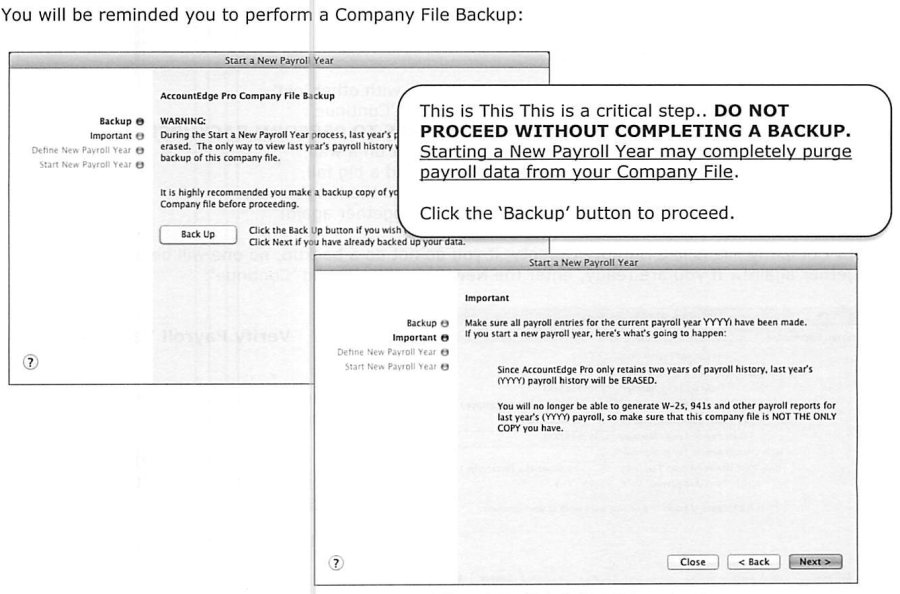
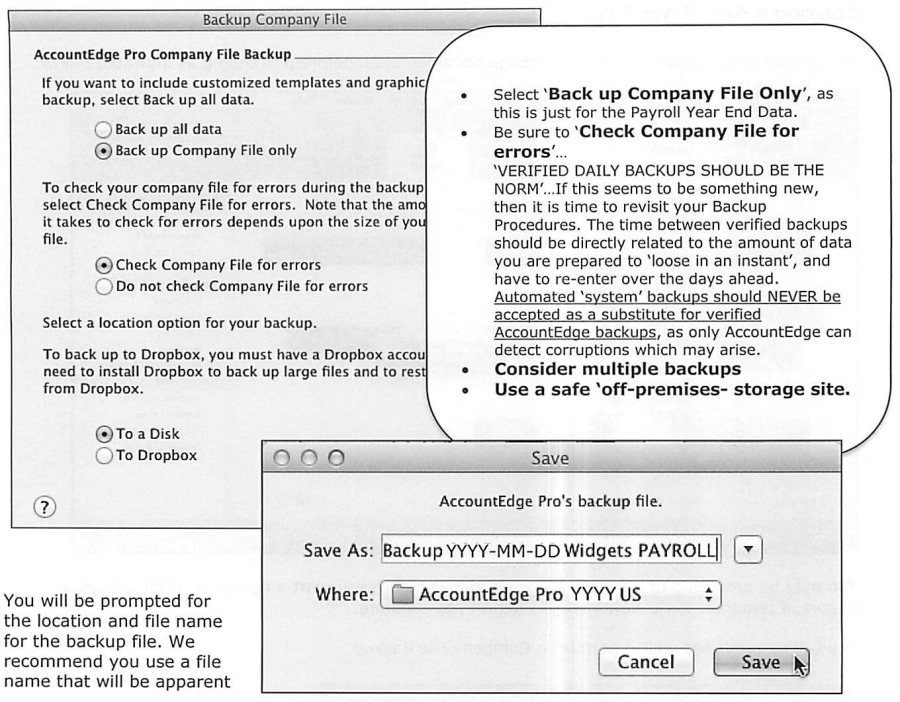
Starting a New Payroll Year (File > Start a New Year > Start a New Payroll Year) may first prompt for a Session Report ("New Year, No Report" skips it if not needed), then presents a mandatory Company File Backup step the guide describes in the strongest terms used anywhere in the training material: "DO NOT PROCEED WITHOUT COMPLETING A BACKUP," since starting a new payroll year "may completely purge payroll data" and, because AccountEdge retains only two years of payroll history, last year's detail will be erased with no way to generate W-2s, 941s, or other historical payroll reports afterward except from a backup. The backup dialog itself offers "Back up Company File only" (appropriate here, since this is specifically about payroll year-end data) with "Check Company File for errors" selected -- the guide uses this moment to restate a broader backup philosophy: verified daily backups should be the norm, automated system-level backups should never substitute for a verified AccountEdge-native backup (since only AccountEdge itself can detect certain kinds of file corruption), and backups belong at a safe off-premises storage location. The guide includes a small aside -- quoting the "Humpty Dumpty" nursery rhyme -- to underline that an un-backed-up company file, once corrupted or lost, genuinely cannot be reassembled after the fact. AccountEdge prompts for backup confirmation three separate times before allowing the process to proceed, by design.
Once the new year has actually started, the guide's verification checklist is: confirm under Setup > Payroll & 1099 Information that the Current Payroll Year now shows correctly, then separately load and verify the new tax table.
Installing Tax Table Updates & Checking for Late-Breaking Changes
Source: p.75
Most AccountEdge users subscribe to the Payroll Tax Service, which downloads updates to the computer automatically -- but loading a downloaded update into a specific company file is a separate, deliberate step (Setup > Payroll Updates), performed only when ready, and the guide's explicit sequencing rule is not to load a new tax table until W-2s/W-3, 1099s/1096, and other year-end reports have already been printed, unless an archived copy of the just-finished payroll year's company file exists specifically for later reporting. After loading, the Payroll Tax Category's Tax Table Revision Date (Setup > Payroll Updates) should be checked to confirm the load actually took -- if the date shown doesn't match what was expected, the guide's advice is to slow down and re-follow the installation instructions exactly rather than assume something is broken, and to call AccountEdge or a Certified Consultant if the mismatch persists. Because tax table updates reflect legislative changes at every level of government -- sometimes requiring actual program-code changes, not just rate updates -- staying subscribed to the Payroll Update Plan is presented as the only reliable way to guarantee compliance, and the guide's closing note is that some legislative changes may also require manually updating specific aspects of individual employees' records, not just the shared tax tables.
US Payroll -- full topic index
All 78 pages, headings as they appear in the original course guide. Page numbers refer to the source PDF.
| Page | Topic |
|---|---|
| p.3 | "Tips", "Tricks", "Traps" & when to "Print & Save" |
| p.5 | Entering Employees (overview) |
| p.7 | Setting up the Payroll Module |
| p.9 | Step Three -- Enter and Confirm Your Current Payroll Year |
| p.10 | Step Five -- Set Up Your Linked Accounts for Payroll |
| p.11 | Step Six -- Set Up Your Payroll Categories |
| p.13 | Level 1 Payroll Linked Accounts -- Global Defaults |
| p.14 | Level 3 Payroll Linked Accounts -- Employee Defaults |
| p.17 | Deleting Expense Categories |
| p.19 | Vacation Leave & Pay Entitlement |
| p.20 | Setting Up Employer Expense, Vacation Pay Entitlement |
| p.21 | Setting up Payroll Deductions |
| p.22 | Adding New Deduction Categories |
| p.23 | Employee Car (Standby) |
| p.26 | 401K Savings Plan |
| p.27 | Setting Up Wage Categories |
| p.29 | Vacation Paid Out (Not Accrued) |
| p.32 | Entering Employees |
| p.33 | Custom Lists & Fields (Naming) |
| p.35 | Profile Tab |
| p.36 | Card Details Tab |
| p.37 | Payroll Details Tab |
| p.42 | Recurring Pay |
| p.43 | Pay History |
| p.44 | Time Billing |
| p.46 | History Tab (Sales) |
| p.47 | Entering 'Payroll' Timesheet |
| p.53 | Reviewing/editing a paycheck |
| p.55 | Prepare Electronic Payments |
| p.56 | Display (& Print) Payroll Earnings |
| p.58 | Processing Payroll Advances |
| p.59 | Determining Total Payroll Advances Outstanding |
| p.60 | Paying for Statutory Holidays |
| p.61 | Job and/or Departmental Costing & Payroll |
| p.63 | Fine-tuning Job Costing |
| p.64 | Payroll & Sales Report Options |
| p.65 | Paying Payroll Liabilities (see above) |
| p.67 | Liabilities Payment Register Report |
| p.68 | Preparing Payroll Tax Forms (see above) |
| p.69 | Printing 940 & 941 Reports (see above) |
| p.73 | Payroll Liabilities Reconciliation Exception Report |
| p.75 | Backup Company File |
| p.77 | Accounts List |
Canadian Payroll -- full walkthrough (p.1-79)
This section works through all 79 pages of the "Enhanced Canadian Payroll" course guide in order, grouped by topic rather than page-by-page, covering setup through year-end procedures. Where Canadian-specific mechanics differ meaningfully from the US guide -- CPP/QPP, EI/EIQ, GST/HST on benefits, Banked Hours, and the retroactive bonus tax limitation among them -- those differences are called out directly.
Course Aims, Icons, and How This Guide Is Organized
Source: Enhanced Canadian Payroll, p.1-3
The Canadian Payroll guide opens with the same course-aims framing used across the Dick Hope training series: it is meant to be worked through at a computer, following along in a sample or demonstration company file rather than read passively. Icons recur throughout the guide to flag specific kinds of content: a Tip icon for shortcuts and efficiency suggestions, a Trick icon for less obvious techniques experienced users rely on, and a Trap icon that calls out situations where AccountEdge's default behavior can produce an incorrect or unexpected result if the user isn't paying attention. The Trap icon shows up disproportionately often in this guide compared to the Daily Applications or Setting It Up Properly guides, because Canadian payroll compliance carries real regulatory exposure — errors in CPP, EI, or tax withholding aren't just bookkeeping inconveniences, they can trigger penalties from the Canada Revenue Agency (CRA).
The guide's table of contents previews its structure: setting up the Payroll module through the Easy Setup Assistant, configuring Payroll Categories (Wages, Taxes, Expenses, Deductions, Accruals), entering employees, running Timesheets, processing payroll itself, handling special pay situations (advances, statutory holidays, vacation payouts), Job and Departmental Costing as it applies to payroll, and year-end procedures including T4/RL-1 preparation and starting a new payroll year.

Expanded Data Import/Export
Source: Enhanced Canadian Payroll, p.4
AccountEdge supports importing and exporting payroll-related data — most usefully, Timesheet data and Employee Card details — in delimited text formats. This matters for businesses converting from another payroll system or from a legacy version of AccountEdge: rather than manually keying in every employee's personal details, wage setup, and historical pay information, much of it can be prepared in a spreadsheet and imported in bulk. The guide flags this as a capability to be aware of during setup rather than walking through a full field-mapping exercise, since exact field requirements vary by what's being imported.
Setting Up the Payroll Module: Easy Setup Assistant, Steps One Through Four
Source: Enhanced Canadian Payroll, p.5-9
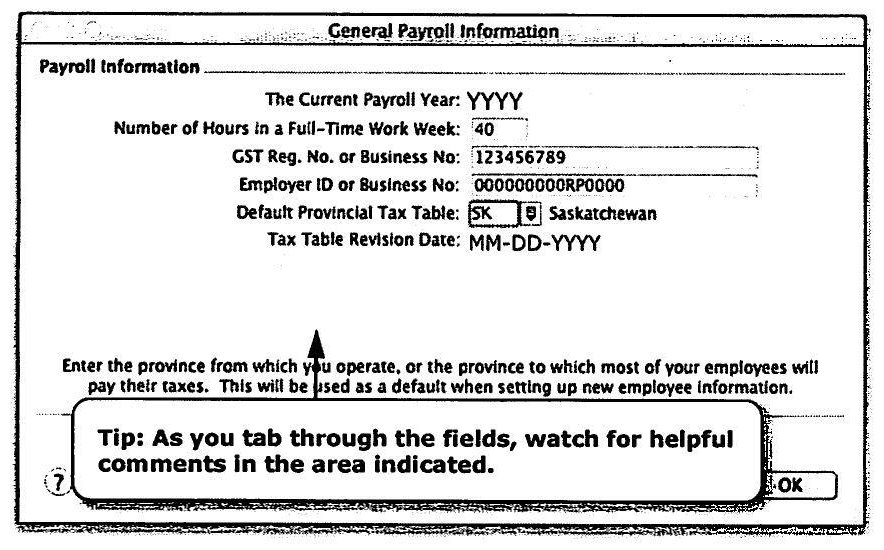
Payroll setup in AccountEdge is driven by the Easy Setup Assistant, reached through Setup » Easy Setup Assistant » Payroll. The Assistant walks through a fixed sequence of steps, and the guide stresses that skipping ahead or backtracking out of order can leave categories half-configured. Step One establishes General Payroll Information: the current payroll year, the number of hours in a standard full-time work week (used as the default for computing hourly-equivalent pay), and the employer's GST/HST registration and Business Number. Step Two sets the default province for tax table purposes — the province where most employees work and pay tax — which becomes the default applied to new employee cards, though individual employees can be assigned a different province if they work elsewhere.
Step Three deals with Payroll Categories at a summary level, previewing the five category types (Wages, Taxes, Expenses, Deductions, Accruals) that Steps Five through Nine configure in detail. Step Four addresses Payment Methods available for paying employees — Cheque, Cash, or Electronic (direct deposit) — and sets up the linked bank accounts each method draws from. The guide notes that a business can use more than one payment method simultaneously (some employees on direct deposit, others by cheque) as long as each employee's Card File specifies their individual default method.
Step Five: Linked Accounts and the Three-Level Hierarchy
Source: Enhanced Canadian Payroll, p.7
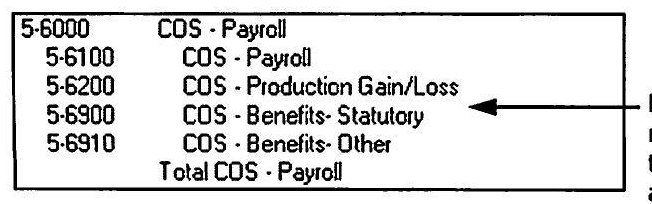
Step Five sets up Linked Accounts for Payroll, and the guide explains this using a three-level hierarchy that recurs throughout the entire payroll module: a Wage or Expense category needs an account to post the actual cost to (typically a Cost of Sales or Expense account like "COS - Payroll"), a Deduction or Tax category needs a Liability account to post the amount withheld to (since money withheld from an employee isn't yet remitted — it's a liability owed to a third party), and Accrual categories need their own Liability account tracking amounts owed to the employee in the future, such as accrued vacation pay. Getting this linkage right at setup avoids a huge amount of manual correction later, because every category created afterward inherits sensible defaults from these linked accounts unless explicitly overridden.
Step Six: Payroll Categories and the Case Against Keeping Unused Ones
Source: Enhanced Canadian Payroll, p.10-13
Step Six is where the actual list of Payroll Categories gets built out — Wages, Taxes, Expenses, Deductions, and Accruals, each populated with the specific categories relevant to the business. AccountEdge ships with a large set of default categories to accommodate a wide range of business types, but the guide is emphatic that unused categories should be deleted rather than left inactive. An overstuffed Payroll Category list makes every employee setup screen more cluttered and increases the odds of accidentally selecting the wrong category when processing pay. The guide poses this as a discipline question directly to the reader: before moving on, take the time to prune the list down to what the business genuinely needs.
Steps Seven Through Nine, and the Alternate Approach
Source: Enhanced Canadian Payroll, p.13-14
Steps Seven, Eight, and Nine of the Assistant continue building out category detail — assigning linked accounts to individual categories, setting default rates or formulas where applicable, and confirming category-to-employee associations. The guide also describes an "Alternate Approach": rather than working strictly through the Assistant screen by screen, experienced users can go directly to Lists » Payroll Categories to create and edit categories in a more flexible order, then return to the Assistant (or skip it after the first pass) for subsequent employees. The Assistant is really a guided path through the same underlying category-list screens, not a separate system.
Setting Up Payroll Taxes
Source: Enhanced Canadian Payroll, p.11-12
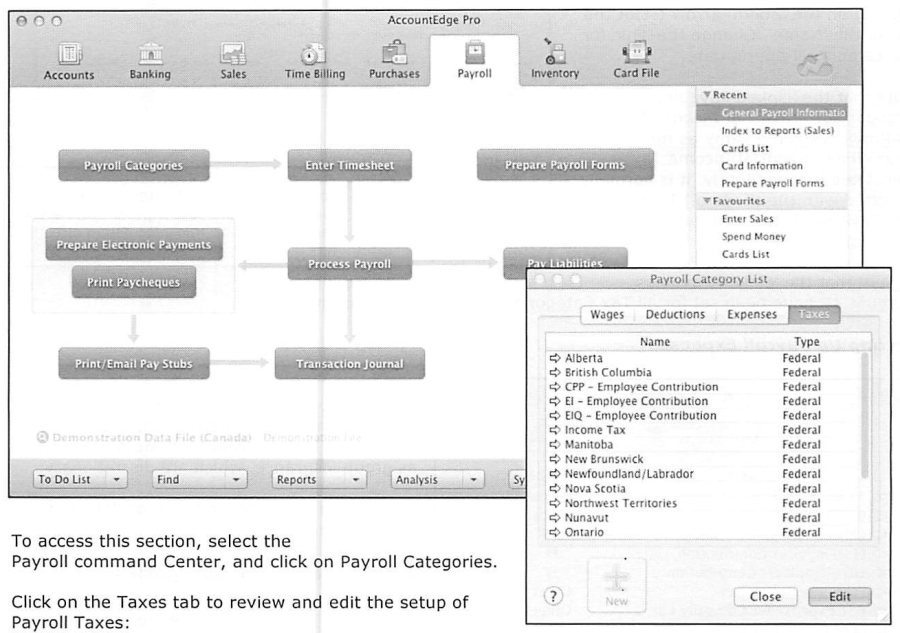
The Payroll Taxes screen lists every provincial and territorial tax table AccountEdge supports, since Canadian payroll tax obligations vary by the province in which an employee works, not necessarily where the employer is headquartered. The guide reproduces the full list of available tax tables covering every province and territory, and stresses that each employee's Card File must specify the correct Tax Table (province) individually — an employee working in a different province than company headquarters needs their own provincial designation, or their tax deductions will be calculated incorrectly. This is a meaningfully different consideration than in the US guide, where tax setup follows federal/state lines but doesn't carry quite the same province-by-province tax-table complexity for a single-location employer.
Setting Up Payroll Expenses
Source: Enhanced Canadian Payroll, p.12-14
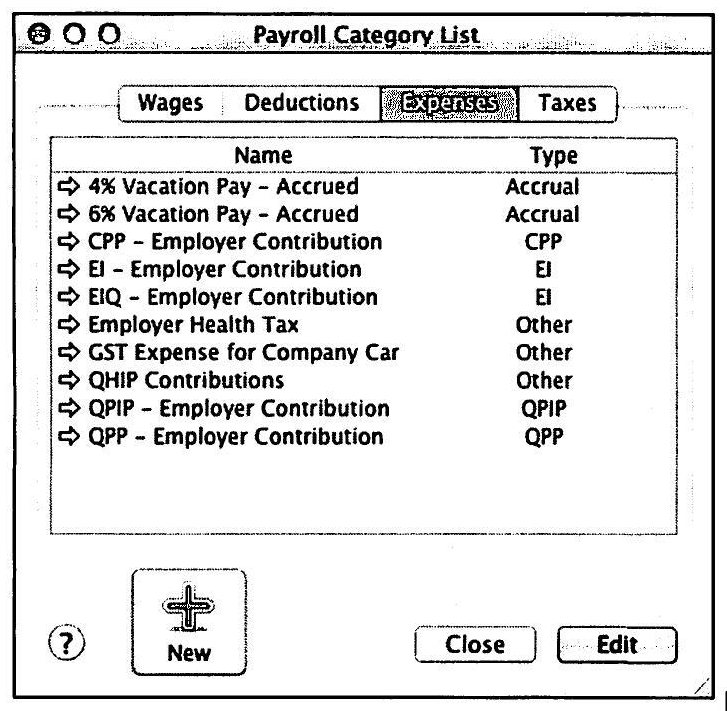
Payroll Expenses are the employer's own cost of employment, separate from what's deducted from the employee's pay — things like the employer's matching CPP and EI contributions, Workers' Compensation premiums, and benefit costs the company pays on the employee's behalf. Setting these up correctly means each Expense category is linked to both an actual Expense account (so the cost shows on the P&L) and, where relevant, a Liability account (so the amount owed to the government or benefit provider is tracked until remitted). The guide walks through deleting or re-linking default Expense categories that don't apply to the business, following the same "don't keep what you don't use" discipline established in Step Six.
Vacation Pay – Accrued: A Worked Example with BC and Alberta Differences
Source: Enhanced Canadian Payroll, p.13-15
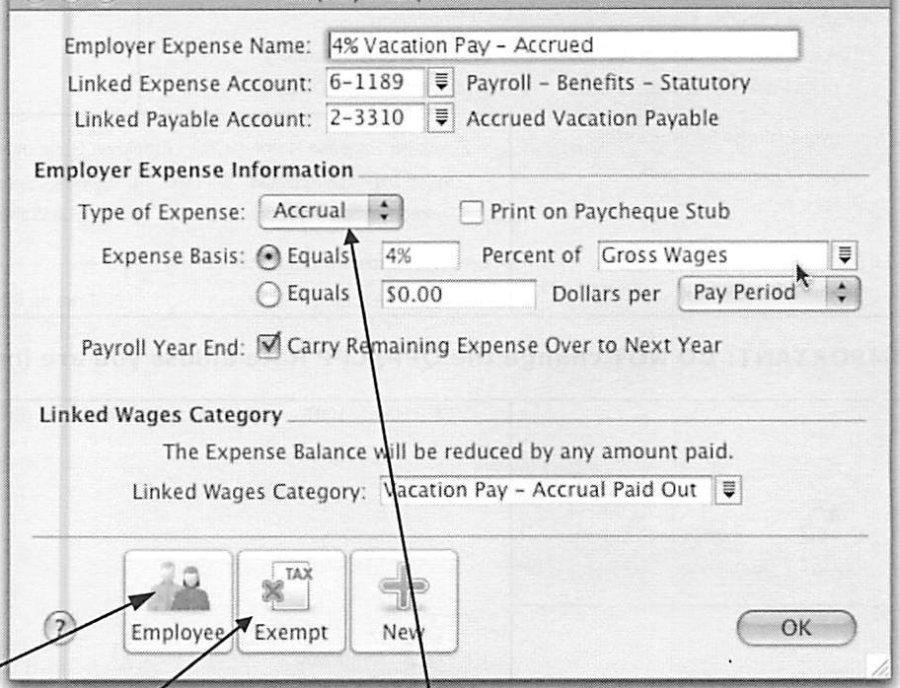
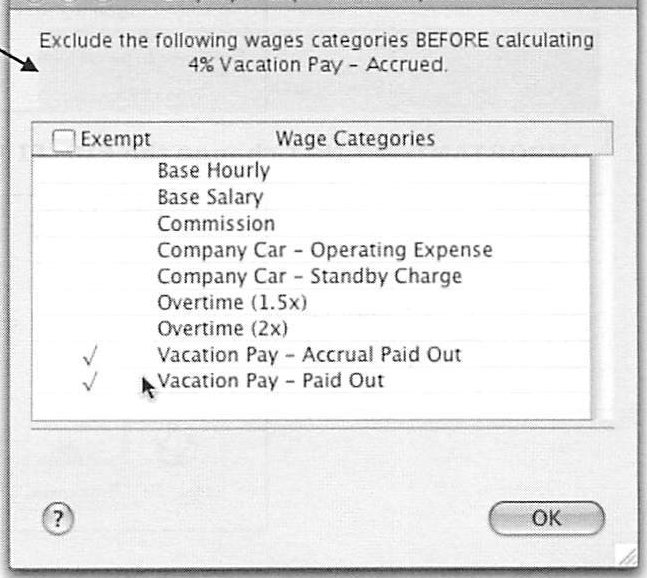
The guide works through a detailed example of setting up Vacation Pay as an Accrual expense category, and explicitly calls out that the applicable vacation pay percentage and accrual rules differ by province — the worked example uses British Columbia and Alberta as contrasting cases to make clear that a business cannot simply copy a "standard" Canadian vacation pay setup without checking the Employment Standards Act of the specific province(s) in which it operates. Vacation Pay – Accrued is set up as an Employer Expense category, tied to an Accrual Liability account that tracks the growing balance owed to the employee, calculated as a percentage of gross wages and updated with each pay run.
CPP/QPP and EI/EIQ Employer Contribution Setup
Source: Enhanced Canadian Payroll, p.14
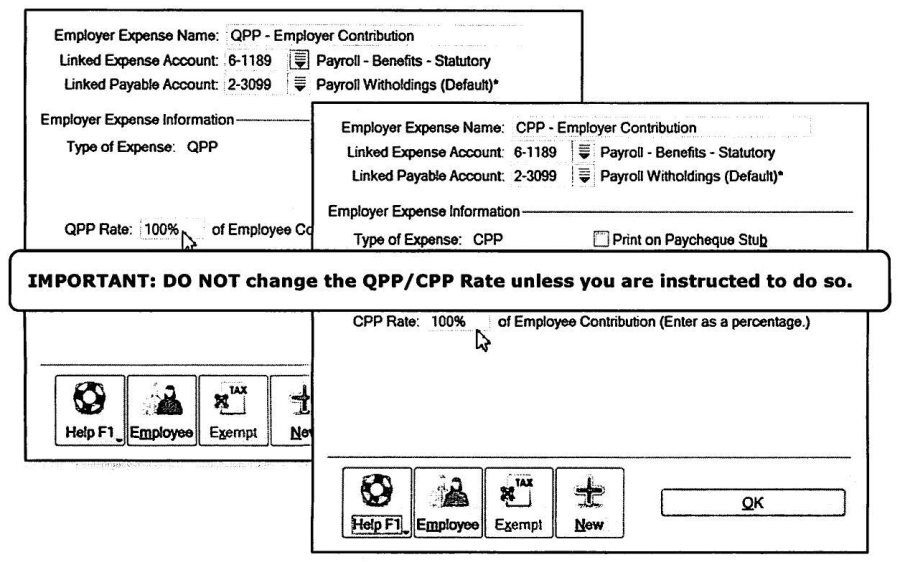
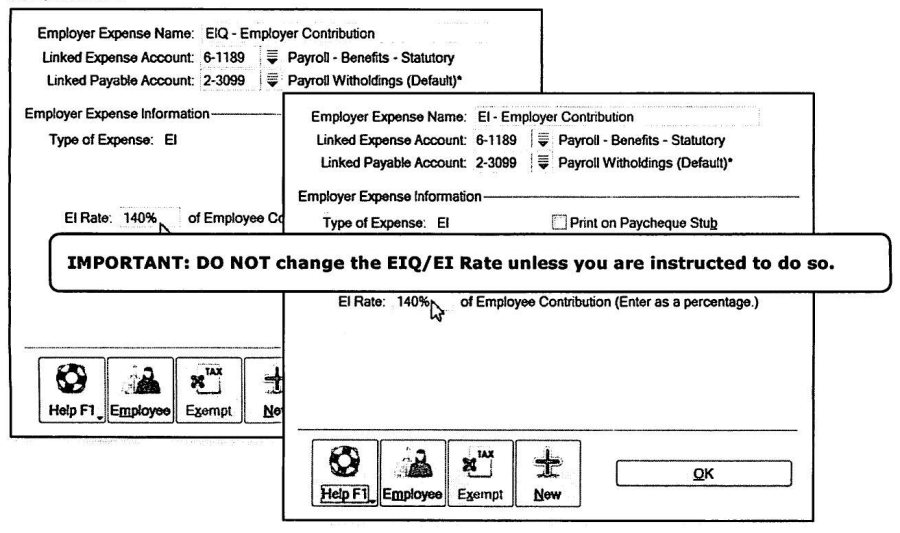
The employer's matching contributions to the Canada Pension Plan (CPP) or, for Quebec employees, the Quebec Pension Plan (QPP), and to Employment Insurance (EI) or, for Quebec, the Quebec parental insurance-adjusted EI (EIQ), are set up as Employer Expense categories linked to the same Liability accounts used for the employee-side deductions of the same programs. This linkage matters because CPP and EI Payable liability accounts need to capture both the employee's withheld share and the employer's matching share together, so that when the combined remittance is made to CRA, the full liability clears in one transaction.
The Employment Insurance Premium Reduction Program
Source: Enhanced Canadian Payroll, p.14-15
The guide devotes significant detail to the EI Premium Reduction Program, a genuinely Canada-specific mechanism with no US equivalent covered elsewhere in this guide series. Employers who provide a qualifying short-term disability plan to employees can apply to Service Canada for a reduced EI premium rate, since the government's own EI sickness benefit is partially offset by the employer-provided plan. The guide details the eligibility requirements for qualifying plans and explains the cash-rebate mechanism: employers who qualify pay EI premiums at the reduced rate throughout the year, and in some structures, a portion of the premium reduction is required to be shared with employees in the form of a rebate, since the reduced rate is meant to benefit employees who are also contributing to the cost of the private plan. Setting this up correctly in AccountEdge means using the reduced EI Employer Expense rate rather than the standard rate, and the guide cautions that businesses should confirm their approved reduction rate with Service Canada before configuring it, since applying an unapproved reduced rate is a compliance problem waiting to surface at audit.
GST/HST on Company Car — Standby and Operating Expense
Source: Enhanced Canadian Payroll, p.15-16
When an employer provides an employee with a company car for personal use, CRA treats that as a taxable benefit, and GST/HST rules require the employer to remit GST/HST on the value of that benefit. The guide walks through setting up two related Expense categories: GST/HST Expense on Company Car Standby Charge (the taxable benefit for simply having the car available for personal use) and GST/HST Expense on Company Car Operating Expense (the taxable benefit tied to the employer paying operating costs like fuel). Both are configured as Employer Expense categories linked to the appropriate GST/HST Payable liability account, so the tax owed on these benefits flows into the same remittance process as GST/HST collected on sales.
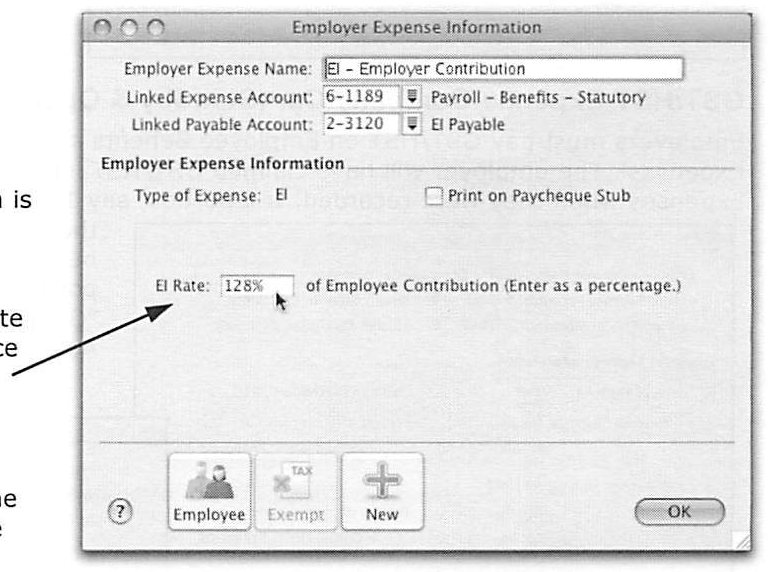
GST/HST Input Credit on Employee's Car
Source: Enhanced Canadian Payroll, p.16
Separately from the Company Car benefit categories, the guide addresses the case where an employee uses their own personal vehicle for company business and is reimbursed — here, the employer may be entitled to claim an Input Tax Credit (ITC) recovering some of the GST/HST embedded in that reimbursement. This is set up as its own category, distinct from the Company Car benefit categories, because the direction of the tax flow is reversed: the employer is recovering tax, not remitting it.
Workers' Compensation Expense (WCB/CSST) — A British Columbia Example
Source: Enhanced Canadian Payroll, p.16-17
Workers' Compensation premiums are mandatory employer-paid insurance against workplace injury, administered provincially — WCB in most provinces, CSST in Quebec (now known as CNESST). The guide works through a detailed British Columbia example of setting up the Worker's Compensation Expense category, and includes an explicit, direct caution that "the scenario illustrated is applicable in British Columbia only" — premium rates, assessable earnings caps, and reporting requirements vary meaningfully by province, and a business operating in multiple provinces needs to verify the correct rate and rules for each one rather than assuming the BC example transfers directly.
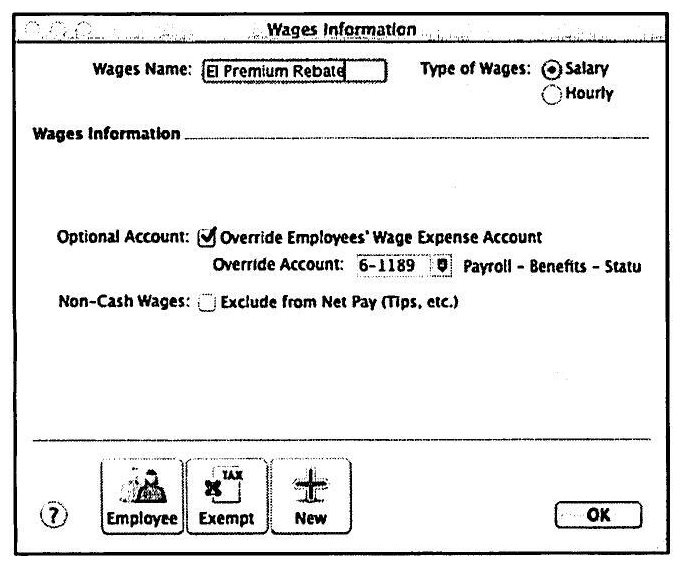
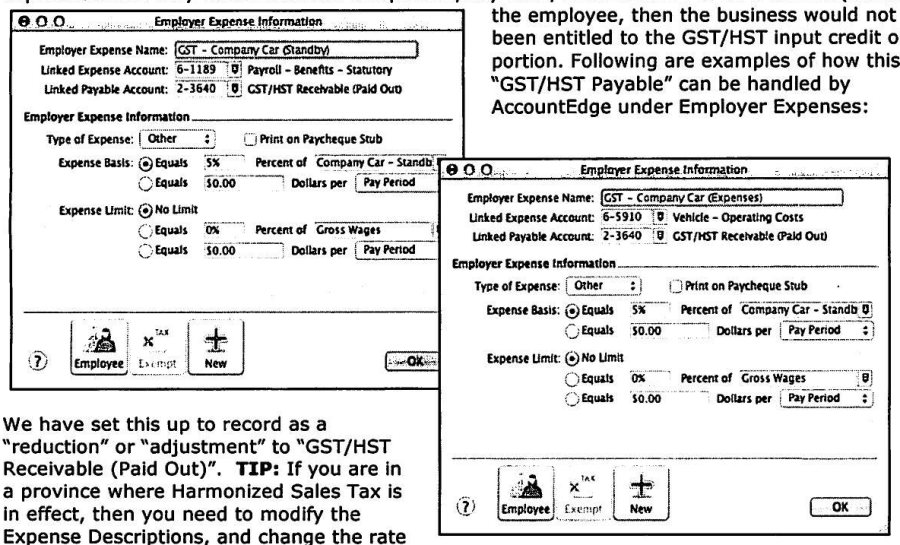
Dental, Life, and Medical Insurance Expense Examples
Source: Enhanced Canadian Payroll, p.17
The guide rounds out the Payroll Expenses section with worked examples for employer-paid Dental Insurance, Life Insurance, and Medical Insurance benefit categories. Each follows the same basic pattern established earlier: an Employer Expense category linked to an Expense account (so the cost appears on the P&L) and, where the employer is fronting the payment to a third-party benefit provider before recovering any employee-paid share through payroll deduction, a corresponding Liability account to track the amount owed until remitted.
Mileage Log, Employee Car Standby, and Employee Car Expense Deductions
Source: Enhanced Canadian Payroll, p.17-18
The guide introduces the Mileage Log as a convenient tool for tracking an employee's vehicle use for reimbursement purposes, cross-referencing the more detailed Mileage Log coverage in the Daily Applications training guide. On the Deductions side, two categories mirror the Company Car Expense categories set up earlier: Employee Car – Standby (a Fixed Dollar deduction recovering part of the standby charge benefit from the employee's pay) and Employee Car Expense (a User-Entered deduction recovering operating-cost benefit amounts). These deduction categories work in tandem with the GST/HST Expense on Company Car categories covered earlier — the expense categories record what the employer owes in tax on the benefit, while these deduction categories record what's recovered from the employee toward the benefit itself.
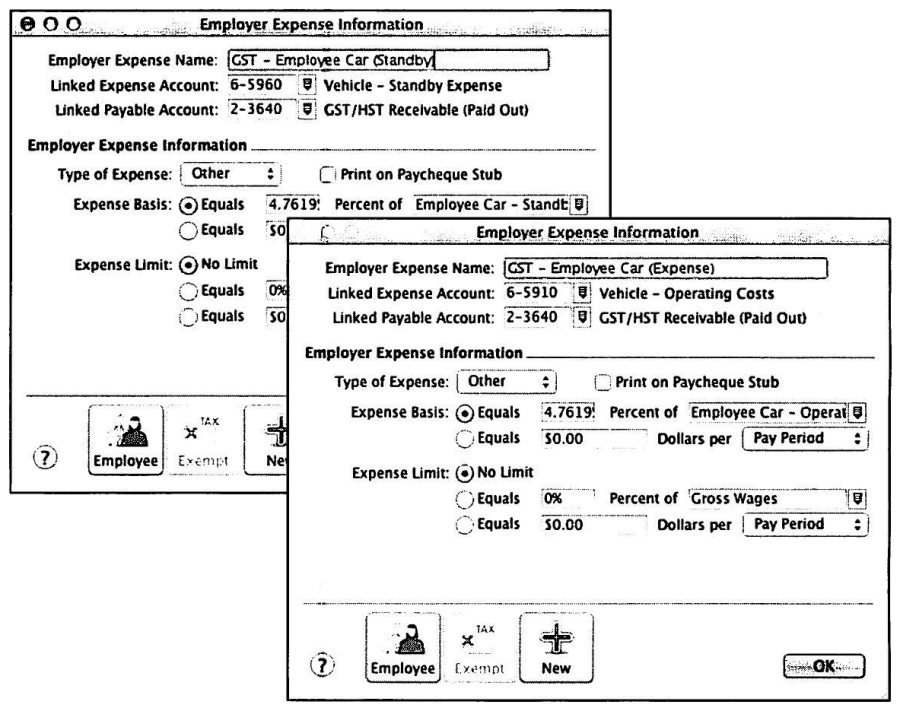
Employee Purchases (A/R Collection) and GST/HST Deduction for Company Car
Source: Enhanced Canadian Payroll, p.18
Employee Purchase (A/R Collect) is a User-Entered Deduction category used when an employee buys goods from the company on account and repays through payroll deduction rather than a separate payment — the deduction posts against the employee's Accounts Receivable balance rather than a payroll liability account, tying payroll processing directly into the receivables ledger for that employee. GST/HST Deduction for Company Car is a Percent-based deduction category recovering the employee's share of GST/HST on the company car benefit from their pay, working alongside the GST/HST expense and Input Credit categories set up earlier to complete the full tax treatment of a company vehicle benefit.
Garnishee, Life Insurance (Two Methods), and Reimbursable Expenses
Source: Enhanced Canadian Payroll, p.18-19
Garnishee is a User-Entered Deduction category for court-ordered wage garnishments, linked to a Liability account since garnisheed amounts must be remitted to the garnishing authority rather than kept by the employer. The guide presents two methods for handling Life Insurance as a deduction — Life Insurance – Deduction Payable (recovering the employee's share as a liability owed to the insurer) and Life Insurance – Expense Recovery (recovering the employee's share by offsetting it against the employer's own insurance expense account instead) — and leaves the choice of method to whichever better matches how the business actually manages its insurance billing. Reimbursable Expenses is set up as a deduction linked to the company credit card account, used when an employee's reimbursable expenses were charged to a company card rather than paid out of pocket, so payroll deduction settles the amount rather than a separate reimbursement transaction.
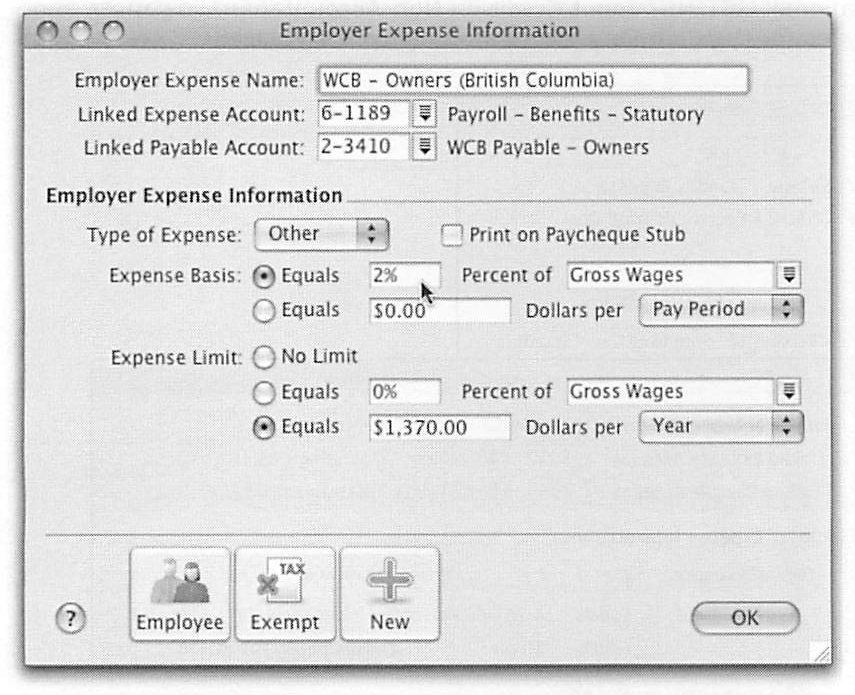
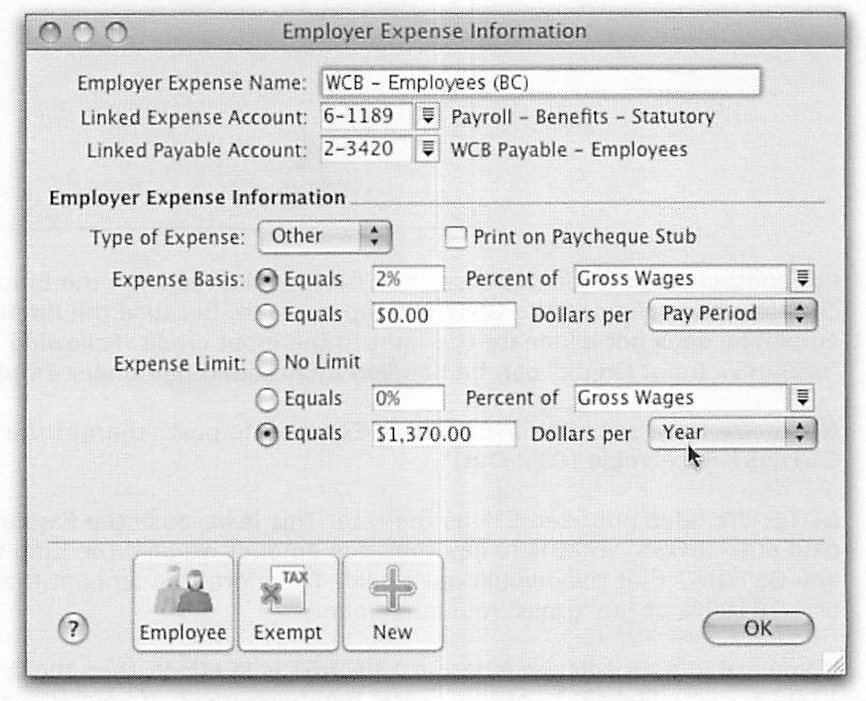
RPP Contributions
Source: Enhanced Canadian Payroll, p.19
Registered Pension Plan (RPP) Contributions is set up as a Percent-based Deduction category, withholding the employee's contribution to a company pension plan from each paycheque. Like RRSP-style deductions generally, this category needs careful linkage to the correct liability account and, where the employer also contributes, a matching Employer Expense category — RPP contributions have specific CRA reporting implications for T4 preparation covered later in the guide.
Setting Up Wage Categories: The Base Hourly/Base Salary Immutability Note
Source: Enhanced Canadian Payroll, p.19-20
The guide flags an important constraint before walking through Wage Category setup: the built-in Base Hourly and Base Salary wage categories cannot be renamed or deleted — they're hard-coded into AccountEdge as the foundational wage types every hourly or salaried employee is built around. Businesses wanting additional distinctly-named wage categories (for a second pay rate, a different department's wage structure, and so on) need to create new, separate wage categories rather than trying to repurpose the Base categories' names.
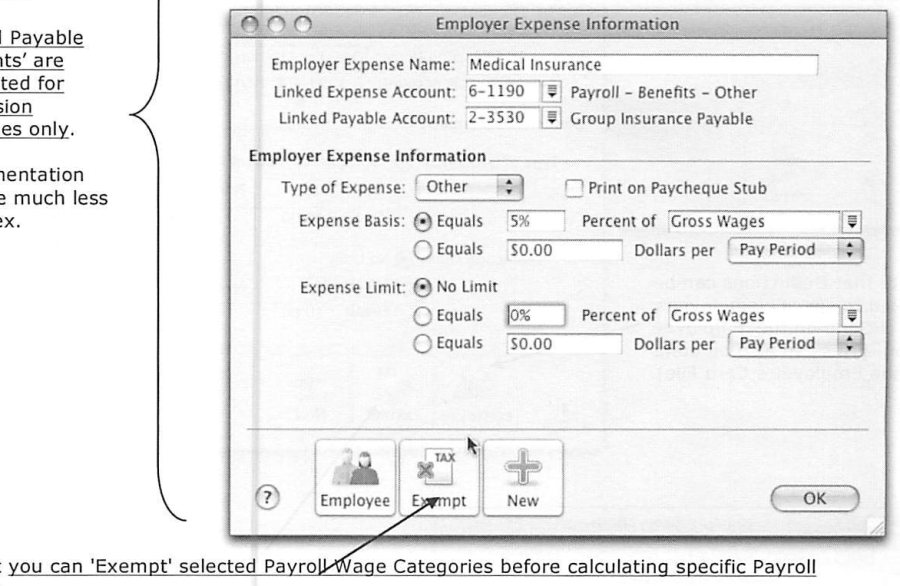
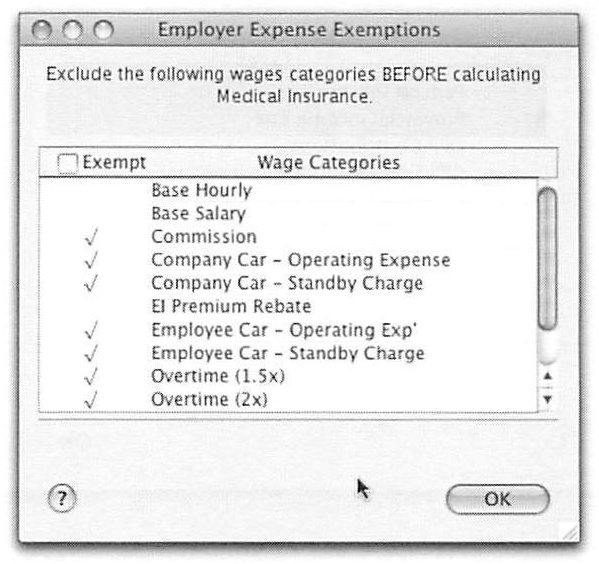
Bonus or Commission — Current Pay, and the Retroactive Tax Limitation
Source: Enhanced Canadian Payroll, p.20
The Bonus or Commission wage category is set up to calculate tax correctly for bonus or commission amounts paid in the current pay period. The guide includes an important, Canada-specific limitation here with no equivalent noted in the US guide: AccountEdge cannot correctly compute the tax on a bonus or commission payment intended to cover, or be attributed to, a prior pay period — CRA's method for taxing retroactive lump-sum payments (the "bonus method") requires a different calculation than a normal current-period paycheque, factoring in the employee's annualized income across the periods the payment relates to. For any bonus or commission payment that isn't a straightforward current-period amount, the guide directs users to CRA's online payroll deductions calculator to determine the correct tax withholding manually, rather than relying on AccountEdge's built-in calculation. This is a real functional gap worth being aware of, not just a documentation caveat — processing a retroactive bonus through the normal Bonus or Commission category as if it were current-period pay will produce an incorrect tax withholding.
Company Car Operating/Standby and Overtime Pay Naming Conventions
Source: Enhanced Canadian Payroll, p.20-21
Company Car – Operating Expense and Company Car – Standby Charge wage categories record the taxable benefit amounts as additions to gross pay (since a taxable benefit increases the employee's taxable income even though no cash changes hands for that portion). The guide also explains AccountEdge's Overtime Pay naming convention, seen throughout the sample data as labels like "Overtime(1.5x)>8D>40W" — read as "time-and-a-half overtime, triggered by hours worked beyond 8 in a day or 40 in a week." This compact naming convention lets a business track multiple overtime rules (daily threshold, weekly threshold, double-time thresholds) as clearly distinguishable wage categories rather than a single generic "Overtime" bucket.
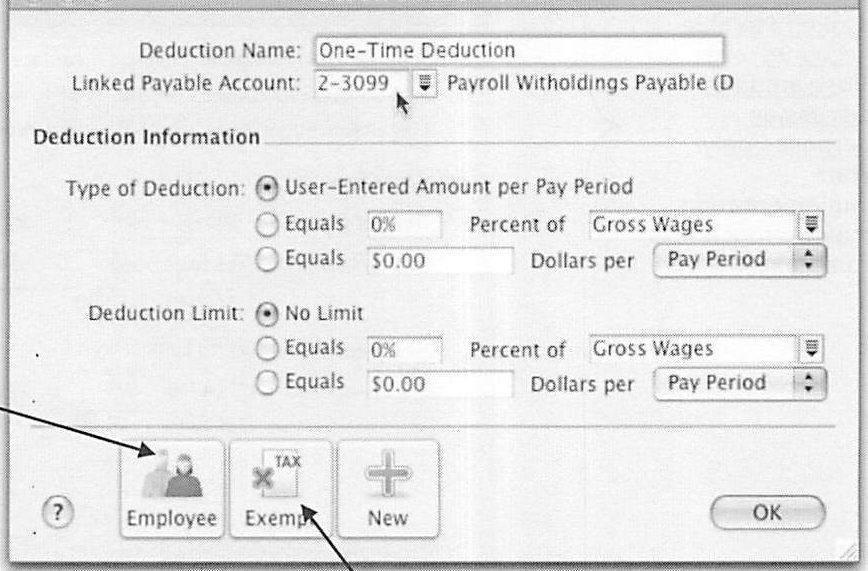
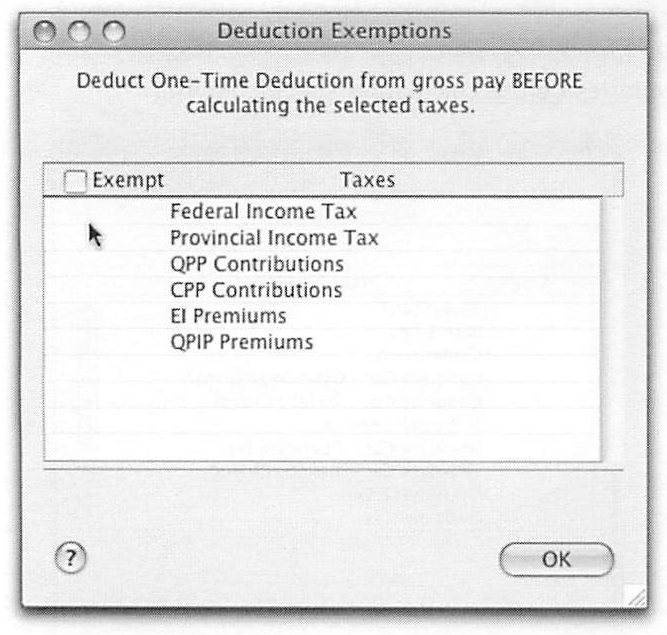
Vacation Paid Out and Accrual Paid Out — New Wage Categories
Source: Enhanced Canadian Payroll, p.21
Vacation Pay – Accrual Paid Out is the wage category used when actually paying an employee's accrued vacation balance, distinct from the Accrual expense category that built the balance up in the first place. This wage category reduces the Accrued Vacation Payable liability account (since the obligation is being settled) while adding to the employee's gross pay for the period (since the payout is taxable income). Getting this pairing right — Accrual category builds the liability, Wage category settles it — is the same three-part pattern that recurs for every accrual-based payroll category in AccountEdge, including the Banked Hours categories covered next.
Banked Hours — Earned and Paid Out (A BC Employment Standards Act Deep Dive)
Source: Enhanced Canadian Payroll, p.21-22
Banked Hours is a substantial, distinctly Canadian topic with no counterpart anywhere in the US Payroll guide. Some provinces' employment standards legislation permit employees to "bank" overtime hours instead of being paid for them immediately, to be taken later as paid time off or cashed out. The guide quotes British Columbia's Employment Standards Act directly to establish the legal basis, then walks through the full three-part category setup this requires: a Banked – Earned wage category (recording hours banked, generally exempted from most payroll taxes at the moment of accrual, since no cash is actually paid yet), a linked Accrued Banked Hours liability Employer Expense category (tracking the growing dollar-value obligation the company owes the employee for banked time), and a Banked – Paid Out wage category (used when the banked time is actually taken or cashed out, at which point it becomes subject to normal payroll taxes just like any other wage payment, since actual pay is now flowing to the employee).
The guide includes an explicit and important caution: if banked hours aren't paid out by calendar year end, this can distort both the employee's T4 and their EI Insurable Earnings for the year, because the earning and the taxing of banked time happen in different periods by design. Businesses using Banked Hours need a year-end procedure to review outstanding banked balances and either pay them out or ensure the accrual is properly reflected, rather than letting balances silently roll across years unmanaged.
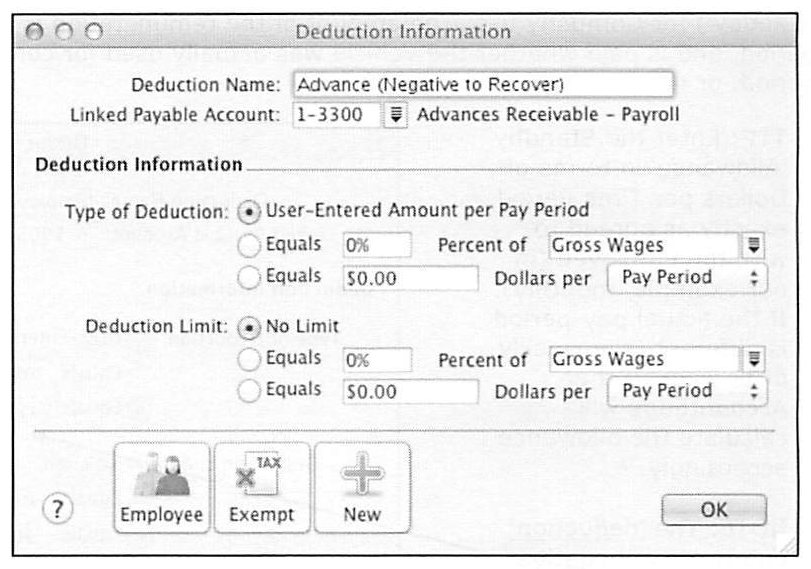
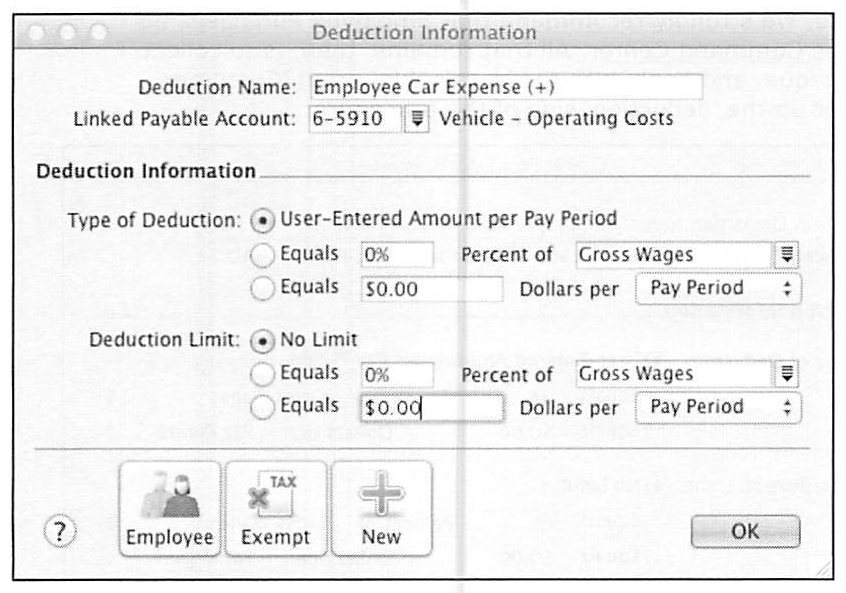
Statutory Holiday Pay – Hourly, and Shift Bonus
Source: Enhanced Canadian Payroll, p.22
Statutory Holiday Pay – Hourly is set up as its own wage category to record pay owed for statutory (public) holidays under provincial employment standards, distinct from regular hours worked. Shift Bonus is a supplementary wage category for premium pay tied to working a particular shift (evening, overnight, weekend), added on top of base wages for the hours involved. Both categories, like the others in this section, need their own linked wage-expense account so the cost is visible and reportable separately from ordinary wage expense.
Entering Employees: Identifiers, Custom Lists, and Custom Fields
Source: Enhanced Canadian Payroll, p.22-23
Before entering individual employee cards, the guide walks through naming Identifiers and Custom Lists — configurable filtering and reporting tags attached to Employee Cards. Identifiers are simple flags (useful for filtering reports to a subset of employees, such as those in a particular benefit program). Custom Lists are pre-defined pick-lists of options a business can name however it likes — the guide's sample data uses examples like Team Affiliation and Department groupings — that appear as dropdown selections on the Employee Card, letting reports be filtered or grouped by whatever categories matter to that business. Custom Fields, covered a little later alongside the Card Details Tab, are free-text fields for information that doesn't fit a fixed pick-list.
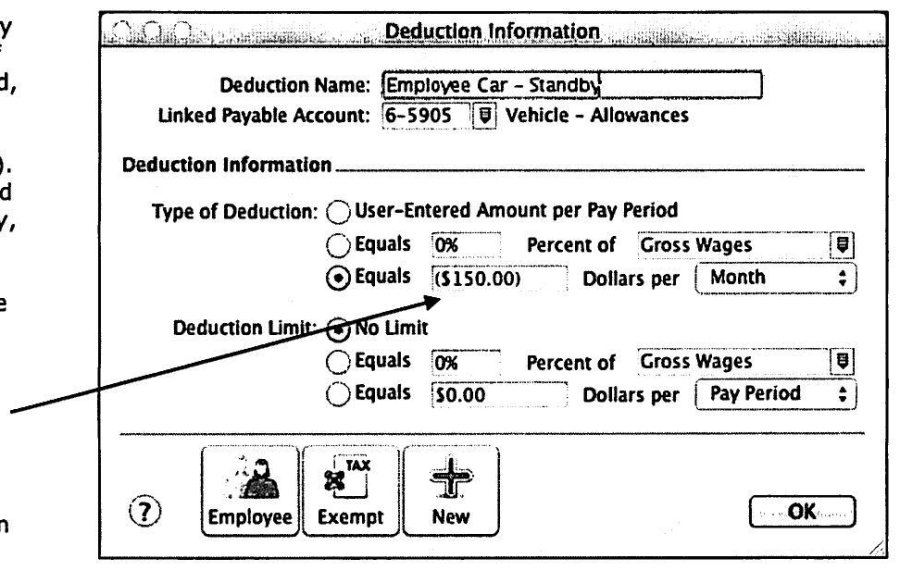
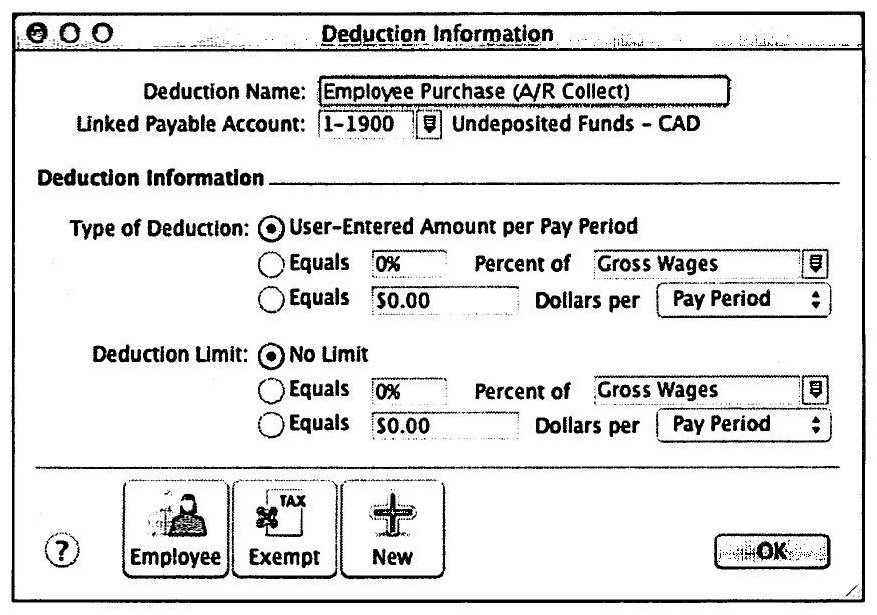
Entering Employee Card File Information
Source: Enhanced Canadian Payroll, p.34-35
With categories and lists configured, the guide moves to actually creating Employee Cards. From the Card File Command Center, the Employee tab of the Cards List is used to click New, opening the Enhanced Card File specific to Employees. The guide notes that the Cards List can be searched by Last Name/Company Name and filtered between Customer, Vendor, Employee, and Personal card types, and demonstrates locating existing sample employee cards before creating a new one.
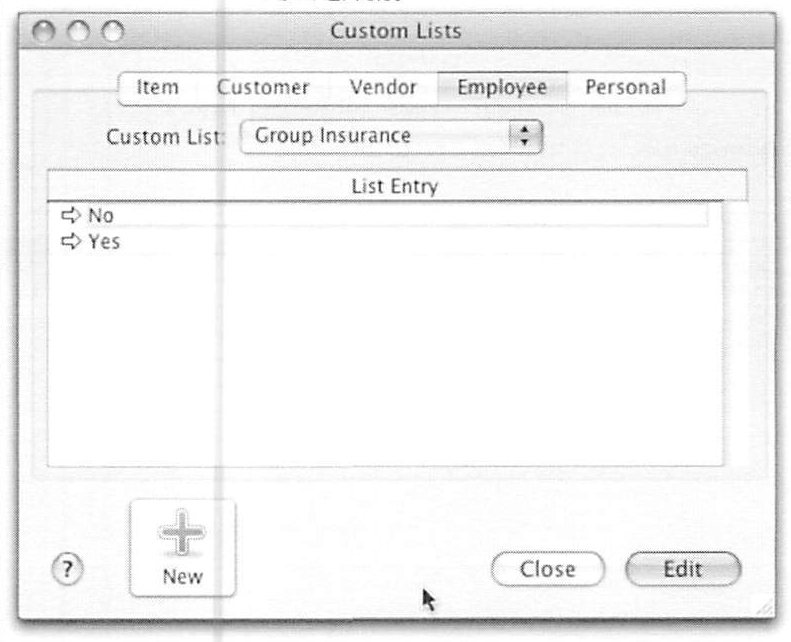
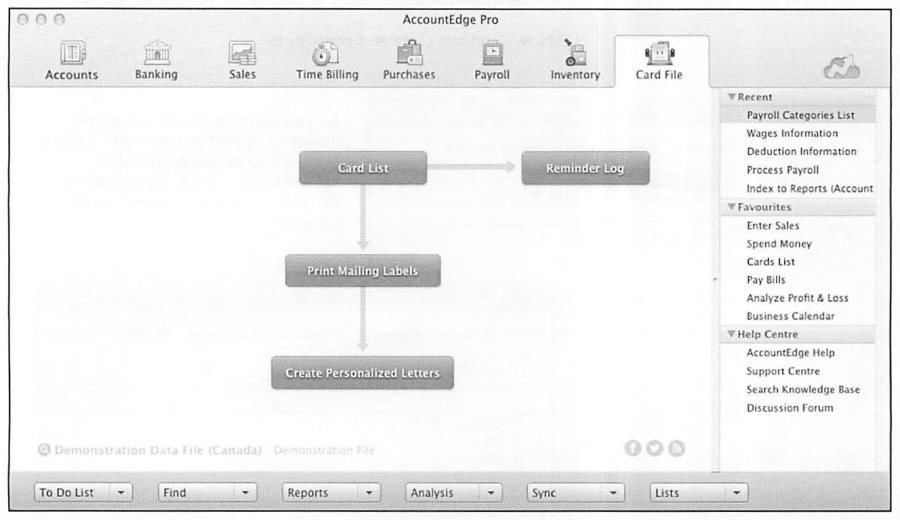
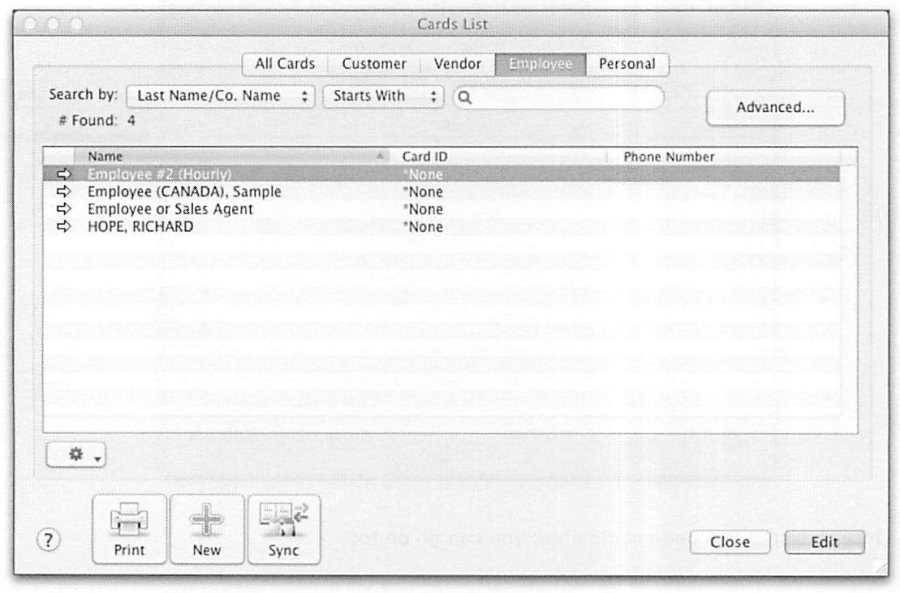
Profile Tab
Source: Enhanced Canadian Payroll, p.35-36
The Profile Tab captures basic contact information: Card Type (Employee), Designation (Individual, though the guide notes a Company designation is technically available and asks the reader to consider when that might be useful — for tracking a salesperson's sales activity even when payroll isn't being processed through that card), and the Inactive Card checkbox, which removes a terminated employee from selection lists without deleting their historical data. AccountEdge supports up to five addresses per card, useful for tracking a "Next of Kin" address alongside the employee's own, and the guide walks through Address, City, Province, Postal Code, Country, up to three phone numbers, fax, email, website, and salutation fields. It notes that Currency on an employee card should generally stay in the home currency, since employees cannot be paid in a foreign currency directly — a business wanting to track foreign-currency sales commission for an employee needs a second card in the home currency to actually process payroll or commission payments.
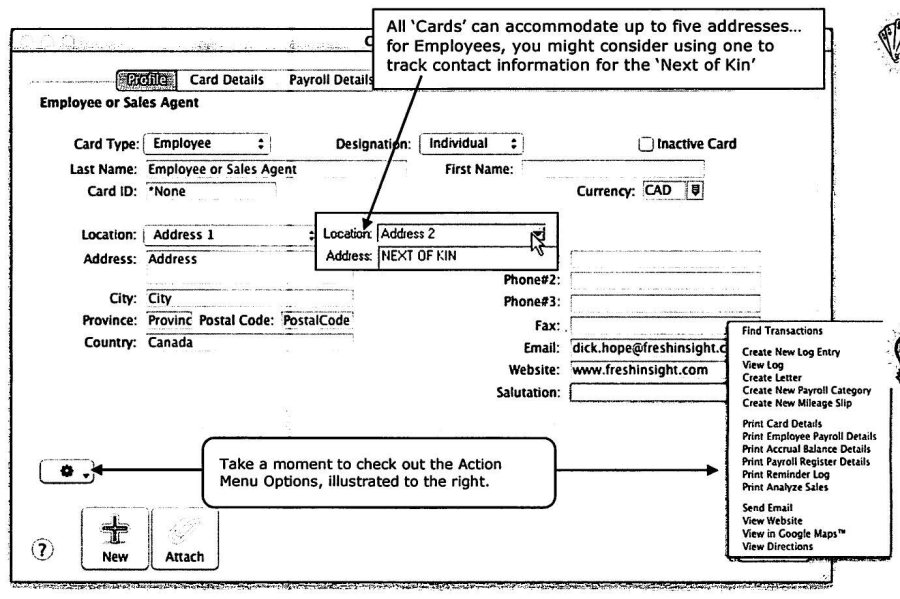

Card Details Tab
Source: Enhanced Canadian Payroll, p.36-37
The Card Details Tab holds optional fields not strictly required for payroll processing but useful for many businesses: a Picture File (a photo, automatically copied to the company file's Graphics Folder), a free-text Notes field (up to 1000 characters), Identifiers, and up to several Custom Lists and Custom Fields defined earlier — the guide's sample data uses Custom Field examples like Team Affiliation, Birthday, and Assigned Parking spot to illustrate the range of what businesses track here. If Departmental Accounting is in use, this tab is also where a default Department can be assigned so the employee's pay is allocated automatically without manual entry each pay run.
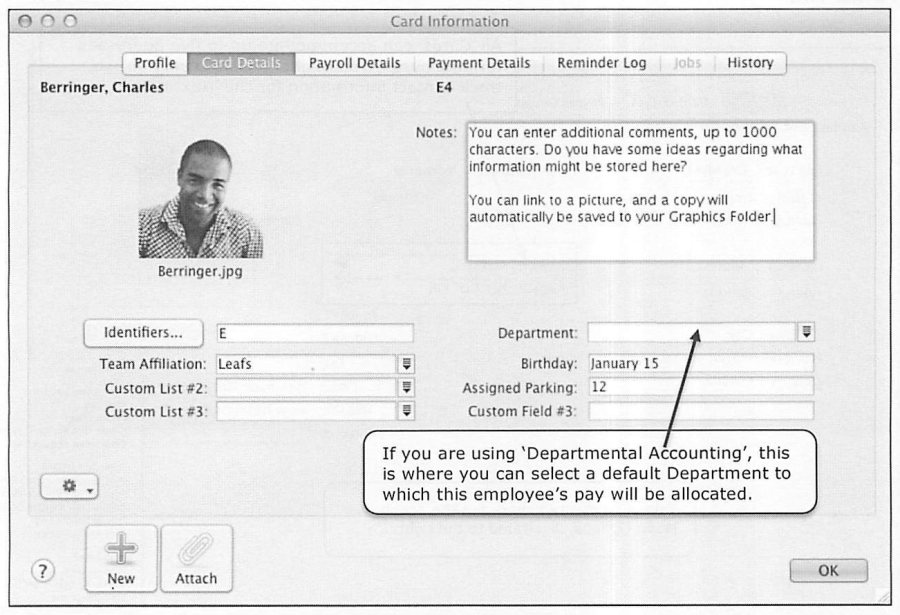
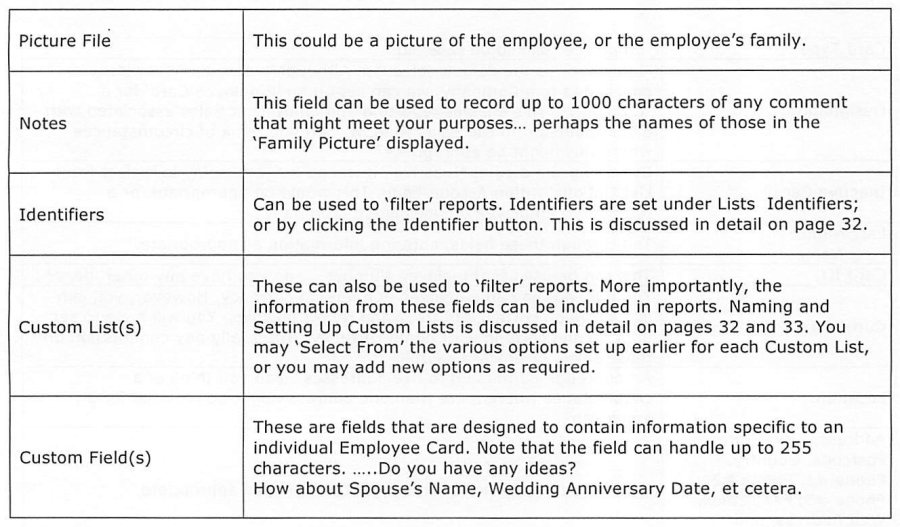
Payroll Details Tab: Personal Details and Wages
Source: Enhanced Canadian Payroll, p.37-39
The Payroll Details Tab is the heart of employee setup, organized as a series of sub-panels reached from a left-hand navigation list: Personal Details, Wages, Accrual Balances, Deductions, Employer Expenses, Taxes, Recurring Pay, Pay History, and Time Billing. Personal Details captures Birth Date (AccountEdge calculates and displays age automatically), Hire Date, Terminate Date, Social Insurance Number (SIN — AccountEdge validates the check-digit format and will warn if an entered SIN doesn't pass validation), Tax Table (the employee's province, which the guide notes is mandatory since province determines which payroll categories and rates apply — an employee working across multiple provinces may require a separate Employee Card per province), and Pay Stub Delivery preference (Printed, Emailed, or both).
The Wages panel sets Pay Basis (Salary or Hourly), the corresponding Annual Salary or Hourly Rate (AccountEdge computes the equivalent of whichever wasn't entered), Pay Frequency (with considerably more options available to upgraders than in older versions — Weekly, Twice a Month, Bi-Weekly, Every 4 Weeks, Monthly, 10 Times per Year, or Annually), Hours per Pay Period (calculated from Pay Frequency and the company-wide default work-week hours, but editable per employee as a convenience default), the Wage Expense Account (accepting the global default or an employee-specific override), and finally the checklist of which specific Wage Categories apply to this employee — only checked categories appear when processing that employee's paycheque, and the guide notes categories can be toggled on and off seasonally, such as disabling a Bonus category for most of the year and re-enabling it in December.
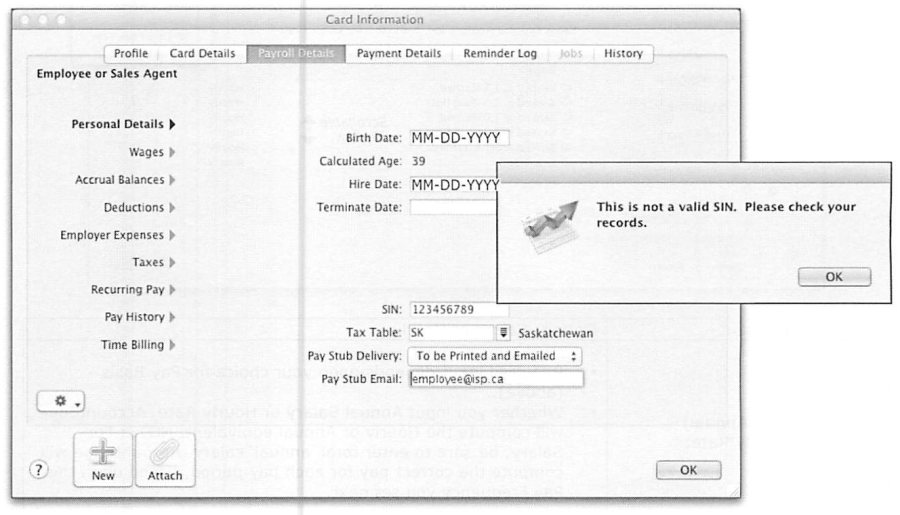
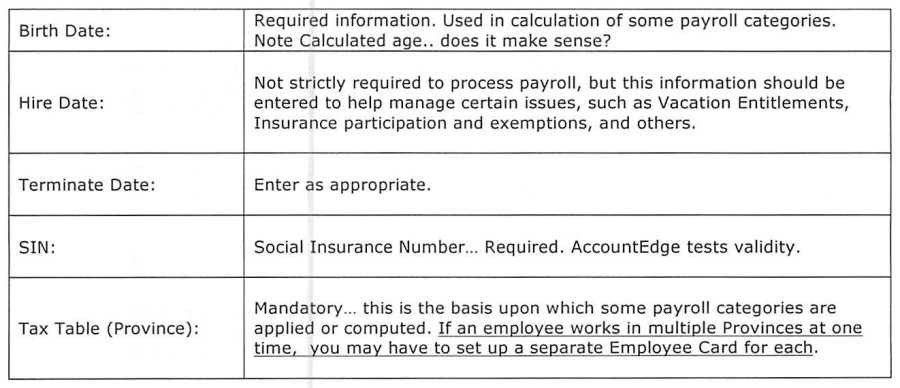
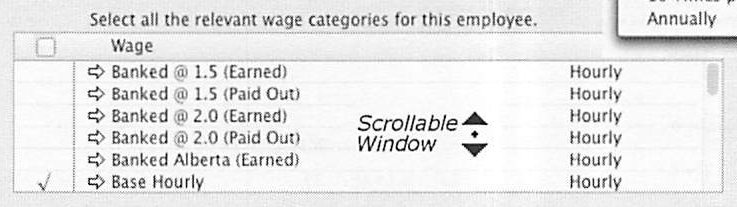
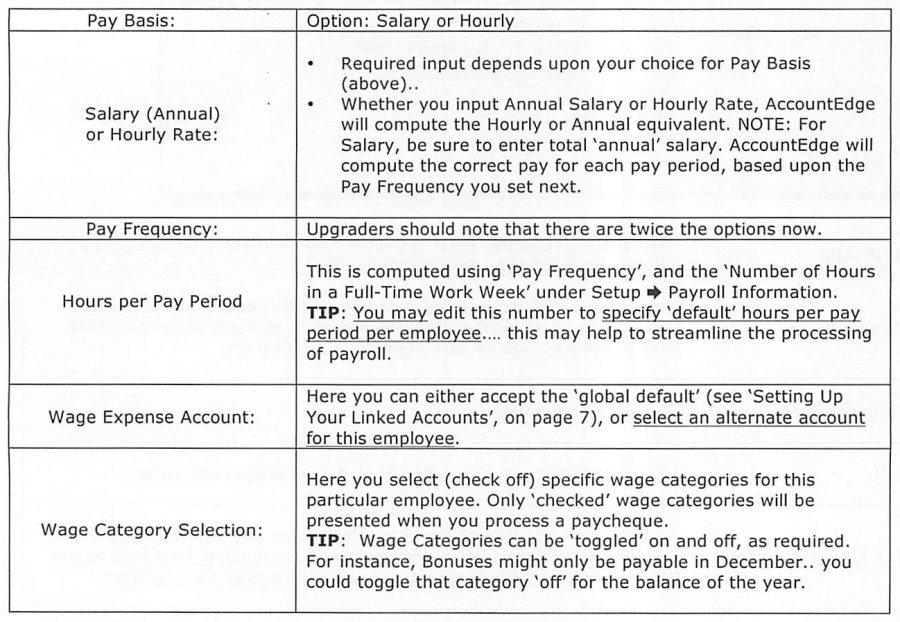
Payroll Details Tab: Accrual Balances, Deductions, and Employer Expenses
Source: Enhanced Canadian Payroll, p.40-41
The Accrual Balances panel lists an employee's accrual categories (Vacation Pay – Accrued, Banked Hours, and similar) with editable Carry Over, Year-to-Date, and computed Total columns. The Carry Over figure is specifically meant for converting a business onto AccountEdge Payroll mid-year — it lets the opening accrual balance from the legacy system be entered so AccountEdge's running totals pick up accurately from that point forward. The guide strongly recommends printing an Accrual Balance Details report before proceeding with conversion, to document that entered balances reconcile to legacy records, and suggests attaching a PDF copy of that report to the Employee Card as a permanent record.
The Deductions panel presents a checklist of deduction categories, mirroring the Wages panel's pattern — only checked categories are available when processing this employee's pay. The guide's example list includes Advance (Negative to Recover), Employee Car – Standby, Employee Purchase, Garnishee, GST Deduction for Company Car, Life Insurance (both methods), One-Time Deduction, Reimbursable Expenses, and RPP Contributions, illustrating how many of the categories built out earlier in the guide converge here at the individual employee level. The Employer Expenses panel works the same way for Employer Expense categories, and the guide notes that certain categories are automatically pre-selected based on the employee's Province (Tax Table) selection made under Personal Details — for example, CPP and EI are selected by default for employees outside Quebec, while EIQ, QPIP, and QPP are selected by default for Quebec employees, since the applicable programs differ by province.
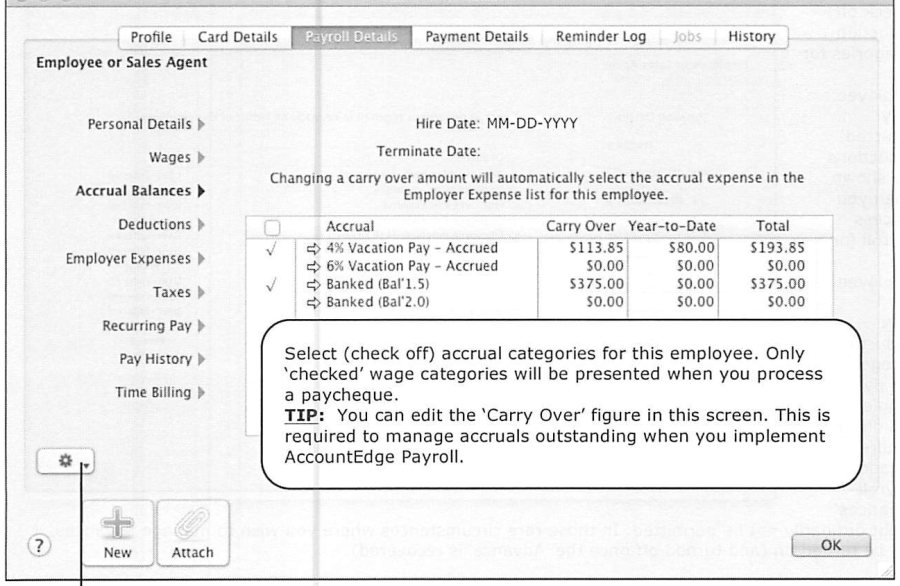
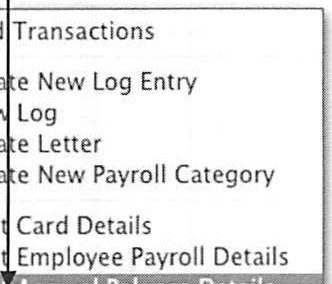
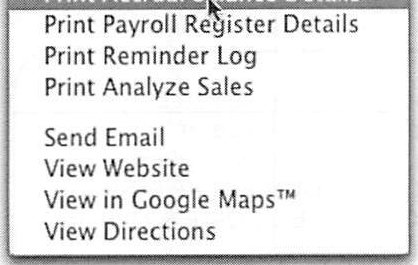
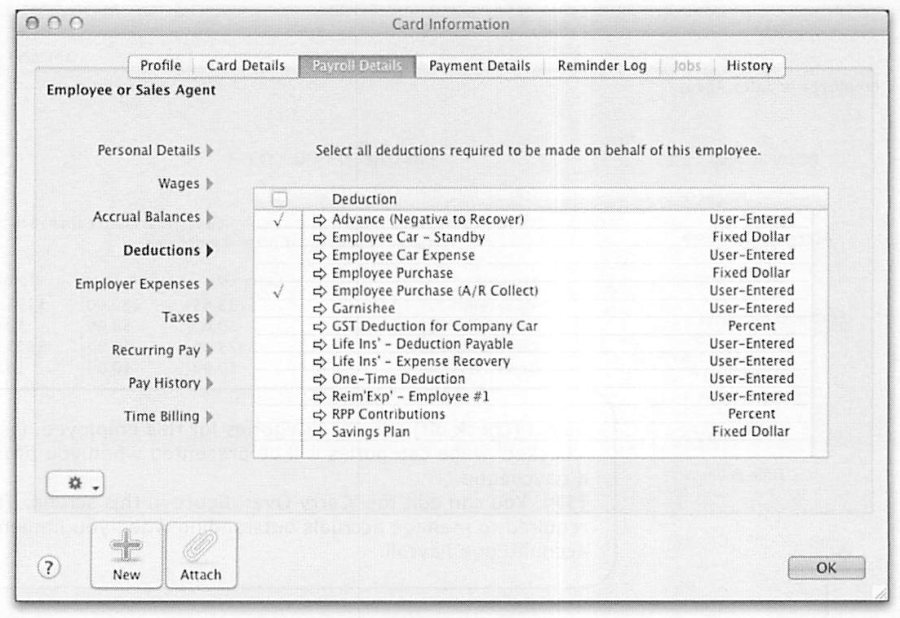
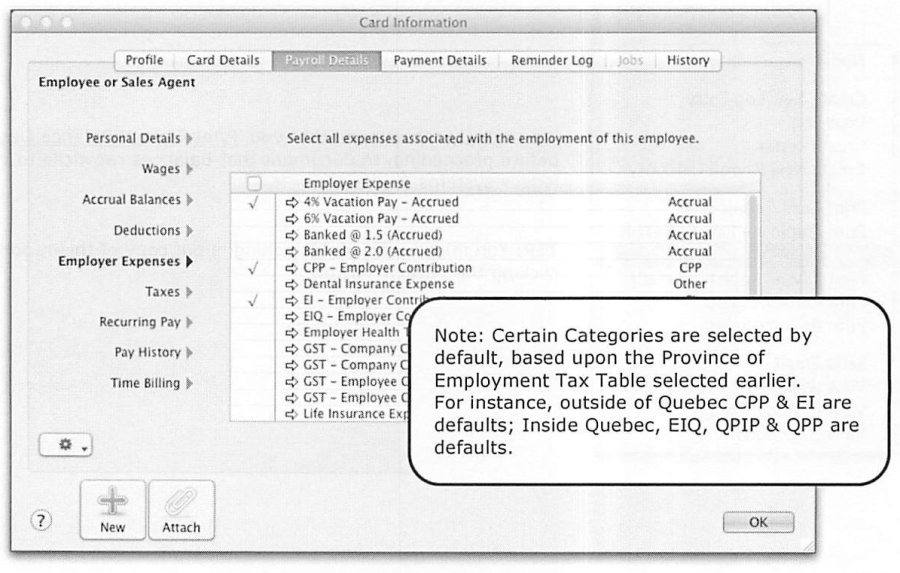
Payroll Details Tab: Taxes — Net Claim, Extra Withheld, and Exemption Rules
Source: Enhanced Canadian Payroll, p.41
The Taxes panel captures the Federal and Provincial TD1 form claim amounts (or, in Quebec, the Federal TD1 alongside the Provincial TP-1015.3-V form) — either the Basic Personal Amount checkbox for automatic default claim amounts, or a specific Net Claim dollar figure where the employee has claimed additional amounts. The guide is explicit that current, signed TD1 and (where applicable) TP-1015.3-V forms are a regulatory requirement before using any Net Claim amount other than the Basic Personal Amount, and that these signed forms must be retained on file for audit purposes — scanning and attaching them to the Employee Card via the Attach button is suggested as good practice.
Extra Withheld allows for an additional flat amount to be withheld each pay period, used when an employee has outside taxable income not otherwise subject to withholding and has requested (in writing) additional withholding to cover it; entering a negative Extra Withheld amount handles the reverse situation, where a tax authority has confirmed in writing that reduced withholding applies. The Tax Selection/Exemption checklist is where an employee is de-selected from specific taxes they're exempt from — the guide gives the example of an employee with significant equity in the business who may be exempt from EI, or an employee already drawing CPP or QPP who may be exempt from further contributions, noting that CPP contribution rules changed as of January 2012 to generally require contributions up to age 65 with optional continuation to age 70, and that Service Canada should be consulted for affected employees.
Two Trap-level cautions close out this panel: AccountEdge does not automatically apply or exempt CPP contributions based on the birth date entered on the Card, and does not automatically calculate EI Insurable Earnings based on an employee's EI exemption status — both must be actively managed by the user, and getting them wrong can produce incorrect Insurable Earnings Reports and T4s that require manual correction after the fact. The guide suggests setting a Reminder Log entry to prompt review of an employee's CPP/QPP/EI/EIQ status as they approach relevant milestones.
Recurring Pay
Source: Enhanced Canadian Payroll, p.42
Recurring Pay, used together with Timesheets, is described as the foundation of AccountEdge's enhanced payroll functionality. This panel lets a default Category (Department/Division, if Category Tracking has been enabled — a global preference the guide directs readers to review in the Setting It Up Properly training guide before turning on) be assigned to an employee's pay, lets default Hours per Pay Period be edited, and lets dollar amounts or hours be entered as recurring values for specific Wage, Deduction, or Employer Expense categories — a recurring Garnishee amount being a typical example. Each line item can also be allocated to a Job or Department, including split allocations across multiple Jobs or Departments by percentage, and the guide walks through both a single-department allocation and a percentage-split allocation (for example, 33% to one department, 67% to another) as worked examples. The guide notes that Recurring Pay figures are different from ordinary Recurring Transactions elsewhere in AccountEdge — their schedule is driven by Pay Frequency rather than the standard Recurring Transactions list, and standard Recurring Pay details are actually built up automatically as an employee's Personal Details through Taxes panels are completed; this panel is where those defaults are reviewed and finalized or adjusted per employee.
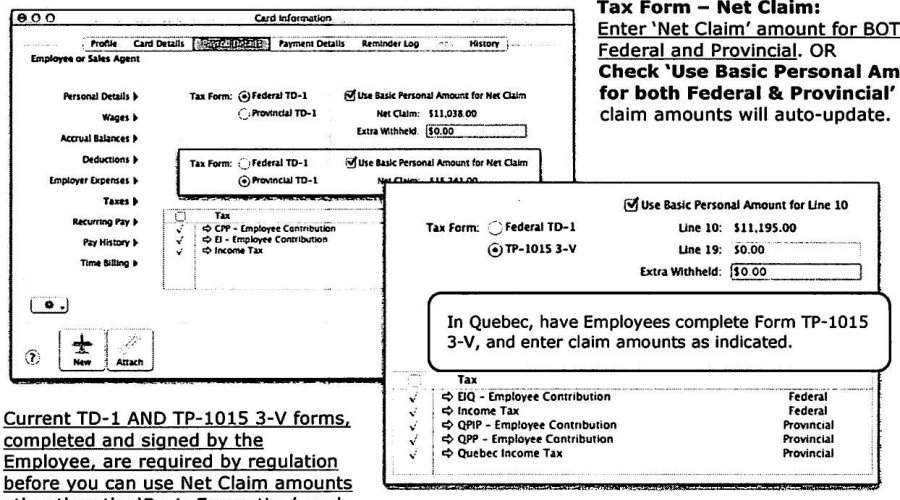
Pay History
Source: Enhanced Canadian Payroll, p.43-44
Pay History exists for businesses converting to AccountEdge Payroll partway through a payroll year — historical pay figures up to the conversion date need to be entered so that annual-limit calculations (CPP, EI, and other capped contributions) and year-end reporting (T4s, RL-1s) come out correct for the full year, not just the AccountEdge-processed portion. The guide recommends entering monthly Pay History for both the prior year and current year where convenient, particularly to support generating a complete Record of Employment (ROE) later, and stresses entering both the employee and employer sides of each category since AccountEdge uses both to determine when annual limits have been reached. Figures should generally be entered as positive numbers — AccountEdge knows internally which amounts need to be treated as reductions from gross wages. After entry, printing and retaining a Year-to-Date Pay History report for each employee, checked against legacy payroll records, is recommended as a conversion safeguard.
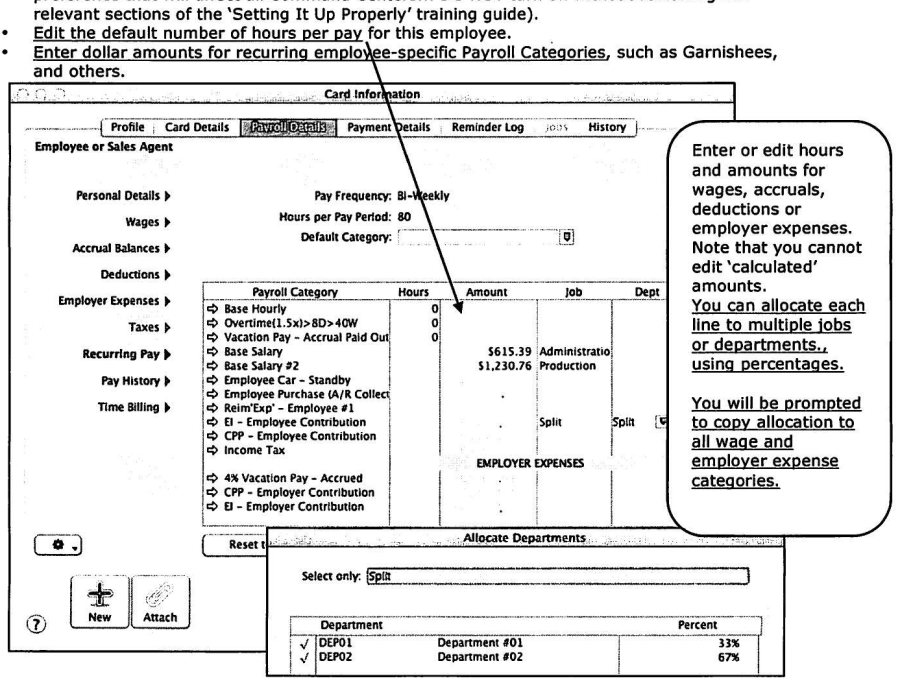
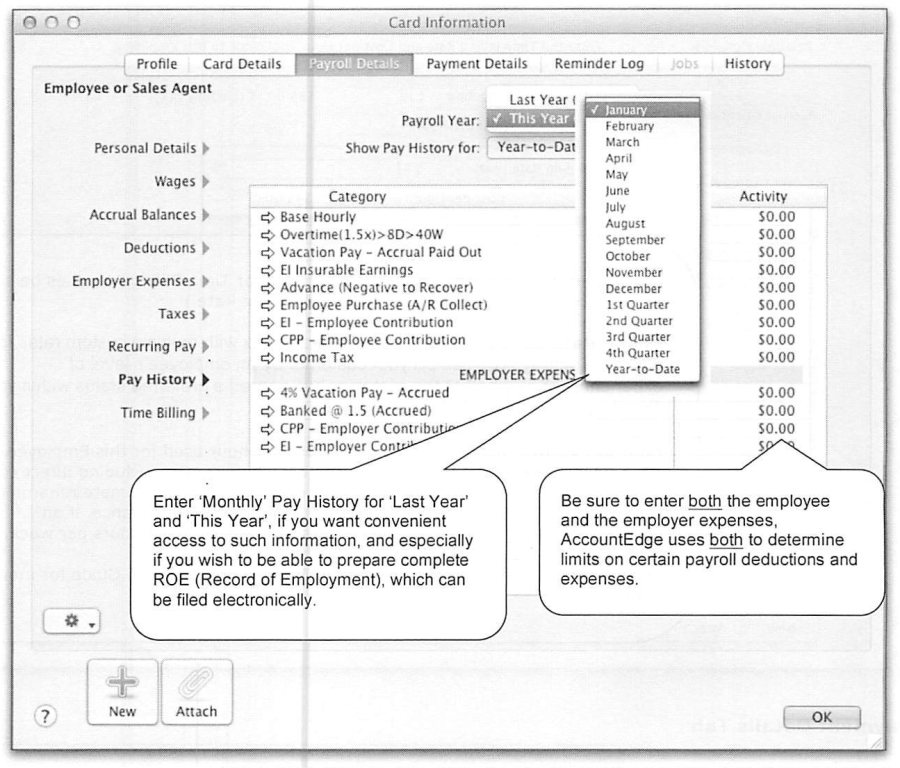
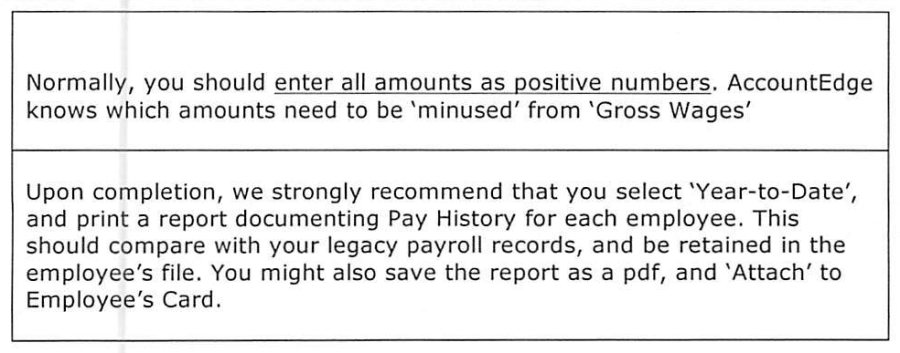
Time Billing and Payment Details Tab
Source: Enhanced Canadian Payroll, p.45
The Time Billing panel, relevant only where Time Billing is in use, captures an Employee Billing Rate (the rate charged to customers for that employee's time, if billing is based on Employee Rate rather than Activity rate), an optional Billing Rate Level (allowing a matrix of rates based on experience level or customer status), and a Cost per Hour figure used for internal Time Billing profitability analysis — the guide notes this figure should typically exceed the base hourly wage, since it needs to account for employer expenses and the reality that billable hours are usually fewer than total paid hours. The Payment Details Tab, a separate tab alongside Profile and Payroll Details, sets the employee's default Payment Method (Cash, Cheque, or Electronic) along with EFT Transit Number, Bank Account Number, and Bank Name fields required for direct deposit.
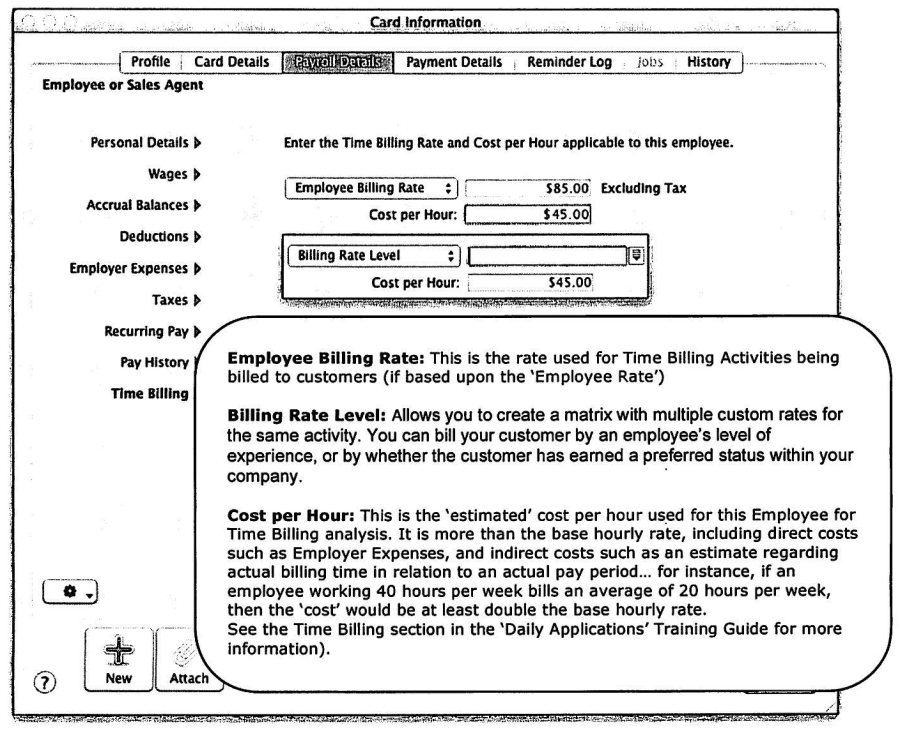
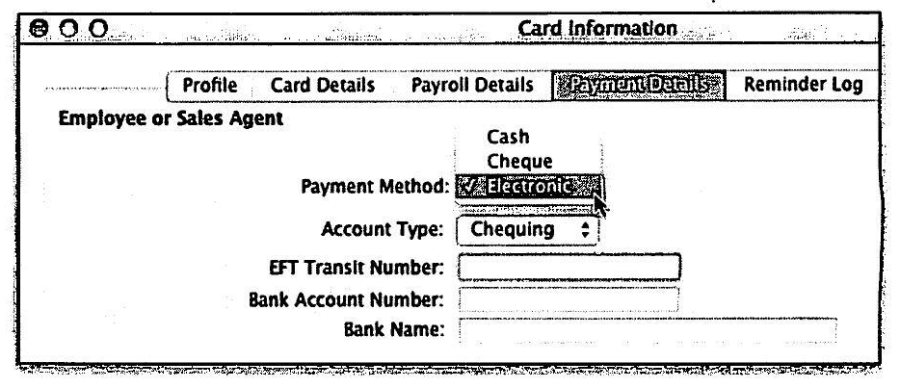
Reminder Log Tab
Source: Enhanced Canadian Payroll, p.46
The Reminder Log Tab tracks three categories of history against an Employee Card: Transactional History (a note logged for every transaction, if the relevant system-wide preference is enabled — the guide recommends against this, since it's usually redundant and can degrade performance on large multi-user files), Notational History (free-form notes covering pay rate discussions, performance appraisals, or reminders to revisit a benefit category), and Communication History (noteworthy communications including commendations or disciplinary actions). Log entries with a Recontact date appear automatically on the AccountEdge To-Do List, and Mac users can optionally publish reminders to iCal. Given the sensitivity of some entries, the guide flags that password restrictions (covered in the Setting It Up Properly guide) may be appropriate to control who can view this tab.
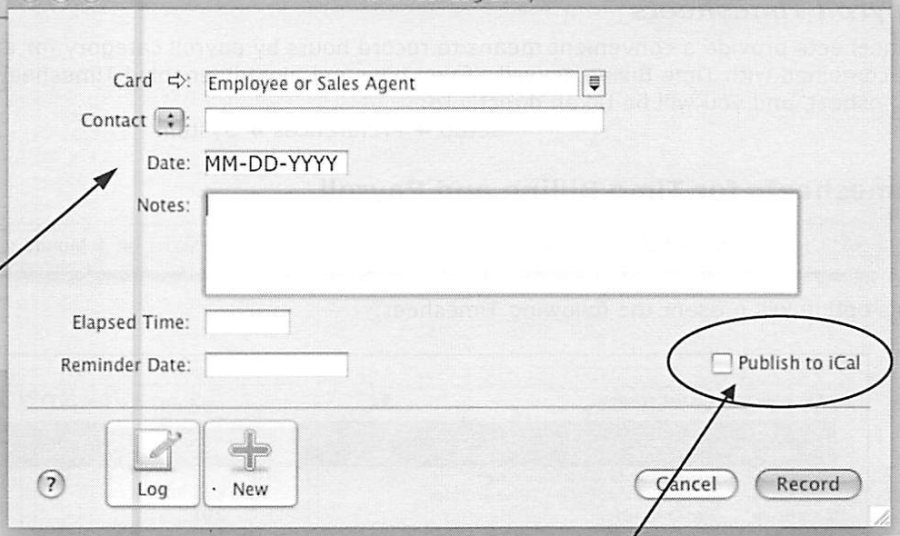

History Tab (Sales) and Introducing Payroll Timesheets
Source: Enhanced Canadian Payroll, p.47
The History Tab automatically tracks monthly sales totals for an employee designated as a Salesperson on Sales Invoices, retained for five years plus the current and next year, and can be manually populated for pre-conversion history when upgrading from a system that didn't track this data. From here the guide transitions into Timesheets, which record hours by payroll category for each day and can be used purely for Payroll, purely for Time Billing, or for both together (as covered in the Daily Applications guide). The relevant preference, Setup » Preferences » System » Use Timesheets for [Time Billing and Payroll / Payroll], determines which mode is active, and the guide notes that if a Time Billing Activity is Chargeable it must be linked to a customer, while Non-Chargeable activities may optionally include a Job allocation. For payroll-only purposes, the simpler Payroll-only Timesheet screen presents Payroll Category, Job, and Notes columns against each day of the selected week.
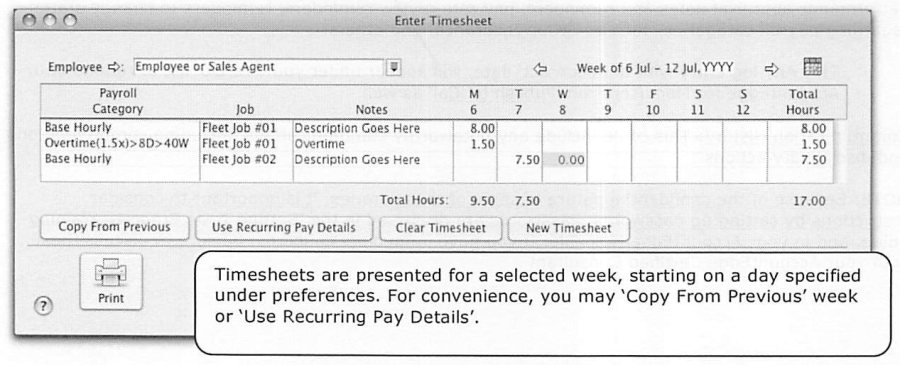
Entering a Payroll Timesheet
Source: Enhanced Canadian Payroll, p.47-48
To enter a Timesheet, the employee and pay week are selected first (the employee must already exist in the Card File, and week navigation uses either arrow buttons or a calendar picker), then hours are entered against Payroll Categories that must already be selected for that employee under the Payroll Details tab. Job Allocation on Timesheet lines is optional but recommended for consistency if Job Costing is used elsewhere — the guide points to the System preference "Warn if Jobs Are Not Assigned to All Transactions," which triggers a reminder if a line is tabbed through without a Job selected. Timesheets can be built up incrementally across the week rather than completed in one sitting, and Copy From Previous or Use Recurring Pay Details buttons speed up repetitive entry.
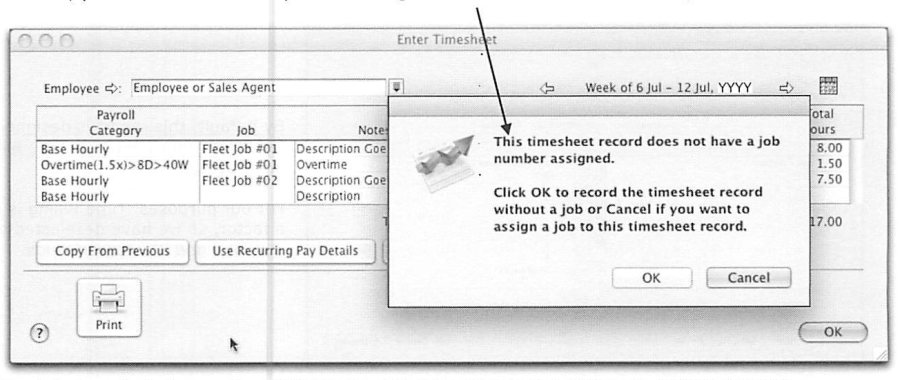
Timesheet Reports
Source: Enhanced Canadian Payroll, p.48-51
Two Timesheet reports are available under Reports » Index to Reports » Payroll. The Timesheets Report mirrors what prints from within the Timesheet entry screen but adds Advanced Filter options (filtering by employee, or by Custom List fields configured on Employee Cards) and customizable Report Fields — the guide shows the report both with Time Billing fields (Activity, Customer) included and, for a payroll-only shop, with those fields deselected to leave a cleaner Payroll Category and Job breakdown. A customized version of this report can be saved for reuse under the Custom tab and optionally added to the Reports Menu. The Unprocessed Timesheets Report shows all Timesheet entries not yet used to process payroll, filterable by Pay Frequency and date range, and can optionally include Job Allocation and Calculated Dollar Amounts — the guide notes this second option is particularly useful at period end for valuing (and accruing) unprocessed time as work-in-process.
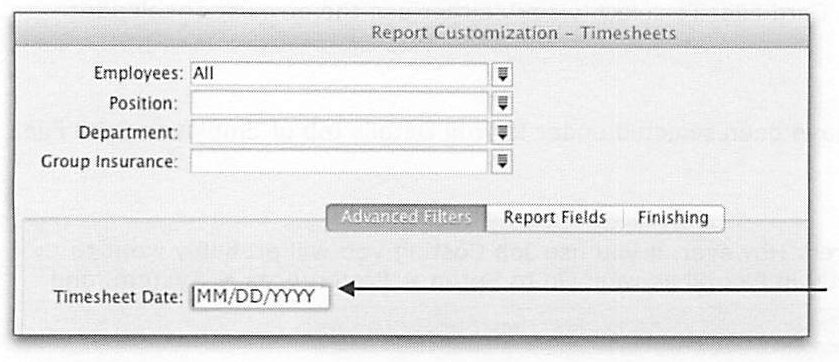
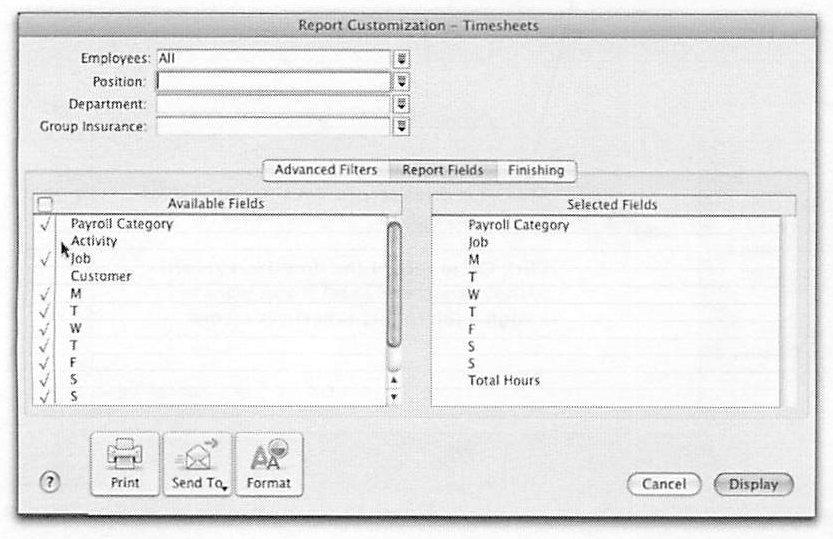
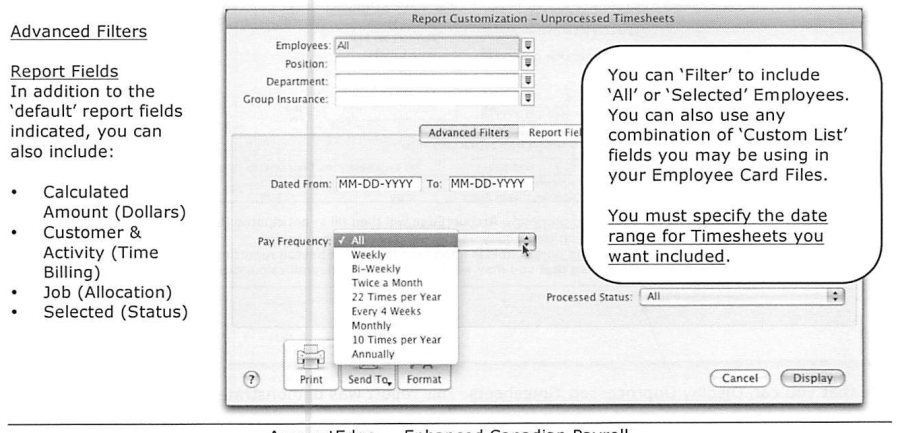
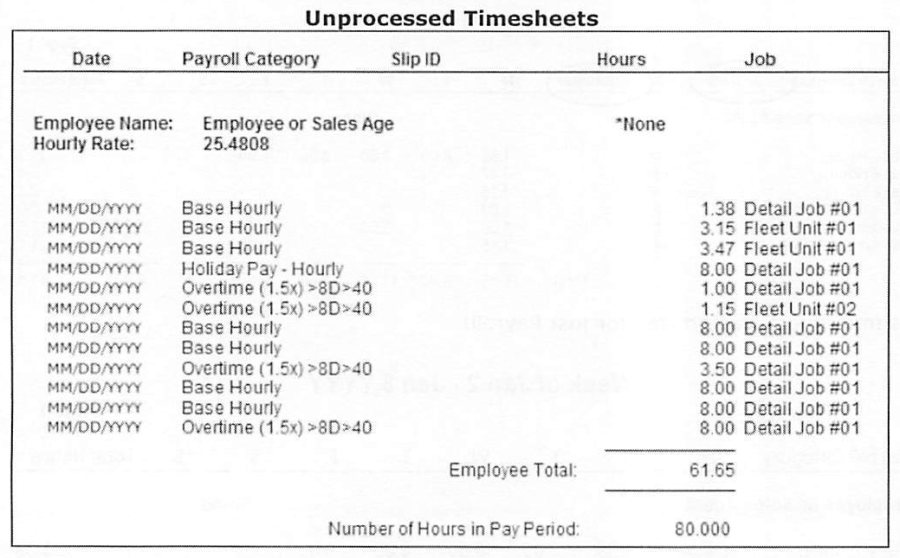
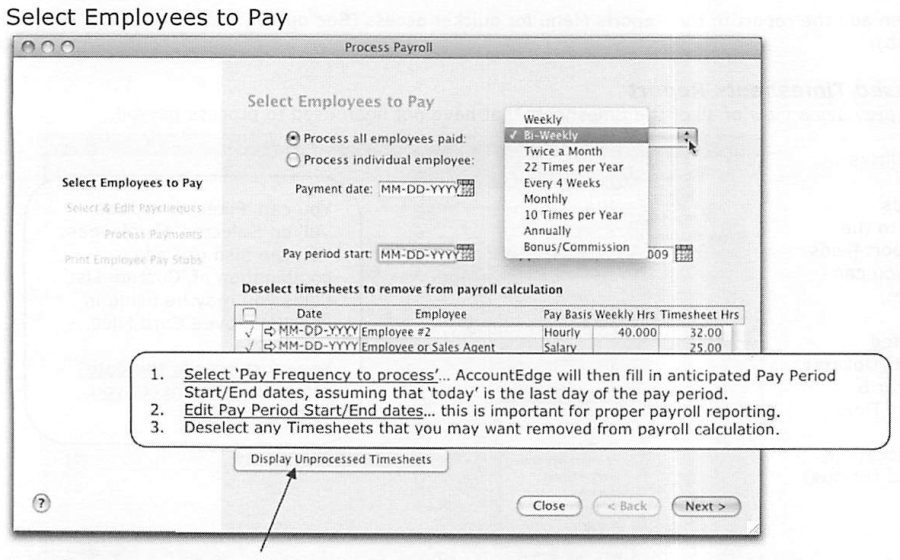
Processing Payroll: Select Employees to Pay
Source: Enhanced Canadian Payroll, p.49-50
Processing Payroll begins by selecting the Pay Frequency to process, which causes AccountEdge to propose Pay Period Start/End dates assuming the current date falls at the end of the period — these proposed dates should always be checked and corrected if needed, since accurate period dates matter for downstream reporting. The screen lists employees due to be paid at that frequency along with their Timesheet hours where applicable, and any Timesheets that shouldn't be included in this run can be deselected. The Display Unprocessed Timesheets button gives quick access to the report covered in the previous section directly from this screen.
Select and Edit Paycheques
Source: Enhanced Canadian Payroll, p.51-52
The Select & Edit Paycheques screen lists every employee in the current processing batch with computed Hours, Gross Pay, and Net Pay, and a Preview Pay Details option to display or print a Payroll Verification Report before committing anything. Clicking the zoom arrow beside any employee opens the full Pay Employee screen for review or editing — this is where every Wage, Deduction, Employer Expense, and Tax line for that specific paycheque is visible, with linked accounts and calculated amounts shown line by line. The guide walks through this screen in detail using a sample paycheque, pointing out that categories allocated across more than one Job or Department are marked "Split," and that clicking Split opens the underlying percentage or dollar allocation for review before the paycheque is finalized.
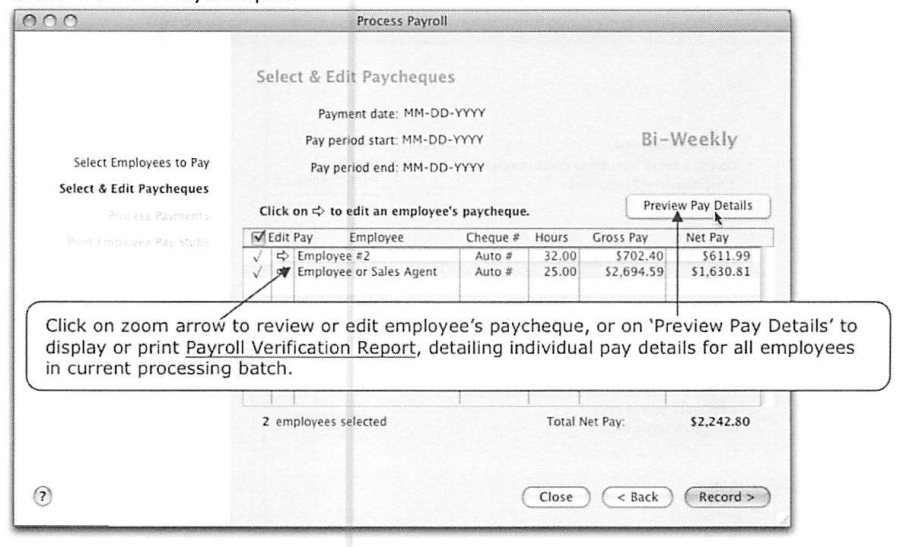
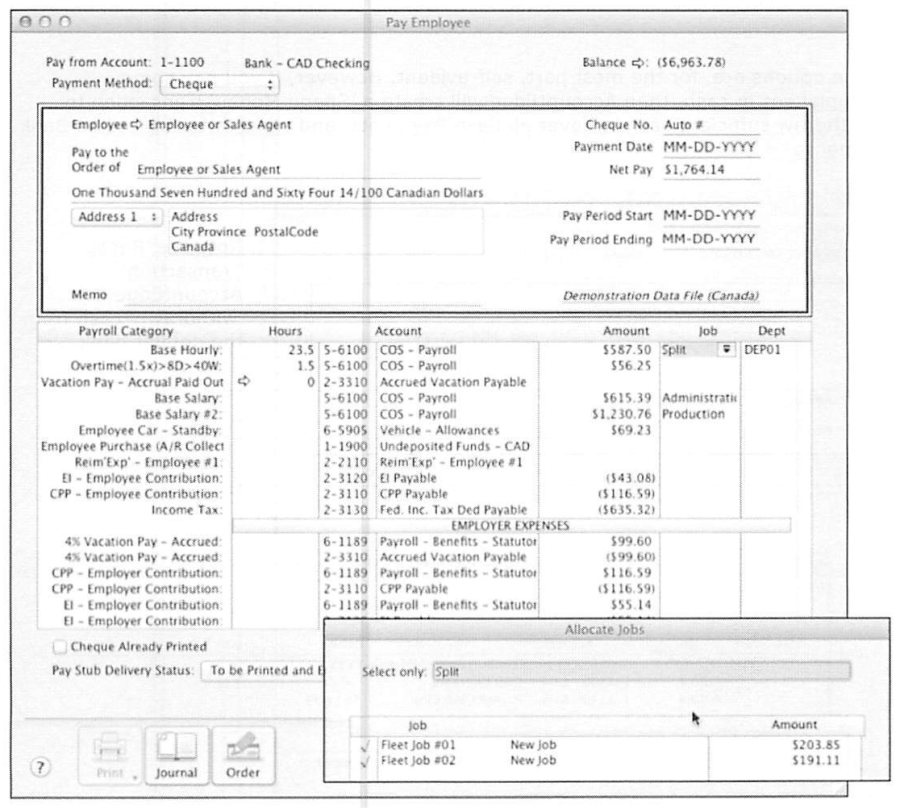
Process Payments, Print Paycheques, and Print Pay Stubs
Source: Enhanced Canadian Payroll, p.52-54
Once paycheques are recorded, the Process Payments screen summarizes what needs to happen next, broken out by Payment Method: cheques ready to print, electronic payments ready to prepare and send, and cash payments needing a Spend Money transaction generated to withdraw sufficient cash. For cash payroll specifically, AccountEdge automatically creates a Spend Money transaction moving funds from the regular bank account into a dedicated Payroll Cash Clearing account, so cash paid out to employees is properly tracked rather than simply vanishing from the books. From here, Print Paycheques or Prepare Electronic Payments can be triggered directly, or the guide continues to Print or Email Employee Pay Stubs — a review screen listing each pay stub with its delivery method (based on the setting in each Employee Card), amount, and for emailed stubs, the destination address and a customizable email subject and message.
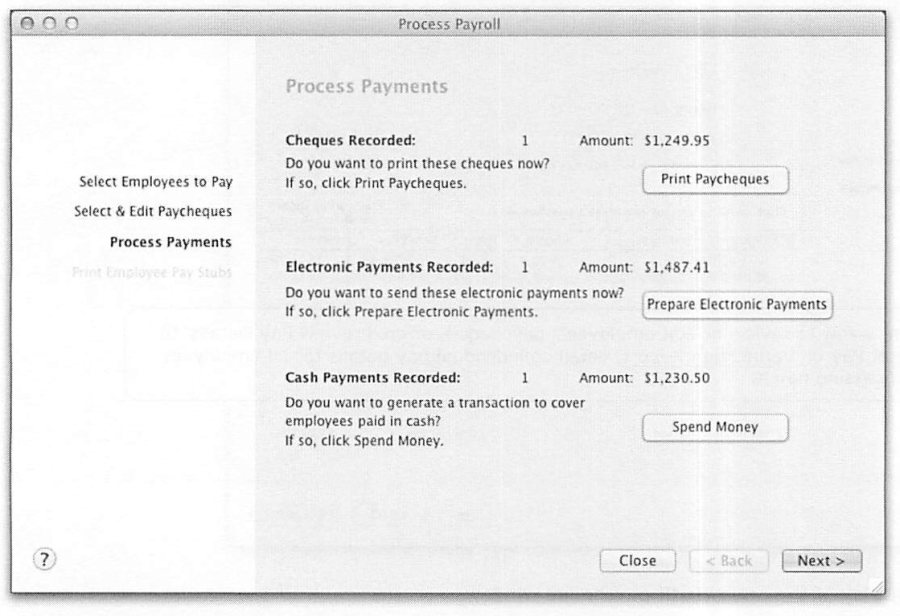
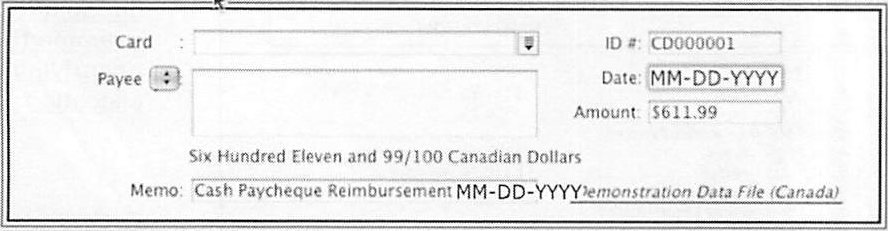
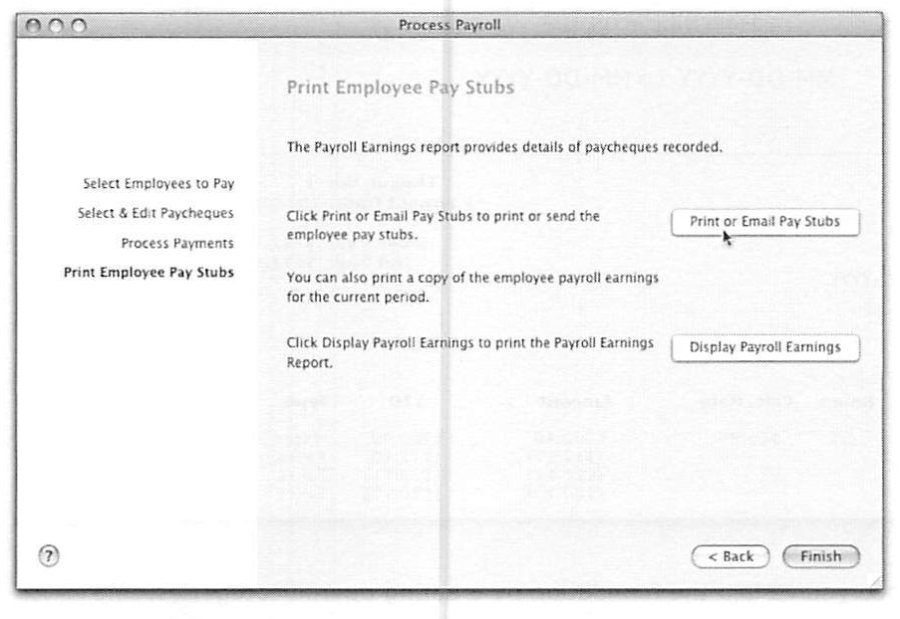
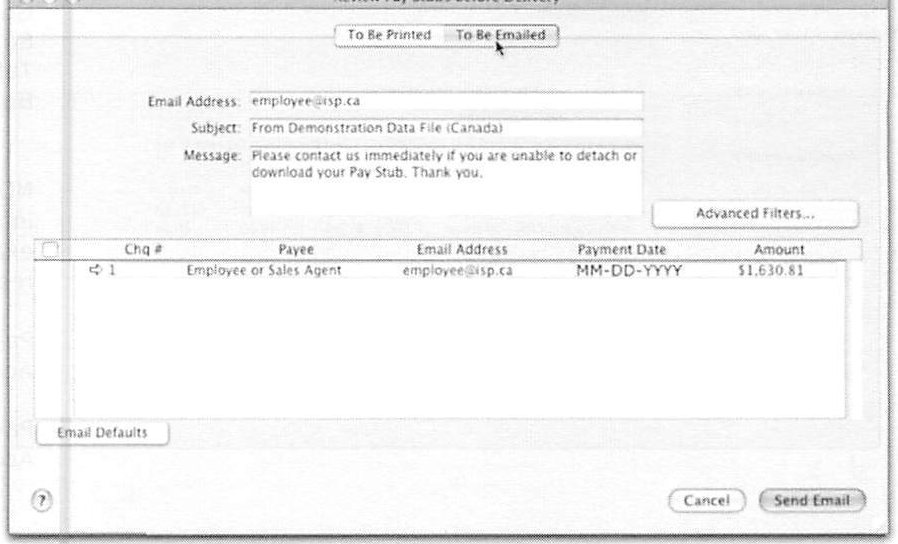
Display and Print Payroll Earnings
Source: Enhanced Canadian Payroll, p.55
The Payroll Earnings Report is designed to print a separate page for each employee, showing gross pay, every wage/deduction/tax line with hours, rate, and amount, and net pay for the period alongside year-to-date totals — useful as a standalone record, particularly for employees paid in cash where a formal pay stub might not otherwise be generated. The guide closes this section on a congratulatory note: once the setup work of building categories and configuring each employee is done, actually processing a routine payroll run becomes comparatively quick.
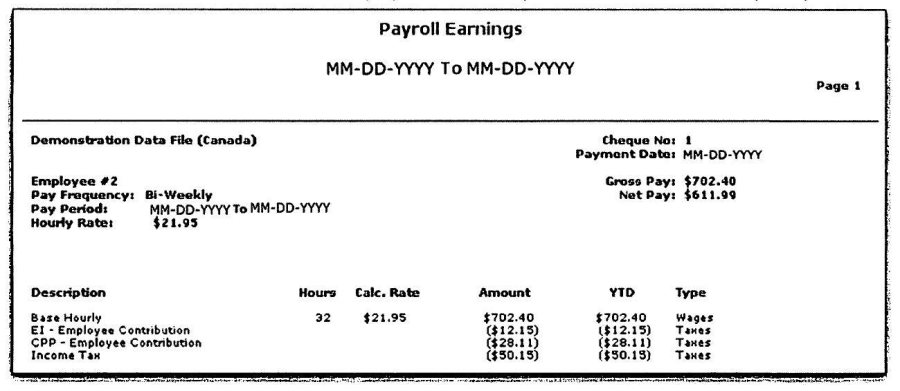
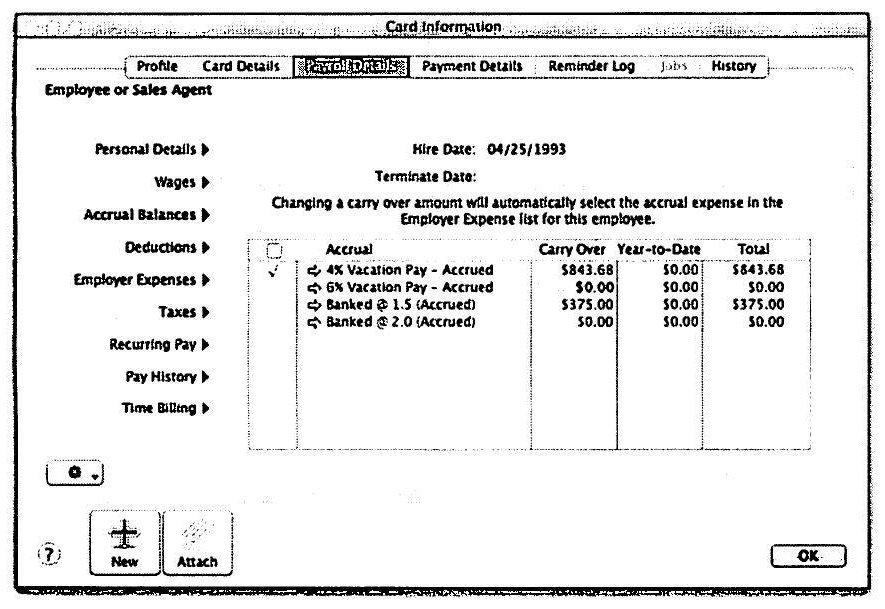
Paying Out Accrued Vacation Pay
Source: Enhanced Canadian Payroll, p.54-55
To determine how much vacation an employee has accrued, the guide directs to the Accrual Balances panel of the Payroll Details tab, or to the more detailed Accrual Balance Summary and Accrual Balance Detail reports under Reports » Payroll » Employer Accruals. When actually paying out accrued vacation through the Pay Employees screen, the Vacation Pay – Accrual Paid Out line will auto-compute based on hours entered, but the guide notes the dollar amount can be manually edited — in its worked example, a computed $1,000.00 payout is adjusted upward to $1,046.46 to match the employee's full Lifetime Accrual Balance exactly. A related Trap-adjacent note: if this is an employee's final paycheque, any Vacation Pay Accrued still building for the current period should be added into the final Accrual Paid Out amount as well, and the guide advises reviewing any other financial exposure — payroll advances outstanding, staff receivables, employer-funded program participation — before issuing a truly final paycheque to a departing employee.
Processing Payroll Advances
Source: Enhanced Canadian Payroll, p.56-58
The guide is candid about Payroll Advances: historically they served two purposes — avoiding the need to calculate tax on a mid-month advance separately from the month-end paycheque (a problem AccountEdge's built-in payroll tax calculation has largely eliminated) and, more commonly, business owners informally lending money to employees, a practice the guide discourages except in unusual circumstances. It includes a direct compliance caution: depending on when an advance is recovered, issuing one can have the effect of deferring the withholding and remittance of payroll taxes, which tax authorities may prohibit and penalize — exposure should be confirmed before adopting the practice.
Mechanically, if Timesheets are in use, the Timesheets preference needs to be temporarily turned off to issue an advance to an hourly employee (since normal processing would otherwise require a completed timesheet first), and turned back on afterward. An advance is entered through Process Individual Employee, with the advance amount entered in the Advance (Negative to Recover) line and all deduction categories cleared for that one paycheque. To determine total advances outstanding, the AccountEdge Analyst's Payroll Summary screen, filtered to Year-to-Date, shows the balance in parentheses if the employee still owes the company, or without parentheses if the company has actually over-recovered from the employee. Recovering an advance later means entering the recovery amount as a negative in the Pay Employee screen against the same Advance category, offsetting the outstanding balance.
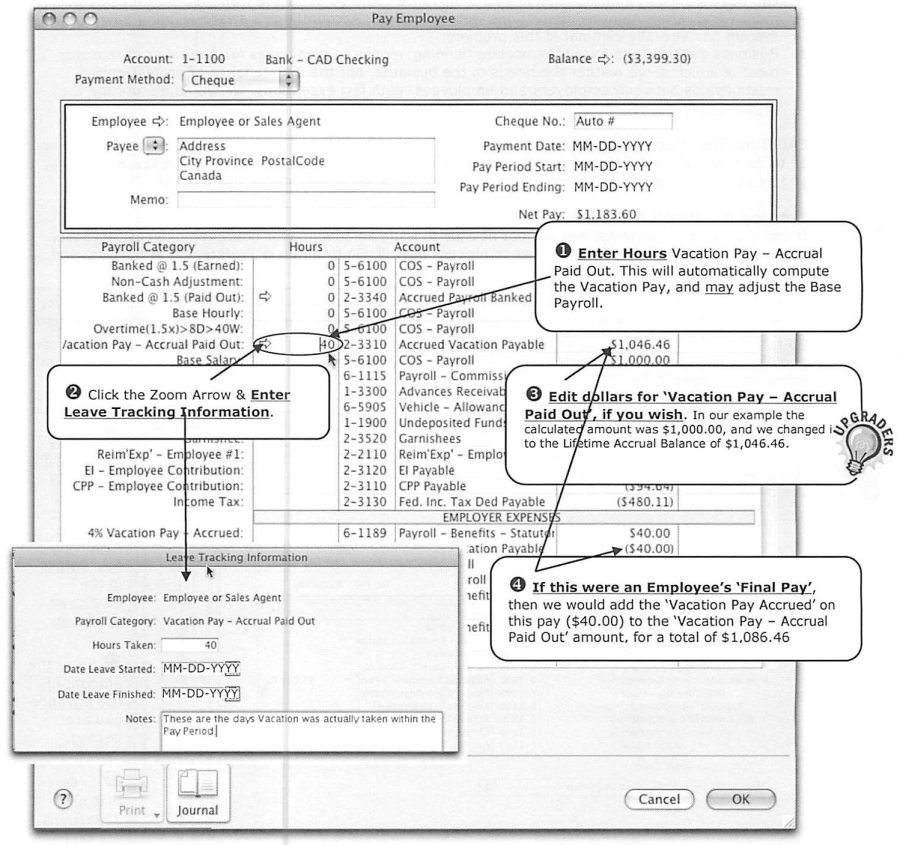
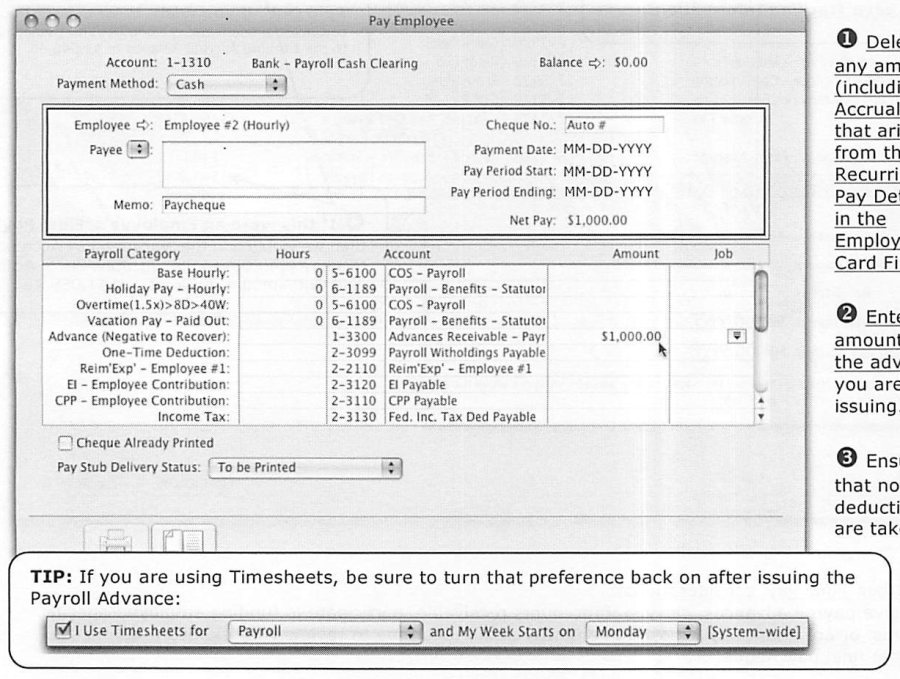
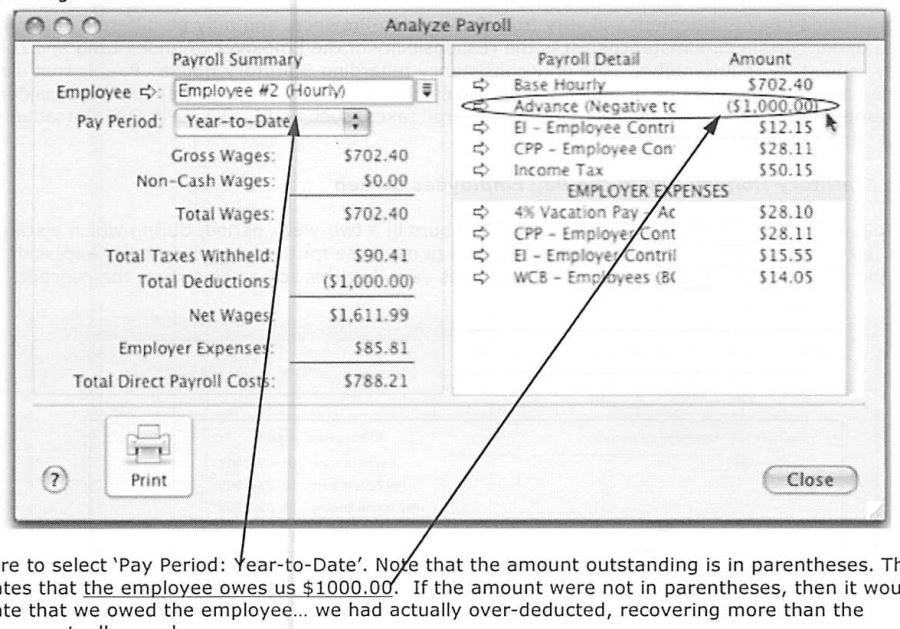
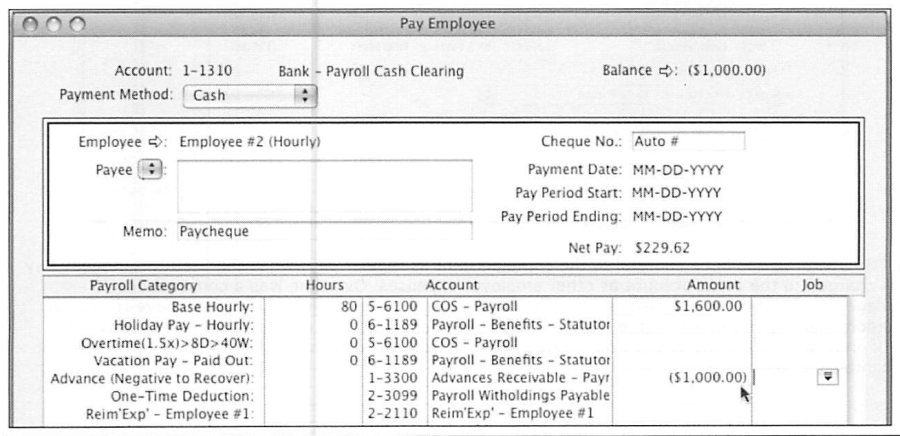
Paying for Statutory Holidays
Source: Enhanced Canadian Payroll, p.59
Statutory Holiday Pay entitlement varies by province, and sometimes within a province depending on circumstances, and the guide places responsibility for understanding the applicable rules squarely on the employer, framing Statutory Holiday Pay as functionally just another payroll tax/employer expense to be managed alongside EI, CPP, and Vacation Pay. Its worked example shows an employee who worked 80 hours over a two-week period spanning a statutory holiday, receiving both Overtime for hours worked beyond a weekly threshold and Statutory Holiday Pay for the holiday itself — Overtime is charged to the same account as regular wages (since it results from scheduling decisions), while Statutory Holiday Pay is charged alongside other employer expense/benefit categories. The guide notes that in some circumstances, working on a statutory holiday can effectively cost the employer two-and-a-half times regular pay once entitlements are combined, underscoring why careful scheduling around statutory holidays matters for cost control.
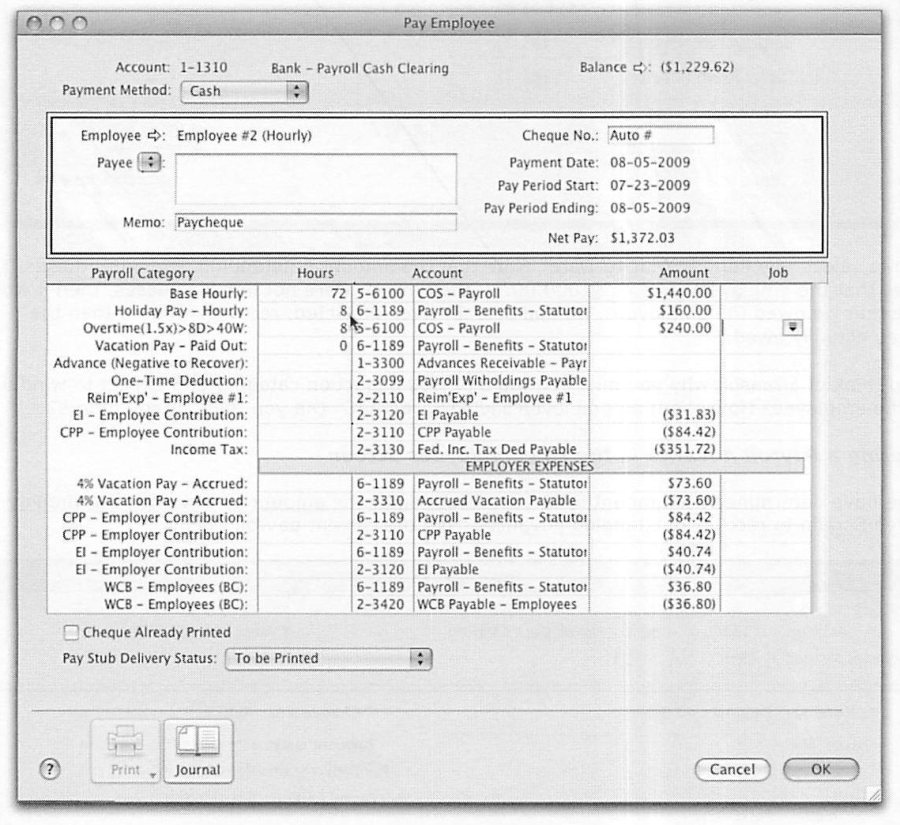
Job and Departmental Costing and Payroll
Source: Enhanced Canadian Payroll, p.59
Having covered the mechanics of Job and Departmental Costing in depth in the Daily Applications guide — creating and organizing Jobs and Departments, budgets, transaction allocation, invoicing for reimbursables, and reporting — this guide picks up specifically at how payroll detail gets allocated to Jobs and/or Departments, presuming familiarity with the underlying concepts covered elsewhere.
Salaried Payroll and Job Costing — Single and Split Allocations
Source: Enhanced Canadian Payroll, p.59-61
For a salaried employee working consistently in a single area of responsibility, Recurring Pay in the Employee Card can allocate the entire paycheque to a single Job — the guide's example allocates a salary to an "Administration" job cost center, noting that every Payroll Category including Calculated tax and deduction lines gets allocated, not just the Wage line, so the full cost picture including employer expenses shows up correctly against that Job. For a salaried employee split consistently across more than one Job or Department, the same Recurring Pay screen supports percentage-based splits (the guide's example: 50% to one project phase, 50% to another), and this split is honored automatically at Process Payroll time.
Where a business wants the split reflected not just as a percentage allocation but posted to two genuinely different expense accounts — for example, Administration payroll expense versus Cost-of-Sales payroll expense — the guide demonstrates creating a second wage category, "Base Salary #2," with its Wage Expense Account overridden to point at the second account, then splitting recurring pay between "Base Salary" (posting to the default account, allocated to Administration) and "Base Salary #2" (posting to the override account, allocated to Production). This produces a paycheque where the wage cost itself lands in two different GL accounts, not just two different Job tags on the same account — a materially different outcome than a percentage split alone, and worth understanding as a distinct technique.
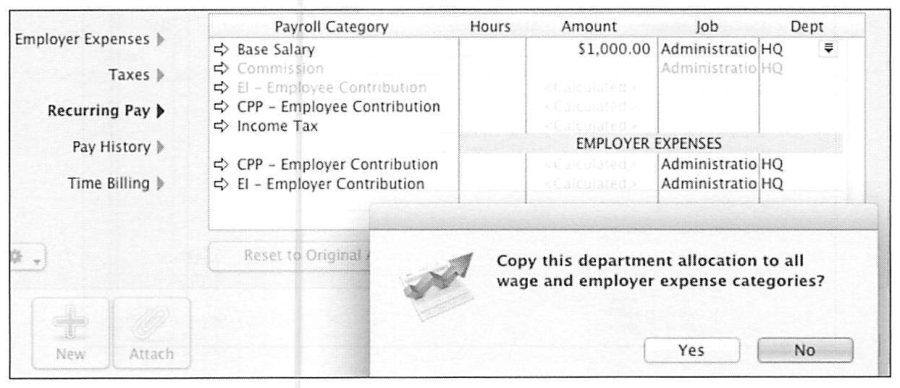
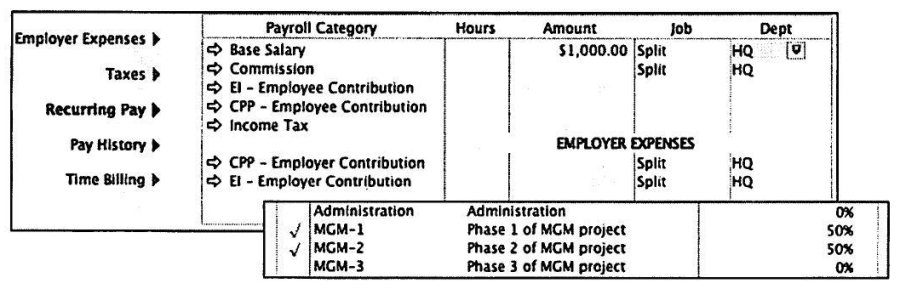
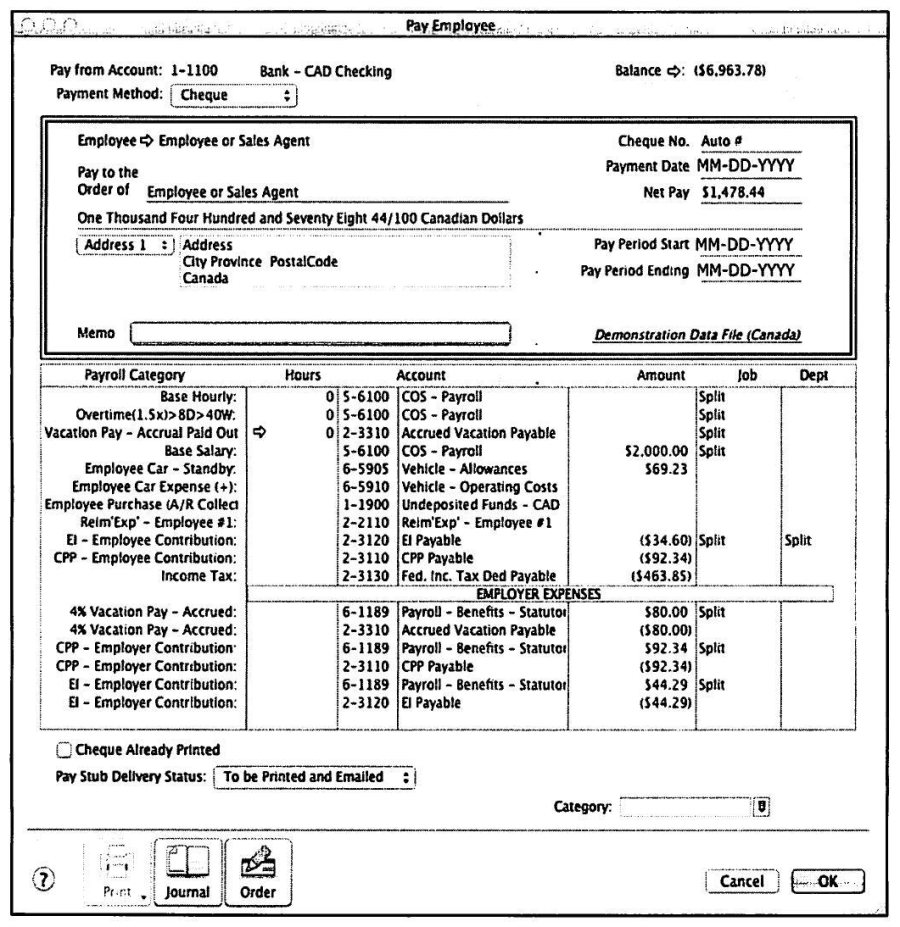
Hourly Payroll and Job Costing
Source: Enhanced Canadian Payroll, p.62
Hourly Payroll allocated to a single recurring Job is handled the same simple way as salaried single-Job allocation — just set the Job on Recurring Pay. For an hourly employee split recurring between exactly two Jobs, a second hourly wage category (e.g., "Base Hourly #2") mirrors the Base Salary #2 technique. But where the number of Jobs an hourly employee might work varies pay-period to pay-period, and the split of time and dollars across them is genuinely variable, the guide is clear that creating additional wage categories becomes impractical — this is exactly the scenario Timesheets exist to solve, since Timesheet entries carry their own per-line Job allocation without requiring a dedicated wage category for every possible Job combination.
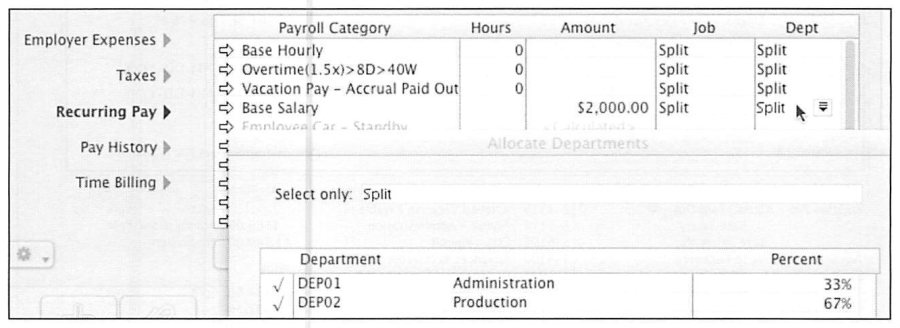
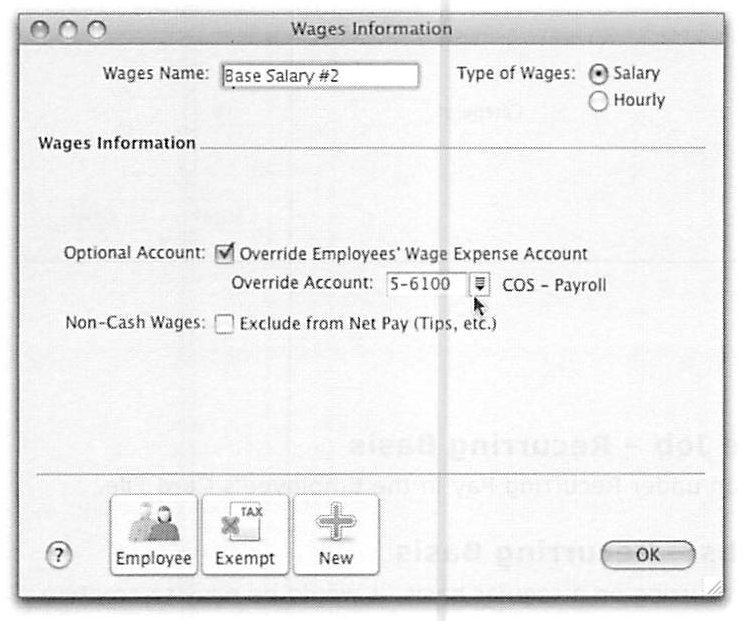
Fine-Tuning Job and Departmental Costing, and Using the Analyst
Source: Enhanced Canadian Payroll, p.63-64
The guide acknowledges that more sophisticated Job Costing needs — building in a provision for overhead, indirect employer payroll expenses, unallocated/unproductive time, or a share of general administrative salaries charged against Jobs — go beyond what a training guide can prescribe in general terms, since the right approach is genuinely business-specific; it frames AccountEdge's role as providing the flexible tools, with the business responsible for designing the implementation that fits its needs. The AccountEdge Analyst's Payroll button, accessible from the Payroll Command Center, gives a per-employee Payroll Detail breakdown for any period (Month, Quarter, or Year-to-Date) showing Gross Wages, Non-Cash Wages, Total Wages, Total Taxes Withheld, Total Deductions, Net Wages, Employer Expenses, and Total Direct Payroll Costs in one screen — a fast way to sanity-check an individual employee's payroll picture without running a full report.
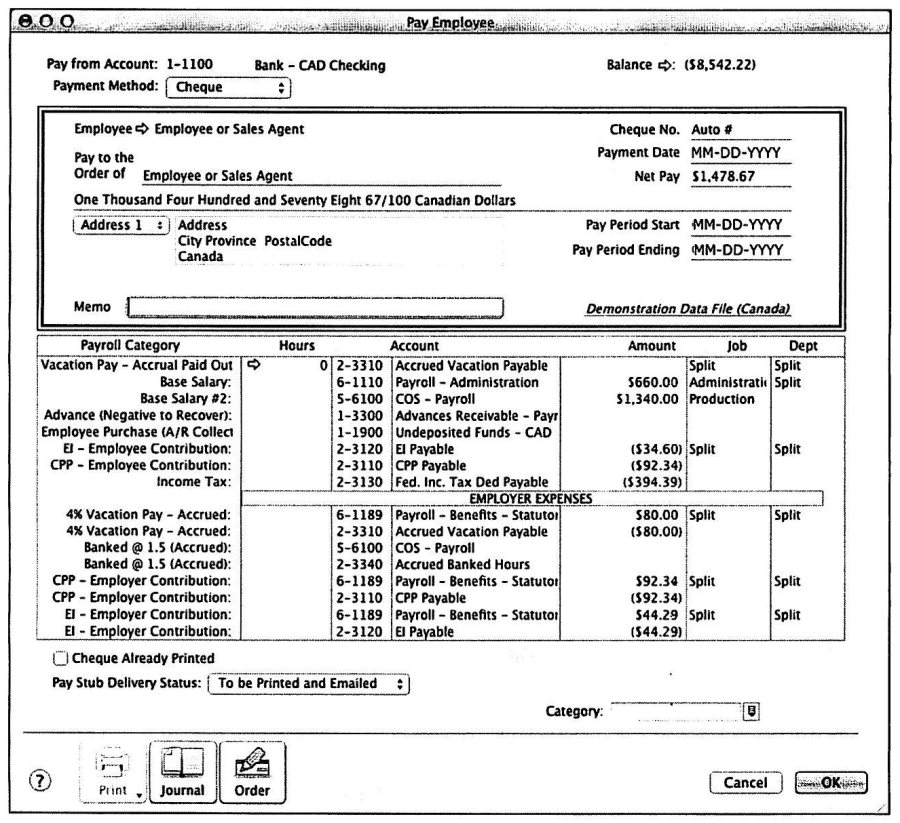
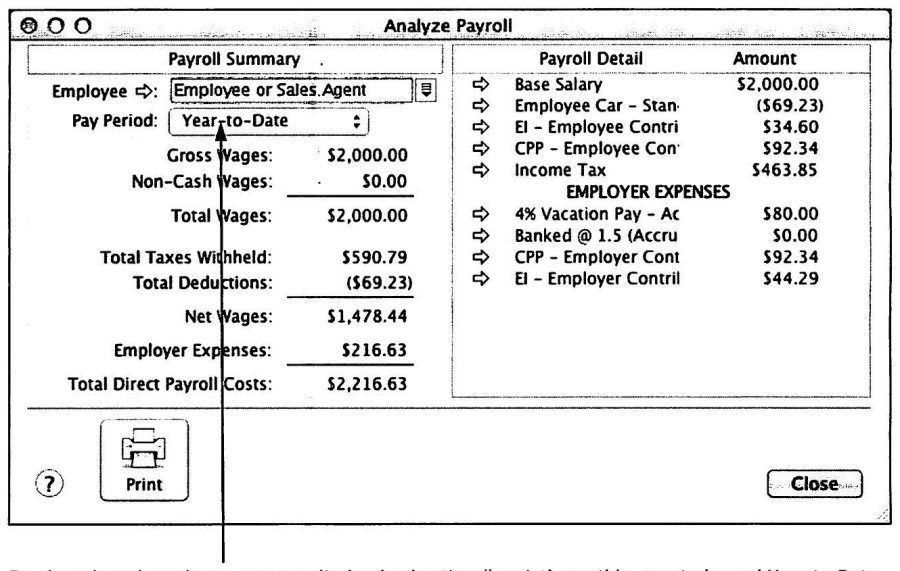
Payroll and Sales Report Options
Source: Enhanced Canadian Payroll, p.65
Reports » Index to Reports » Payroll catalogs the full report set: Payroll Categories, Payroll Category Transactions, Payroll Summary, Employees, Payroll List, Activity Summary/Detail, Register Summary/Detail, Payroll Earnings, Payroll Liabilities and Payroll Liabilities by Category, Liabilities Payment Register, RL-1 Summary, T4 Summary, Tax Liabilities, Insurable Earnings, Payroll Journal, and Recurring Pay Details, alongside a set of Exceptions reports (Payroll Liabilities Reconciliation among them) under the Accounts tab. The guide encourages exploring each report's Customize options rather than relying on default views, flags specific reports as particularly worth attention for businesses upgrading from an older version, and notes that businesses tracking sales by Salesperson should also explore the Sales reports, which can be filtered by employee.
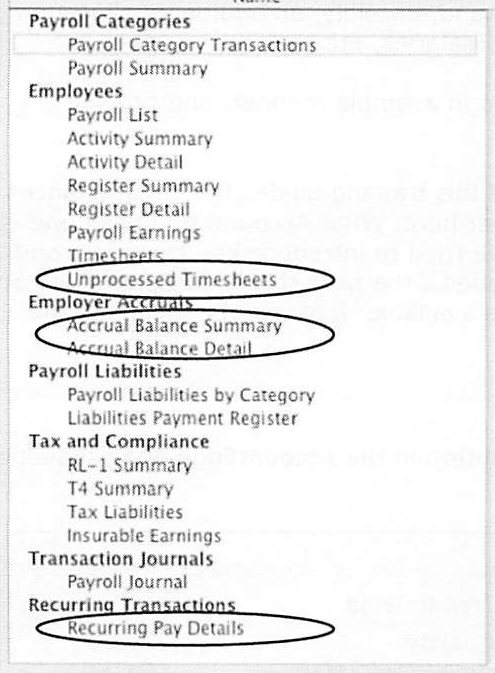
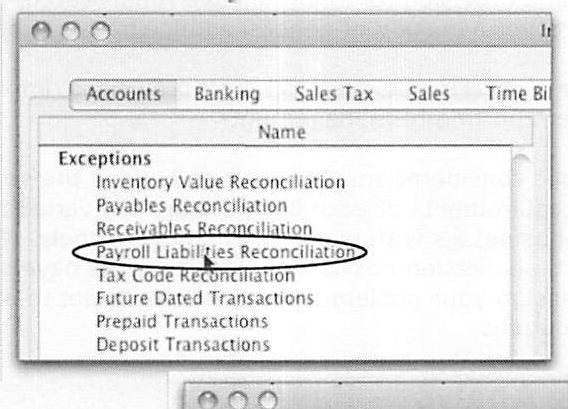
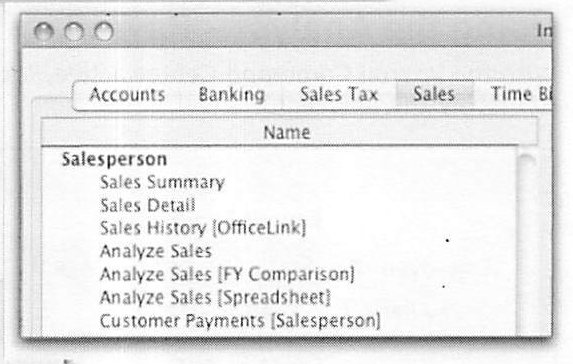
Paying Payroll Liabilities
Source: Enhanced Canadian Payroll, p.65-66
Pay Liabilities, accessed from the Payroll Command Center, defaults to paying from the first bank account listed in the home currency, similar in feel to a Spend Money transaction. The screen lets Liability Type and specific Payroll Categories be selected, filtered to a date range, with selected categories highlighted against grayed-out unselected ones. After choosing the Vendor (the remitting authority) the transaction is recapped before recording — the guide notes a debit posts for every included transaction, since AccountEdge is marking each individual payroll liability transaction as paid, which is what allows liabilities reports to clearly separate paid from unpaid amounts going forward. The Payroll Liabilities by Category report and the Liabilities Payment Register report are the two management reports this paid/unpaid tracking supports — the guide includes full sample output for both, showing CPP, EI, and Income Tax liabilities broken out by employee, pay period, amount, and payment status.
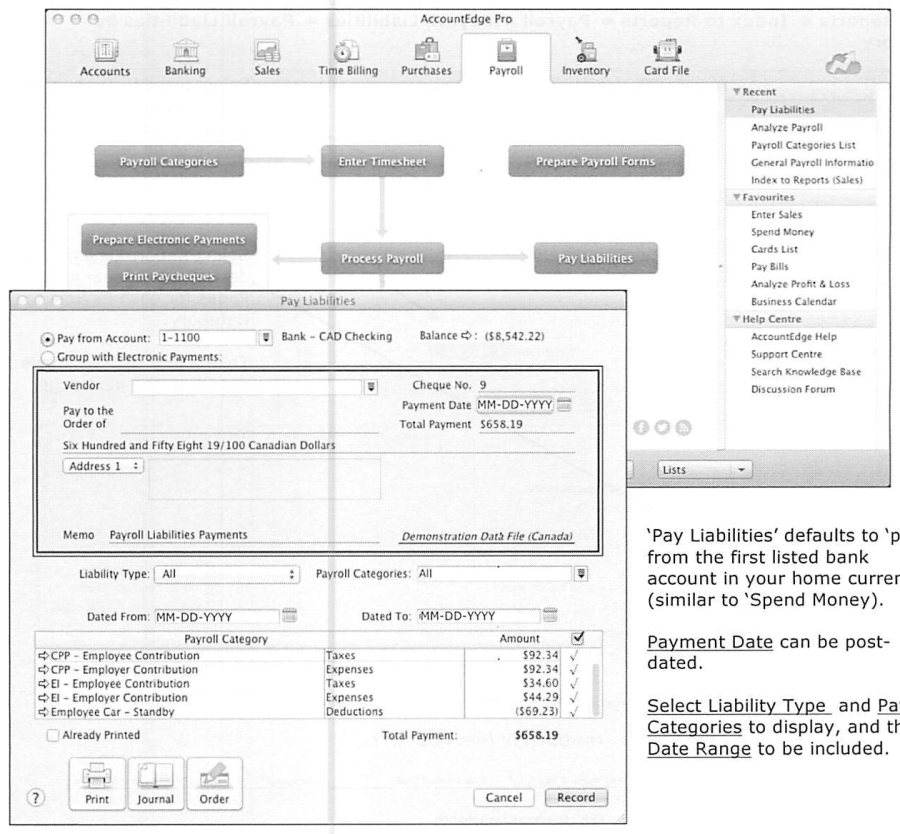
Printing T4 and RL-1 Forms — PIER and Preparing to Close the Year
Source: Enhanced Canadian Payroll, p.66-67
The guide frames T4/RL-1 preparation as an area that changes almost every year due to evolving regulatory requirements, so it covers the core stable workflow rather than year-specific detail (which arrives with each year's Payroll Tax Service update). It introduces the Pensionable and Insurable Earnings Review (PIER) — CRA's annual reconciliation of T4-reported CPP-pensionable and EI-insurable earnings against remitted deductions, for which employers are responsible for any resulting balance owed, including the employee's share — and recommends conducting a self-review using CRA's published PIER guidance before filing, to catch and correct discrepancies proactively rather than face penalties after the fact. Before closing a payroll year (a mandatory step before the first paycheque of the new year can be recorded), all pay runs for the year must be complete and year-end forms printed, since much of the underlying transaction detail is purged during the year-close process.
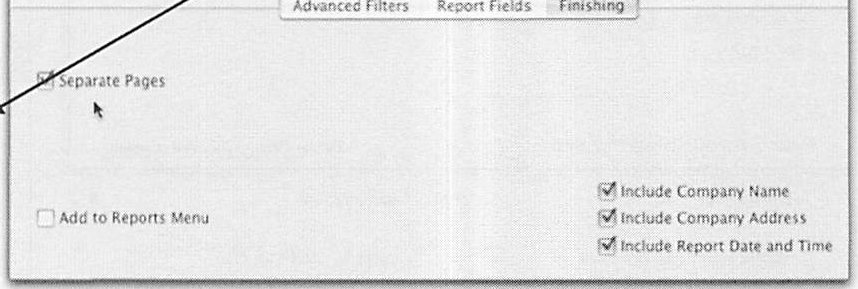
Preparing Payroll Forms: Matching Categories to T4 and RL-1 Boxes
Source: Enhanced Canadian Payroll, p.68-69, 71-72
Prepare Payroll Forms, from the Payroll Command Center, offers a choice of Form (T4 Slip Electronic, T4 Slip Printed, T4 Summary Printed, RL-1 Slip Printed, or ROE Electronic), the Payroll Year, Employer ID/Business Number, and Report Type (Original or Amended). The core of this screen is matching AccountEdge's Payroll Categories to the correct T4 (or RL-1) box: each box is highlighted on the left, and the specific Payroll Categories that should "fill" that box are checked off on the right — the guide stresses verifying this matching carefully, since an incorrectly mapped category will misstate a box on every affected employee's slip. RL-1 preparation, required for Quebec employers, follows the identical highlight-box-then-select-categories pattern against RL-1's own box list (labeled with French designations like D, F, J, K, L, M, N, O, P, Q, R). Once category mapping is confirmed, forms can be filtered to All Employees or a Selected subset using Identifiers, Postal Codes, or Custom List fields, and the guide recommends printing an alignment form first to confirm the data lines up correctly on whatever physical or plain-paper form stock is being used — noting AccountEdge's Plain Paper Forms option includes all required CRA graphic elements, avoiding the need for pre-printed stock entirely.
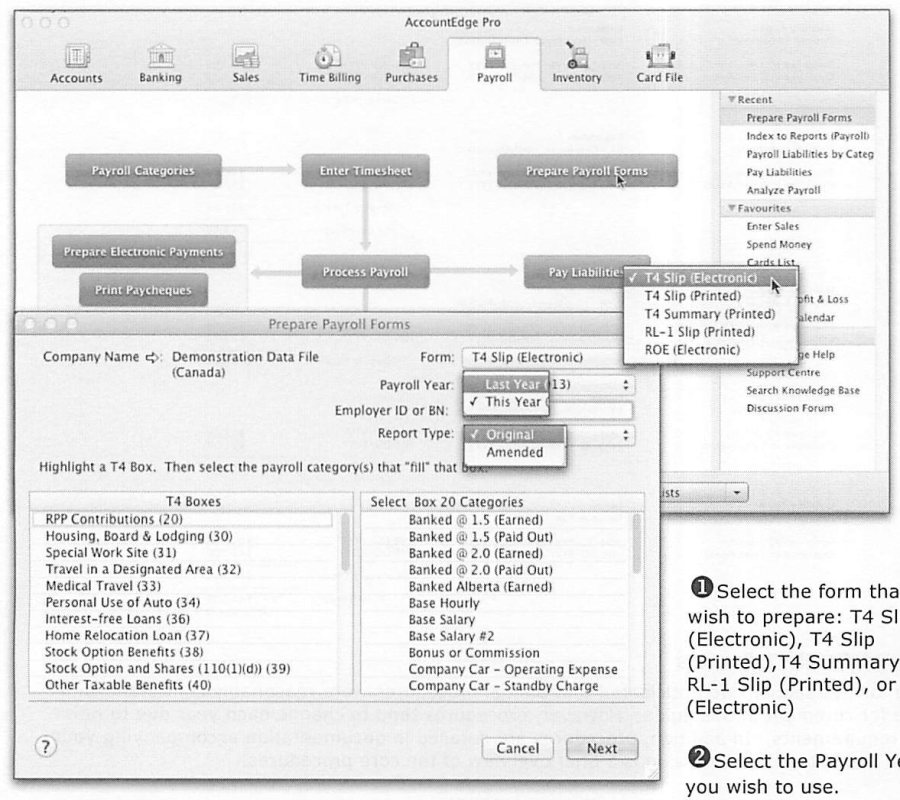
Reviewing and Editing Employee's T4 Information
Source: Enhanced Canadian Payroll, p.71
Before finalizing, the guide directs a zoom-level review of every employee's T4 data: confirming CPP/QPP, EI/EIQ, and PPIP exemption status is correctly reflected, and verifying pension and insurable earnings accuracy (tying back to the PIER review). Each employee's zoom screen shows the full box-by-box breakdown — Employment Income (Box 14), CPP contributions (Box 16), QPP (Box 17), EI (Box 18), RPP contributions (Box 20), Income Tax deducted (Box 22), CPP/QPP pensionable earnings (Box 26), and the various taxable benefit boxes (Housing, Special Work Site, Travel, Medical Travel, Personal Use of Auto, and others) — before printing is initiated for the full batch.
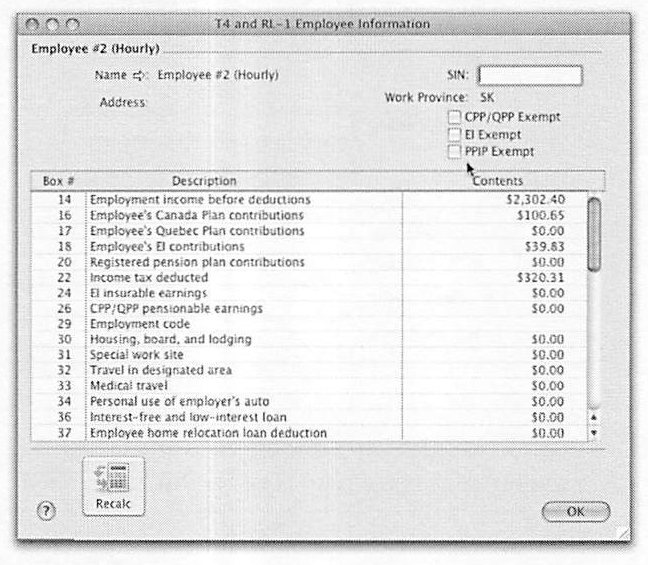
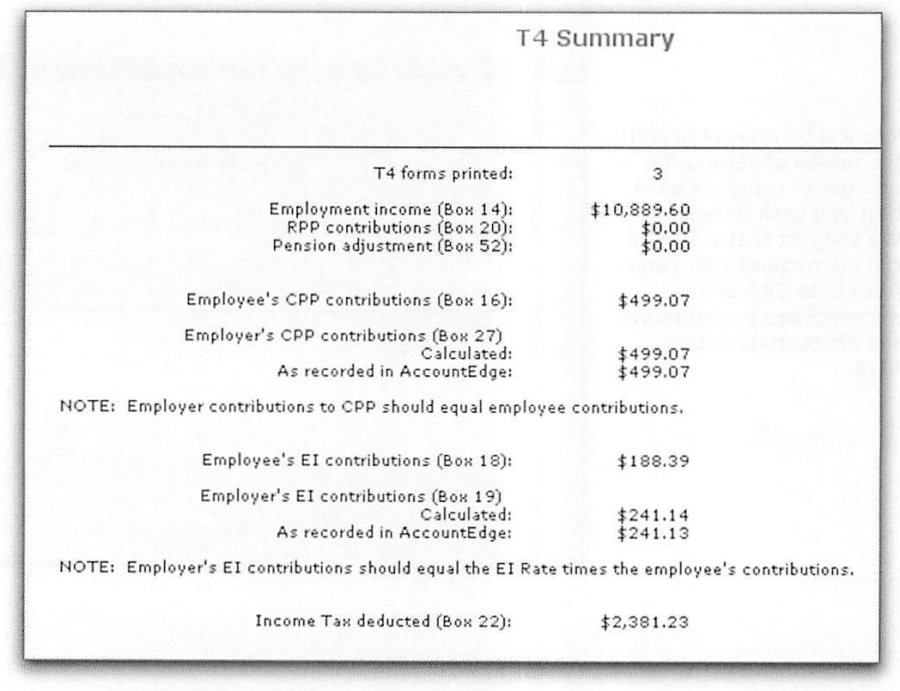
T4 Summary Report and Form, and Printing RL-1 Forms
Source: Enhanced Canadian Payroll, p.70, 72
After printing individual T4 slips, AccountEdge prompts for a T4 Summary Report — an internal reconciliation document, not the actual CRA submission form — which shows totals for forms printed, Employment Income, RPP contributions, Pension Adjustment, and both employee and employer CPP/EI contributions with a calculated-versus-recorded comparison, flagging with a note that employer CPP contributions should equal employee contributions dollar for dollar. The actual T4 Summary Form for CRA submission is a separate step (Payroll Command Centre » Print T4 & RL-1 Forms » T4 Summary Printed), requiring contact information and total remittances made for the year so AccountEdge can calculate any balance payable or refund due. RL-1 printing for Quebec employers follows a nearly identical process to T4 printing, using the RL-1 box-matching screen, filtering employees, and choosing Laser or Continuous form stock — the guide notes the resulting totals should agree exactly with the T4 Summary Report totals for the same employees.
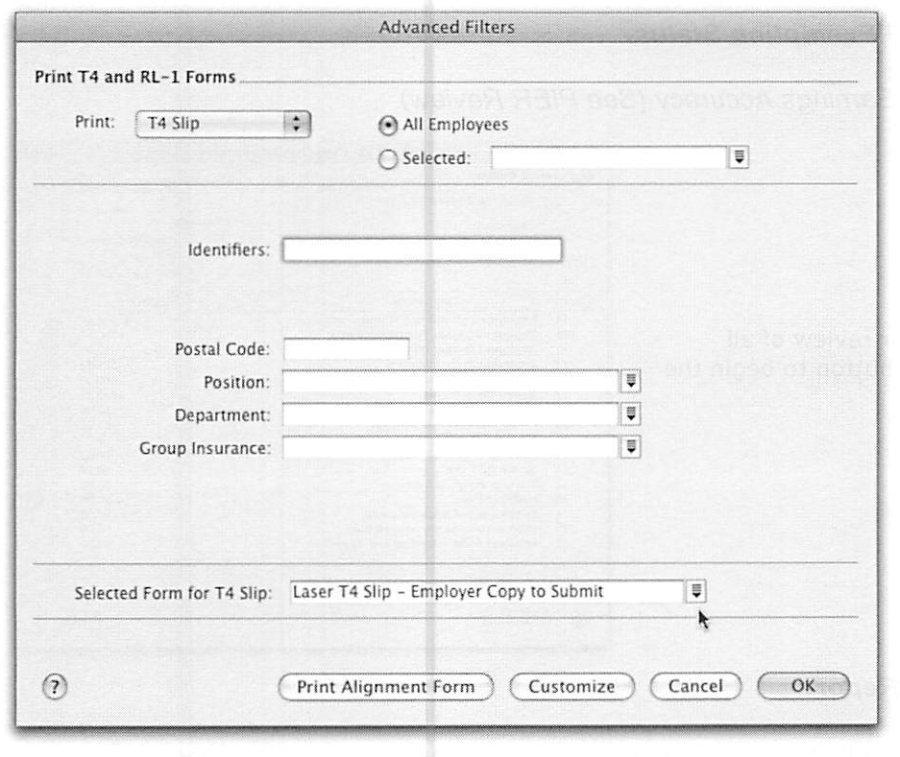
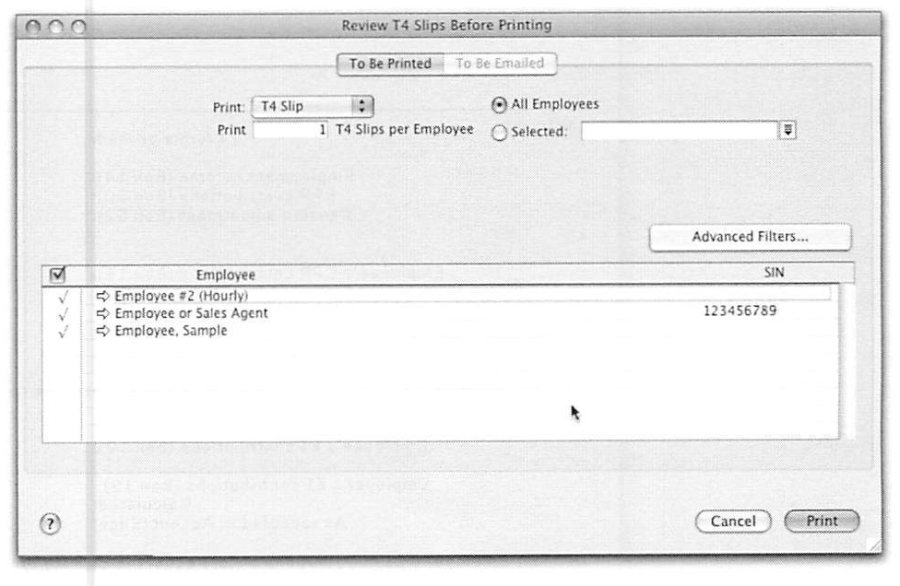
Preparing the Record of Employment (ROE)
Source: Enhanced Canadian Payroll, p.73
A Record of Employment must be filed whenever an employee leaves their position or experiences an interruption of employment, since it's the document Service Canada uses to determine EI benefit eligibility — it captures hours, pay, EI collected, the reason for the interruption, and the relevant date range of employment. AccountEdge generates an electronic ROE file through Payroll » Prepare Payroll Forms » ROE (Electronic), which can be uploaded to the ROE web service; the guide recommends printing copies for both the employer's own files and the affected employee.
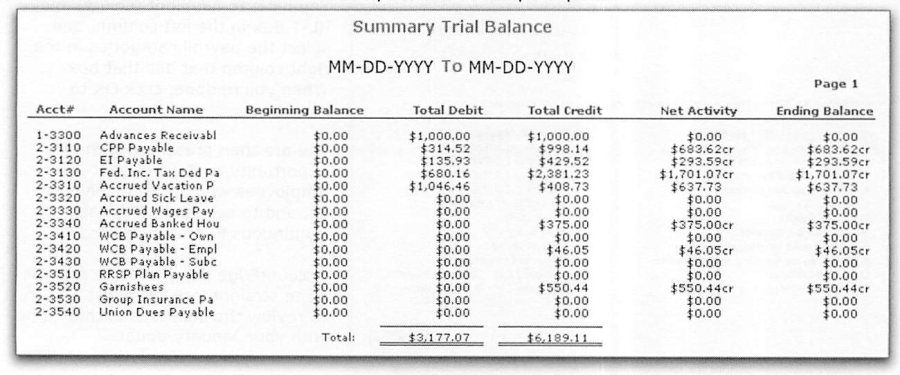
Payroll Year-End: Prior Period Adjustments and Trial Balance Reconciliation
Source: Enhanced Canadian Payroll, p.73-74
The guide addresses the scenario where an error is discovered after a period's Payroll Liabilities have already been remitted — the amount that should have been remitted differs from what actually was — noting that timely processing largely avoids this, but that period-end balances of payroll liability accounts should periodically be reconciled to the Payroll Liabilities by Category report for the same period regardless. Upgraders who haven't previously performed this reconciliation are strongly advised to do so immediately after upgrading and certainly before advancing to a new payroll year, engaging an accounting professional or AccountEdge Certified Consultant if discrepancies can't be resolved with confidence. The recommended process pulls a Trial Balance Summary filtered to just the Payroll Liability accounts (including zero-activity accounts) for the payroll year-to-date, cross-checked against the Payroll Liabilities by Category report filtered to Not Paid status across all Liability Types — where the two don't reconcile, the Payroll Liabilities Reconciliation Exceptions report (under Reports » Accounts » Exceptions) helps isolate which specific transactions are causing the imbalance by showing the accrual value, the account balance, and the individual transactions contributing to the difference.
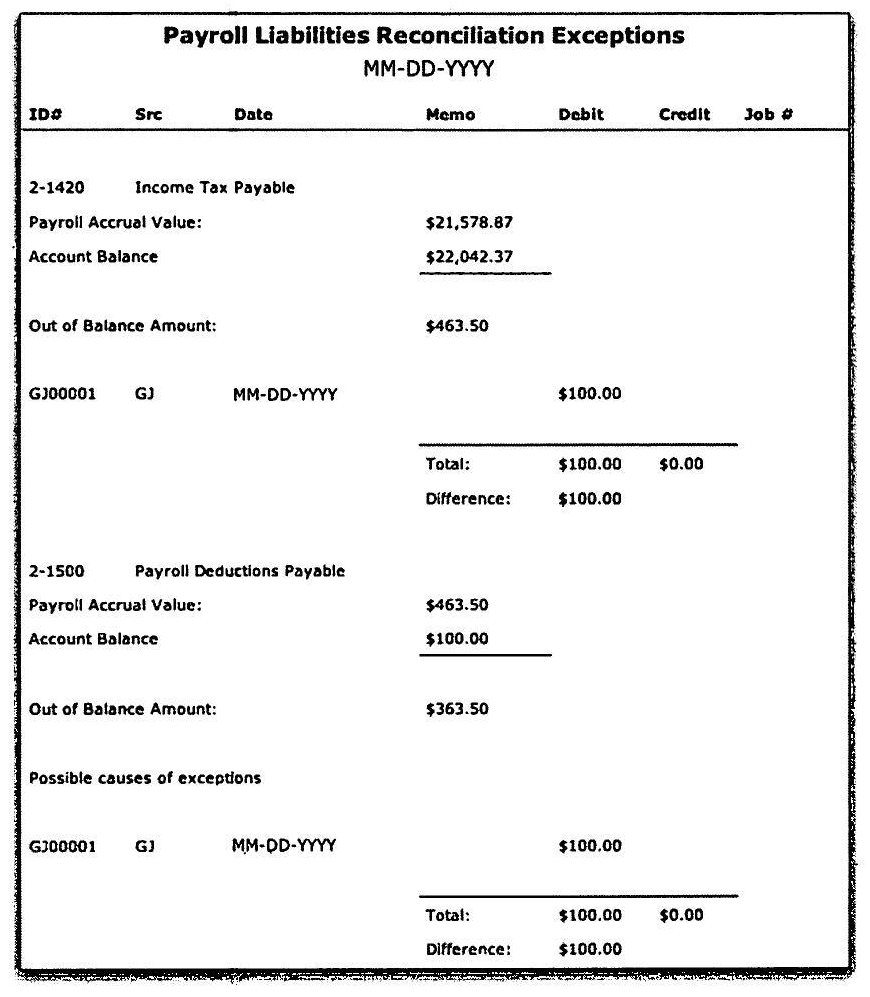
Backup Procedures Before Starting a New Payroll Year
Source: Enhanced Canadian Payroll, p.73
AccountEdge will not allow payroll transactions to be entered for a new year until the current payroll year is formally closed, and closing a year purges much of the underlying transaction detail — meaning proper backups beforehand aren't optional. The guide recommends creating a dedicated Special Payroll Folder for the year just ending and copying the entire company file into it for permanent reference, in addition to at least two off-premises backups, both verified by an actual test restore to another computer before proceeding. Archived files should be marked Read-Only (Setup » Preferences » Security) to prevent current transactions from accidentally being entered into what's meant to be a frozen historical copy.
Starting a New Payroll Year
Source: Enhanced Canadian Payroll, p.74-75
Setup » Start a New Year » (Payroll Year) begins the process, which may first prompt for a Session Report before proceeding. The backup warning appears at this exact step with unusual emphasis: AccountEdge warns explicitly that payroll history will be erased during this process and can only be recovered by restoring a backup — the guide underscores this with its own blunt callout that users are prompted about backup no fewer than three separate times before the process completes, driving home that this is the point of no return for the year's detailed payroll data. Once the new year begins, Setup » General Payroll Information should be checked to confirm the Current Payroll Year updated correctly and that the default Provincial Tax Table and related settings are still accurate.
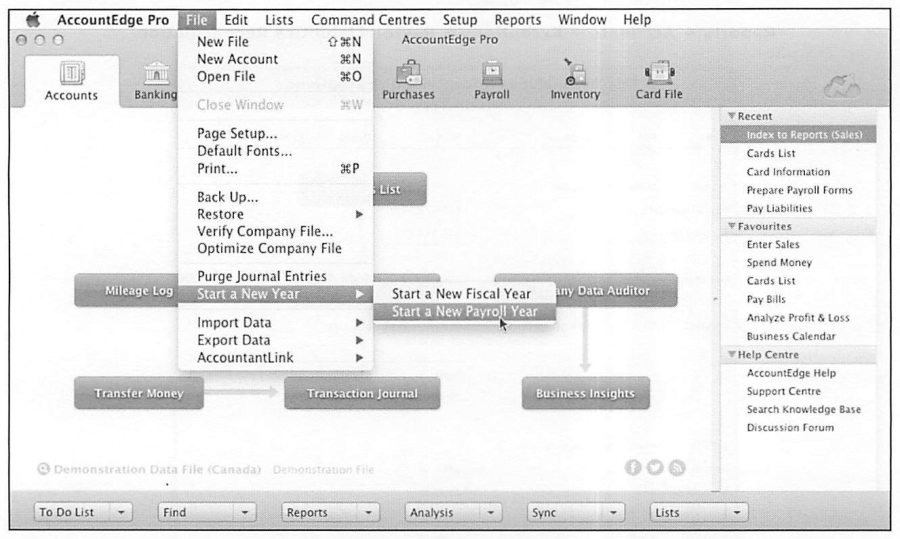
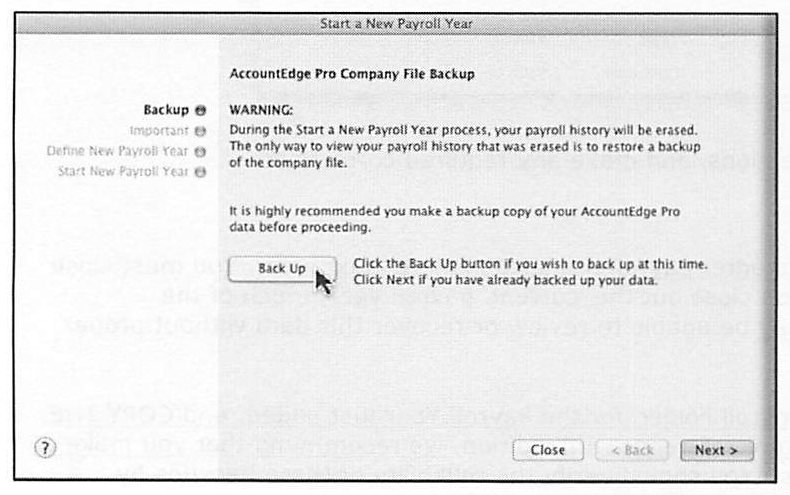
Installing Tax Table Updates and Late-Breaking Changes
Source: Enhanced Canadian Payroll, p.76
Most AccountEdge users subscribe to the Payroll Tax Service, which delivers updates automatically, but loading an update into any given company file remains a separate, deliberate step under the user's control. The guide cautions against loading new tax tables until all T4s, RL-1s, and other year-end reports for the prior year have been printed — unless a full archive copy of the just-finished year has already been made for reporting purposes — and recommends verifying the update took effect by checking the Tax Table Revision Date under Setup » General Payroll Information. Because tax table updates reflect legislative changes at federal, provincial, and sometimes local levels, staying current requires an active update subscription; some changes additionally require manually updating individual employee records, most commonly TD1 and RL-1 claim amounts at the start of each new payroll year. Employees using the Basic Personal Amount option update automatically, but employees claiming a non-standard amount require manually updated figures on receipt of newly signed claim forms — which, per regulation, must be completed and signed by the employee before any change to their claim amount can be applied, with copies retained on file.
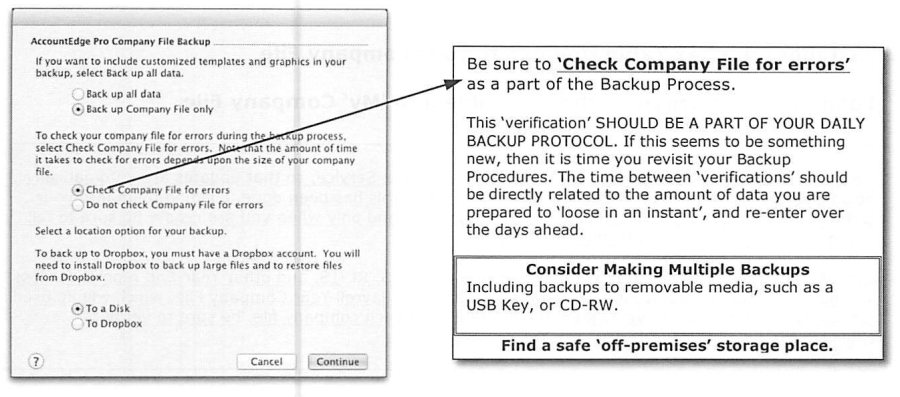

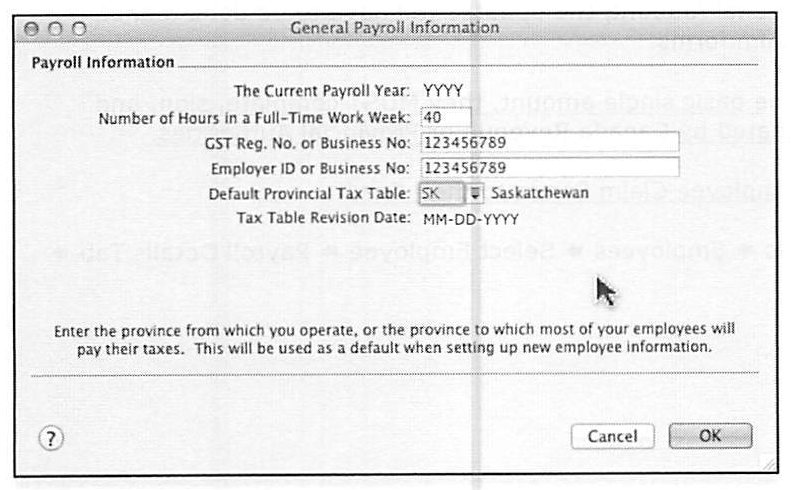
Canadian Payroll -- full topic index
All 79 pages, headings as they appear in the original course guide. Page numbers refer to the source PDF.
| Page | Topic |
|---|---|
| p.2 | Course Aims & Objectives |
| p.5 | Payroll & Sales Report Options |
| p.11 | Level 2 Payroll Linked Accounts -- Payroll Category Defaults |
| p.13 | Editing active taxes |
| p.21 | Setting up Payroll Deductions |
| p.23 | Employee Car (Standby) |
| p.25 | Life Insurance |
| p.27 | RPP Contributions |
| p.29 | Overtime Pay -- Naming Convention |
| p.33 | Entering Employees |
| p.34 | Custom Lists (List Entries) |
| p.35 | Entering Employee Card File Information |
| p.40 | Accrual Balances |
| p.43 | Recurring Pay |
| p.45 | Time Billing |
| p.46 | Reminder Log Tab |
| p.47 | History Tab (Sales) |
| p.49 | Timesheet Reports |
| p.53 | Process Payments |
| p.54 | Print Paycheques |
| p.55 | Display (& Print) Payroll Earnings |
| p.57 | Processing Payroll Advances |
| p.59 | Paying for Statutory Holidays |
| p.65 | Payroll & Sales Report Options |
| p.67 | Payroll Liabilities (by Payroll Category) Report |
| p.71 | Reviewing & Editing Employee's T4 Information (see above) |
| p.75 | Starting a New Payroll Year (see above) |
| p.79 | Life Insurance |