Course aims
Source: Setting It Up Properly, p.2
Key topics in depth
These five topics were pulled out in full because they directly back up existing setup and inventory content on the Hub.
The New Company File Assistant
Source: Setting It Up Properly, p.44
Finalizing the Accounts List & Opening Balances
Source: Setting It Up Properly, p.71 & p.78
Inventory Command Center -- Setting It Up
Source: Setting It Up Properly, p.93 & p.101
Establishing Backup Procedures
Source: Setting It Up Properly, p.109
Customizing Forms & Checks
Source: Setting It Up Properly, p.110-126
Full walkthrough (complete: p.1-130)
Introduction to AccountEdge -- An Overview
Source: p.7-9
AccountEdge is described as "an award-winning accounting package for small and medium sized businesses worldwide," fully localized for Australia, China, Hong Kong, Malaysia, New Zealand, Singapore, the United Kingdom, the United States, Canada, and other locations. The pitch to reps-in-training: once a company file is properly set up, "you will not have to think of debits and credits and other 'bookkeeping' considerations" for most day-to-day work -- "we have clients that have never posted a Journal Entry, and only vaguely know what a debit or a credit is... yet they keep excellent records."
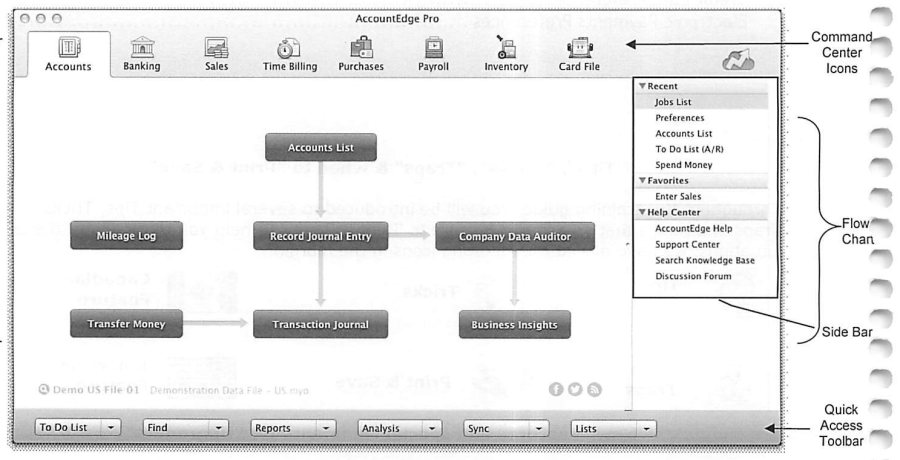
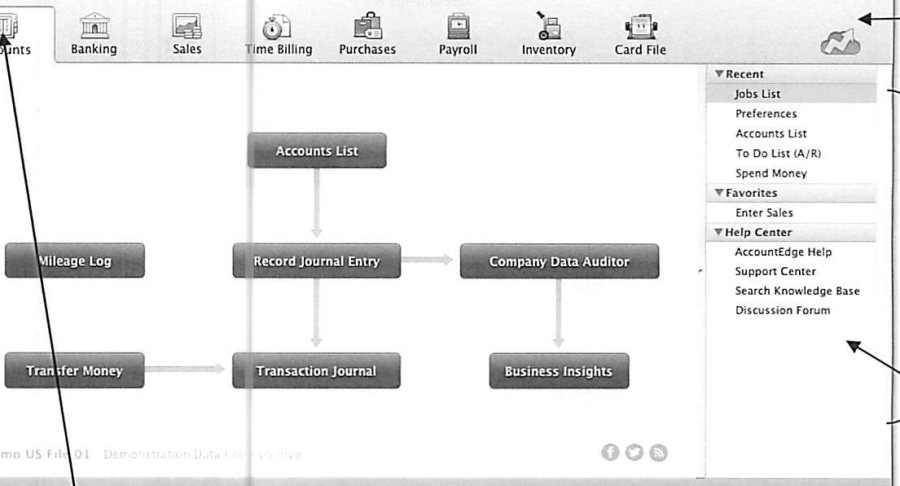
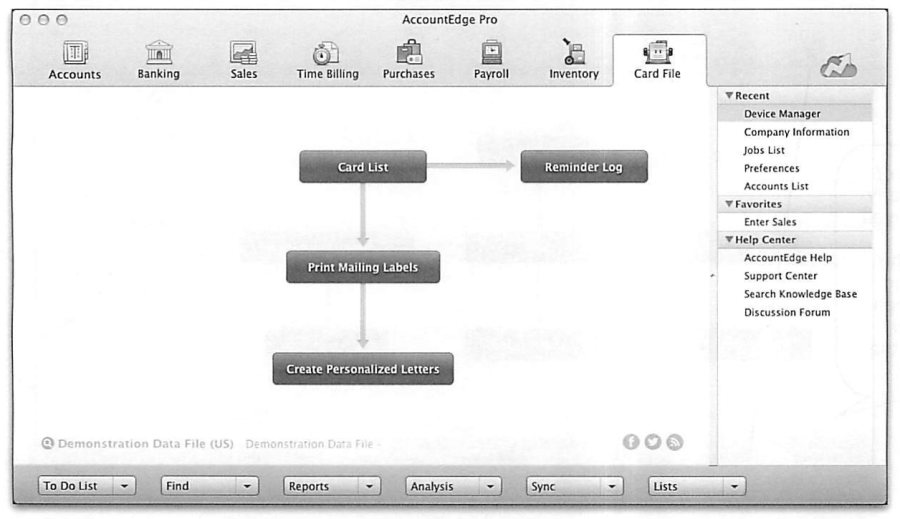
The opening screen is made up of four key areas: the Menu Bar across the top; the Command Center (which includes the Flow Chart) occupying the majority of the screen, covering Accounts, Banking, Sales, Time Billing, Purchases, Payroll, Inventory, and Card File; the Side Bar, which can be customized for one-click access to frequently-used windows or reports; and the Quick Access Toolbar at the bottom, with To Do List, Find, Reports, Analysis, Sync, and Lists.
Only one Command Center is active at a time -- activated by clicking its icon, using the Command Centers menu, or a keyboard shortcut. The Flow Chart portion presents a logical layout of functions in order of execution and changes for each Command Center.

Navigating AccountEdge
Source: p.9-12
Dates can be entered by typing, or by opening a calendar picker with the space-bar, a right-mouse-click, or the equal key, then navigating with arrow keys. Numeric fields support a pop-up calculator the same way -- space-bar or any of +, -, /, *, or equal -- with calculations displayed like an adding-machine tape.
The Tab key is the primary way to move between fields on a data-entry screen (Shift+Tab to go back); the mouse also works, and in some configurations Enter behaves like Tab. Escape is generally the fastest way to close a dialog or window. The Zoom Arrow (»), found throughout AccountEdge, lets you drill down into the detail behind a transaction or line item (it renders as a plain arrow, not a zoom arrow, on unchangeable/locked transactions).
When selecting from a list (accounts, customers, vendors, employees, inventory items), typing triggers "Easy Fill" to auto-complete against the closest match, or you can open the full list via the "Select from List" button and use arrow keys to scroll. "Ship To" and "Select" buttons work similarly for addresses, payment methods, and sale/purchase status. A right-mouse-click brings up context-sensitive edit options -- Find, Erase, Delete, or Reverse in a transaction list; Mark Inactive/Active in card lists -- depending on where you are.
"Help for This Window" (via the Help button or right-click) is described as comprehensive and context-sensitive. The guide's advice to new reps and trainees: "Take time to explore these features to shorten the learning curve, discover options you may not have recognized, and speed data entry and access."
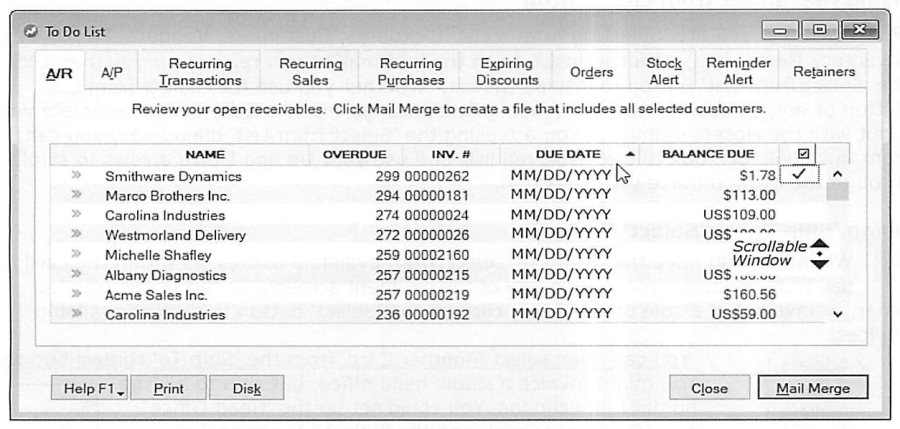
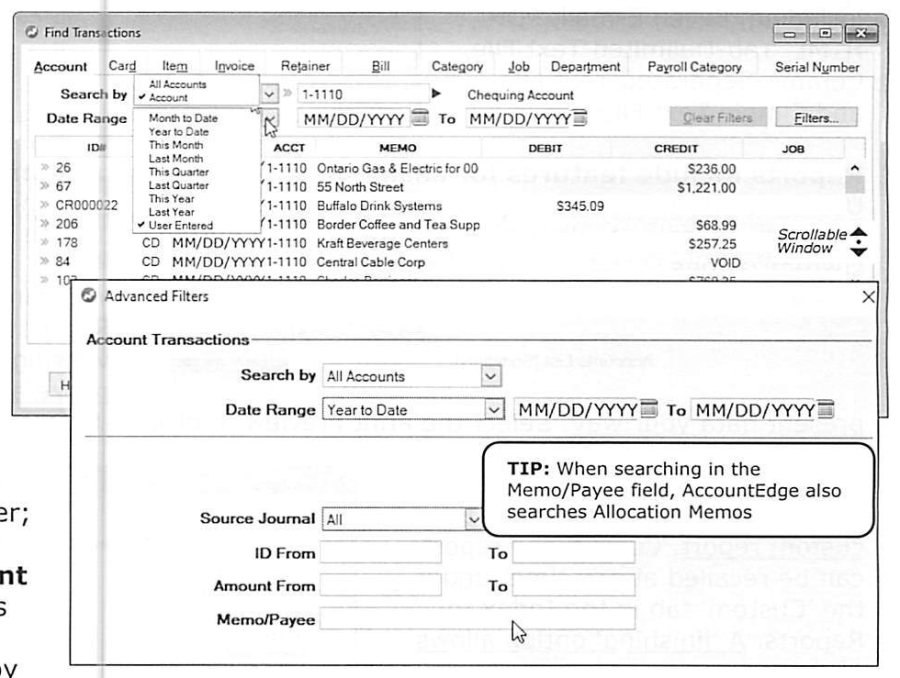
The Quick Access Toolbar: To Do List, Find, Reports, Analysis, Sync, Lists
Source: p.11-16
The To Do List surfaces everything needing attention in one place: overdue receivables and payables in aged order, recurring transactions/sales/purchases, expiring purchase discounts, outstanding orders, stock alerts, and reminders/retainers. Items can be selected individually or all at once, then acted on via the relevant action button (Mail Merge, Pay Bills, Record, Record as Actual, Order/Build, or Remove).
The Find window looks up transactions by account number, linked card, item, sales invoice or customer PO number, retainer, bill order number or vendor invoice number, category, job, department, payroll category, or serial number, with Advanced Filters for date range, source journal, transaction ID, amount range, and memo/allocation text. A tip worth knowing for troubleshooting: searching the Memo/Payee field also searches allocation memos.
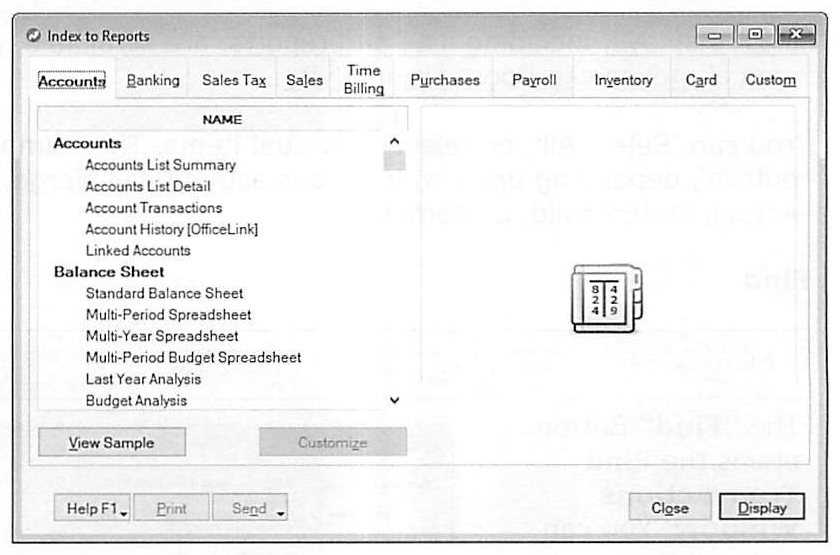
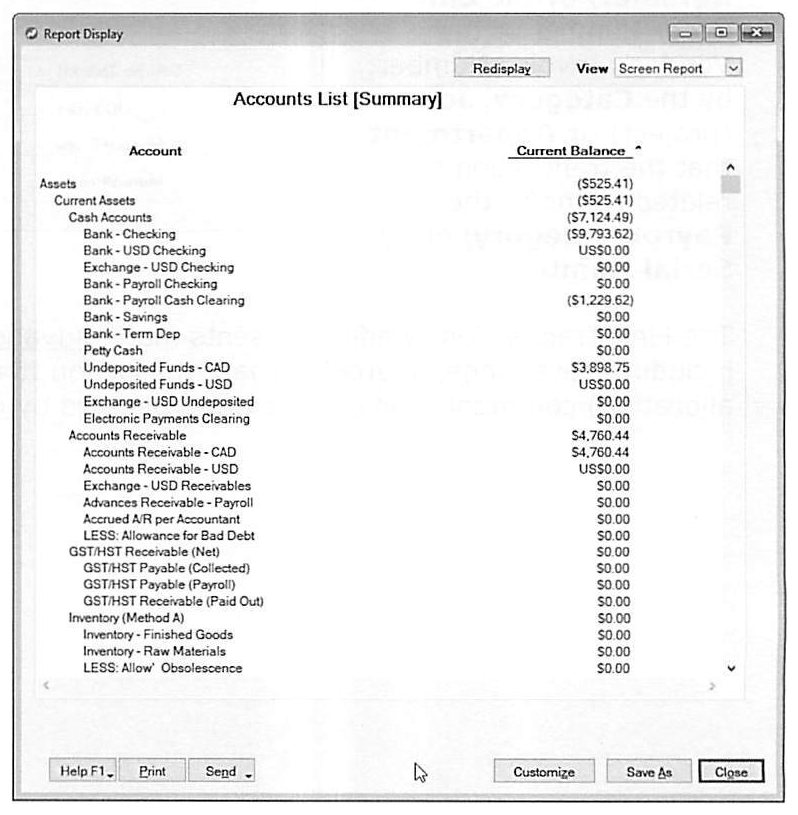
Reports are organized by Command Center, with a "View Sample" option and full Customize (filter, design, format) control. Reports can be sent to Excel, email, PDF, HTML, tab-delimited text, comma-separated text, or plain text, and displayed reports can be resized/reordered on screen or toggled to Print Preview. Customized reports can be saved and recalled under the "Custom" tab of the Index to Reports, and added to the Reports Menu on the Menu Bar or to Favorites under Windows.
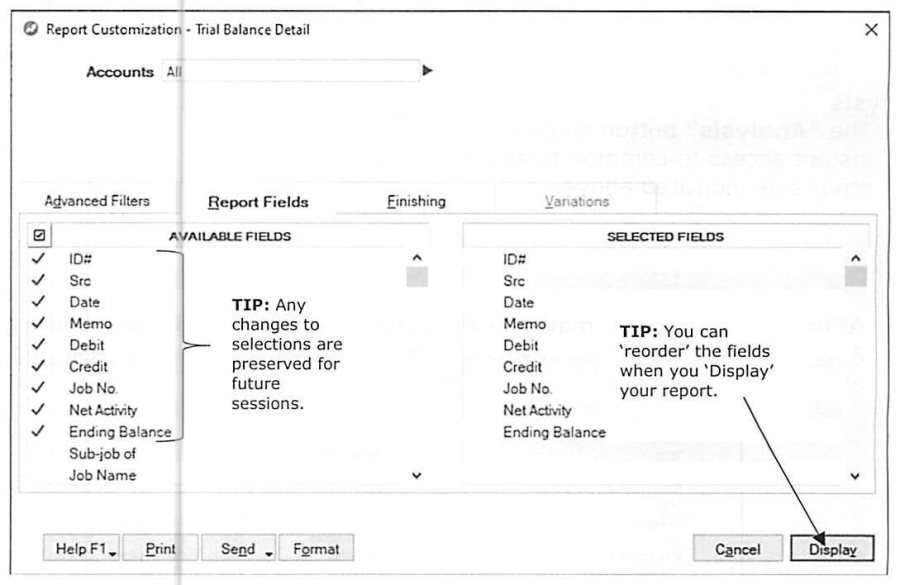
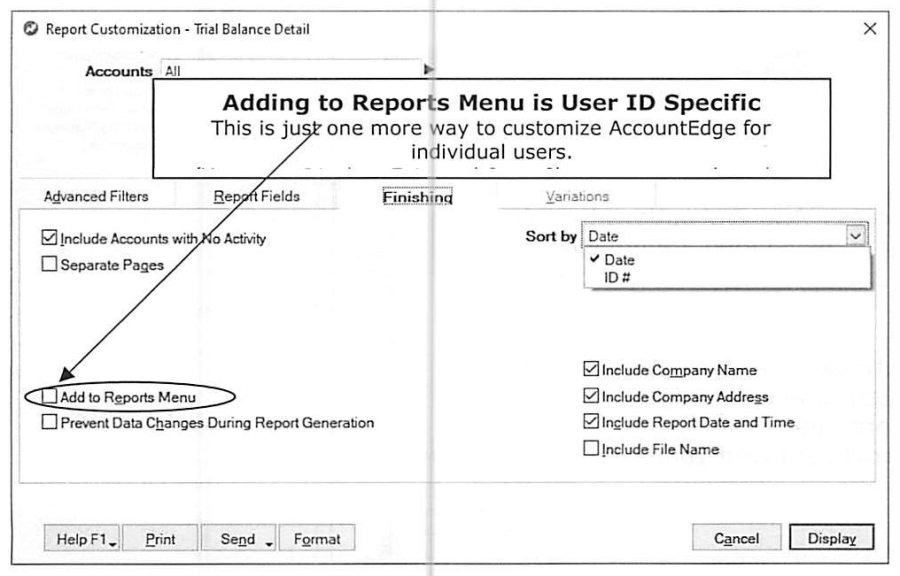
The Report Customization screen has three tabs: Advanced Filters, Report Fields (which columns to include, with field order preserved for future sessions), and Finishing (sort order, whether to include company name/address/report date-time/file name, separate pages, and whether to add the report to the Reports Menu -- a per-User-ID setting).
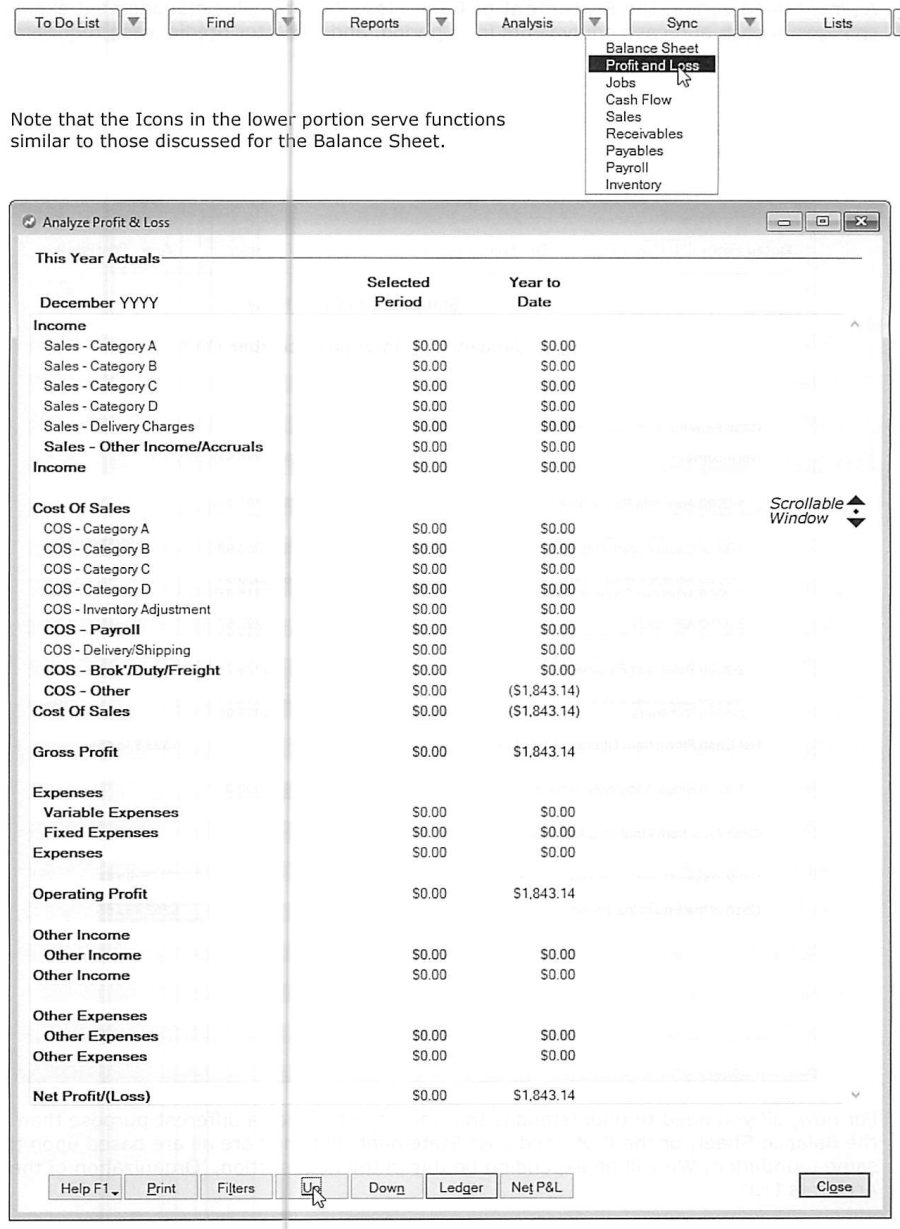
Analysis gives one-click access to common financial reports (Balance Sheet, Profit and Loss, Cash Flow, Jobs, Sales, Receivables, Payables, Payroll) regardless of which Command Center is active. Sync links to external data sources -- AccountEdge Mobile, Rerun, AccountEdge Connect, a web store -- and synchronizes them with the company file. Lists provides direct access to edit the underlying data lists (accounts, cards, sales tax codes, custom fields, and more).
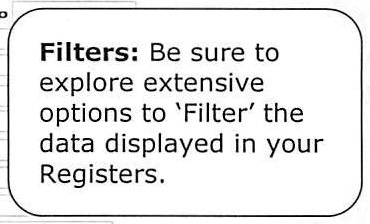
Registers (Bank, Sales, Purchases, Item) present transactions and key functions in one scrollable window: a top pane to filter by type/date range/card, a middle pane showing the selected transactions, and a bottom pane for quick entry of typical current data. The guide's advice: "Take a few moments to consider how you might use each register... this may influence some decisions in how you set up your company file."
Review of Balance Sheet, Profit & Loss Statements, and Statement of Cash Flow
Source: p.17-23
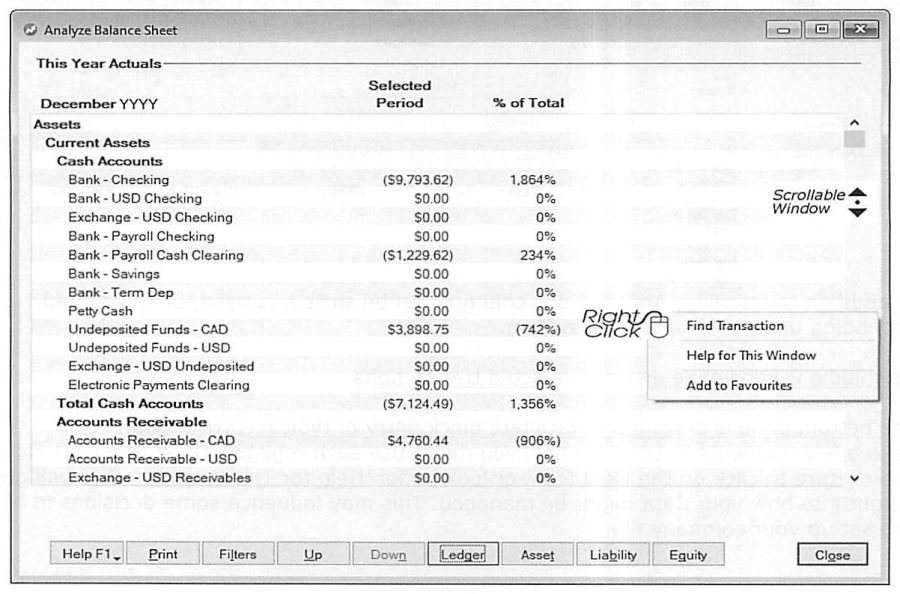
The Balance Sheet and Profit & Loss Statement are described as the two most common financial reports. "The Balance Sheet presents the Financial Condition at a particular point-in-time; while the Profit & Loss Statement (or Income Statement) presents the Profit Performance over a period-of-time. The Balance Sheet might be equated to a snapshot, while the Profit & Loss Statement might be compared to a movie." The Statement of Cash Flow, separately, "helps to examine source and application of funds from a historical perspective, and to better predict future cash requirements" -- helping avoid cash shortages and better use surplus working capital.
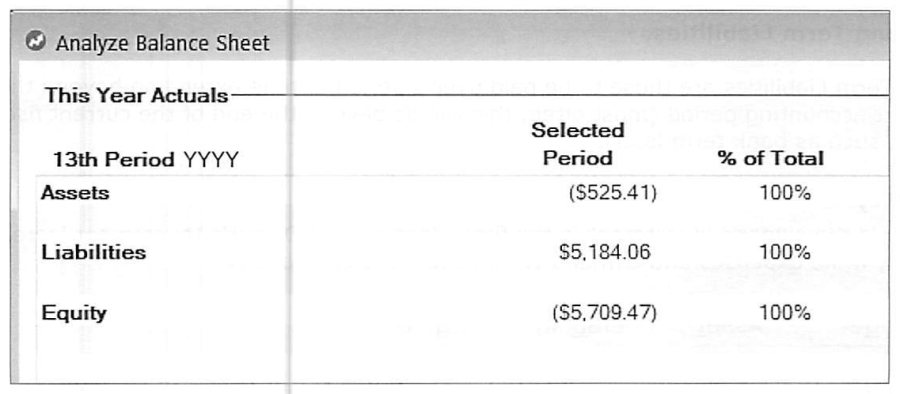
Balance Sheet and P&L reports can be displayed at up to four levels of detail, toggled with Up/Down icons -- bold-faced lines are "Header Accounts" carrying the total of subordinate detail accounts underneath them. At Level 1, a Balance Sheet reduces to the core accounting equation: Assets = Liabilities + Equity.
Assets are things of value or use to the business, split into Current Assets (cash, or things easily converted to cash, like receivables and inventory) and Capital/Fixed Assets (property, vehicles, equipment). The guide stresses ordering assets by descending liquidity: "Recognizing liquidity when you organize your Accounts List will ensure that Management, Investors and Creditors can conveniently and reliably assess the financial position of your company. Failure to do so may cause busy Investors or Creditors to take the most conservative actions warranted by your statements."
Liabilities (debts owed to others) split into Current Liabilities (trade payables, wages, payroll deductions, sales tax trust funds -- generally due within the current accounting period) and Long Term Liabilities (bank term loans and similar, extending beyond the current fiscal year). Equity is the owner's investment in the firm: income and owner investment increase it, expenses and owner withdrawals decrease it.
On the Profit & Loss side: Income is revenue from sales net of discounts, returns, and sales tax. Cost of Sales is the total cost of goods sold, including shrinkage and obsolescence losses, ideally broken out to match Income categories so gross margin can be analyzed per category. Gross Profit (Income minus Cost of Sales) "is a measure of Management's ability to manage Cost of Sales, and Retail Pricing issues." Expenses (everything besides Cost of Sales, Amortization, Interest, and Income Tax) are commonly grouped either by department/responsibility or, per the guide's recommended approach, into Variable Expenses (payroll, advertising, entertainment -- managed on a current basis, highest risk of getting out of line) versus Fixed Expenses (rent, lease payments, and low-risk variable costs like phone bills). Operating Profit (Income minus Cost of Sales minus Expenses) is the figure "comparable to businesses in the same industry," representing revenue available to service both present and proposed debt. Other Income/Other Expenses capture non-recurring, non-core items (interest income, early-payment discounts, gains/losses on asset disposal). Net Profit/(Loss) is the bottom line after all of the above.
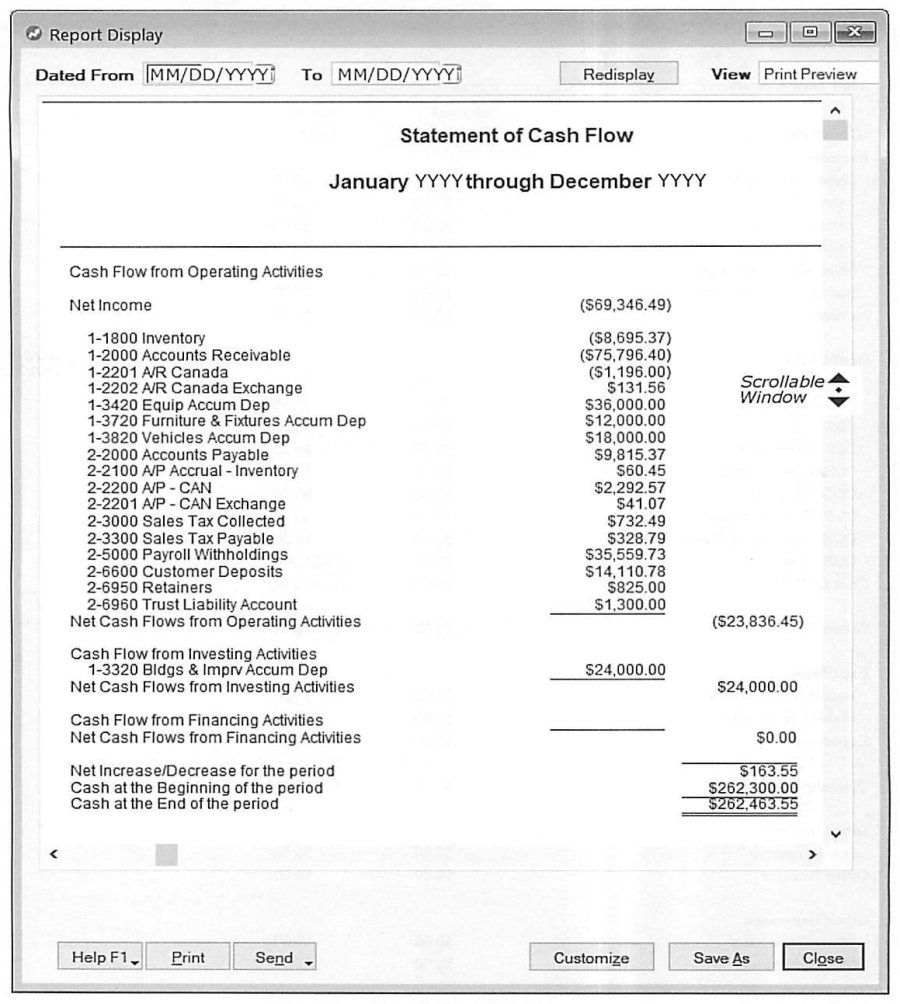
The Statement of Cash Flow (found under the Banking tab of the Reports menu) breaks out Cash Flow from Operating Activities, Investing Activities, and Financing Activities, netting to the change in cash for the period. The guide closes this section noting all three statements "are all based upon the same foundation," setting up the next topic: organizing the Accounts List itself.
Implementing Passwords
Source: p.40-42
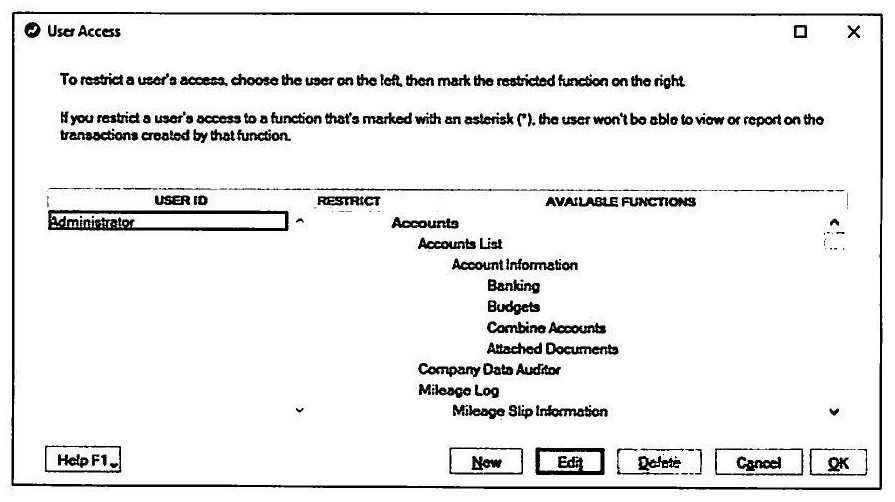
AccountEdge supports unlimited User IDs and passwords in a one-to-one relationship, with access customizable "right down to the screen level." The guide frames this as valuable even for single-user businesses, not just networked/multi-user ones, since it enables safe delegation to less-experienced staff and lets multiple users work concurrently without stepping on each other's areas of responsibility.
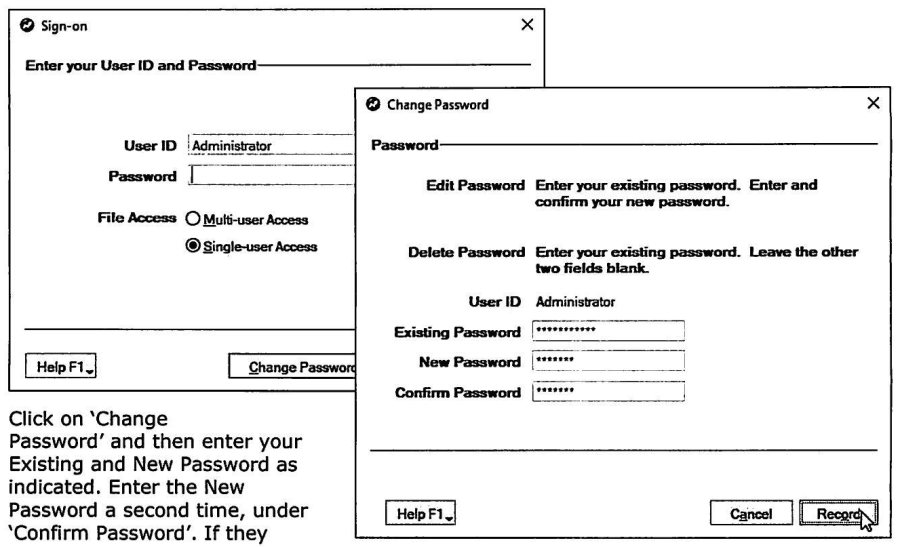
Key guidance: the Administrator password should be reserved strictly for managing other passwords, never used daily -- minimizing its use reduces the risk of unauthorized activity, but also means it's easy to forget, so it should be written down and stored securely (recovery otherwise requires sending the company file in, which is slow and costly). AccountEdge logs the User ID on every transaction, which is useful for identifying who needs correction -- but only works if every user has their own unique login rather than sharing one. By default, new users get unrestricted access; access must be explicitly restricted afterward. The guide's caution to whoever implements this: "Don't 'ASS-U-ME' anything... verify the implementation of each Password" by logging in as each user and exercising the program to confirm they can do their job without seeing more than they should. This validation is called out as "a management responsibility that should not be delegated."
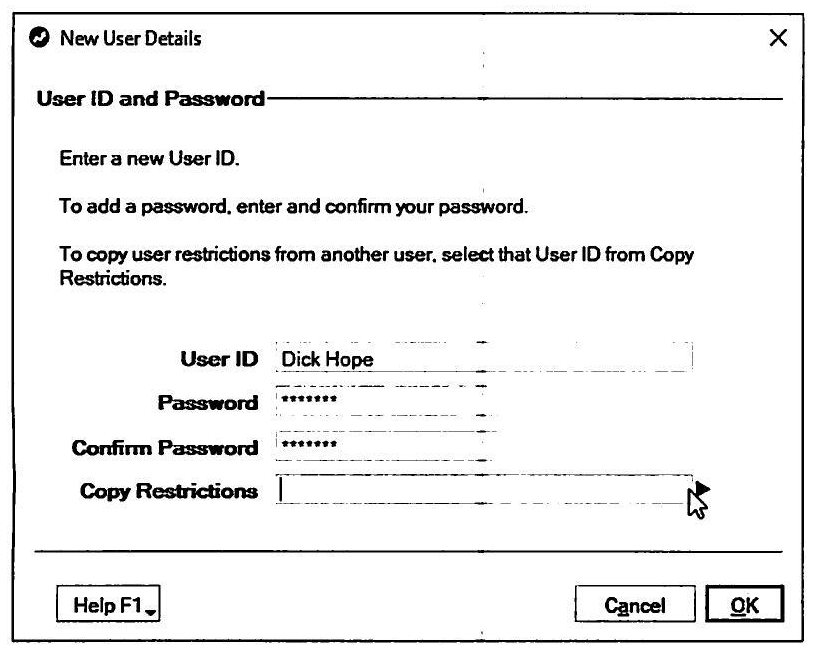
Practically: the Administrator User ID on a new or upgraded file is literally "Administrator" (or inherits a legacy MYOB Master Password on upgrade). New users are created under Setup » Preferences » Security » User IDs, and since a User ID cannot be edited once recorded, it's worth getting right the first time -- the guide suggests a full name like "Sally Jones" over just "Sally" for both reporting clarity and security. New users get a temporary "implementation" password since AccountEdge lets users change their own password later. A "Copy Restrictions" feature lets you clone permissions from an existing user, and the guide suggests creating inactive "User Template" accounts (e.g. one called "SALES & RECEIVABLES") purely to hold a reusable restriction set for onboarding similar roles later. Notably, the Administrator never needs to know a user's password after initial setup -- they can reset it, but not view it.
Creating a Data File for Your Company
Source: p.43
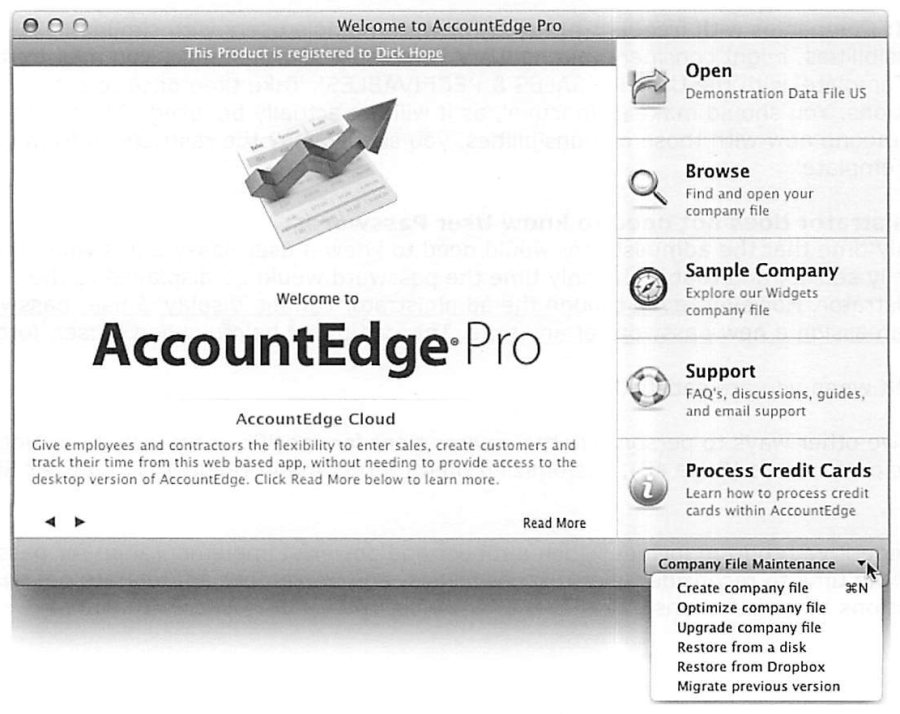
Basic setup guidance before the New Company File Assistant even opens: create a dedicated folder for the company file (AccountEdge defaults to a folder inside "My Documents"), and put a desktop shortcut/alias to that folder rather than storing the file itself on the desktop -- the guide is emphatic about this: "We STRONGLY recommend that your company file NOT be stored on your desktop." Multi-user setups should get direction from the network administrator on file location.
The New Company File Assistant
Source: p.44-48
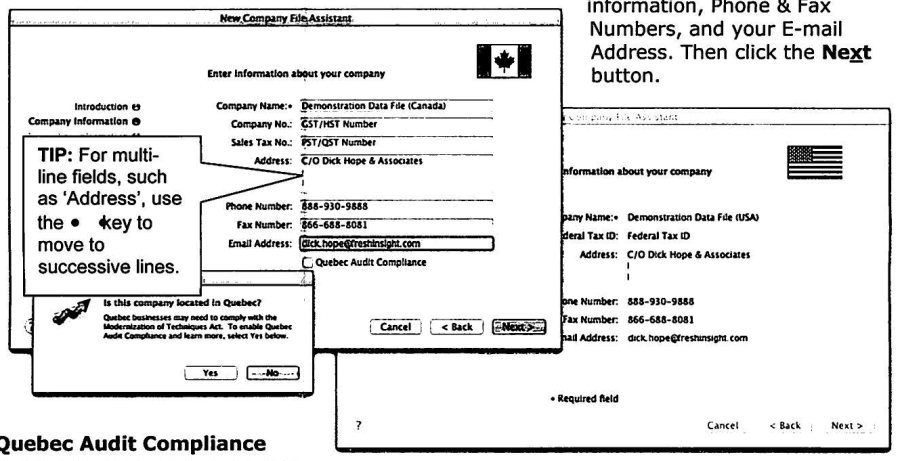
The wizard walks through, in order: Company Name and Address information (including a Quebec Audit Compliance question -- checking this box permanently prevents recorded transactions from being edited or deleted, and is a legal requirement for Quebec businesses under the Modernization of Techniques Act, not an optional hardening step); fiscal year and conversion month; and Accounts List setup.
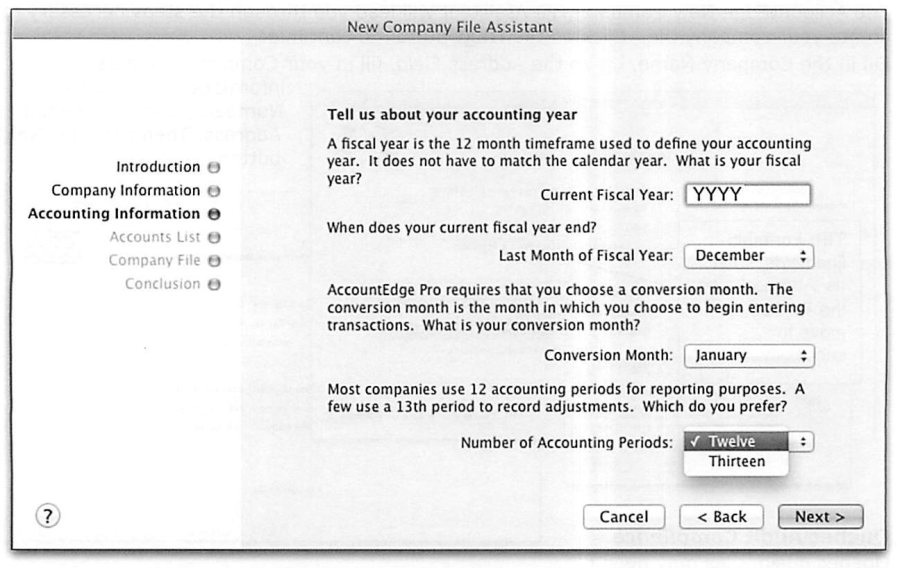
Two concepts worth flagging to a rep before they get to this step: Current Fiscal Year is the calendar year in which the fiscal year's last month falls (a May-to-April fiscal year ending April 2021 has a Current Fiscal Year of 2021). Conversion Month is the month day-to-day entries begin -- if it's the first month of the fiscal year, only Balance Sheet opening balances are needed; any other month also requires year-to-date Profit & Loss opening balances. The guide recommends thirteen accounting periods rather than twelve, so accountant-provided year-end adjusting entries have a dedicated 13th period that affects year-to-date totals without distorting monthly totals. This choice cannot be changed later, so the assistant gives a final review screen before locking it in.
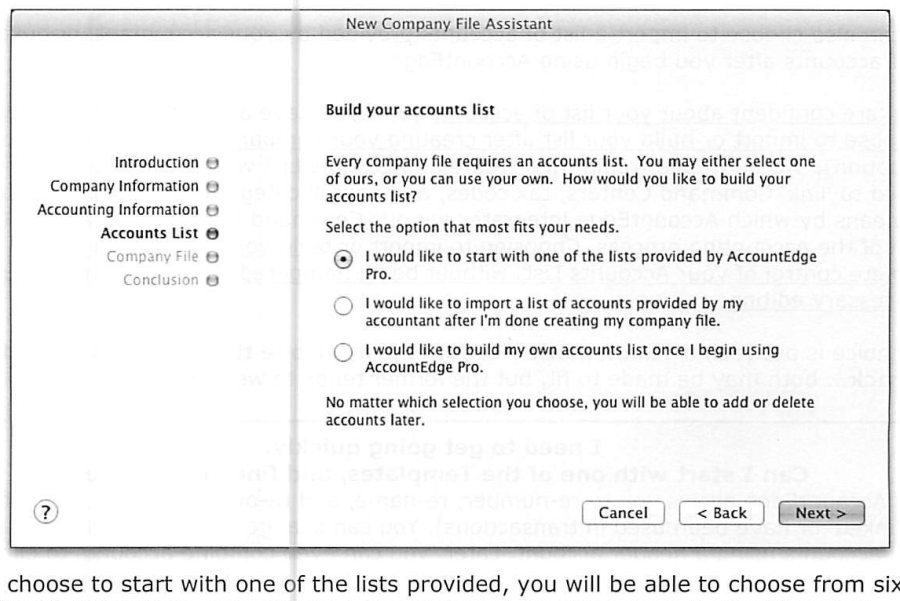
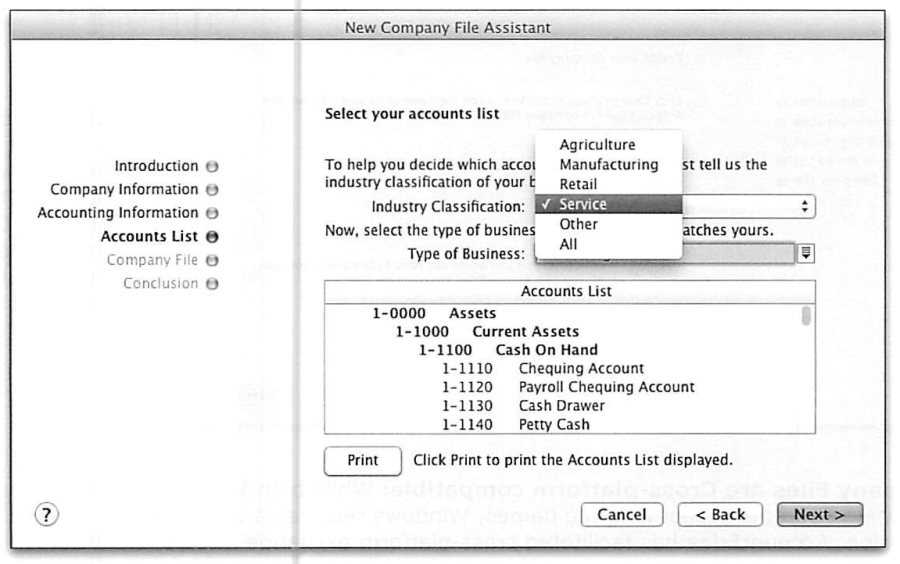
For the Accounts List, three options are offered: start from one of AccountEdge's built-in industry templates (six Industry Classifications, each with multiple Type of Business options), import a list provided by an accountant, or build one from scratch after setup. Templates remain fully editable afterward -- accounts can be renumbered, renamed, reordered, regrouped under header accounts, and even merged later to eliminate duplicates, "even if they are 'linked' or have been used in transactions" (with some restrictions: linked/active accounts can't move between categories like Expenses vs. Cost of Sales, and can't be deleted outright). The guide's framing: "The choice is between a Tailor-made Accounts List, or one that was just picked off the rack... both may be made to fit, but the former tends to wear better."
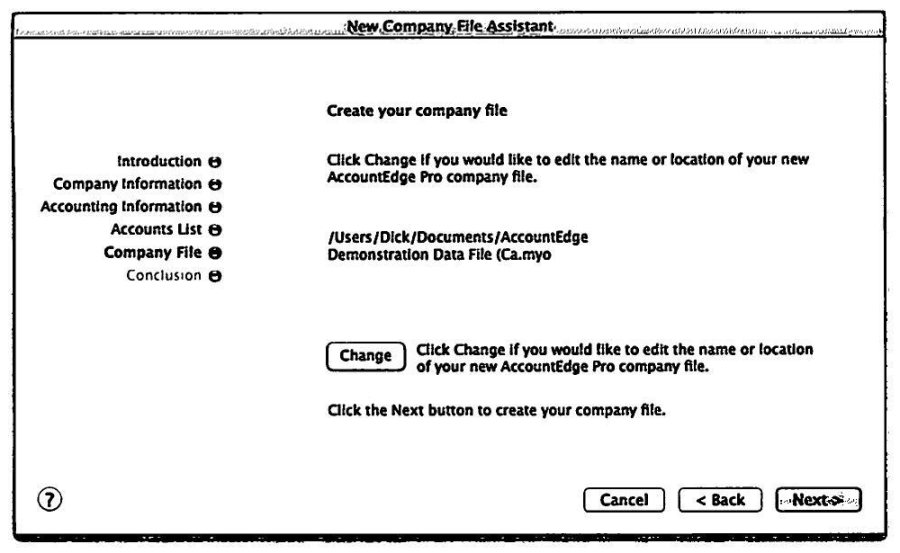
AccountEdge's file extension is .MYO on both Windows and Mac, adopted specifically to keep company files cross-platform compatible despite Windows requiring 3-character extensions.
Easy Setup Assistant & Customize Easy Setup Assistant
Source: p.48-51
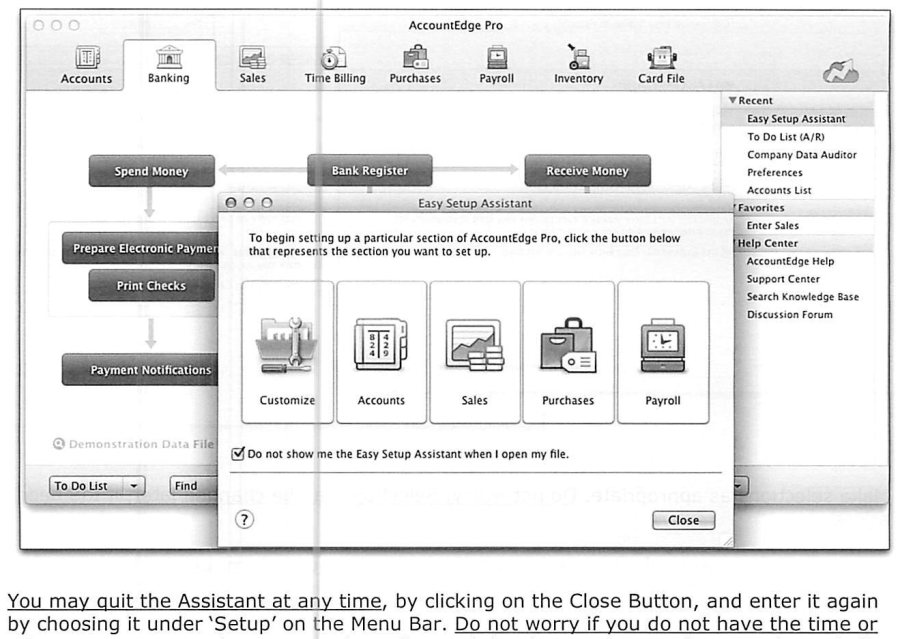
After the company file is created, the Easy Setup Assistant offers dedicated setup sections for Accounts, Sales, Purchases, and Payroll, reachable any time later under Setup on the Menu Bar. Nothing is lost by closing it early -- "AccountEdge will record the choices that you have made, and allow you to continue later, at your own pace."
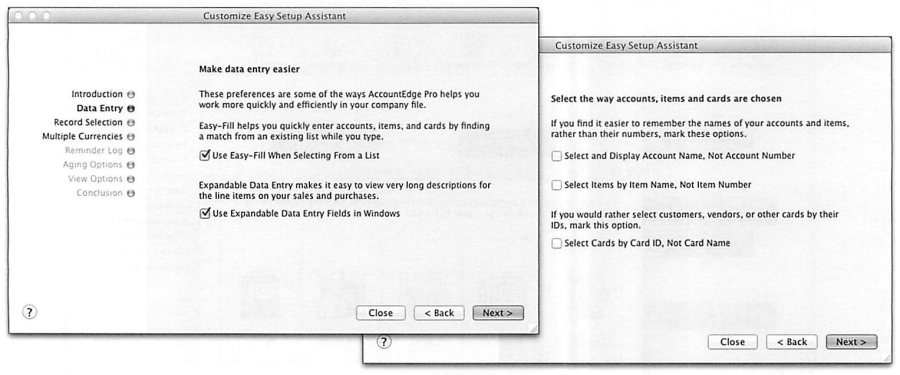
The Customize section covers preferences: Easy-Fill and Expandable Data Entry (for long line-item descriptions) under Data Entry; whether to select accounts/items/cards by name vs. number under Record Selection; and multi-currency under Multiple Currencies. A useful distinction for training reps: most of these preferences are per-User-ID, not system-wide -- to enforce a setting for a specific user, the Administrator has that user log in and set it themselves under Setup » Preferences, then the Administrator restricts that user's access to the Preferences screen afterward so they can't change it back.
The Accounts section adds/edits/deletes/imports accounts and enters opening balances, but notably cannot edit an account's reporting level -- that requires the fuller Accounts List workflow covered later (p.70+). Sales setup covers default sales form layout, selling details (price level, income account, credit limit), default tax code, payment terms, and linked accounts for receipts/undeposited funds. Purchases is described as "the mirror image of Sales" -- default layout, buying details, tax code, payment terms, and the account bills get paid from. Payroll setup is explicitly deferred to the separate Payroll training guides (US and Canadian).
Setup User Preferences (the full Preferences screen)
Source: p.52-58
For reps who used the Accounts List Worksheet to plan ahead of time, the guide recommends going straight to Command Center » Setup » Preferences rather than the Easy Setup Assistant, and walks through each tab:
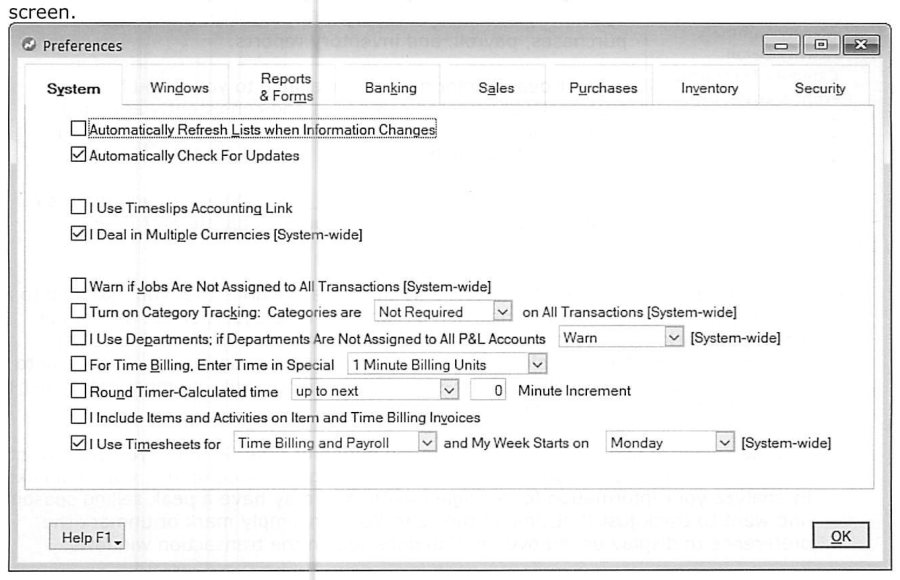
System: "Automatically Refresh Lists" keeps displayed data live but can slow multi-user performance -- discouraged outside single-user mode. "Warn if Jobs Are Not Assigned to All Transactions" is a data-quality guardrail for job reporting (off by default on upgrades). Category Tracking (Required vs. Not Required) governs whether every transaction must be tagged to a Category (division, service line, profit center, region, or fund) -- the guide notes categories can also be toggled on temporarily for a single reporting period, like a peak season, without a permanent commitment.
Reports & Forms: "Always Display Report Customization Options Before Printing" and "Always Display Advanced Filters Before Sending Forms" are both recommended broadly, since AccountEdge evolves and even experienced users may find better options each time they're shown the customization screen.
Banking: "Make a Reminder for Every Cheque/Deposit" is flagged as usually unnecessary bloat -- it attaches a note to the customer/vendor/employee card for every transaction, isn't auto-purged at year-end, and "can significantly erode performance over time" ("we have encountered clients with thousands of such transactions going back several years"). "Default Cheque is Already Printed" should stay checked unless checks are printed in batch mode. "Warn for Duplicate Cheque Numbers" catches accidental double-entry, especially with manual checks. "When I Receive Money, I Prefer to Group It with Other Undeposited Funds" is called the key preference for managing receipts, deposits, and cash reconciliation (detailed further in the Daily Applications guide).
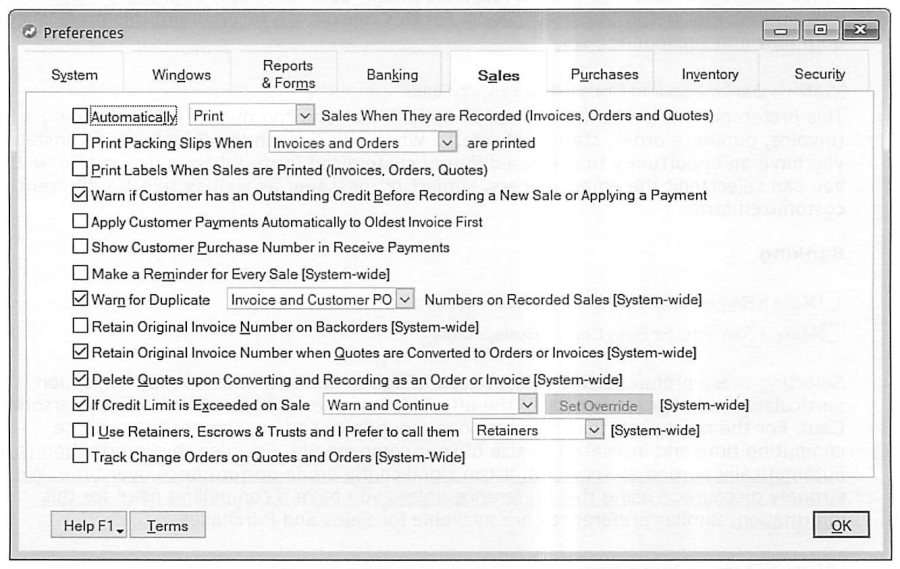
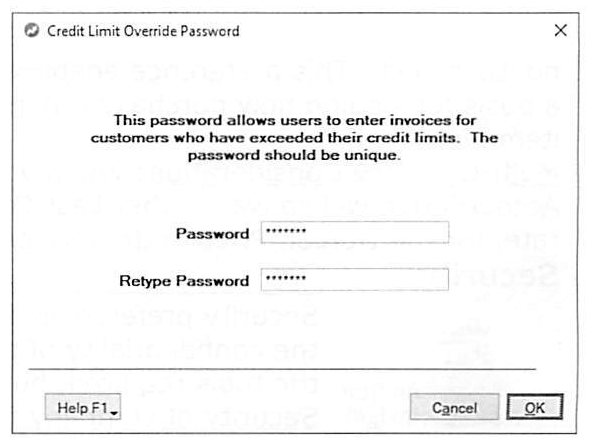
Sales/Purchases: covers auto-printing on record, warning for outstanding customer credit or vendor balances before a new transaction, applying payments to oldest invoice/bill first, duplicate invoice/PO number warnings, and credit limit handling -- either "Warn and Continue" or "Prevent Unless Overridden" with a manager-held override password.
Inventory: "Allow the Sale of Items with Insufficient On-Hand Quantities" permits negative on-hand inventory (using Standard Cost or historical Average Cost as an estimated COGS until the item is actually purchased). "Use Standard Cost as the Default Price on Purchase Orders and Bills" is useful for identifying price increases and avoiding overcharges, and covers new items with no "Last Cost" on record yet.
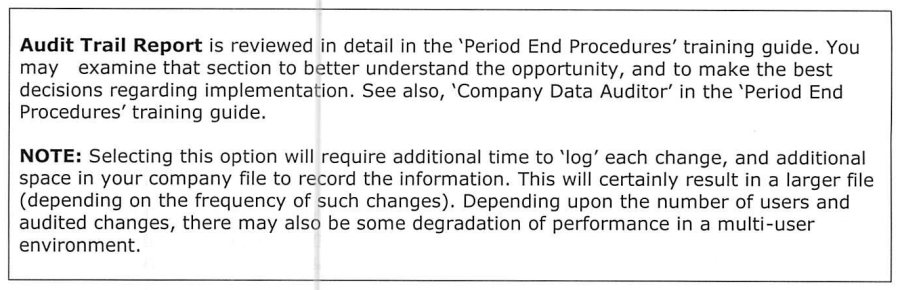
Security: "Transactions CAN'T be Changed; They Must be Reversed" locks the file down completely (required by law for Quebec businesses per the Modernization of Audit Techniques Act -- the guide notes that if this preference even appears as optional, AccountEdge wasn't installed correctly for a Quebec business). "Lock Period: Disallow Entries Prior To" is the more flexible alternative -- locking only reconciled/reviewed prior periods while current-period work stays open. "Check Company File for Errors Before the Backup Process" is strongly recommended despite the time cost on large files -- "backing up without verification can leave you with a backup of little or no value." "Use Audit Trail Tracking" logs every change (transactions, tax, accounts, system settings) with who/when, reviewable via Reports » Index to Reports » Accounts » Audit Trail -- but the guide recommends leaving it off during initial setup itself, since there's no value logging the flood of changes made while building the file for the first time, and turning it on adds file size and can affect multi-user performance.
Multi-Currency Implementation
Source: p.59-60
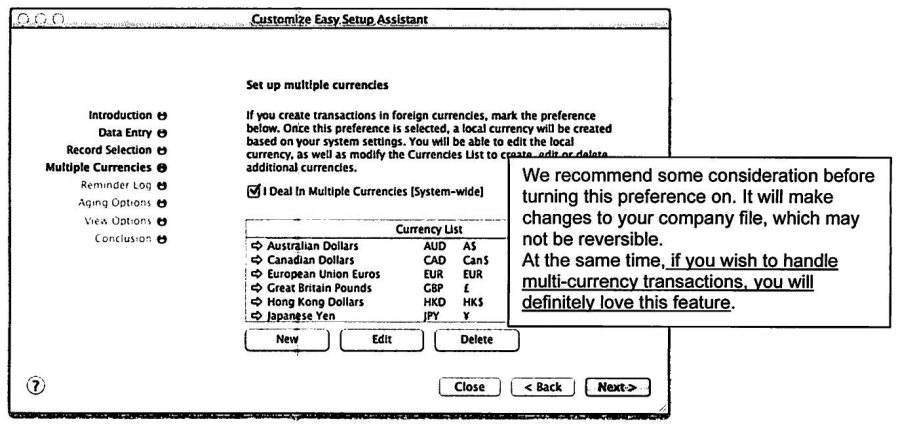
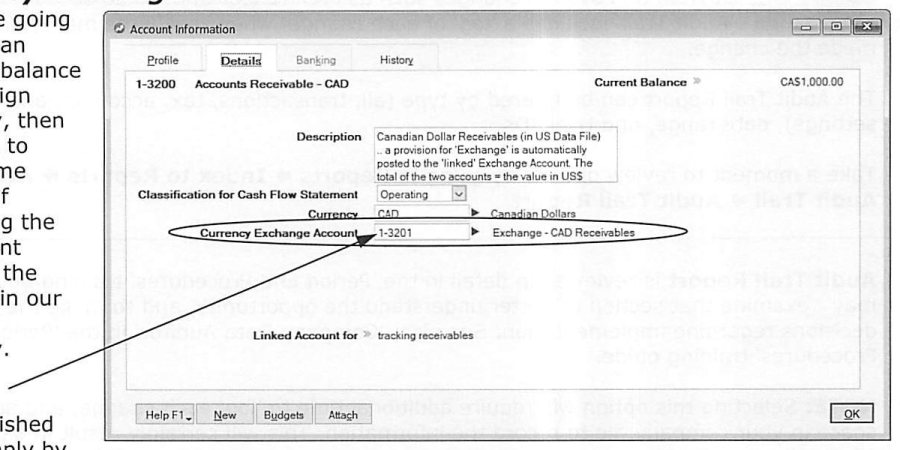
Financial statements must "speak" only one language -- the home currency (USD in the US, CAD in Canada). Foreign-currency balances (bank accounts, receivables, payables) are handled via a Currency Exchange Account linked to each foreign-currency account: the exchange account carries a balance that, combined with the foreign-currency balance, equals the correct home-currency value. Worked example from the guide: a Canadian receivable of CAD$1,000 with a linked Exchange account of (US$100) nets to US$900 in home currency -- "Simple, isn't it?"
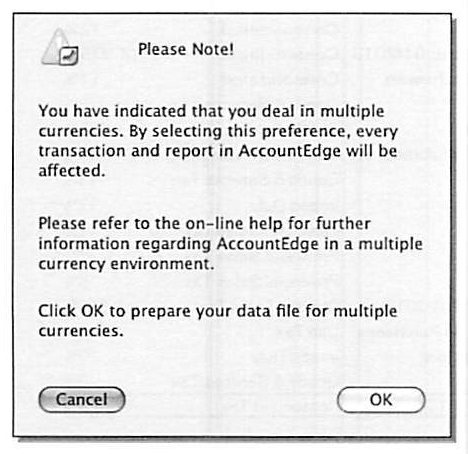
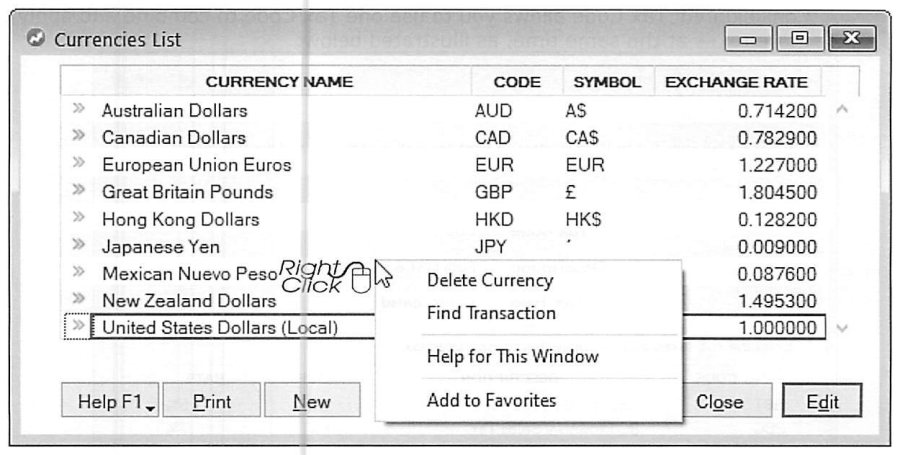
Turning on "I Deal in Multiple Currencies" is described as consequential and not easily undone: "every transaction and report in AccountEdge will be affected." It's also flagged as sensitive enough to restrict via passwords. AccountEdge ships with common currencies pre-configured (rates need updating) under Lists » Currency List; unused ones can be deleted. The guide explicitly tells setup reps not to configure the Receivable/Payable linked accounts for multi-currency at this point in the walkthrough -- that comes later.
Sales Tax / GST / HST / PST Codes (Canada)
Source: p.61-64
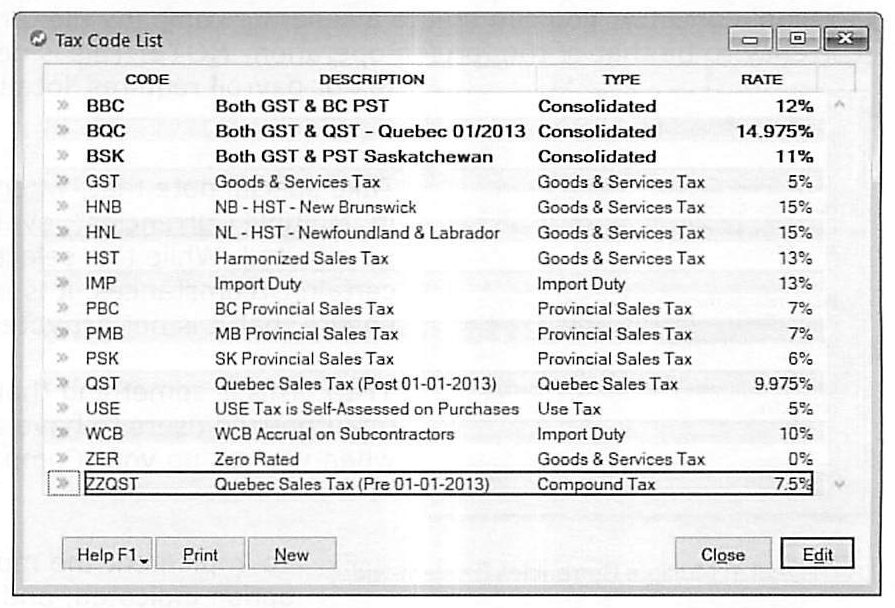
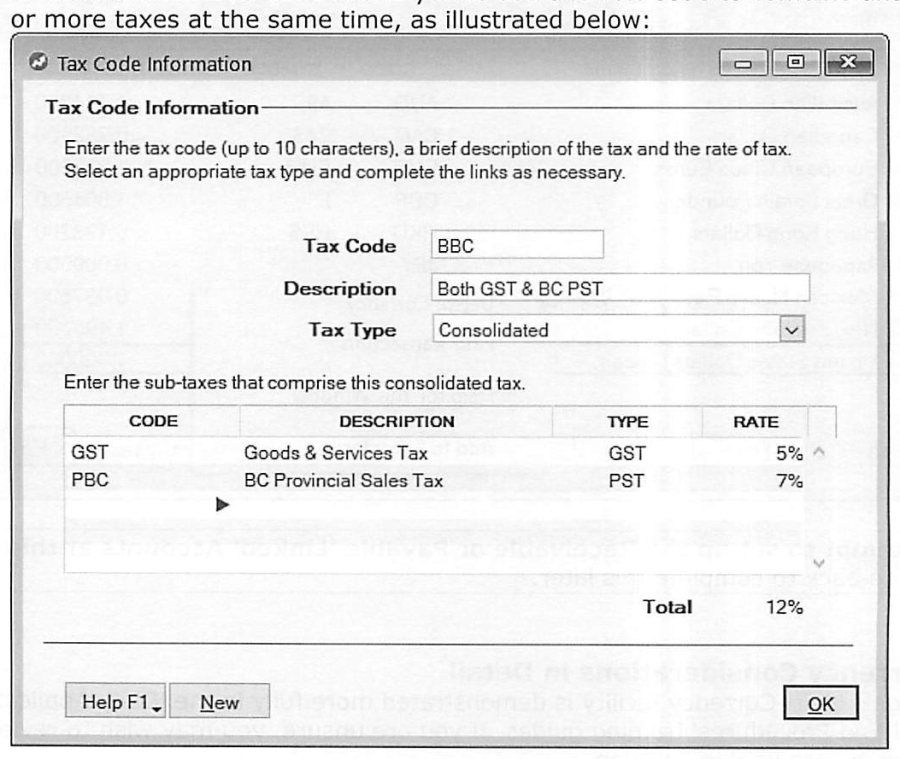
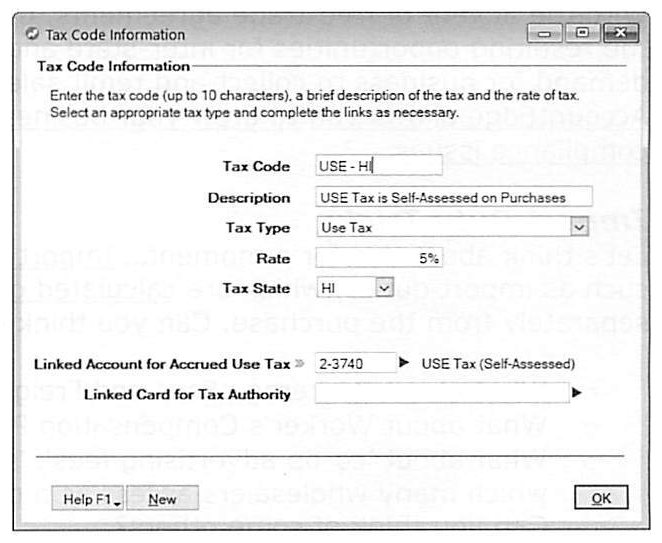
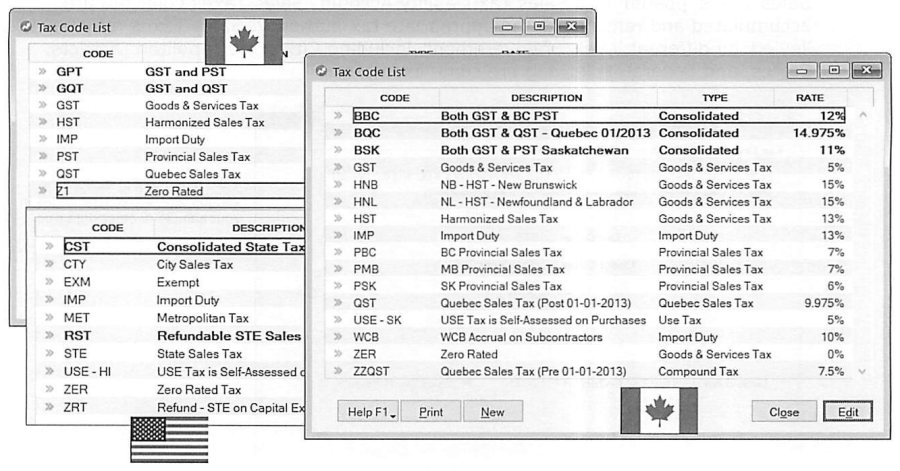
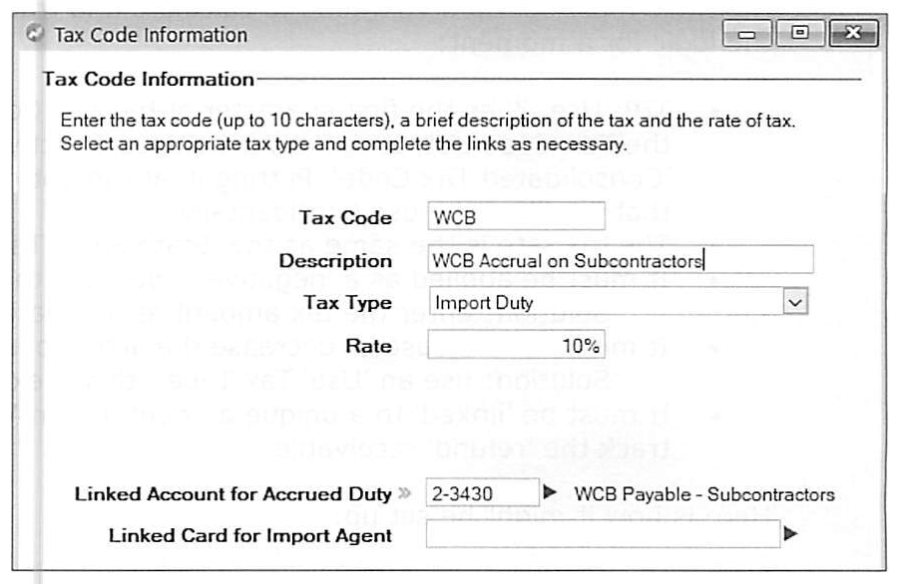
The Canadian version supports six Tax Code types. Consolidated combines two or more sub-taxes into one code applied at once (e.g. "BBC" = GST + BC PST at a combined 12%). Import Duty adds a duty cost into a purchase's expense amount and accrues the payable separately, without changing the purchase order total -- the guide notes this same mechanic can be repurposed for other percentage-based accruals like Workers' Compensation on subcontracted labor. Provincial Sales Tax works similarly, added to and expensed with the purchase amount. Goods & Services Tax is a value-added tax: revenue-neutral to the P&L, since GST paid on purchases offsets GST collected on sales and only the net difference is remitted. Harmonized Sales Tax isn't a distinct type -- it's a GST-type code representing a province's PST and GST combined into one tax with one authority. Quebec Sales Tax (post-2013) is its own value-added tax type with a separate provincial authority, shown separately on forms, though AccountEdge can still combine GST+QST into one consolidated code for convenience. Use Tax self-assesses tax on purchases where a vendor didn't charge it -- it doesn't touch the transaction total but adds the amount as an accrued payable, tagged by province for reporting.
Sales Tax Codes (United States)
Source: p.64-66
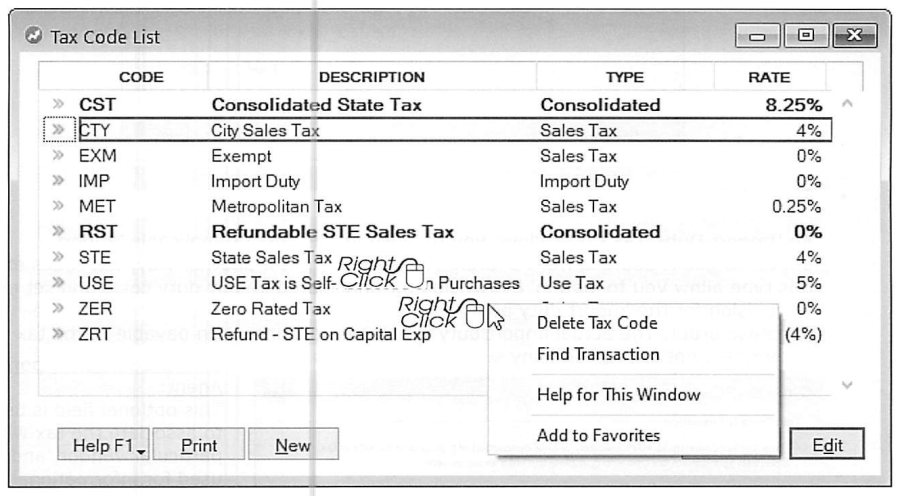
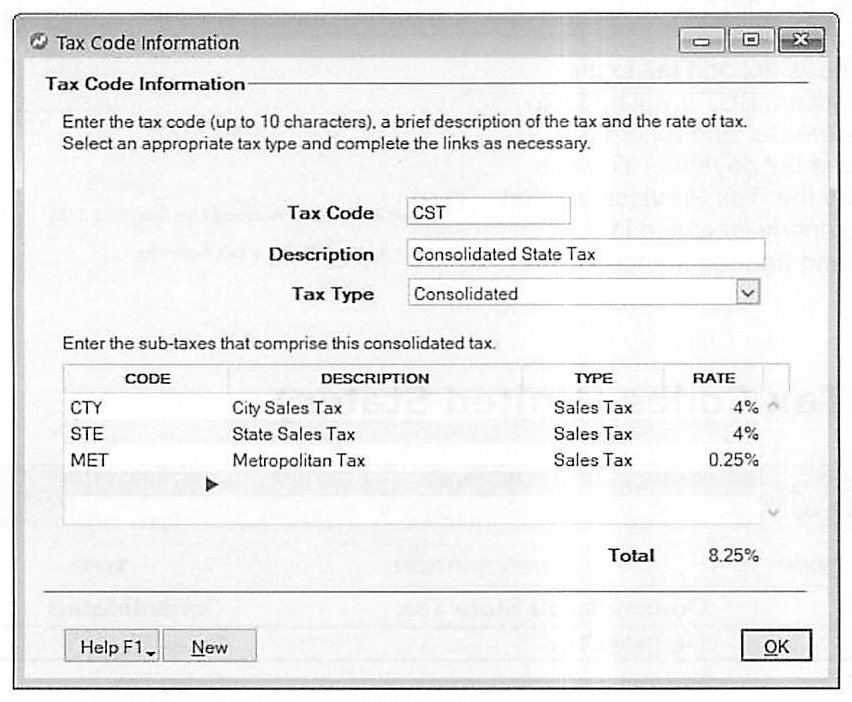
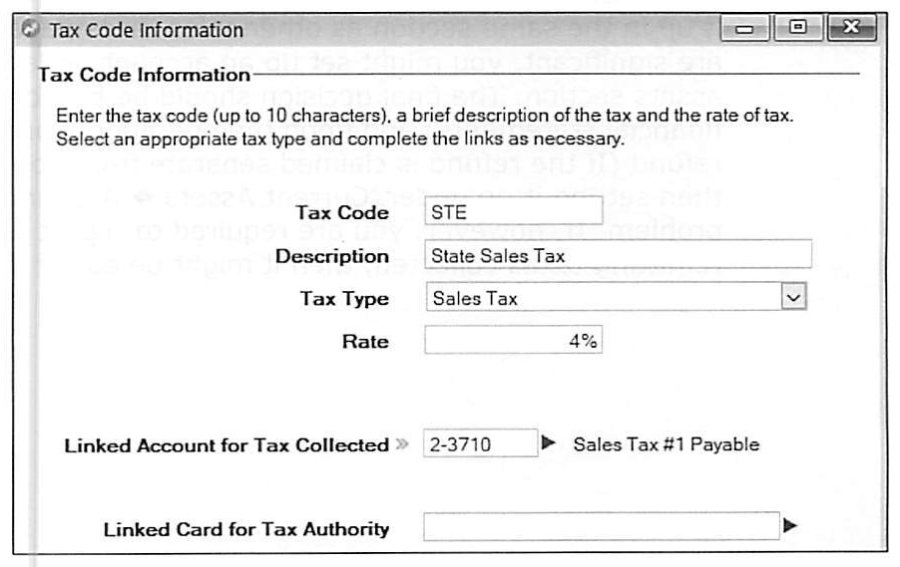
The US version supports four types: Consolidated (same combining logic as Canada -- e.g. City + State + Metropolitan into one code), Import Duty (identical mechanic to Canada's), Sales Tax (posts collected tax to a Sales Tax Liability account for remittance -- can be layered by City, Metropolitan District, State, or Federal), and Use Tax (self-assessed on untaxed purchases, tagged by state).
Tax Code Magic
Source: p.67-70
Practical tricks the guide highlights: use the alphabet strategically in tax code naming (e.g. a single leading letter lets users key in a code with one keystroke -- useful for reps migrating from legacy software that used single-character codes); AccountEdge can accommodate sales tax compliance across multiple jurisdictions as a business grows. The Import Duty mechanic (accrue a percentage-based cost, remitted separately, without changing the transaction total) is reused for things beyond literal import duties -- the guide specifically suggests Workers' Compensation on subcontracted labor, brokerage/freight fees, and co-op advertising or wholesaler up-charges as other legitimate uses, with the caveat: "Don't get carried away... do not add unnecessary complexity."
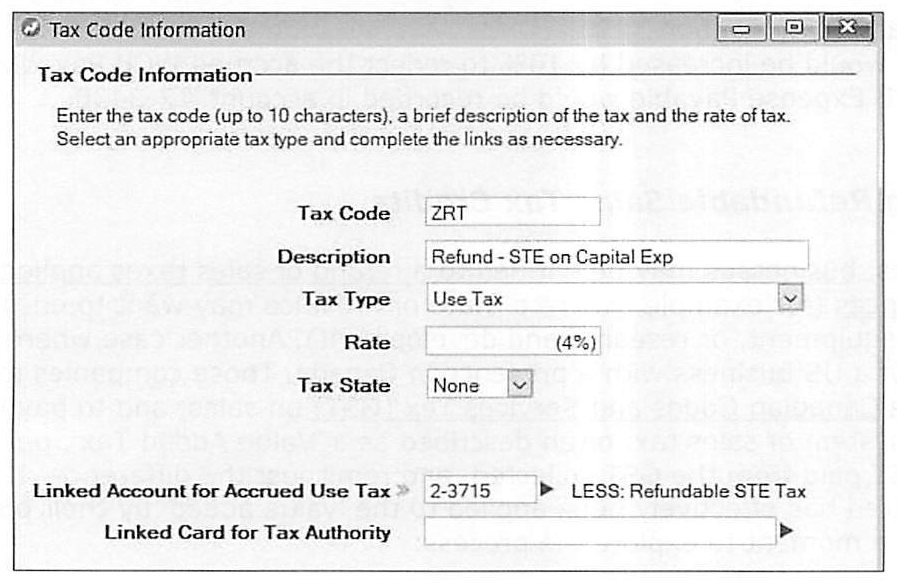
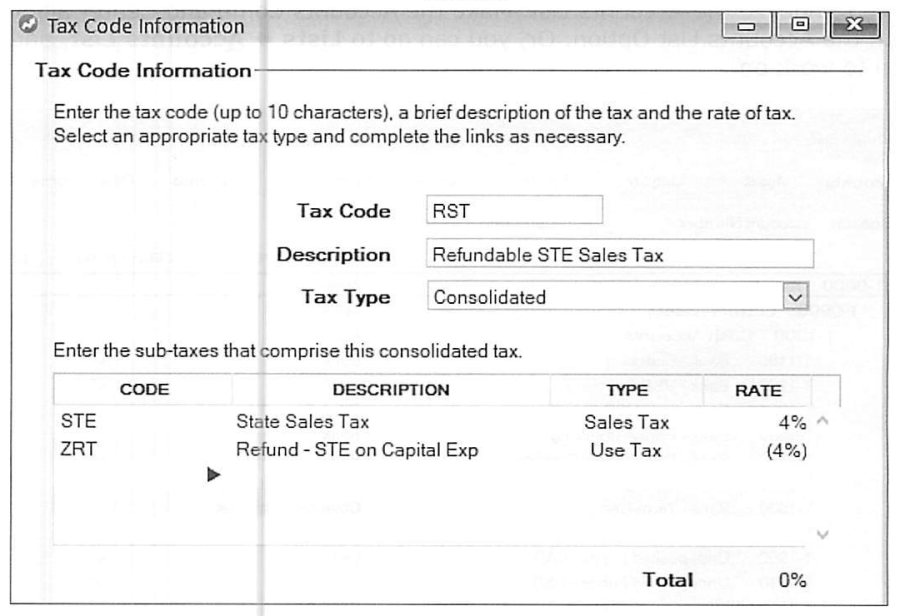
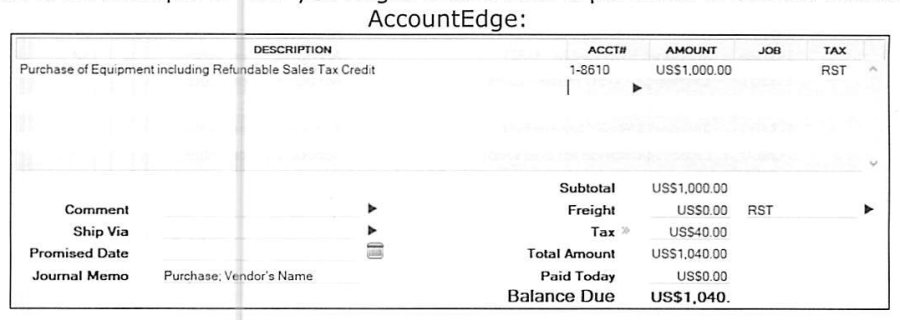
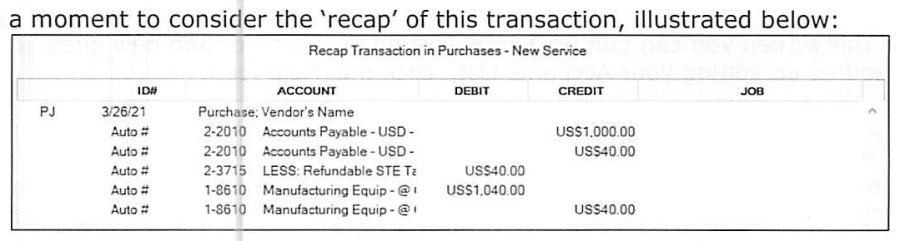
A full worked example walks through tracking a refundable sales tax credit (e.g. a US business with Canadian GST exposure, or a jurisdiction that refunds tax on capital equipment): set up the normal tax code first; then a second "refund" Use Tax code entered as a negative rate so it doesn't change the transaction total, conventionally prefixed with "Z" so it sorts to the bottom of the tax code list and is never selected by accident; then a Consolidated code combining both, so recording a purchase automatically applies the tax and tracks the refund receivable in one step.
Finalizing the Accounts List
Source: p.71
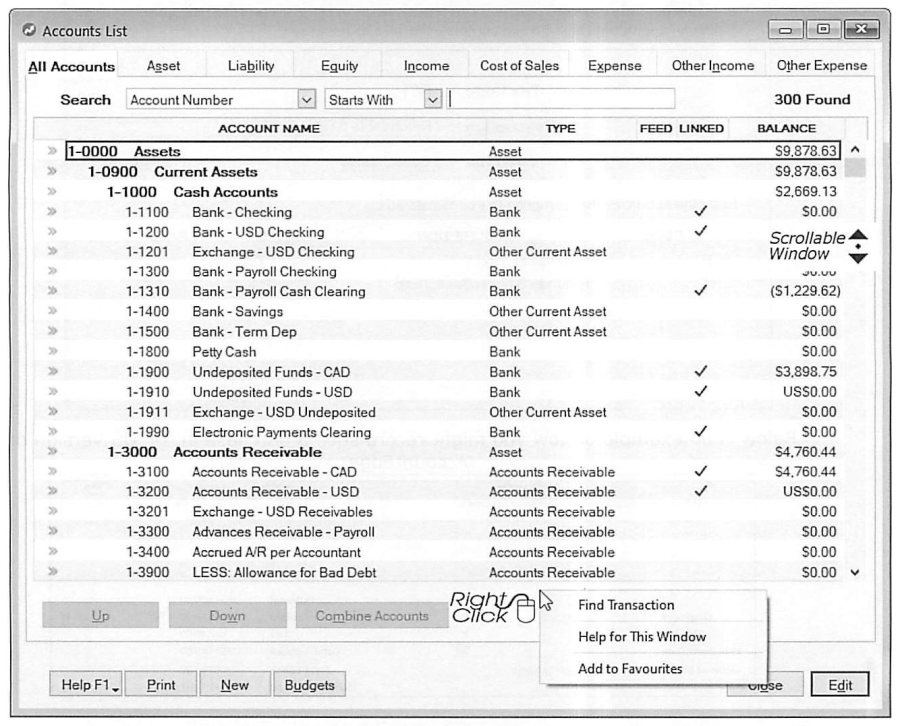
Once currencies and tax codes are set up, "it will be possible to finalize the Accounts List," via the Accounts Command Center's Accounts List option, or Lists » Accounts List. Two steps: first, modify or delete accounts to agree with the proposed Accounts List (you cannot delete a "linked" account without first turning off the link -- sometimes as simple as clicking the zoom arrow next to "Linked Account for:" and unchecking it, other times, for tax codes or payroll categories, the link has to be removed elsewhere); second, add or import the new accounts required. Use the Up/Down buttons throughout to set the correct reporting level (header vs. detail) for each account.
Setting Up Linked Accounts: Accounts & Banking, Sales, and Purchases
Source: p.72-74
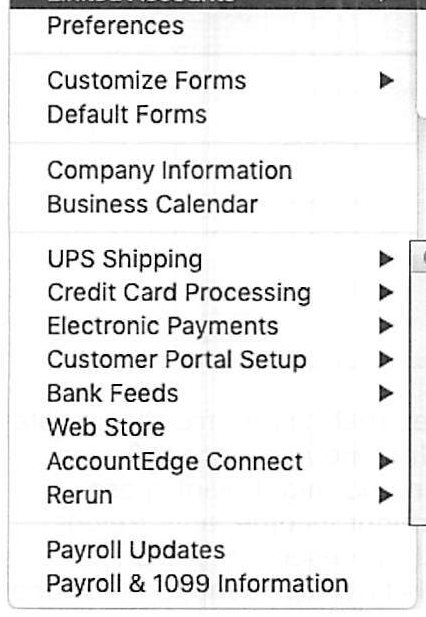
Setup » Linked Accounts presents four groups, one per Command Center: Accounts & Banking, Sales, Purchases, and Payroll Accounts (Payroll is deferred entirely to the Payroll Training Guide).
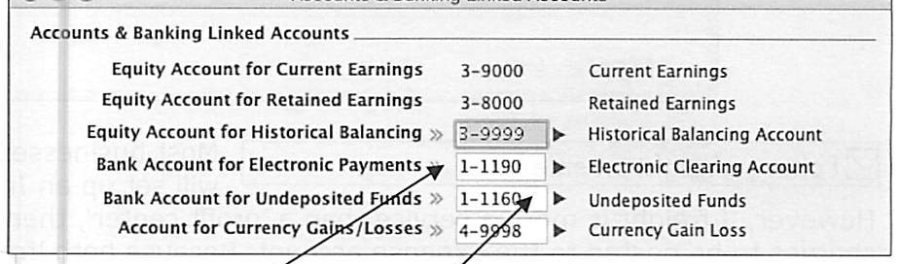
Accounts & Banking Linked Accounts: Equity Accounts for Current and Retained Earnings; the Equity Account for Historical Balancing, "provided to track discrepancies on conversion to AccountEdge, where the historical information from previous records may be incomplete, deficient, or not up-to-date and balanced to the penny"; a Bank Account for Electronic Payments, which is to disbursements what Undeposited Funds is to receipts -- checks/bills "grouped with Electronic Payments" sit here until batched and sent to the bank; a Bank Account for Undeposited Funds, fed either by the system-wide "Group It with Other Undeposited Funds" preference, by checking that box on individual Receive Money/Receive Payments transactions, or via Prepare Bank Deposit in the Banking Command Center; and, only if multi-currency is active, an Account for Currency Gains/Losses Realized, which AccountEdge computes automatically as payments are applied to foreign receivables or payables.
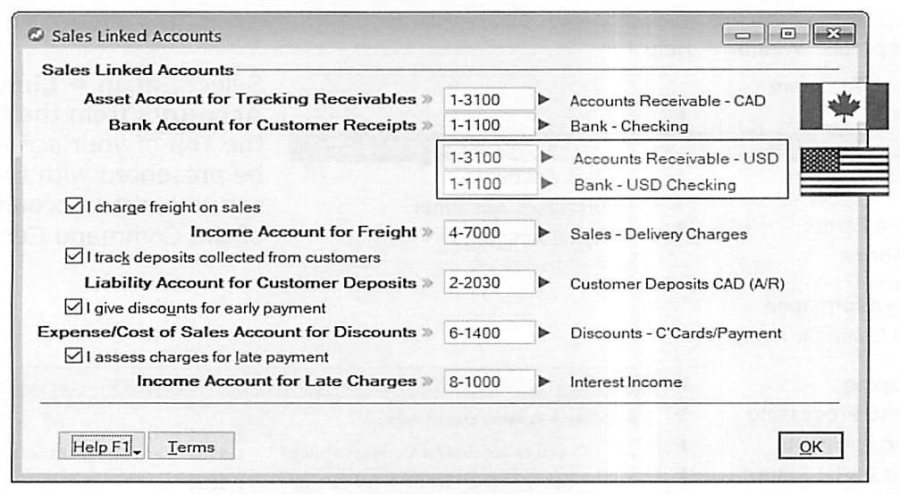
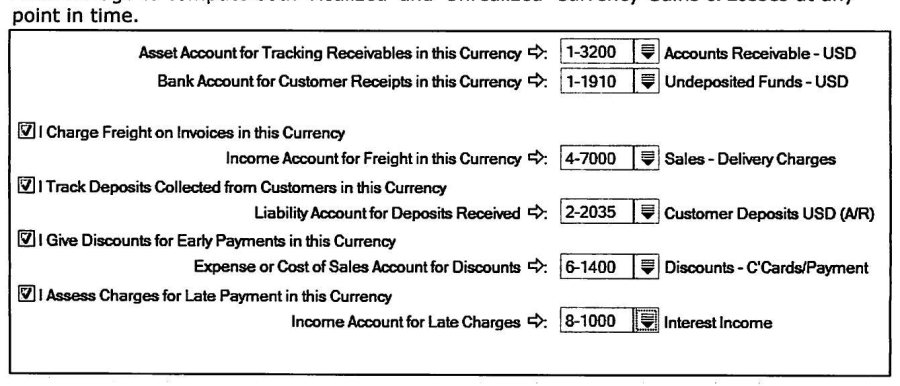
Sales Linked Accounts: Asset Account for Tracking Receivables and Bank Account for Customer Receipts are required; four optional checkboxes follow. "Charge freight on sales" links an Income Account for Freight (or, if freight is more a pass-through service than a profit center, some businesses link it to the expense side instead so the balance nets to "cost"). "Track deposits collected from customers" links a Liability Account for Customer Deposits -- the guide calls this "one of the most over-looked features": accepting a deposit creates a liability (you'd have to refund it if the goods/services are never delivered), and there's no open receivable yet to apply it against. With this linked, AccountEdge automatically recognizes a payment applied to an Order as a deposit, posts it to the liability account, and automatically withdraws and applies it to the invoice once the sale is completed. "Give discounts for early payment" auto-computes and applies the terms set on the Customer's Card -- and is worth turning on even if you rarely discount, since it also lets you write off a payment that's a few cents short without editing the original invoice. "Assess charges for late payment" is the mirror case for payments that come in over the amount owed. A Terms icon sets the default credit terms applied to new customers as they're added.
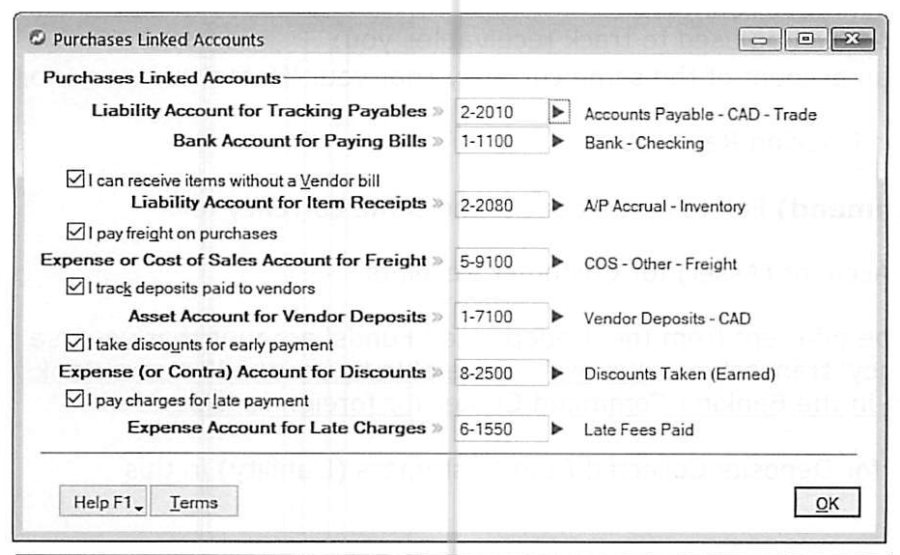
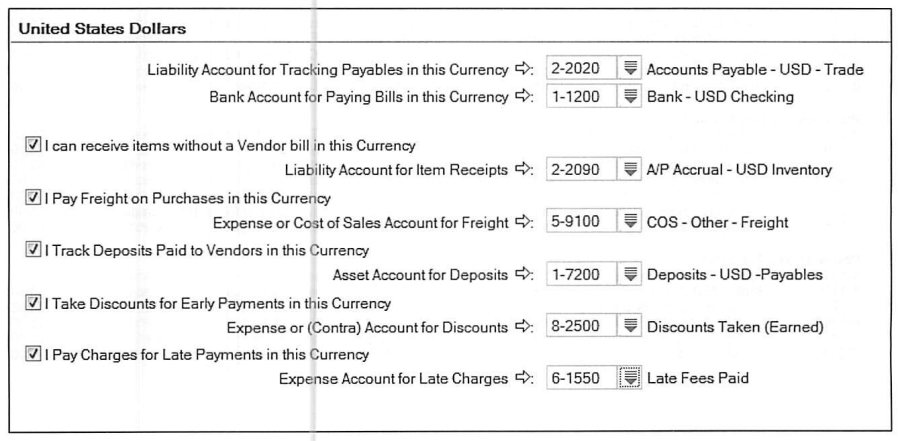
Purchases Linked Accounts mirror Sales: Liability Account for Tracking Payables and Bank Account for Paying Bills are required. "I can receive items without a Vendor bill" links a Liability Account for Item Receipts, letting you receive inventory (at anticipated/standard cost) and sell it before the vendor's bill arrives -- AccountEdge automatically adjusts Cost of Goods Sold once the real bill is recorded. "I pay freight on purchases" and "I track deposits paid to vendors" work as expected. "I take discounts for early payment" is framed as a genuine management decision, not an accounting one: link the discount to an Other Income account if taking early-payment discounts is unusual for your business (reflecting how well-capitalized you are relative to competitors); link it as a contra to Cost of Sales if early discounts are standard practice in your industry and factored into competitors' pricing. "I pay charges for late payment" completes the mirror. A Terms icon again sets default Vendor credit terms.
Multi-Currency Linked Accounts and the Linked Accounts Report
Source: p.75-77
The final step before entering opening balances is linking accounts for each foreign currency in use -- only set up what you actually need (e.g. skip payables links if you have no foreign payables). For each currency used for receivables: you must link an Asset Account for Tracking Receivables denominated in that same foreign currency (not your home currency); you should link a same-currency Detail Checking Account for Customer Receipts (distinct from the home-currency Undeposited Funds account -- you won't be able to use Prepare Bank Deposit for foreign receipts) and a Liability Account for Deposits Collected from Customers in that currency; and all optional income/expense accounts must still link to your home-currency Income Statement, since P&L accounts are always stated in the home currency. The idea, per the guide: park any balance that moves with exchange-rate fluctuations in its own foreign-currency account, so management can see the exposure and AccountEdge can compute both Realized and Unrealized Currency Gains & Losses at any time. Payables mirror this exactly -- required link to a foreign-currency Liability Account for Tracking Payables; recommended links for a foreign-currency Paying-Bills checking account, a Deposits-Paid-to-Vendors asset account, and an Accrued A/P -- Inventory liability account for received-without-bill items. Before moving on, confirm exchange rates in Lists » Currencies are accurate as of the conversion date -- this gets verified later via the Un-Realized Currency Gains/Losses report.
Once linked accounts are set, run Reports » Accounts » Accounts » Linked Accounts and retain a printed copy as a record of the initial setup -- it lists every linked account across all four groups (Accounts & Banking, Sales, Purchases, Payroll) with its debit/credit direction.
Entering Opening Account, Historical, and Job Balances
Source: p.78-79
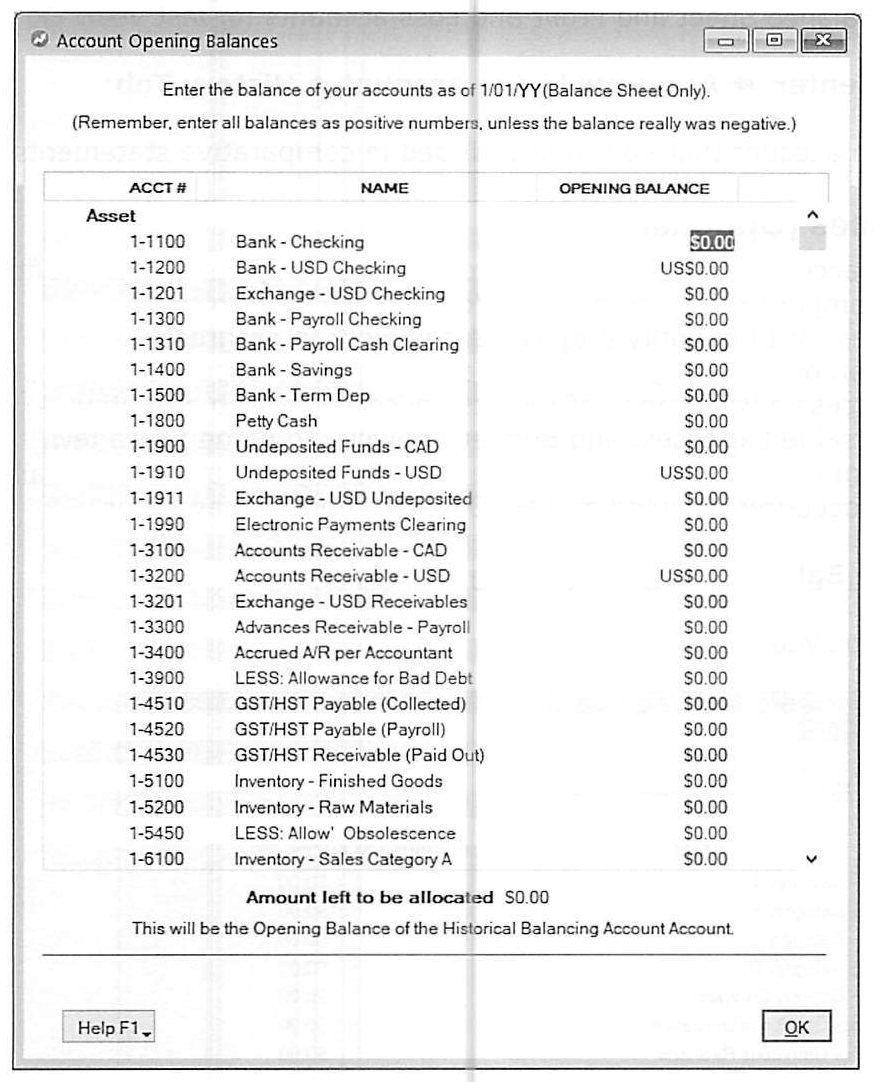
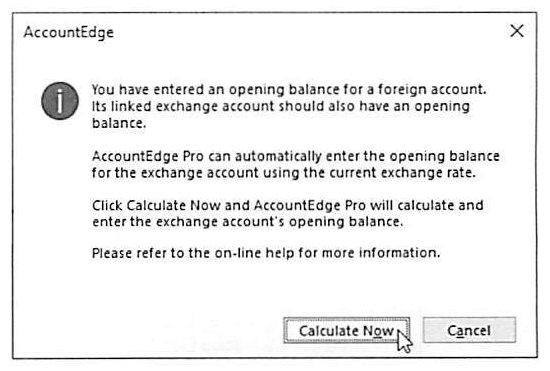
Setup » Balances » Account Opening Balances is where Balance Sheet accounts get their opening figures as of the conversion date (enter all balances as positive numbers unless they genuinely are negative). If the conversion month is the first month of the fiscal year, only Balance Sheet accounts need balances; any other conversion month also requires year-to-date Profit & Loss opening balances. AccountEdge tracks an "Amount left to be allocated" as you go -- it should reach zero; any remainder posts to the Historical Balancing Account in Equity. For each foreign-currency account with an opening balance, AccountEdge offers to auto-calculate the linked exchange account's opening balance at the current exchange rate ("Calculate Now") -- though the guide recommends using the exchange balance carried over from your previous bookkeeping system where available. Trick: leaving opening Inventory account balances at zero lets AccountEdge compute them automatically from item-level opening counts and valuations entered later.
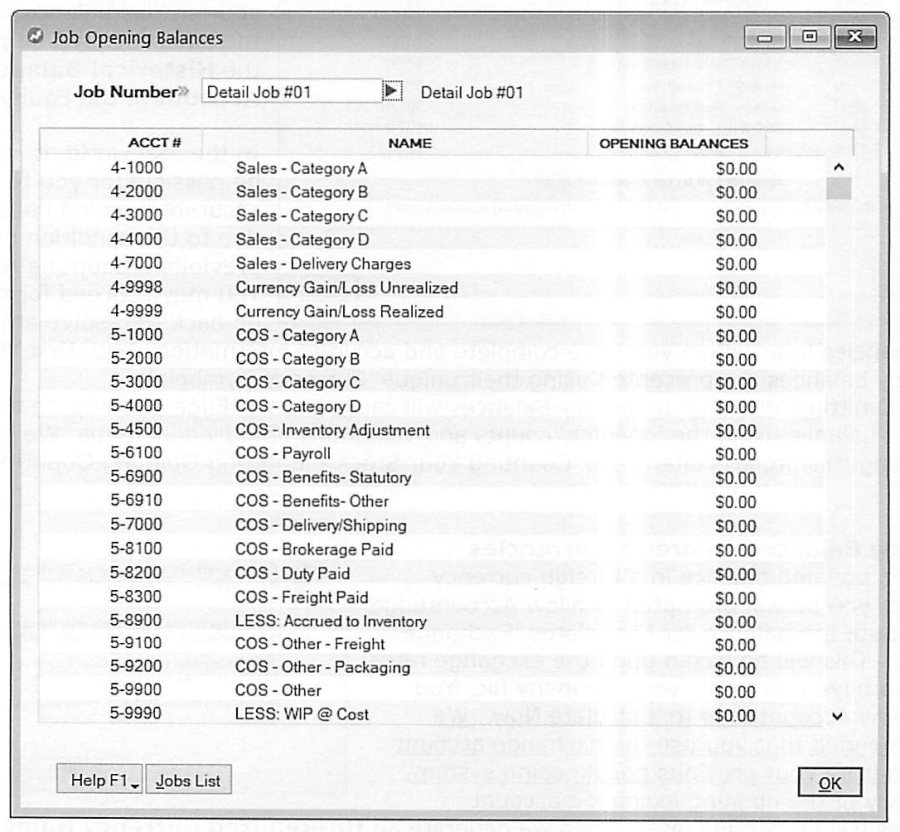
Historical Balances (optional): Accounts Command Center » Accounts List » Account » History tab -- enter last year's month-end balances for accounts you want included in comparative statements. Job Opening Balances (optional): Setup » Balances » Job Opening Balances, after reviewing Job Costing in the Daily Applications and Period End Procedures guides -- job-specific budgets can also be set at this point via Lists » Jobs » Detail Job » Budget.
Entering Opening Customer Balances
Source: p.80-84
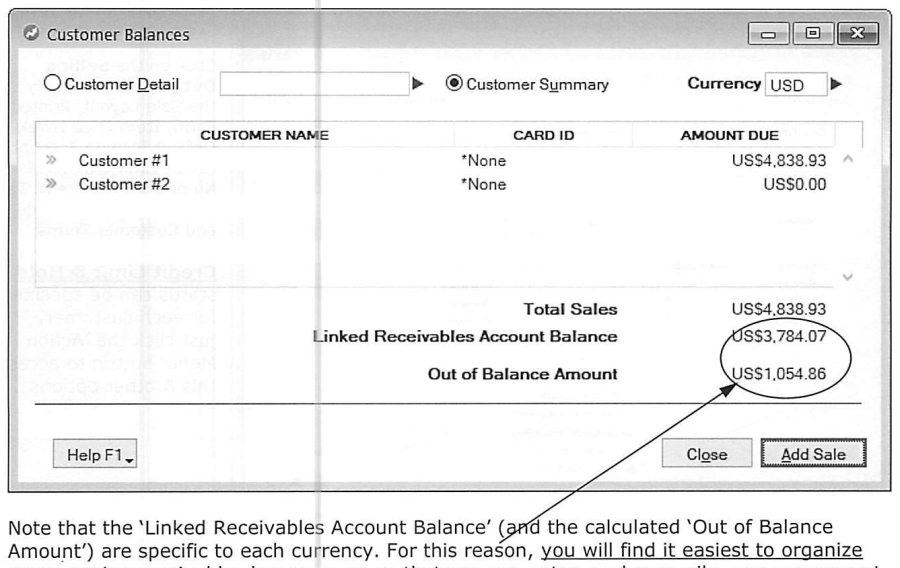
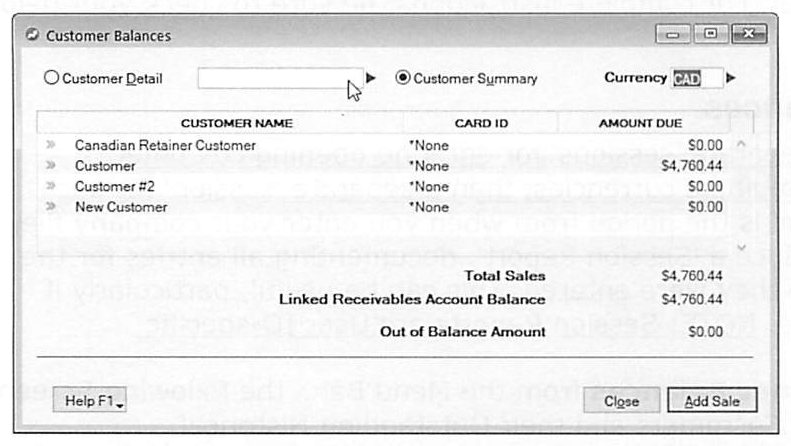
The guide recommends working in separate "sessions" per currency when entering opening receivables (a session runs from opening the company file to exiting it; AccountEdge can print a user-ID-specific Session Report of everything entered in a session, in order). Setup » Balances » Customer Balances: select the currency first if multi-currency is active, then add customers and their outstanding historical receivable balances -- the screen tracks Total Sales entered, the Linked Receivables Account Balance, and the Out of Balance amount, all specific to the selected currency.
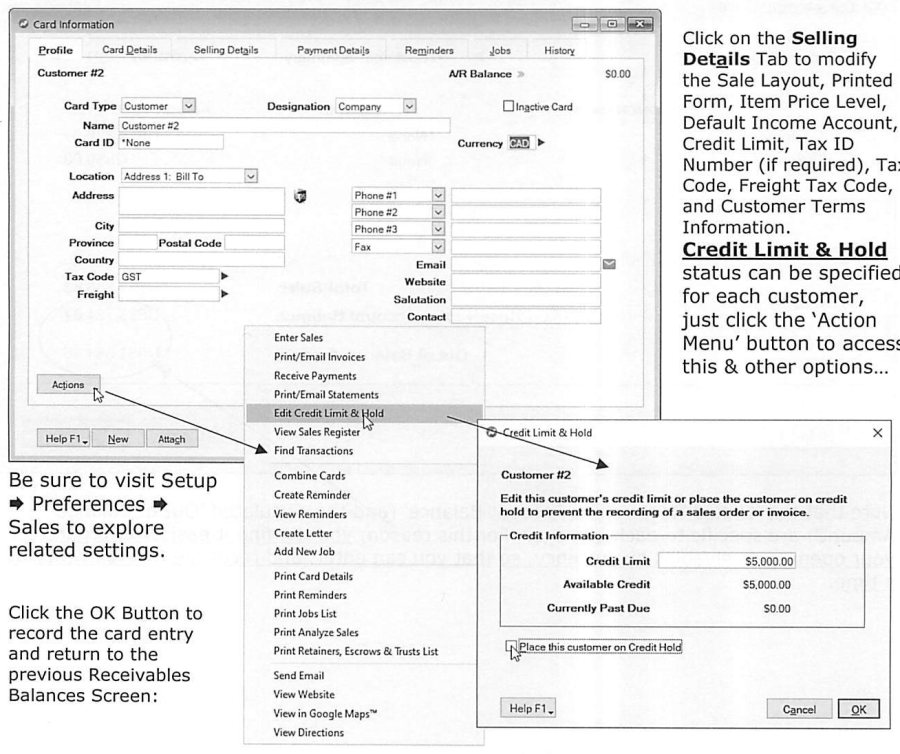
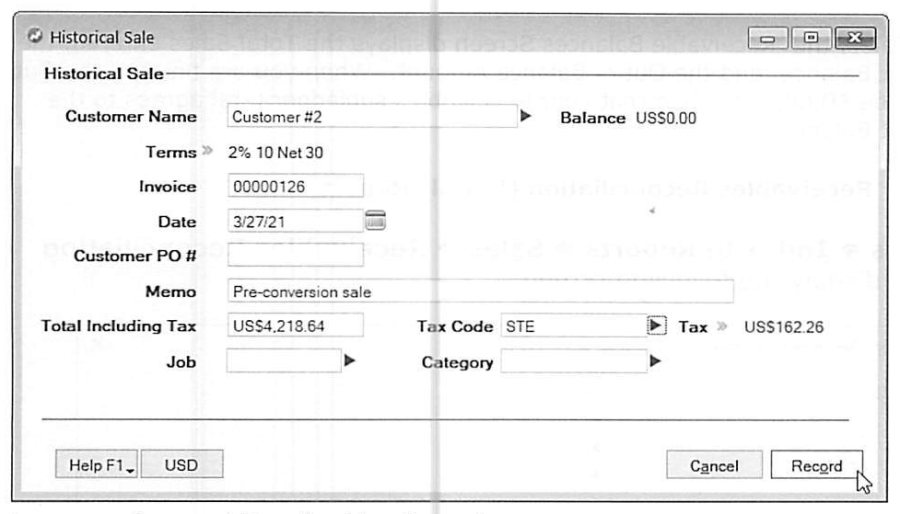
For each historical customer, either select an existing card or type a new name; the New icon opens the full Card Information dialog (Credit Terms, Tax Code, Currency, Credit Limit & Hold, and more -- covered fully in Daily Applications), while Easy-Add creates a minimal card and proceeds straight to the balance. Clicking Add Sale opens the Historical Sale window: Terms default from the card (editable per sale via the zoom arrow); Invoice # should be the original invoice number of the outstanding historical invoice; Date must be the true original transaction date (it precedes the conversion date and drives accurate aged-receivables reporting); Memo defaults to "Pre-conversion sale"; Total Including Tax is the net amount due in the originating currency; a customer credit balance can be entered as a negative sale; Tax Code and Tax preserve full sales-tax history for future early-payment-discount and bad-debt-recovery calculations; Job and Category allocation only appears if the Category feature has been turned on. If multi-currency is active, a currency-exchange-rate icon lets you verify or set the rate for that specific historical transaction (either the rate as of the original date, or as of the conversion date) -- AccountEdge automatically computes gain/loss due to rate changes once the transaction is later paid.
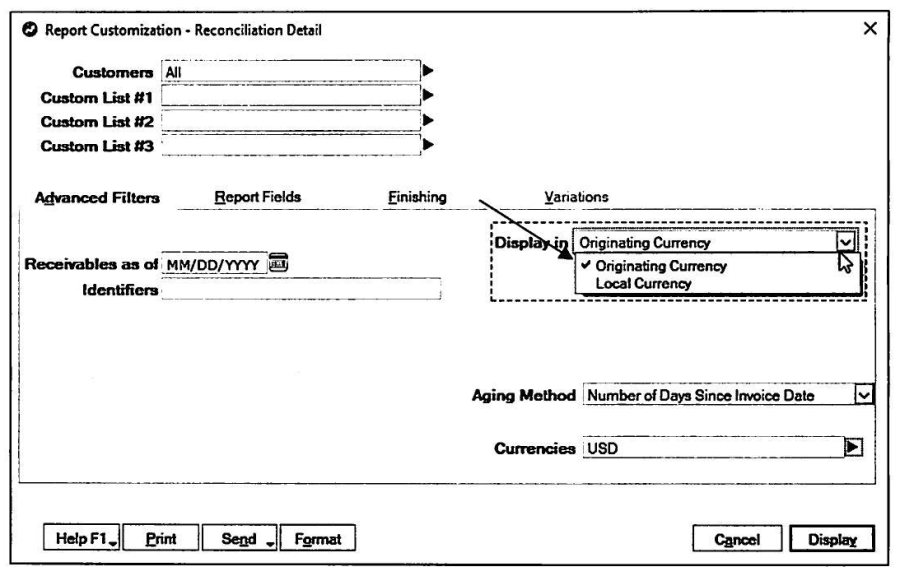
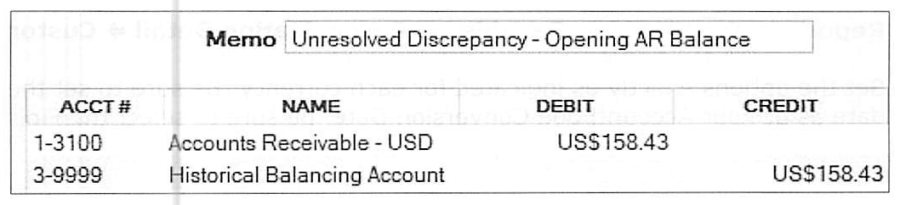
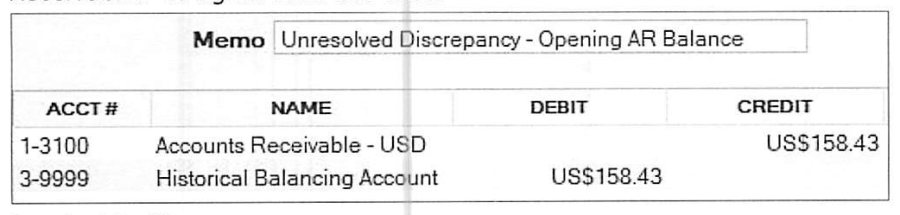
To confirm everything ties out, run Receivables Reconciliation (Detail) (Reports » Index to Reports » Sales » Receivables Reconciliation Detail), customized per currency with "Receivables as of" set to the conversion date and Finishing set to "Originating Currency." The Grand Total should agree with the Receivables Account balance, with an Out of Balance amount of $0.00 -- print and retain this with your source documents. If the total is incorrect, post adjusting entries or edit incorrect entries and reprint. If the total is correct but still doesn't tie to the linked account, there's an unresolved discrepancy in the old records: record a Journal Entry as of the first day of the conversion month, debiting or crediting the linked Asset Account for Tracking Receivables (whichever direction is needed) against the Historical Balancing Account. Repeat this whole process, one exited/re-opened session at a time, for each currency with receivable balances. Optionally, Customer Sales History can be entered on the Card File's History tab -- up to five years of monthly totals plus year-to-date (the "Customer Since" field is never auto-populated and must be entered manually if wanted).
Entering Opening Vendor Balances
Source: p.85-86
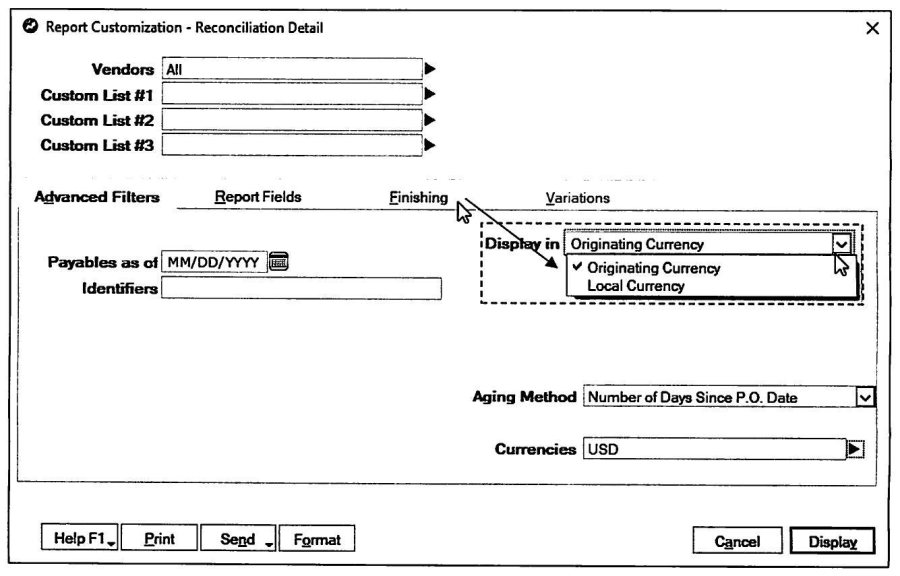
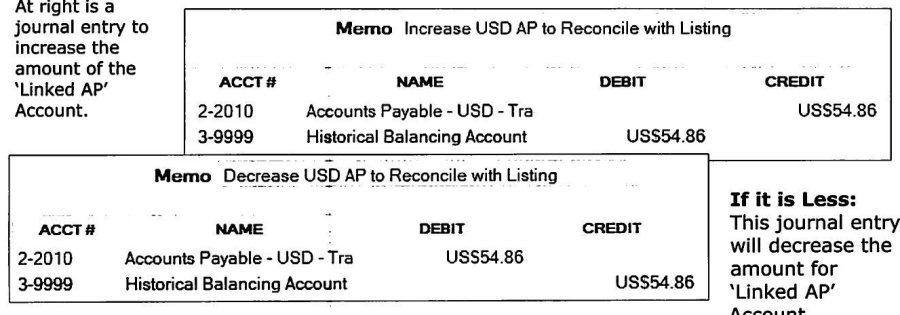
Entering opening vendor (payable) balances follows the identical procedure via Setup » Balances » Vendor Balances -- review the customer-balances section above first if you haven't already, and check Daily Applications for the fuller Vendor Card treatment. Once entered, run Purchases Reconciliation Detail (Reports » Purchases » Payables » Reconciliation Detail), set per currency with "Payables as of" the conversion date and "Display In: Originating Currency." If the report is incorrect, post adjustments or edit entries (transactions must be flagged as changeable under Setup » Preferences » Security first) and reprint. If the sub-ledger total is confirmed correct but still doesn't balance to the linked account, record a Journal Entry as of the first day of the conversion month between the linked Accounts Payable account and Historical Balancing, in whichever direction reconciles the difference. Repeat per currency with payable balances, each in its own session. Vendor Purchase History can optionally be entered on the vendor Card File the same way as customer sales history.
Entering Outstanding 'Pre-Conversion' Checks & Deposits
Source: p.87-90
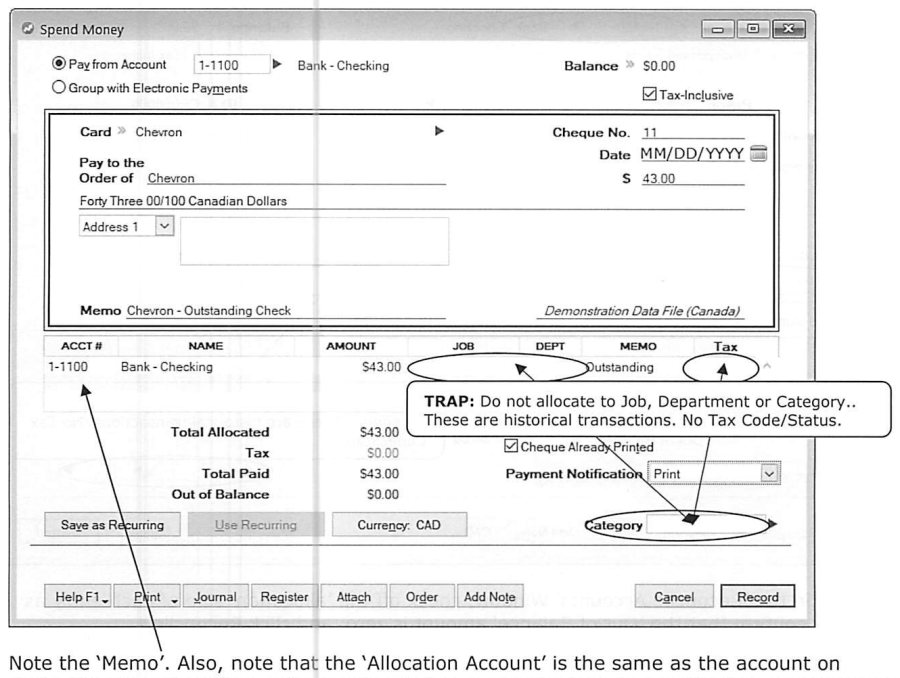
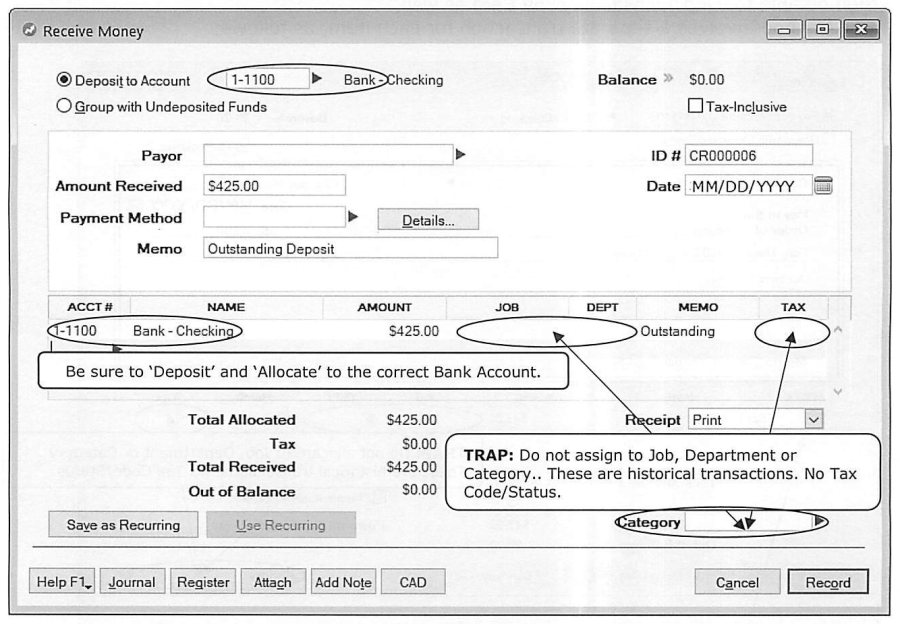
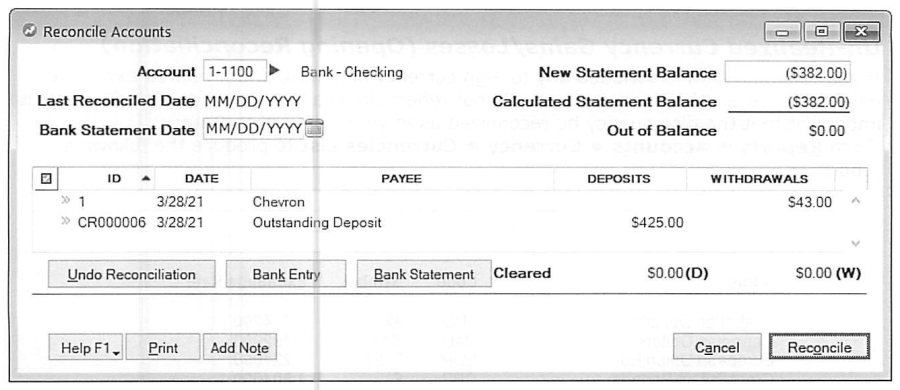
Recording items outstanding from before the conversion date gives an accurate record of when they clear and produces a clean, complete reconciliation of the first post-conversion bank statement. Two approaches: (1) a single Journal Entry against the checking account, with a separate debit for each uncleared deposit and credit for each uncleared check, plus a balancing line item if debits and credits don't naturally match, then reconciling those individual lines against the actual bank statement in Reconcile Accounts (enter the statement's ending balance and closing date, mark every check/deposit and the balancing line that appear on the statement, click Reconcile, and print the report). (2) A separate transaction per item -- recommended when there are many outstanding items, since it lets you record check number, payee/payor, and other detail, and link each transaction to a card so it surfaces later under Find Transactions by Card. Outstanding checks are entered via Spend Money, outstanding deposits via Receive Money -- in both cases, the allocation account is set to the same account the check/deposit was written against or deposited into, so no account balances actually change when recorded (confirmed by "recapping" the transaction). The guide flags a trap: do not allocate these historical entries to Job, Department, or Category, and they carry no Tax Code/Status. Once entered, mark off each item's allocation line in Reconcile Accounts until Out of Balance reads $0.00, then print the Reconciliation Report and repeat for each detail bank or credit-card account. Tip: avoid dating any new/current transactions on the first day of the conversion month, so a clean "as of conversion date" reconciliation report showing only pre-conversion outstanding items can always be reprinted later -- this can be enforced with Setup » Preferences » Security » Lock Period: Disallow Entries Prior To. Trick worth considering: the same single-item transaction technique used here for checks and deposits can be adapted for other balance-sheet accounts where historical detail is useful, such as prepaid expenses or customer/vendor deposits (the guide notes deposits are "a little more complex" and depend on understanding how AccountEdge manages them against outstanding orders).
Un-Realized Currency Gains/Losses (Opening Reconciliation)
Source: p.91-92
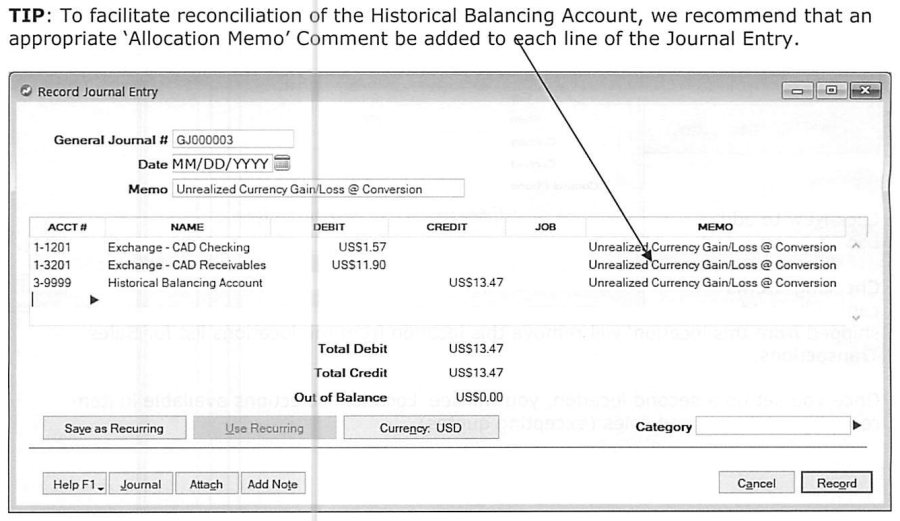
If opening figures included foreign-currency balances and the related exchange-account balances were inaccurate or didn't reflect unrealized gains/losses, that discrepancy needs to be recognized as of the conversion date. First print Currencies List (Reports » Accounts » Currency » Currencies List) as a permanent record of the exchange rates in effect at conversion. Then run Currency Unrealized Gain/Loss (Reports » Accounts » Currency » Unrealized Gain/Loss), which shows the gain or loss per linked exchange account that needs posting, with the total closed to the Historical Balancing Account via a Journal Entry dated as of the conversion date. Posting rules: for an asset account, debit a gain (or credit a loss) to the linked exchange account; for a liability or equity account, credit a gain (or debit a loss). Tip: attach a clear Allocation Memo to each line to make future Historical Balancing Account reconciliation easier. Note: this is strictly the one-time "opening" entry procedure -- recurring unrealized gain/loss accruals (e.g. at each period end going forward) are covered separately in the Period-End Procedures training guide.
Inventory Command Center: Setting Up Locations & Creating Items
Source: p.93-100
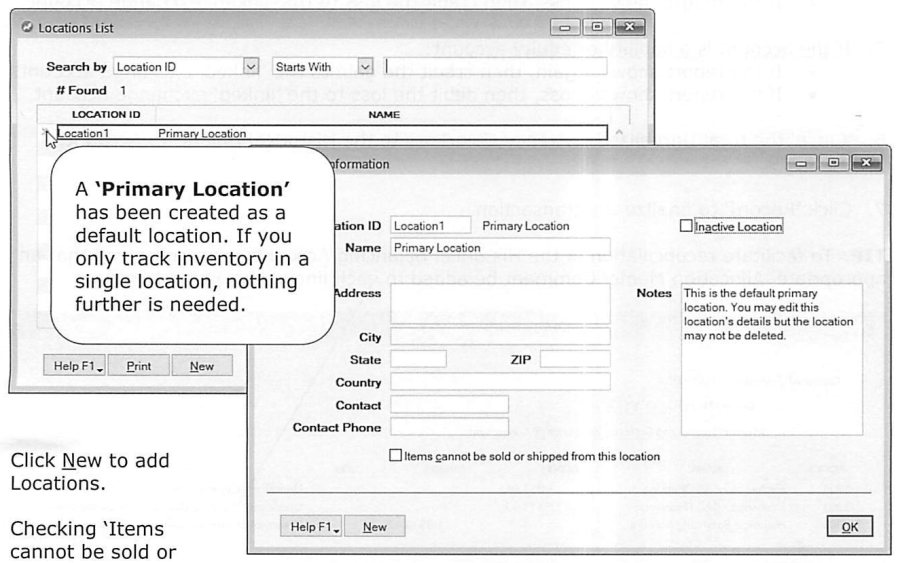
AccountEdge's inventory system is described as matching or exceeding "much more expensive programs." Locations (Lists » Locations) support use cases like multiple warehouses, or a main warehouse plus sub-inventories -- stock held by sales/service/delivery staff, stock on consignment, or components in-process with a sub-contractor who is processing raw materials the business still owns. A "Primary Location" exists by default, and if only one location is ever tracked, nothing further is needed. A location can be flagged so items "cannot be sold or shipped from" it, removing it from sales-transaction location pickers. Once a second location is added, Location selectors appear throughout items, purchases, and sales (except quotes).
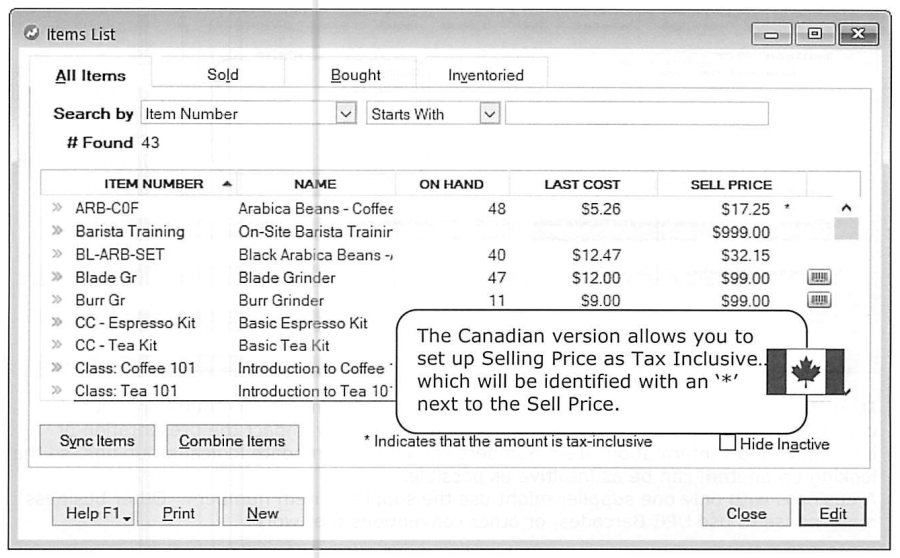
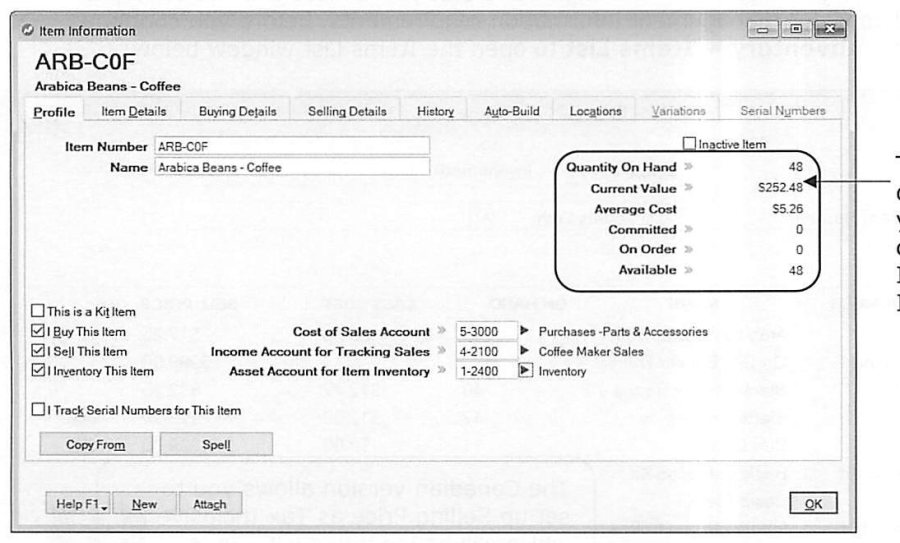
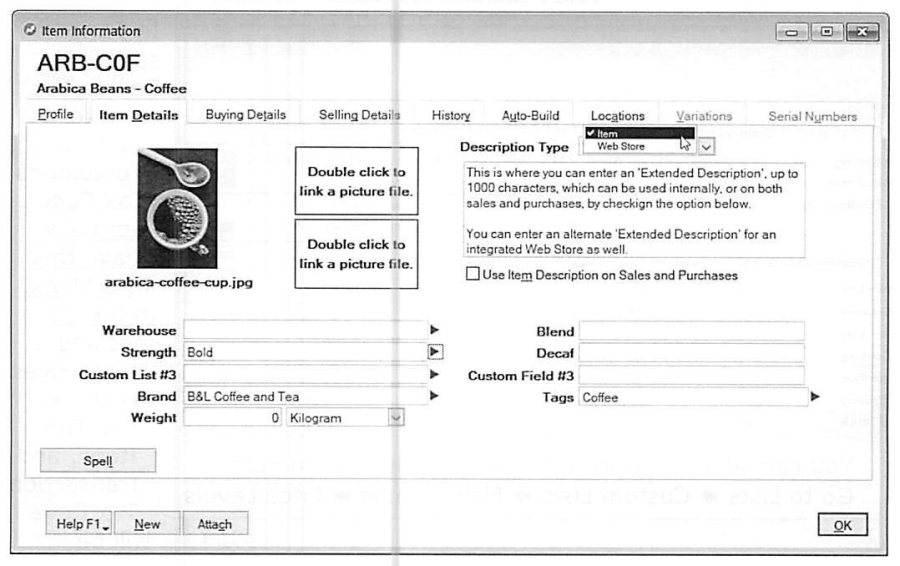
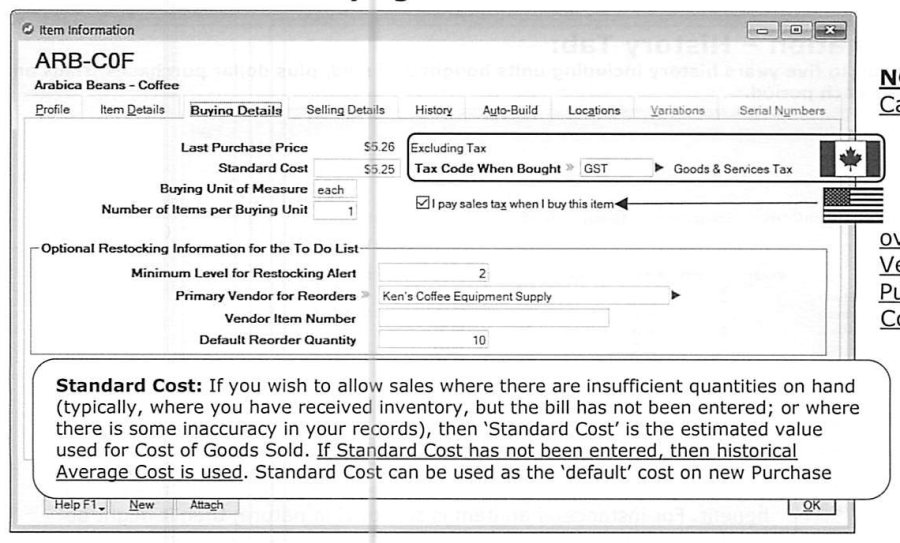
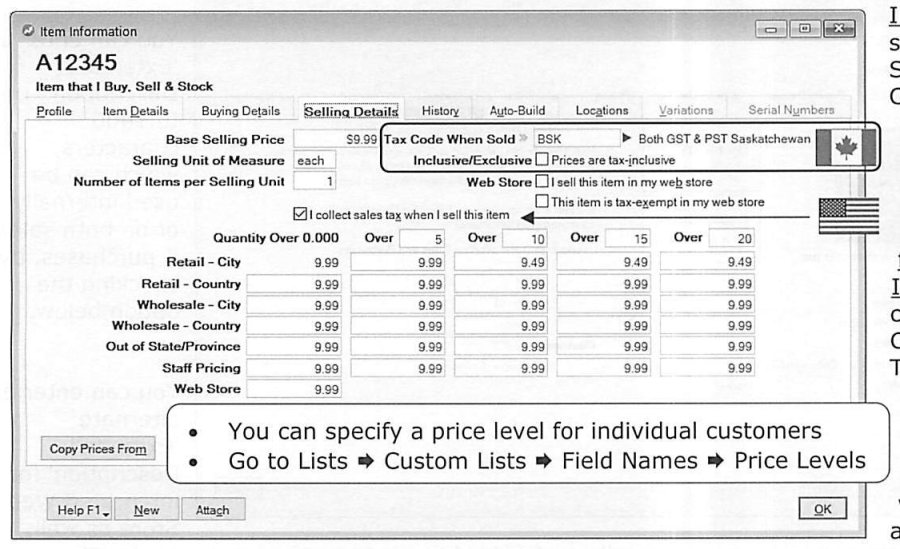
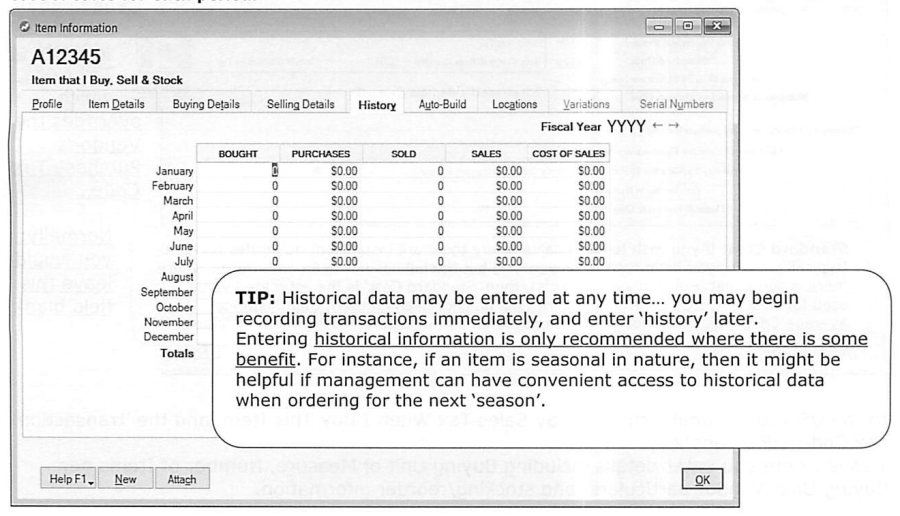
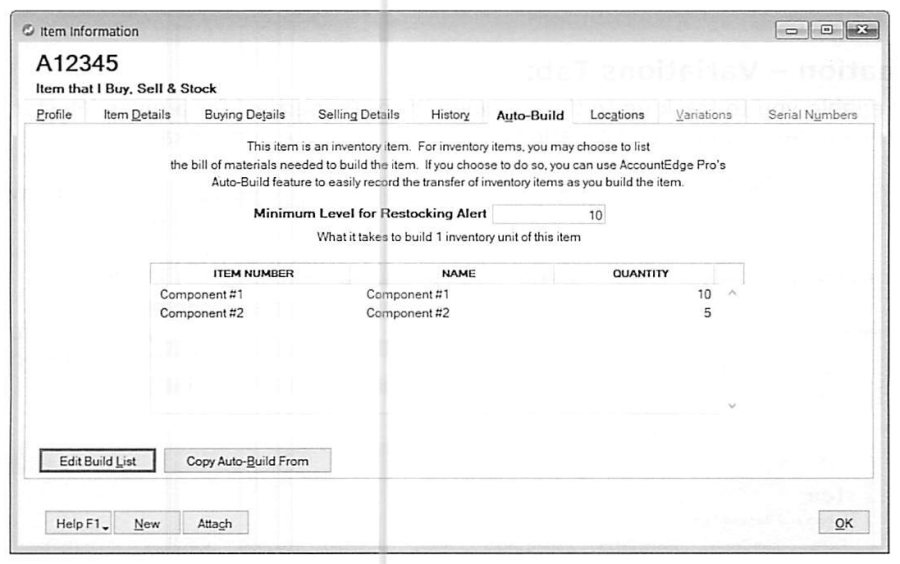
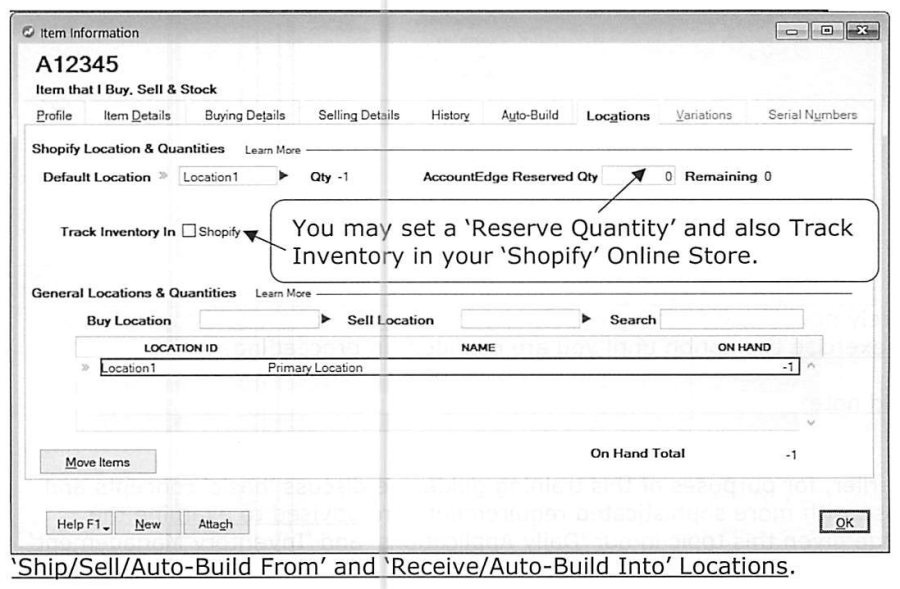
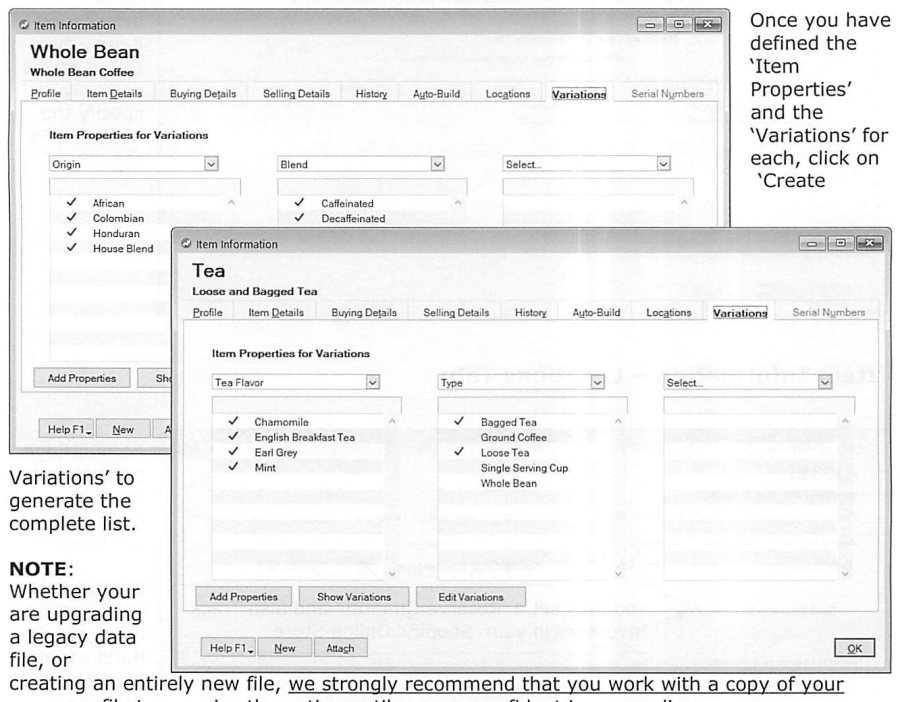
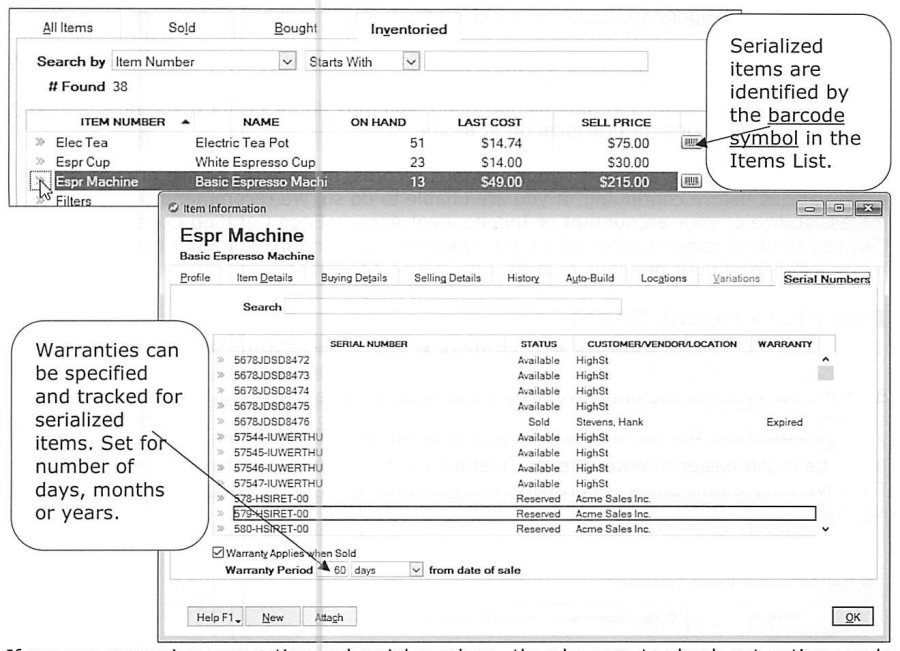
Creating items (Inventory » Items List) starts with a strong caution: items fall into any combination of Sold, Bought, and Inventoried, and "once you have set up an item AND processed transactions, you may not be able to change the setup" -- the guide directs reps to Daily Applications or Professional Inventory Management for full depth, and to involve a Certified Consultant if unsure. Trick: large item files can be imported from Excel, text, or Word rather than hand-keyed. Item Information is organized into tabs: Profile sets the Item Number (up to 45 alphanumeric characters -- often supplier item numbers or UPC codes) and Name, plus which of Buy/Sell/Inventory apply and their linked Cost of Sales, Income, and Asset accounts (buying increases on-hand count and asset value; selling decreases on-hand count and asset value by average cost, increases the Income account by the selling price, and increases Cost of Sales by the average cost). Item Details holds an Extended Description (up to 1000 characters, usable on sales/purchases and separately for an integrated web store), a linked picture, fully customizable Custom Lists/Fields (grouping, substitutes -- detailed in Daily Applications), and Brand/Tags/Weight fields for web-store use. Buying Details covers Purchase Price, Standard Cost (the estimated COGS value used when selling with insufficient on-hand quantity, or as the default PO cost if set -- otherwise historical Average Cost is used), Buying Unit of Measure and quantity-per-unit, the Tax Code When Bought (Canada) or "I Pay Sales Tax When I Buy This Item" checkbox (US), plus restocking alert level, primary reorder vendor, and default reorder quantity. Selling Details covers Base Selling Price, the Tax Code When Sold (Canada) or "I Collect Sales Tax When I Sell This Item" checkbox (US), tax-inclusive pricing, up to six price levels (retail, wholesale, staff, web store, etc.) each with up to five quantity price breaks, per-customer price-level assignment via Lists » Custom Lists » Field Names » Price Levels, and web-store sell/tax-exempt flags. History holds up to five years of monthly bought/sold/cost-of-sales figures plus year-to-date, enterable at any time -- most useful for seasonal items. Auto-Build defines the bill of materials for assemblies/bundles built from other inventoried items, with its own restocking alert level. Locations sets default Ship/Sell/Auto-Build-From and Receive/Auto-Build-Into locations, shows on-hand quantity by location, and can sync a reserve quantity with a Shopify online store. Variations tracks up to three "Item Properties" (e.g. Flavor, Origin, Type) on a Master Item, then generates every combination as its own Variation -- a pre-existing item cannot be used as a Master Item, and the guide recommends testing on a copy of the company file first. Serial Numbers tracks status (Available/Sold/Reserved), the associated customer/vendor/location, and warranty period (days/months/years from sale date) per unit, with reporting under Reports » Inventory » Serial Numbers and lookups via Find Transactions » Search by Serial Number.
Counting Your Stock & Inventory Value Reconciliation
Source: p.101-105
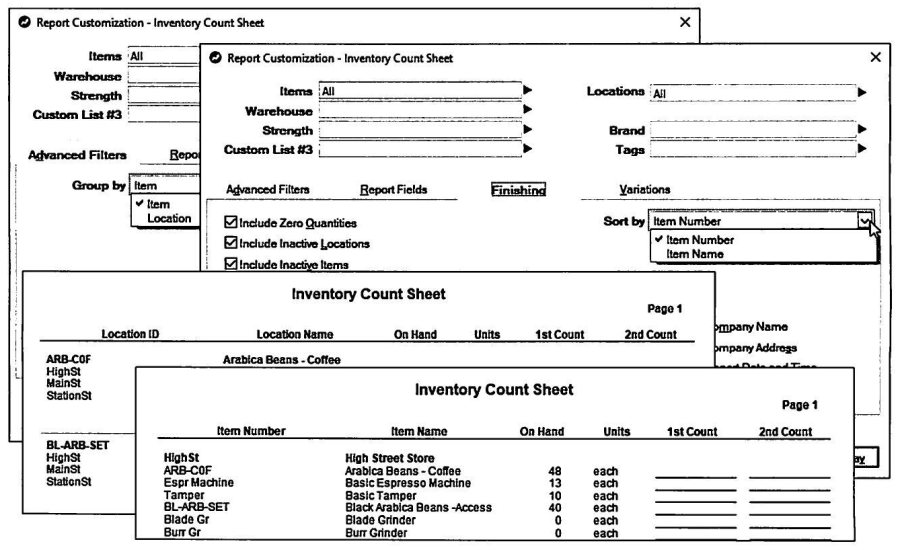
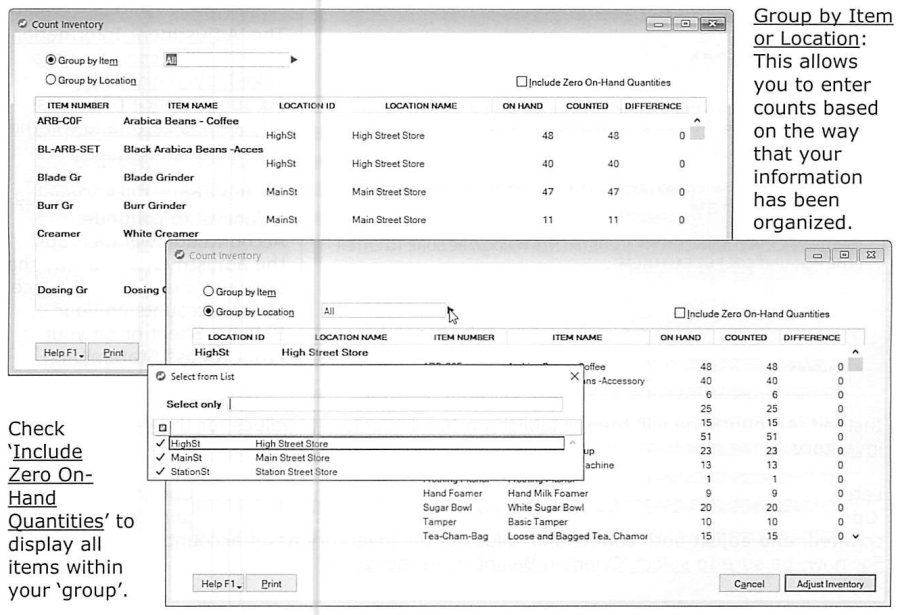
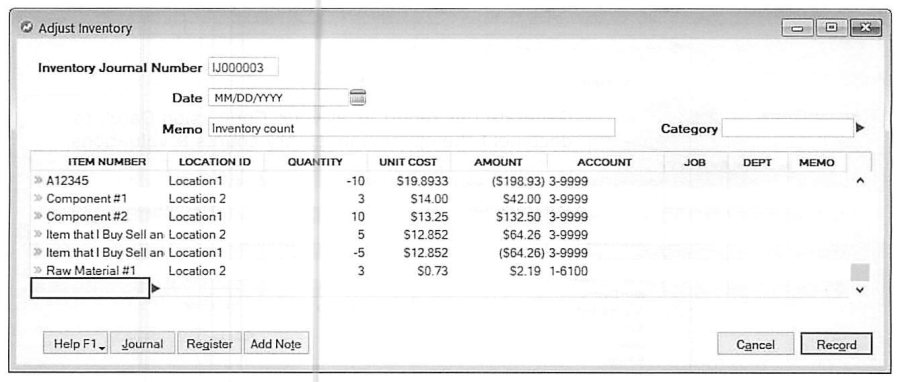
After every item is set up, enter the opening count and value for each so it agrees exactly with the corresponding inventory asset account's opening balance (leaving that account's opening value at zero lets AccountEdge compute and post the correct balance automatically). For a very large inventory, it's often easier to post counts/valuations one asset account, or one location, at a time. An Inventory Count Sheet (Reports » Inventory » Inventory Count Sheet, grouped by Item or Location, sorted by Item Number or Description) is useful for transcribing counts from a prior system before keying them in. Actual entry happens under Inventory » Count Inventory, grouped by Item or Location, optionally including zero on-hand quantities, with a Counted column and an automatically-calculated Difference.
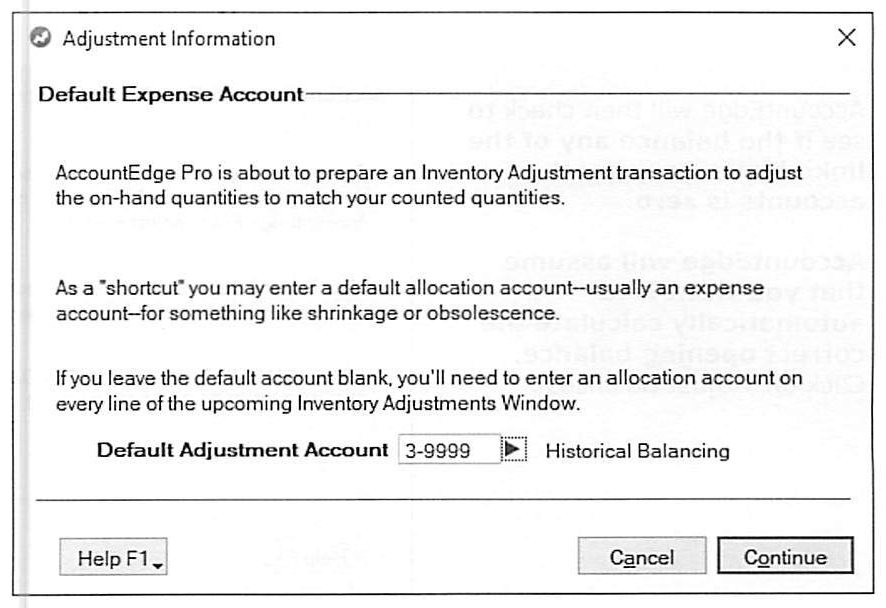
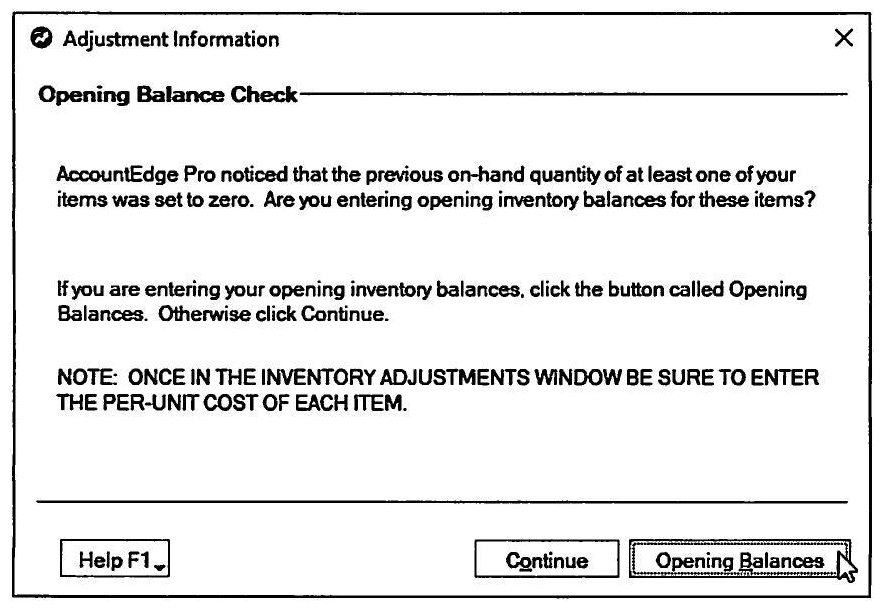
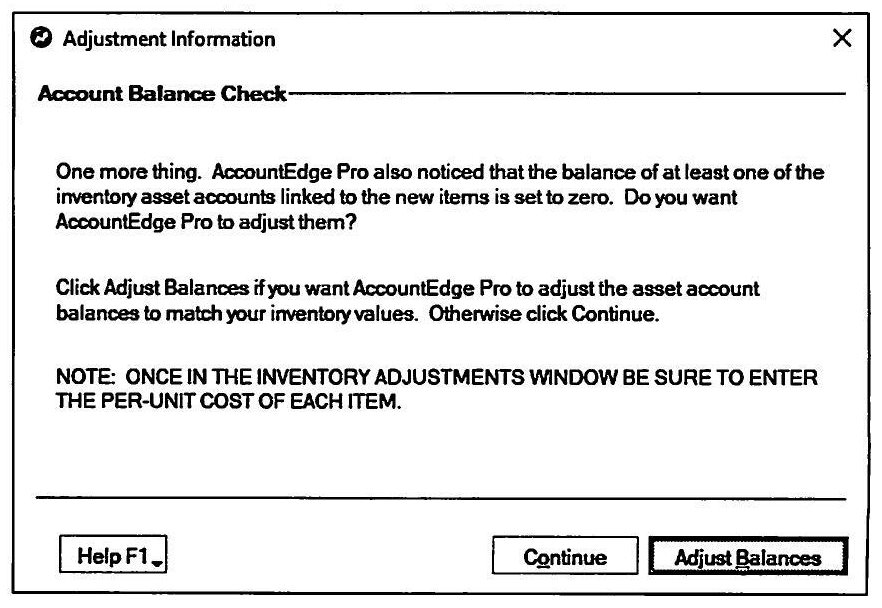
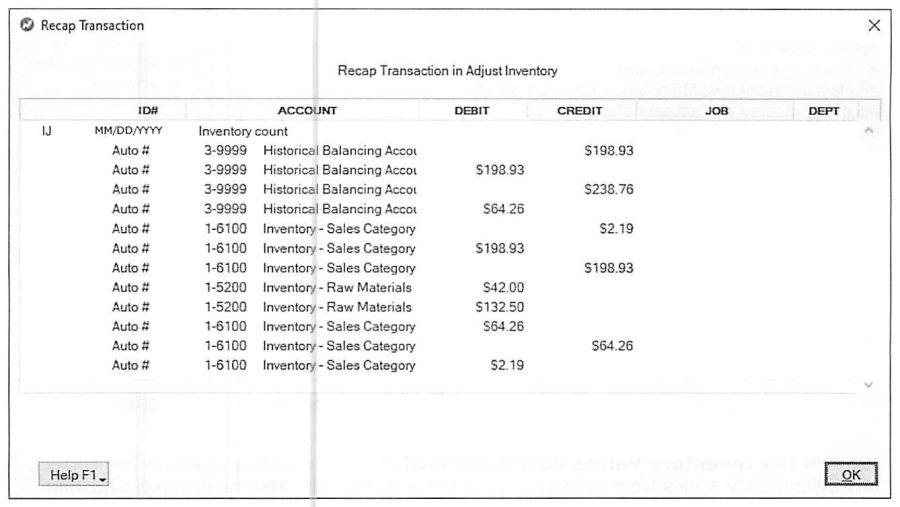
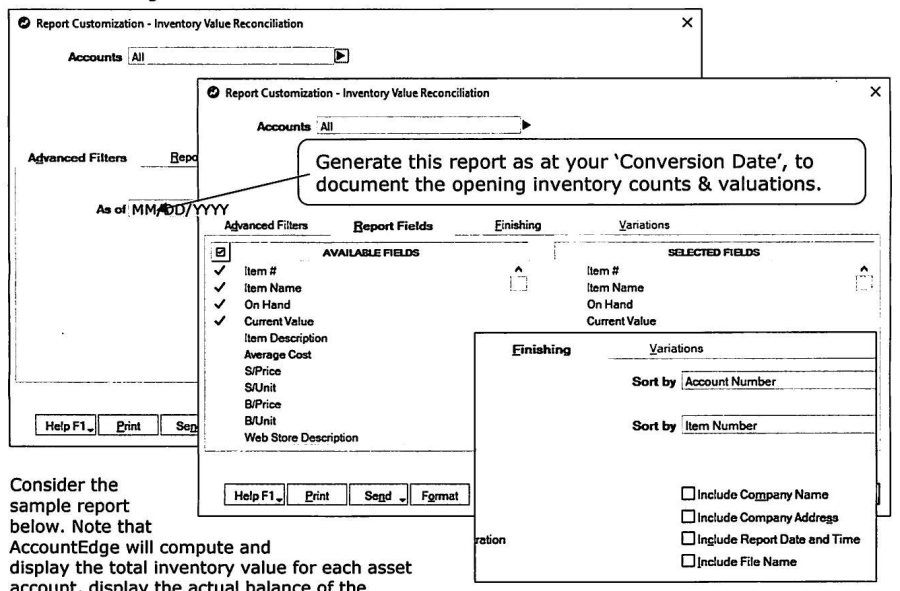
After counting, click Adjust Inventory, set a Default Adjustment Account (the guide recommends the Historical Balancing Account for this opening-balance pass, rather than a shrinkage/COGS account), then enter the per-unit cost or extended amount for each item. AccountEdge distinguishes two modes here: if it detects a linked inventory asset account still at a zero balance, it asks whether you're entering Opening Balances -- choosing that mode posts the adjustment without touching any Balance Sheet or P&L account balance (it's purely establishing the starting point). Choosing Continue instead is for real cycle counts later, where AccountEdge records actual shrinkage/gain and adjusts both the counts and the dollar value of the inventory asset accounts. It's important to select Opening Balances during initial setup, not Continue. Finally, run Inventory Value Reconciliation (Reports » Inventory » Inventory Value Reconciliation, as of the conversion date) to compare AccountEdge's computed inventory value per asset account against the account's actual balance -- the Out of Balance figure should be zero; if not, resolve it with the same style of adjusting entry used for receivables.
Historical Balancing Account: Final Reconciliation, Audit Tracking & the Business Calendar
Source: p.106-108
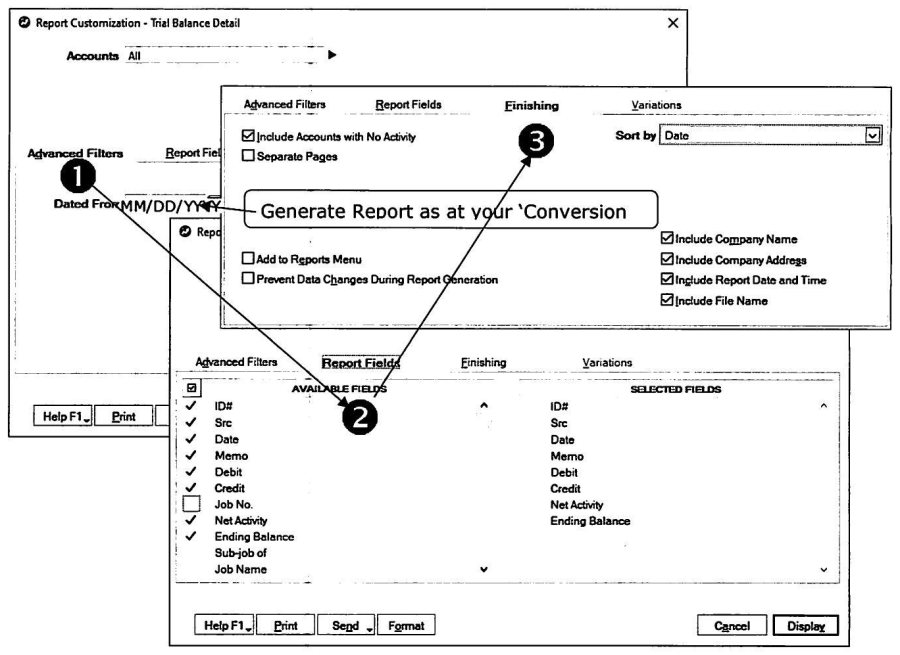
Once opening account balances, historical receivables/payables, outstanding checking items, opening inventory, and any unrealized currency gain/loss entries are all recorded, run Trial Balance Detail (Reports » Accounts » General Ledger Trial Balance » Trial Balance Detail, as of the conversion date, including accounts with no activity) and check whether account 3-9999 Historical Balancing carries an ending balance. If it does, the guide lists the likely causes to investigate: incomplete, inaccurate, or incorrectly-entered opening account balances; opening receivables not matching the linked account total (re-run the Receivables Reconciliation Detail report per currency); opening payables not matching the linked account (same, for Payables); opening inventory valuations that differed from the prior system's closing figures; incomplete or inaccurate opening exchange-account balances; or exchange-account balances that didn't reflect unrealized currency gains/losses. Whatever balance remains after correcting what can be corrected should be documented with supporting evidence for your accountant or Certified Consultant to review. If there's no balance at all, the guide's own words: "Give yourself a pat on the back!" -- print a final Trial Balance (Both Summary & Detail, including zero-activity accounts) and retain it as a permanent historical record alongside the old system's source documents.
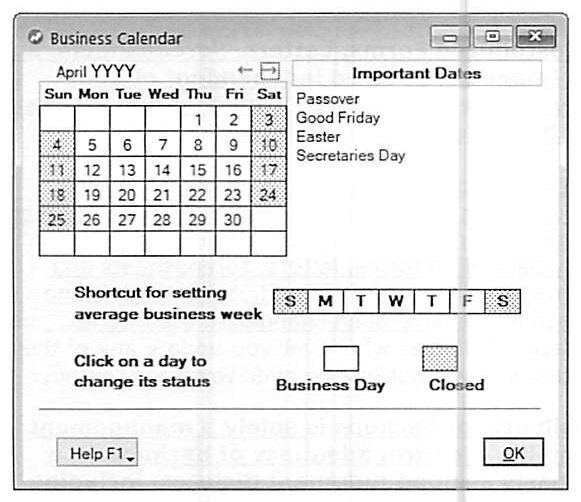
Turn On Audit Tracking (Setup » Preferences » Security) is unchecked by default on a new or upgraded file, to give users room to learn and exercise the program without generating noise in the audit trail -- once setup is complete, turning it on gives an early, reliable read on training or implementation problems. This is also the point to revisit Finalizing Passwords as a non-delegable management responsibility (see the Passwords section earlier in this guide). The Business Calendar (Setup » Business Calendar) defines the normal workweek and important dates and drives how the To Do List reschedules items landing on a non-business day -- they're moved to show on the previous business day instead.
Establishing Backup Procedures
Source: p.109
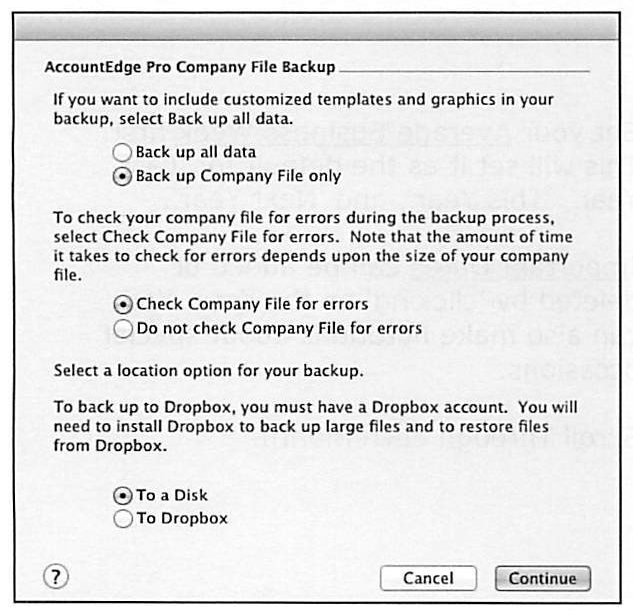
AccountEdge prompts to verify and back up the company file on exit, defaulting to a local "backup" folder -- which does not protect against hard-drive failure or theft. The guide recommends at least five labeled, rotating backup media sets: two rotating on-site sets (e.g. Mon/Wed/Fri overwritten in turn, Tue/Thu/Sat overwritten in turn) so any given day has a backup from the close of the previous two business days, plus three weekly off-site sets retained longer-term. All backups should compress data and verify as part of the process. The author's stated bias: backup responsibility should sit with whoever is responsible for the accounting -- "DO NOT rely on backup systems managed by anyone else, such as your IT Manager... your financial records are simply too valuable." When backing up, "Back up all data" includes customized forms, letters, spreadsheets, and graphics (stored independently of the company file itself); "Backup Company File only" does not. Restoring an "All Data" backup restores everything in that snapshot, potentially overwriting anything changed since -- so back up "all data" whenever customized files change, to avoid losing or overwriting them by accident. Options include checking the file for errors during backup (time cost scales with file size) and backing up to local disk or Dropbox (useful for mobile users).
Customizing Forms: The Toolbar & Customize Form Window
Source: p.110-114
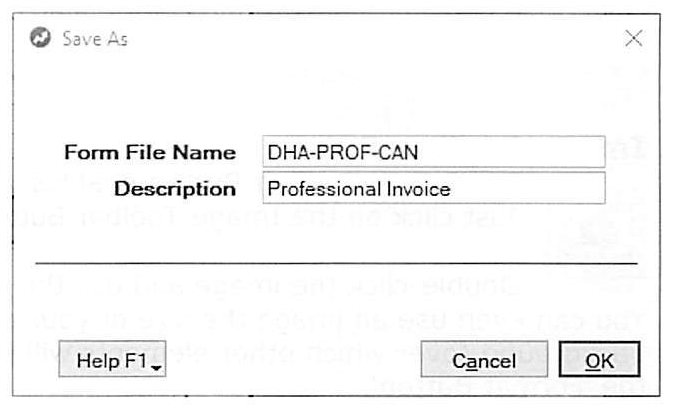
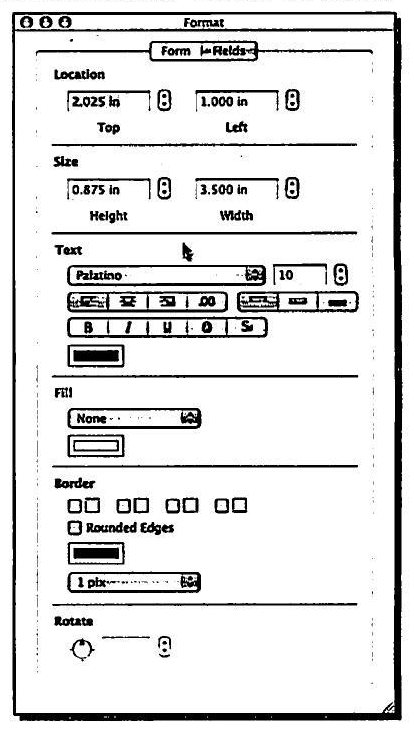
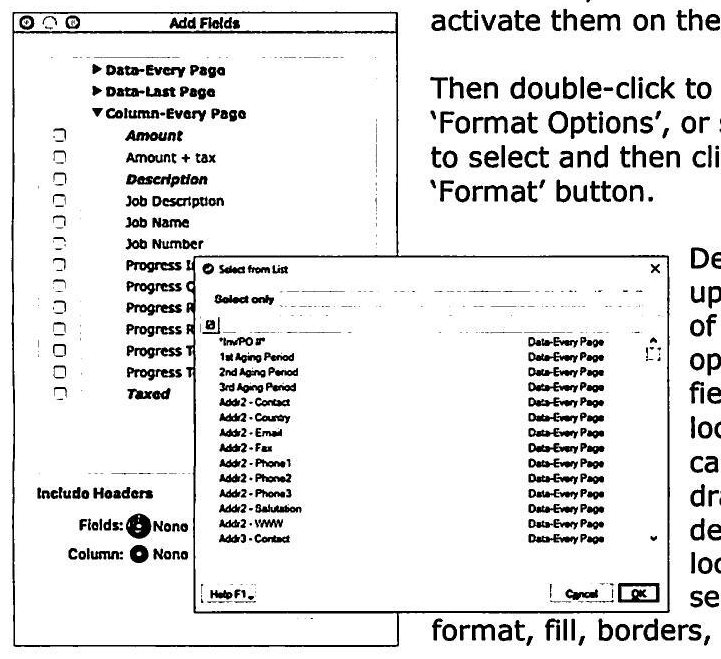
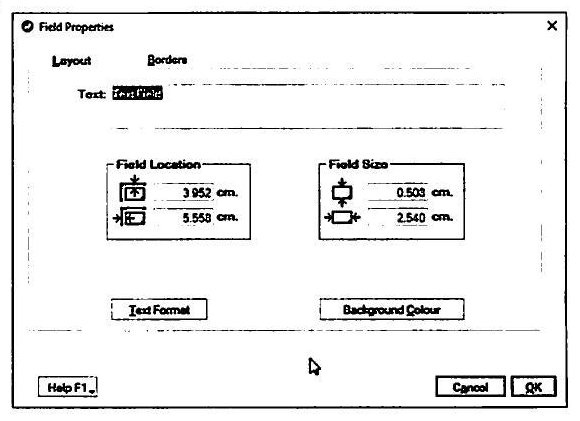
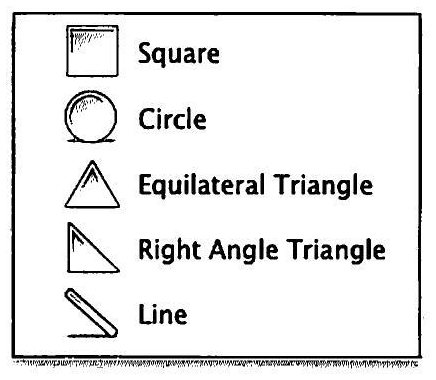
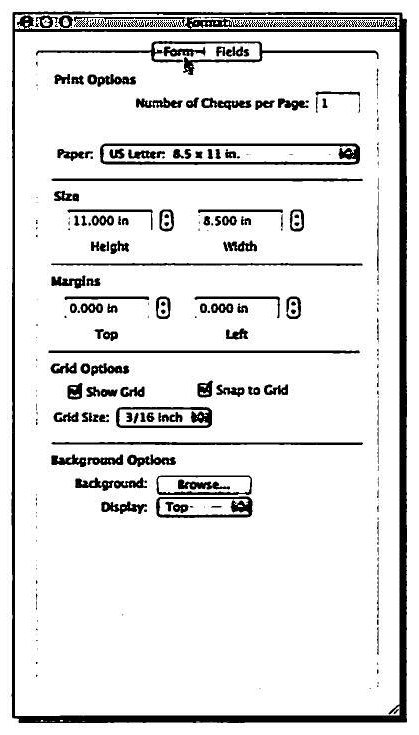
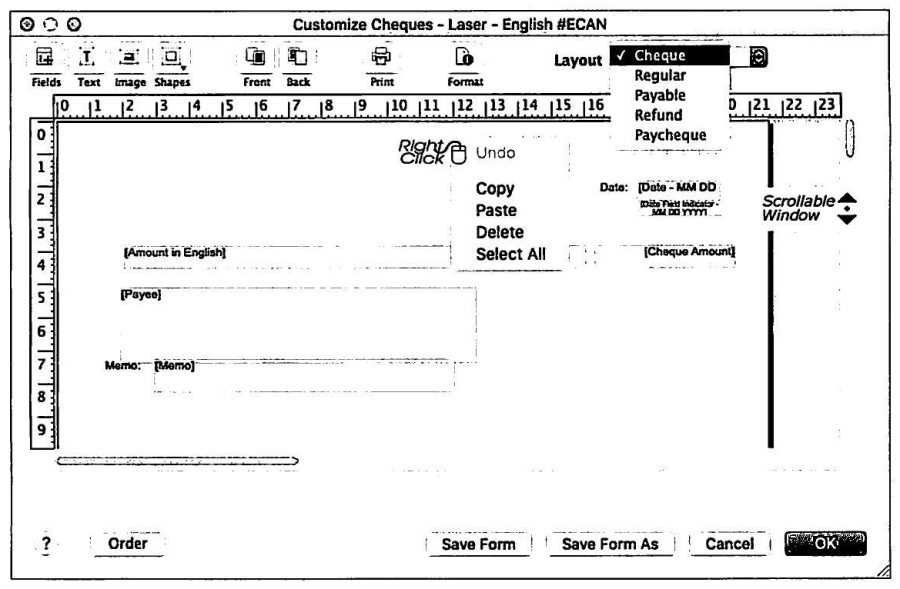
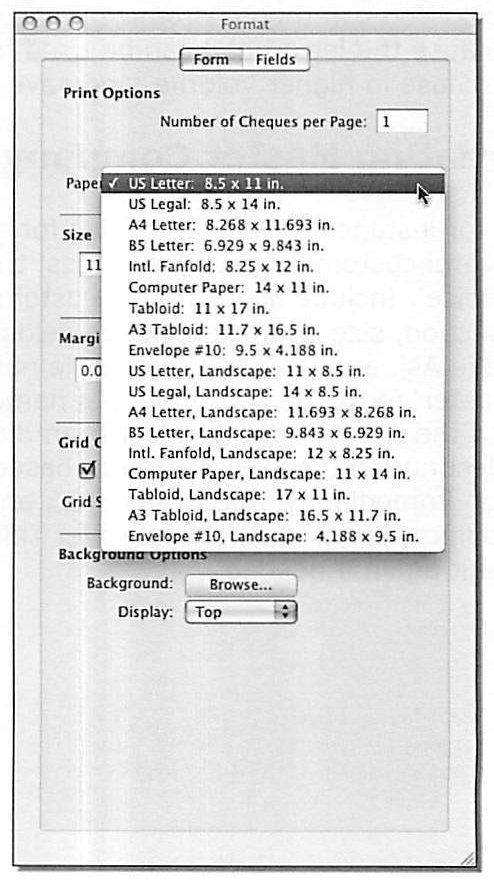
Setup » Customize Forms (or the Customize option available from any Print menu) covers checks, paychecks, receipts, payment notifications, invoices, statements, purchase orders, pay stubs, deposit slips, and mailing labels -- described as needing "no special training or talent." The Customize Forms window shows a ruler (inches or centimeters, per the OS's regional settings) and a consolidated toolbar: Save Form frequently, and use Save As with a unique Form File Name before making extensive changes, so the original can always be recovered. Select Fields opens a picker of available data fields to activate on the form; double-click a placed field (or select and click Format) to open Format Options for size, location, font, fill, borders, and rotation. Text creates a free-form Custom Text Field (up to 255 characters) that can then be dragged and styled. Image places a graphic image field -- including using a full-form image as a watermark or background. Shapes (Rectangle/Line) behaves differently by OS: Windows offers a rectangle tool, macOS a dropdown of shapes (triangle, line, etc.) -- same Format Button customization applies either way, and right-click gives Undo/Delete. Move Front/Move Back reorders overlapping elements, useful when elements sit close together or should intentionally overprint. Print Preview previews or prints and exposes print setup (portrait/landscape depends on the selected printer). The Format buttons expose Form-level options (forms per page, paper size including several landscape variants, margins), Grid Options (Show Grid, Snap to Grid, grid size), and Background Options (browse for a background image and choose a display mode).
A practical tip on default fonts: a different default (e.g. Verdana) may look nicer but changes how much fits -- Windows' default Arial 9pt accommodates a 121-column report where Verdana only fits 107 -- and the chosen font should display well both on screen and in print, especially for forms emailed as PDFs. Default fonts are changed under Setup » Preferences » Reports & Forms » Forms, and only affect the stock forms shipped with the software, not forms already customized.
Special-Purpose, Sales, and Statement Forms
Source: p.115-118
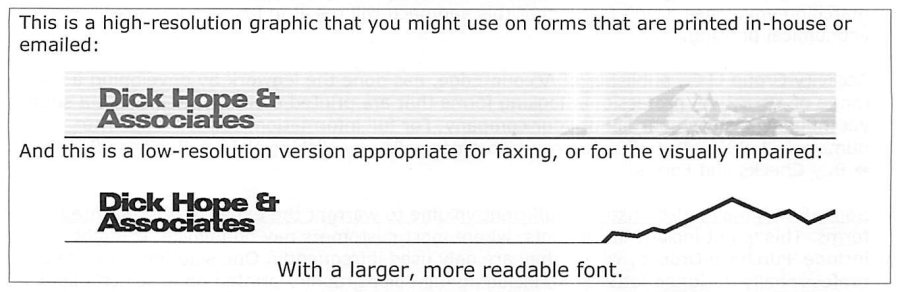
Special Purpose Forms: for faxing or visually-impaired recipients, use larger, more readable fonts and simplified, lower-resolution graphics. For emailing as PDF, favor a more "standard" font in case it isn't installed on the receiving computer, and weigh the cost/print-time impact of color as a courtesy to the recipient. The Format Button's paper-size list (Legal, A4, Fanfold, Tabloid, Envelope, and landscape variants of each) lets a form carry more detail than plain portrait mode allows.
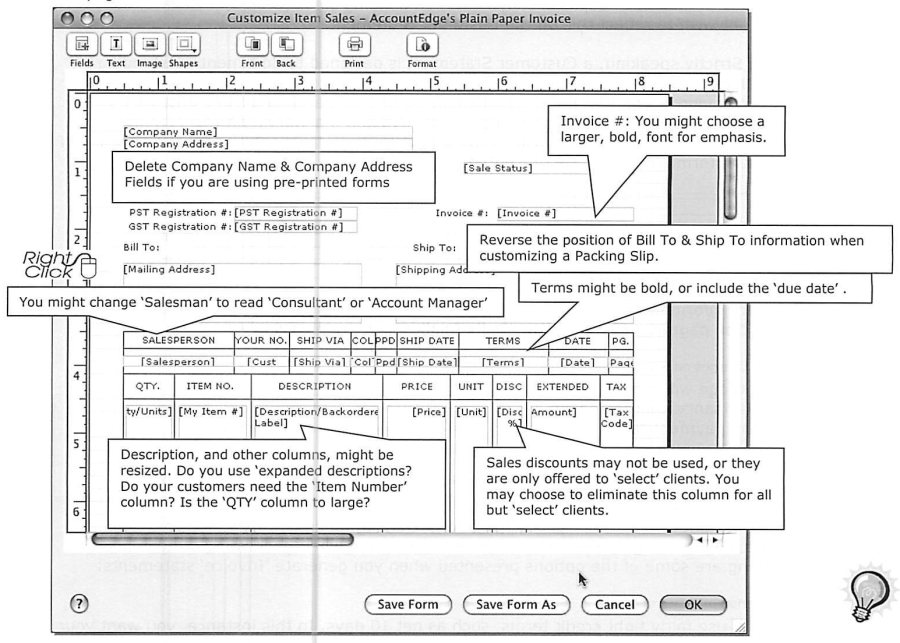
Customer/Application-Specific Sales Forms: common modifications include bolding the Invoice # for emphasis, deleting the Company Name/Address fields when using pre-printed letterhead stock, reversing the Bill To/Ship To position when customizing a packing slip, relabeling "Salesperson" as "Consultant" or "Account Manager," resizing description or quantity columns, and dropping the sales-discount column entirely for clients who never receive discounts. High-volume customers may benefit from added data-entry fields (Category, Fax/Telephone, Job # or Name, Referral Source, State/Provincial Tax ID, Card and Item Custom Fields). A Warehouse Pick-Slip variant of the Item Packing Slip -- built by Save As-ing the base form -- can add Location, "picked by," and "checked by" columns for multi-location businesses.
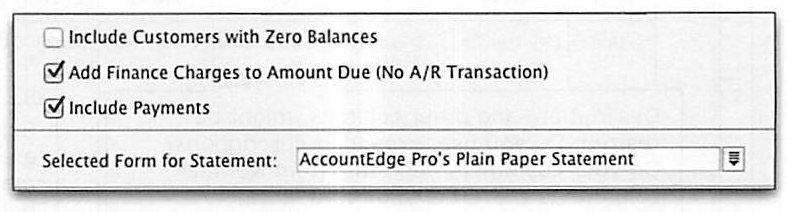
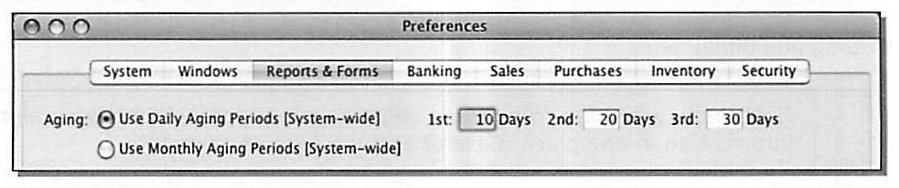
Customer/Application-Specific Statements: a statement technically documents completed-sale receivables, excluding pending Orders -- but many businesses still want deposits visible, so a "Deposits on Sales Orders" line can be added (see Sales Linked Accounts, above, and Daily Applications for full detail). Finance Charges on Statements are computed from each invoice's payment terms and can be folded into the Amount Due (Daily Applications covers this fully); relevant options include including zero-balance customers, adding finance charges to Amount Due, and including payments already received. Aging Periods are set under Setup » Reports & Forms » Aging, using either Daily or Monthly aging buckets -- tight terms (e.g. net 10) usually pair with matching statement aging, and it's worth resetting to industry-standard 30-60-90 buckets when reporting to a banker who expects that convention. Retainer, Escrow, or Trust Statements need balance-forward, in-period transaction detail, and ending balance, supported by Reports » Sales » Other Sales Reports and To Do List reminders (see Daily Applications and Period End Procedures for more).
Vendor/Application-Specific Purchase Forms reuse the same customization concepts as Sales forms, with one notable wrinkle: a vendor may require their own item numbering ("Vendor's Item #") on a purchase order rather than your internal "My Item #." Businesses using Categories or Jobs to manage departments, divisions, or projects may need those fields on purchase forms too, which can in turn require adjusting the form's size or orientation (see "Including more detail than you can normally print," above).
Customizing Checks, Paychecks & Receipts
Source: p.118-123
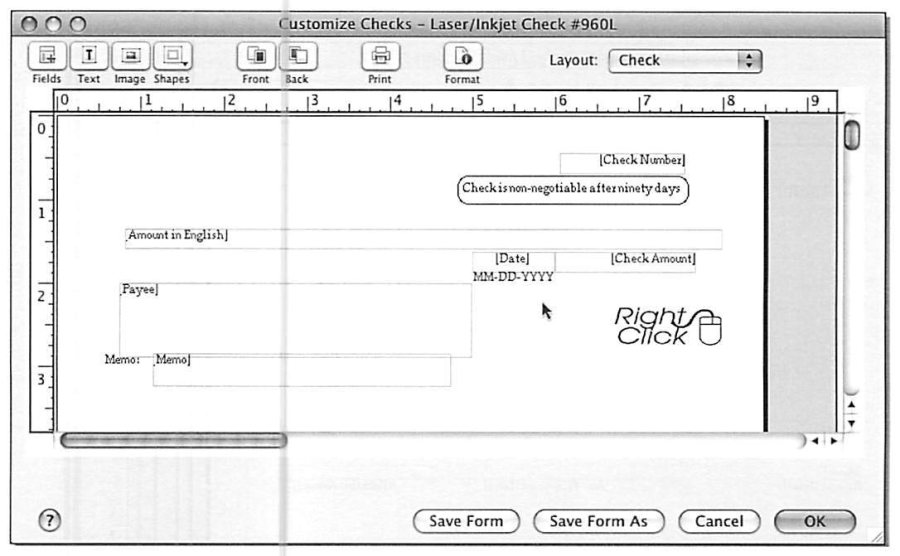
A check's "body" is customized once; there are four distinct stub types, each customized separately. Canadian cheques comply with Canadian Payments Association specifications, and Quebec clients can present the written amount in French. Continuous Feed checks suit high-volume, batch-mode printing on a dedicated dot-matrix printer; Laser checks are the most common, print on any sheet printer, and suit both single on-demand checks and batch runs -- though the guide notes truly high-volume disbursement is better handled through Direct Deposit or Electronic Payment than more paper checks.
Three practical considerations for the check body: Check Number -- pre-printed stock can get out of sequence, so the guide recommends also printing AccountEdge's own "assigned" check number (in a small font) on every check, to simplify reconciliation if the two ever diverge. Date Format -- the US uses MM/DD/YY, Canada/UK/Commonwealth countries use DD/MM/YY, and Quebec uses YYYY MM DD; when dealing with anyone outside your own country, add a text field clarifying which format is in use to avoid ambiguity. Stale-dated checks -- there's no universal legal cutoff for how long a check stays negotiable, and stop-payment orders can be costly or time-limited, so some businesses print a "void after X months" notice on checks (not permitted in Canada; confirm exact wording with your bank or legal advisor either way).
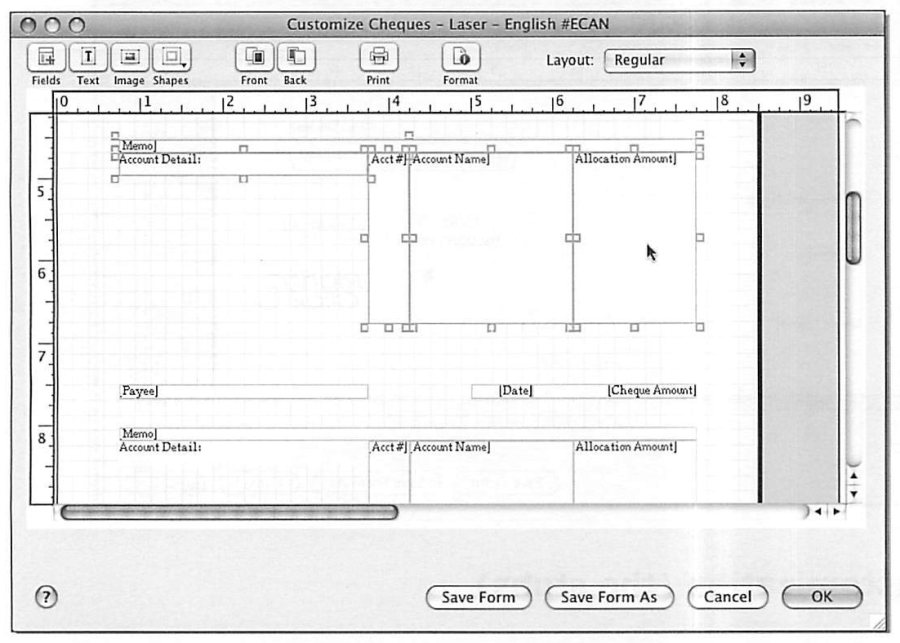
For the stubs: Regular Checks (written via Spend Money) default to printing the account number, account name, and allocation amount -- information the recipient generally shouldn't see. Either don't send the first stub with the mailed check, or delete those fields from stub 1 only (shift-click to multi-select, then hit delete; save the form). Payable Checks (from Pay Bills) need to itemize which bills are being paid and how much on each -- if one stub can't fit them all, delete every field from stub 2 and drag stub 1's bottom column boundary all the way down, giving the check the full space of both stubs; remember to send both stubs with the check, and reprint or photocopy first if you want to retain a paper copy. Print/Email Payment Notifications (Setup » Customize Forms » Payment Notifications) exist separately for Pay Bills, Spend Money, and Credit Refunds, useful for conveying more payment detail than a stub can hold -- especially relevant for Electronic Payments -- and can be printed on demand from the Pay Bills window.
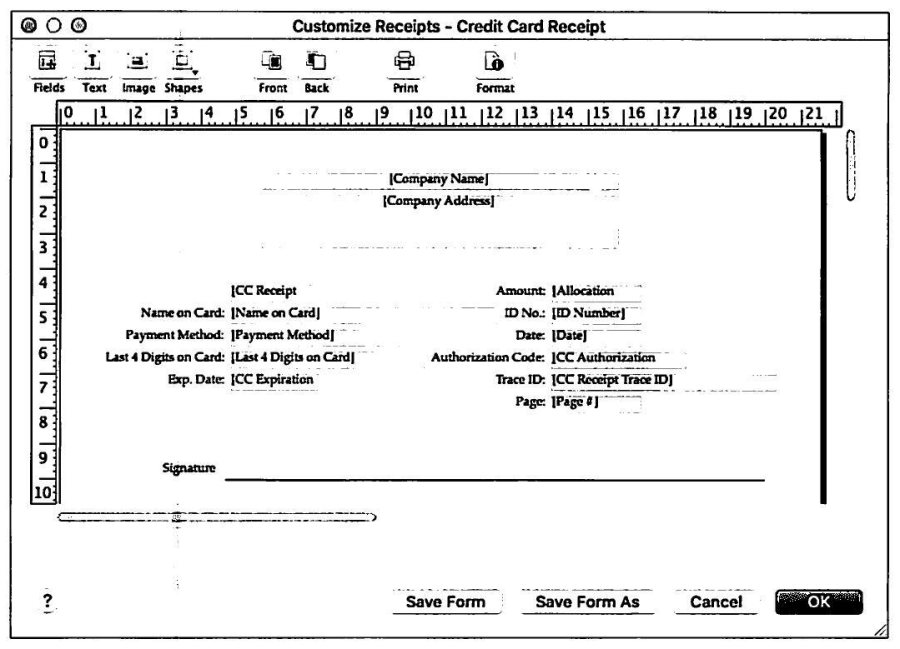
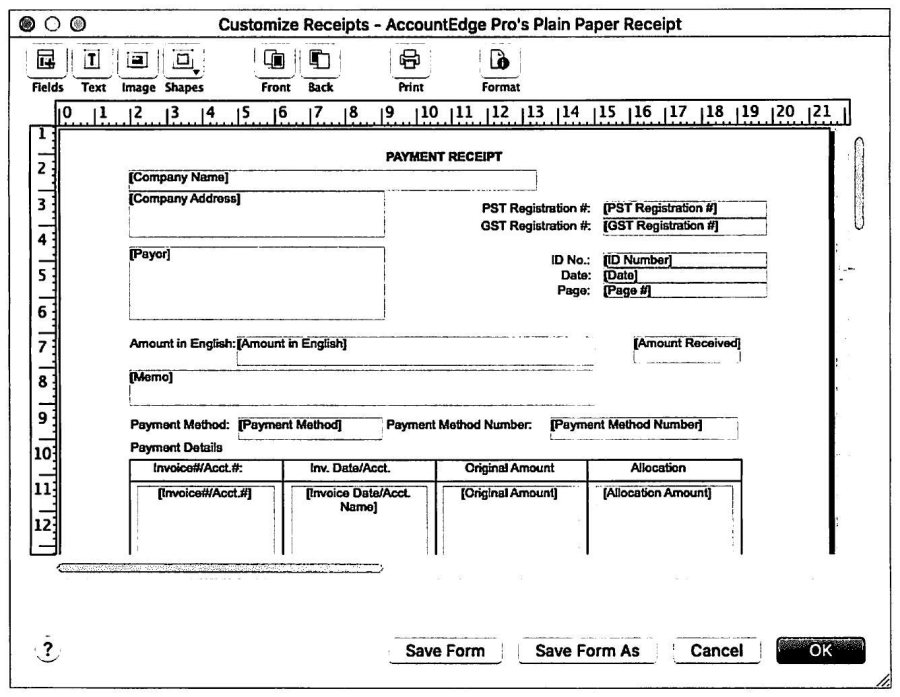
Credit Card Receipts (for payments authorized directly within AccountEdge through the integrated processing partner) print two receipts on plain or pre-printed stock, and intentionally have no client mailing-address fields since they're generated at point-of-sale for the payee's signature. Payment Receipts (for in-house or manually-entered credit card payments, or any payment recorded via Receive Money/Receive Payments and grouped with Undeposited Funds) can include the client's Name & Address positioned to show through a window envelope, for payments handled by phone or fax.
Mailing Labels, Backups & Sharing Customized Forms
Source: p.124
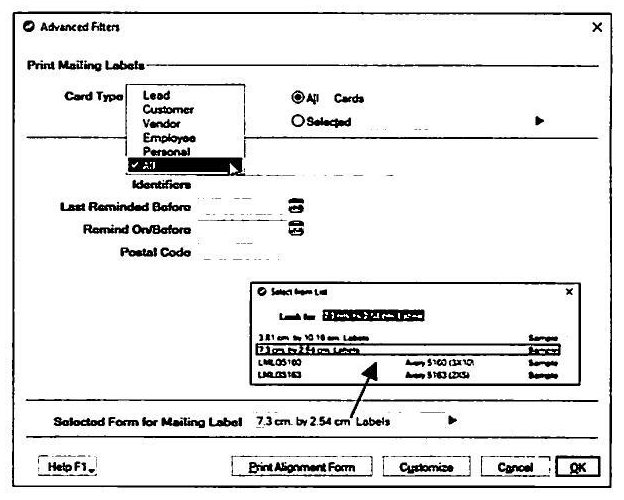
Mailing Labels print on standard label stock and can pull nearly any Card File field plus graphics; cards can be selected individually or filtered by identifier, last-contact date, re-contact date, or Postal Code/ZIP. Backing up customized forms: forms represent a real investment of time and are not included in ordinary company-file backups by default -- be sure to choose "Back up all data" (not "Backup Company File only") after completing valuable customizations. Sharing: customized forms live locally on each workstation, in a "forms" folder inside "AccountEdge" under My Documents, and cannot be shared over a peer-to-peer network the way the company file can -- in a multi-user setup, a copy of each customized form must be placed into the forms folder on every workstation to be available there. Tip: do all customization work on a single designated "master" workstation, so there's always one complete, easily-backed-up source of every customized form.
AccountEdge Business Services: Credit Card Processing & Electronic Payments
Source: p.125-126
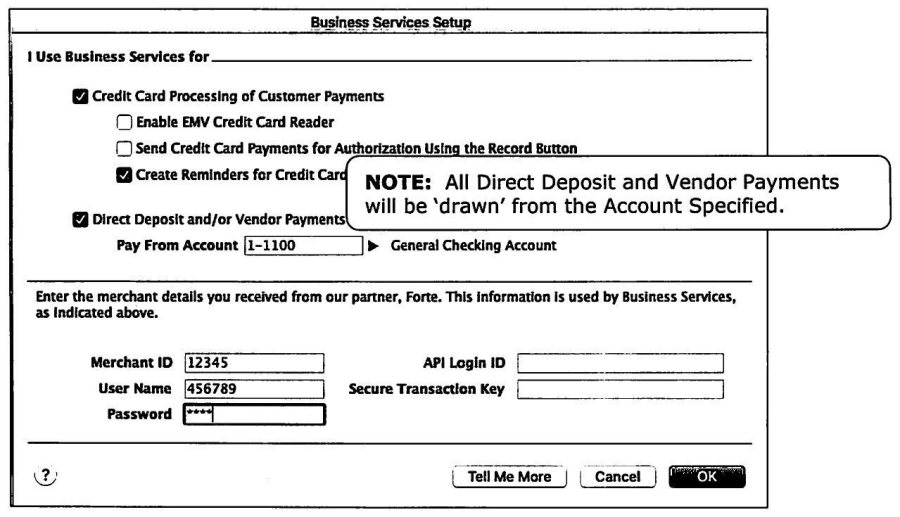
The integrated Payments Gateway lets AccountEdge accept credit card transactions and process electronic payments over the internet directly, subject to two limitations: all transactions must process in your home currency (no foreign-currency support), and Electronic Debits are not permitted. To enable, apply via Setup » Credit Card Processing (or Electronic Payments) » Setup; approval issues a Merchant ID, User Name, and Password, which get entered into the Business Services setup screen to initialize the service.
Credit Card Processing preferences: "Send Credit Card Payments for Authorization Using the Record Button" suits businesses that need immediate authorization at the moment a sale is recorded. "Create Reminders for Credit Card Payments" attaches a detailed log entry -- including the Authorization Code and Trace ID -- to the customer's card for every transaction, useful for later reversals or authorization queries. AccountEdge can also apply credit card merchant discounts directly within Prepare Bank Deposit, via the Deposit Adjustment button.
Electronic Payments (EFT/ACH): used for Direct Deposit paychecks (a real benefit for employees working off-site, and it avoids using company time for personal banking) and electronic vendor payments (lets a business fully use the terms vendors offer without risking late payment, and avoid paying early just to catch discounts); checks can also be sent electronically for urgent situations, via Spend Money in the Banking Command Center. Setup requires selecting the Pay From Account for electronic disbursements and creating a dedicated "Electronic Payments Clearing" account (see Accounts & Banking Linked Accounts, above); Spend Money, Bill Payment, and Pay Employee transactions are then grouped with Electronic Payments Clearing rather than paid directly from the bank account, and "Prepare Electronic Payments" batches and transmits them over the internet. Further detail on both features is covered in the Daily Applications and Period End Procedures training guides.
Full topic index
All 130 pages, headings as they appear in the original course guide. Page numbers refer to the source PDF. A block of scanned, rotated worksheet tables (pp.24-39) is summarized as one entry rather than indexed page by page -- consult the source PDF directly for that section.
| Page | Topic |
|---|---|
| p.2 | Course Aims & Objectives |
| p.4 | Table of Contents -- Detail |
| p.7 | Introduction to AccountEdge -- An Overview (Command Centers) |
| p.8 | The Menu Bar |
| p.9 | Navigating in AccountEdge |
| p.10 | Navigating Fields in Various Data Screens |
| p.11 | Help for This Window |
| p.13 | Reports (Index to Reports) |
| p.14 | Report Customization Tools |
| p.15 | Exporting Reports (Send To) |
| p.16 | Using Registers (Bank, Sales, Purchases & Item) |
| p.17 | Review of Balance Sheet, Profit & Loss Statements |
| p.20 | The Profit & Loss Statement |
| p.23 | Statement of Cash Flow |
| p.24-39 | Accounts List Worksheet -- reference tables (scanned/rotated, not indexed individually) |
| p.40 | Implementing Passwords |
| p.41 | Administrator Password -- Assigning or Changing |
| p.43 | Creating a Data File for Your Company |
| p.44 | The New Company File Assistant (see above) |
| p.49 | Customize Easy Setup Assistant |
| p.50 | Set Up Multiple Currencies |
| p.51 | Accounts Easy Setup Assistant |
| p.53 | System Preferences |
| p.54 | Departmental Accounting |
| p.59 | Multi-Currency Implementation |
| p.61 | Tax Codes (Canada) |
| p.63 | Goods & Services Tax |
| p.66 | Sales Tax (US) |
| p.67 | Tax Code Magic (Canada & USA) |
| p.71 | Finalizing the Accounts List (see above) |
| p.72 | Setup » Linked Accounts |
| p.73 | Sales Linked Accounts (and default Terms) |
| p.75 | Multi-Currency Linked Accounts |
| p.77 | Linked Accounts Report |
| p.78 | Enter Opening Account Balances (see above) |
| p.79 | Enter Historical Balances (Accounts List) |
| p.80 | Importing Card File Details from Address Book or Outlook |
| p.84 | What if my Opening Receivables Do Not Balance to the Linked Account? |
| p.85 | Entering Opening Vendor Balances |
| p.87 | Entering Outstanding 'Pre-Conversion' Checks & Deposits |
| p.91 | Un-Realized Currency Gains/Losses (Opening Reconciliation) |
| p.93 | Inventory Command Center -- Setting It Up (see above) |
| p.94 | Enter (Create) Inventory Items |
| p.95 | Item Information -- Profile Tab |
| p.101 | Counting Your Stock -- Entering Opening Quantities & Values (see above) |
| p.105 | Inventory Value Reconciliation Report |
| p.108 | Turn On Audit Tracking |
| p.109 | Establishing Backup Procedures (see above) |
| p.110 | Customizing Forms |
| p.113 | Customize Form Window |
| p.114 | Using Pre-Printed Forms or Letterhead |
| p.115 | Special Purpose Forms |
| p.117 | Customer or Application-Specific Statements |
| p.119 | Continuous Feed versus Laser Checks |
| p.123 | Payment Receipts (Including In-House Credit Card Payments) |
| p.126 | Credit Card Processing |
| p.127 | Index / Electronic Payments (see AccountEdge Business Services overview) |